


JSON and MQTT Thermostat Access
This article is compiled from an existing operations manual into an online operations reference. Operations marked as expected or not executed in the original text must still be verified against the actual environment.
First understand the product, device, and publish/subscribe topics, then use the thermostat example to verify reporting, control, status, and history.
Before you start: you are logged in to the platform and have product, device, and control permissions; if you already have the thermostat from this article, reuse the existing product, device, and FMQX Web session; the access address, port, and authentication credentials are provided by the deployment administrator; 127.0.0.1 in this article only applies to a same-machine environment.
Understand This Access Flow First
This tutorial uses a thermostat to demonstrate four things: the device reports temperature, the platform shows real-time and historical data, the platform adjusts the temperature, and the device reports back its actual status. JSON is the message content format; MQTT is how the device connects to send and receive messages.
For first-time access, complete the configuration first; a device with the same configuration already in place can start from reporting temperature. The example reuses the existing product, device, and connection; the first-time configuration part uses the real pages from that time for illustration.
Replace These Parameters Before Copying the Templates
The code in this article uses generic template names; the screenshots retain the actual historical resources. Complete the following checks before saving as a UTF-8 file or sending any message.
- temperature and setpoint are the template property identifiers for temperature and set temperature; you may keep them when generating a Thing Model for the first time, but when reusing an existing product you must replace them with that product's real identifiers and update all messages and the initialState keys accordingly.
- demo-device is the Device Number template. Replace the device number in clientId, the device number in every publish/subscribe topic, and the clientId of TCP reports together with the platform device number for this device; the product number and tenant number in the MQTT identity must also be replaced with the current device connection parameters.
- The host, port, and listening direction in the connection file must be changed to the actual address of the current environment; 127.0.0.1 means the local machine running FMQX. When MQTT is involved, also verify the product number, username, subscription topic, and responseRoute; enter the password only on the connection page, securely.
- Group, session, and subscription ids are internal references of the import file; if you rename them, groupId must match the corresponding group id. Verify before importing, and do not create a same-named connection again on a retained session.
- The code blocks are customer templates rewritten from existing password-free assets or original code; it has not been proven that this version of the template imports successfully. Historical screenshots, send times, and business pass scope are still governed by the records of each step; do not treat template names as the actual resource names in the old evidence.
1. First-Time Configuration and Connection
Sample message used by the wizard to identify fields json
{"temperature":26.5,"setpoint":30}Only used to let the wizard identify temperature and set temperature; send the test values below after the configuration is complete. Replaceable customer template names are used here; check against the replacement list in this section before importing or sending.
1. Select New Product
Location: IoT*→*Device Access Steps: Select New Product and enter Product Name FastBee_Thermostat.
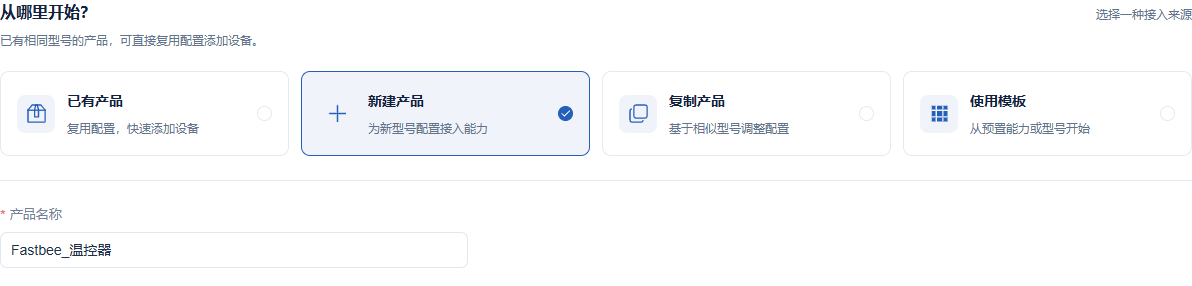
Select New Product and enter the name
Key Points in the Screenshot
| Field / Control | Notes |
|---|---|
| Access Source | New Product is used for the first-time access of a device type; Existing Product is used to add more devices of the same model. Required · Enter: New Product |
| Product Name | All devices of the same model share one product. Required · Enter: FastBee_Thermostat |
Expected result (not executed): New Product is selected with the name FastBee_Thermostat; the product has not been created in this step yet.
2. Enter the Access Information Page
Location: Device Access*→*Select Access Source Steps: Click Next, Complete Information to enter the page for filling in the message sample and access method.

Enter the access information completion page
Expected result (not executed): The access information completion page opens, showing the product name already filled in.
3. Import the Report Sample
Location: Device Access*→*Complete Access Information Steps: Paste the sample below into Generate Fields from JSON Sample and click Parse and Preview.
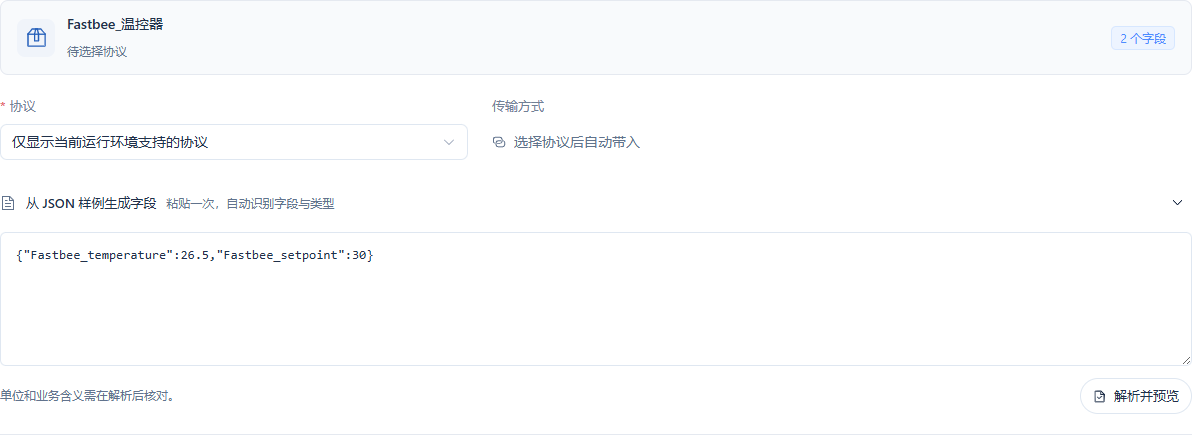
Paste the JSON sample and parse it into two fields
Key Points in the Screenshot
| Field / Control | Notes |
|---|---|
| JSON Sample | Fill in the JSON object the device will actually report, used to identify fields. Required · Enter: {"FastBee_temperature":26.5,"FastBee_setpoint":30} |
| Parse and Preview | Parses the fields in the JSON sample into the collection point table; then check types and paths. Required · Enter: Parse and Preview |
Expected result (not executed): The page shows 2 fields; the protocol and device number are filled in later, and no product or device has been saved yet.
4. Select JSON and MQTT
Location: Device Access*→*Configure Access Steps: Select JSON as the data format and MQTT as the transport.

This article accesses a plain JSON object over MQTT.
Key Points in the Screenshot
| Field / Control | Notes |
|---|---|
| Data Format / Transport | This article uses a JSON object sent and received over an MQTT connection. Required · Enter: JSON / MQTT |
Expected result (not executed): This article accesses a plain JSON object over MQTT.
5. Verify the Collection Fields
Location: Device Access*→*Collection Point Table Steps: Verify that the two Identifiers, Data Types, and JSON Paths match the description below.

Temperature uses a decimal; set temperature uses an integer; both use ℃ as the unit.
Key Points in the Screenshot
| Field / Control | Notes |
|---|---|
| Identifier | Must match the JSON key, case-sensitive. Required · Enter: FastBee_temperature / FastBee_setpoint |
| Field Name | The name displayed on the page. Required · Enter: FastBee_Temperature / FastBee_Setpoint |
| Data Type | Temperature keeps decimals; set temperature uses an integer. Required · Enter: Decimal / Integer |
| Unit | Fill in the unit of measurement. Required · Enter: ℃ |
| JSON Path | Fill in the value path; $ denotes the whole JSON object. Required · Enter: $.FastBee_temperature / $.FastBee_setpoint |
Expected result (not executed): Temperature uses a decimal; set temperature uses an integer; both use ℃ as the unit.
6. Enter the Device Number
Location: Device Access*→*Device Steps: Enter Device Number FastBee_MQTT_Tutorial_01; use the thermostat name as the device name.

Use a unique number for new access; the existing device of this article can be re-verified directly.
Key Points in the Screenshot
| Field / Control | Notes |
|---|---|
| Device Number | A unique number per device, used for connection authentication and publish/subscribe topics. Required · Enter: FastBee_MQTT_Tutorial_01 |
Expected result (not executed): Use a unique number for new access; the existing device of this article can be re-verified directly.
7. Confirm and Create the Access Configuration
Location: Device Access*→*Confirm Access Configuration Steps: Confirm that the configuration pre-check passed, then click Create and Access.

Check that the product, protocol, device count, and collection field count are all correct.
Key Points in the Screenshot
| Field / Control | Notes |
|---|---|
| Create and Access | After the pre-check passes, save and publish the access configuration. Required · Enter: Create and Access |
Expected result (not executed): Check that the product, protocol, device count, and collection field count are all correct.
8. Allow Adjusting the Set Temperature
Location: Product Management*→Thermostat→*Feature Definition Steps: Edit the set temperature, clear Read-only Data, keep History Storage, set the range, and save.
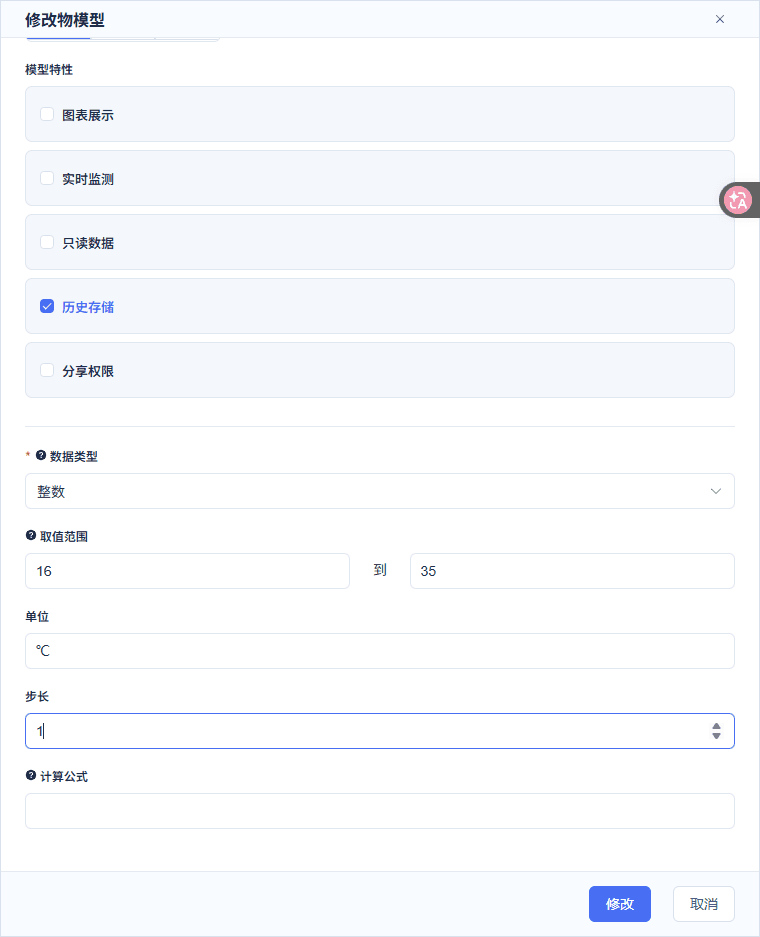
Temperature stays read-only; set temperature range 16~35℃ with step 1. Fill in the English name when editing.
Key Points in the Screenshot
| Field / Control | Notes |
|---|---|
| Read-only Data | When checked, only reports are received; when cleared, the property can be controlled in the device running status. Required · Enter: On for temperature; off for set temperature |
| History Storage | When enabled, reported property values are saved for history queries. Required · Enter: Enabled for both fields |
| Chart Display / Real-time Monitor | In this article only temperature enables these two; set temperature disables them but keeps the control entry. Required · Enter: On for temperature; off for set temperature |
| Range / Step | Limits the selectable range of control values and the adjustment size per step. Required · Enter: Temperature -40~125 / 0.1; set temperature 16~35 / 1 |
| English Name | When modifying the Thing Model, fill in the English name as required by the page. Required · Enter: Temperature / Setpoint |
Expected result (not executed): Temperature stays read-only; set temperature range 16~35℃ with step 1. Fill in the English name when editing.
9. Publish and Confirm It Takes Effect
Location: Product Management*→*Thermostat Steps: After saving the Thing Model, publish the product and confirm that the access configuration shows Effective.

Saving alone does not mean the access service is using the new configuration; the effectiveness receipt has been received here.
Key Points in the Screenshot
| Field / Control | Notes |
|---|---|
| Publish / Effective | After saving the fields, publish the product; continue connecting the device only after the access configuration shows Effective. Required · Enter: Effective |
Expected result (not executed): The screenshot of this step records the publish receipt of the original batch; the first-time configuration of this article is a historical example, and this publish action was not re-executed in this round. For current running results, see the later temperature adjustment and independent status verification steps.
10. Copy the Device Connection Parameters
Location: Device Management*→Thermostat→*Basic Information Steps: Click Authentication Info and copy the Client ID, password, and publish/subscribe topics from the connection parameters.
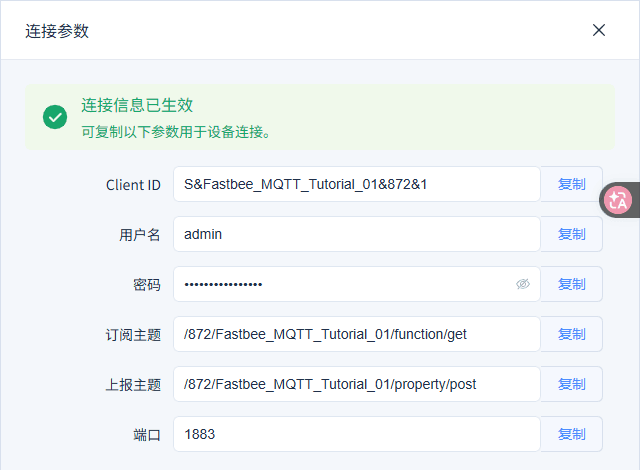
In this article the tool and the access service are on the same computer, so the address is 127.0.0.1:1883; the access address is provided by the deployment administrator. Other computers must not copy this address verbatim.
Key Points in the Screenshot
| Field / Control | Notes |
|---|---|
| Host / IP | The MQTT access address reachable by the device. Required · Enter: 127.0.0.1 (same-machine demo in this article) |
| Port | The MQTT listening port. Required · Enter: 1883 |
| Client ID | Copy the full client ID; do not click random generation. Required · Enter: S&FastBee_MQTT_Tutorial_01&872&1 |
| Username | Copy the username from the device connection parameters. Required · Enter: admin |
| Password | Copy the connection password of this device from the platform; the platform login password is not needed. Required · Enter: Copy from the device connection parameters; not disclosed in the manual |
| Subscription Topic | When the platform sends a command down, the device receives it on this topic. Required · Enter: /872/FastBee_MQTT_Tutorial_01/function/get |
| Authentication Info | The entry in the device detail's basic information; clicking it opens the connection parameters drawer. Required · Enter: Authentication Info |
Expected result (not executed): In this article the tool and the access service are on the same computer, so the address is 127.0.0.1:1883; the access address is provided by the deployment administrator. Other computers must not copy this address verbatim.
Thermostat connection JSON template (no password) json
{

  "groups": [

    {

      "name": "接入教程",

      "id": "tutorial_group",

      "sortOrder": 50,

      "isSystem": false

    }

  ],

  "schemaVersion": 3,

  "sessions": [

    {

      "subscriptions": [

        {

          "qos": 1,

          "topic": "/872/demo-device/function/get",

          "active": true,

          "id": "platform_downlink"

        },

        {

          "qos": 1,

          "topic": "S&demo-device&872&1/function/get",

          "active": false,

          "id": "legacy_default"

        }

      ],

      "host": "127.0.0.1",

      "transport": "TCP",

      "username": "admin",

      "protocol": "MQTT",

      "id": "tutorial_mqtt",

      "name": "温控器",

      "clientId": "S&demo-device&872&1",

      "port": 1883,

      "autoReconnect": false,

      "groupId": "tutorial_group",

      "jsonDevice": {

        "responseRoute": "/872/demo-device/property/post",

        "format": "JSON",

        "initialState": {

          "temperature": 27.4,

          "setpoint": 30

        }

      },

      "qos": 1

    }

  ]

}Save it as thermostat-connection.json; enter the password on the FMQX connection page. Replaceable customer template names are used here; check against the replacement list in this section before importing or sending.
11. Import the Thermostat Example Connection
Location: FMQX Web*→*More Actions Steps: Save the configuration below as a UTF-8 JSON file and select Import Configuration.
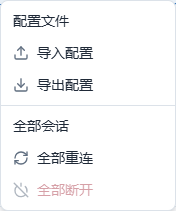
The configuration file contains no password. When switching to your own product, also replace the product number, device number, tenant number, and publish/subscribe topics.
Key Points in the Screenshot
| Field / Control | Notes |
|---|---|
| Import Configuration | Import the example JSON file below to create the thermostat example connection with real state execution capability. Required · Enter: thermostat-connection.json |
Expected result (not executed): The configuration file contains no password. When switching to your own product, also replace the product number, device number, tenant number, and publish/subscribe topics.
12. Enter the Password and Connect
Location: FMQX Web*→Thermostat→*Connection Configuration Steps: For first-time access, copy the current device password and save, click Connect, and wait for Connected.
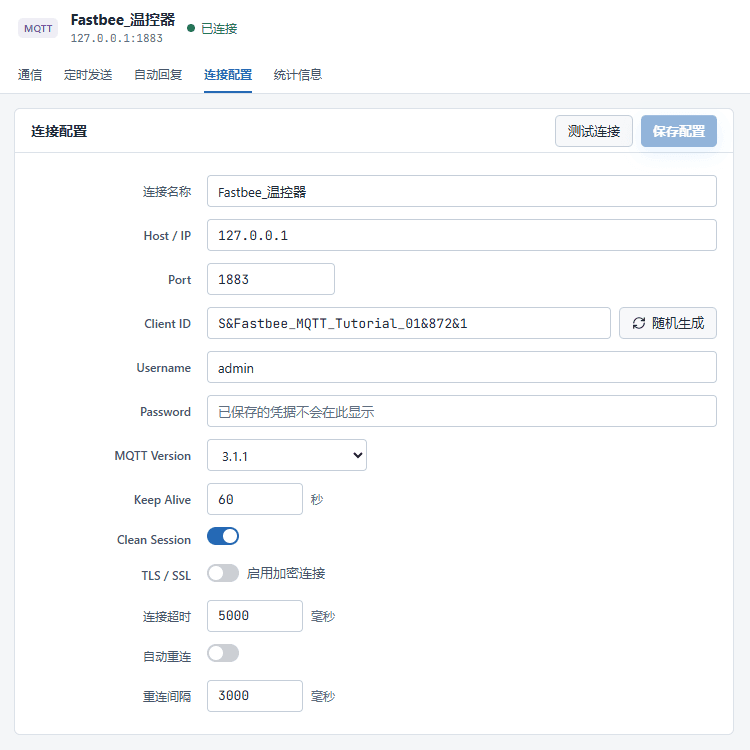
Do not click random generation for the client ID; the credentials in the picture are already saved securely and are not displayed publicly.
Key Points in the Screenshot
| Field / Control | Notes |
|---|---|
| Host / IP | The MQTT access address reachable by the device. Required · Enter: 127.0.0.1 (same-machine demo in this article) |
| Port | The MQTT listening port. Required · Enter: 1883 |
| Client ID | Copy the full client ID; do not click random generation. Required · Enter: S&FastBee_MQTT_Tutorial_01&872&1 |
| Username | Copy the username from the device connection parameters. Required · Enter: admin |
| Password | Copy the connection password of this device from the platform; the platform login password is not needed. Required · Enter: Copy from the device connection parameters; not disclosed in the manual |
| MQTT Version | Select an MQTT version supported by both the device and the service. Required · Enter: 3.1.1 |
| Keep Alive | Connection keep-alive check interval, in seconds. Required · Enter: 60 |
| Clean Session | A new session is enabled in this article; after reconnecting, still confirm that the correct topic is subscribed. Required · Enter: On |
| TLS / SSL | Whether to use an encrypted connection; must match the server-side listening mode. Required · Enter: Off for local 1883 in this article |
| Connect Timeout / Reconnect Interval | The timeout is in milliseconds; the reconnect interval is only used when auto reconnect is enabled. Required · Enter: 5000 / 3000 |
| Auto Reconnect | Disabled in this article, to explicitly observe disconnect and reconnect. Required · Enter: Off |
| Connect / Disconnect | Starts or stops the current device connection; does not delete the product or historical data. Required · Enter: Connect |
Expected result (not executed): This article reused the retained credentials in this round and did not re-enter the password; do not click random generation for the client ID.
13. Confirm the Downlink Subscription Topic
Location: FMQX Web*→Messaging→*Subscriptions Steps: Confirm that the subscription list contains the Subscription Topic given by the platform, with QoS set to 1.
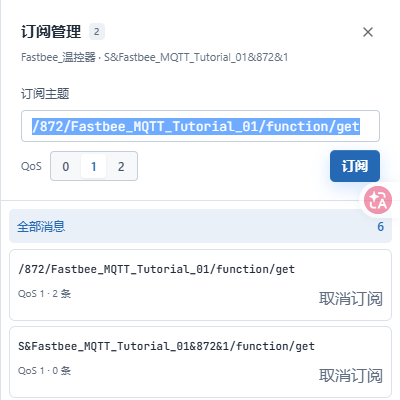
The valid topic is /product-number/device-number/function/get. The old default entry in the example is disabled; do not enable it or use it to replace the correct topic.
Key Points in the Screenshot
| Field / Control | Notes |
|---|---|
| Subscription Topic | When the platform sends a command down, the device receives it on this topic. Required · Enter: /872/FastBee_MQTT_Tutorial_01/function/get |
| QoS | The MQTT message delivery level. This article uses 1, so the send record shows the server acknowledgment. Required · Enter: 1 |
Expected result (not executed): The valid topic is /product-number/device-number/function/get. The old default entry in the example is disabled; do not enable it or use it to replace the correct topic.
2. Report Ten Temperature Readings
Send 31.1 first, then increase the temperature by 0.1 each time until 32.0, ten readings in total; the set temperature stays at 30. Send each reading individually so the order can be verified.
14. Send the First 31.1℃ Temperature
Location: FMQX Web*→Messaging→*Publish Message Steps: In this device's report topic, fill in the JSON with temperature 31.1 and setpoint 30, then click Send.
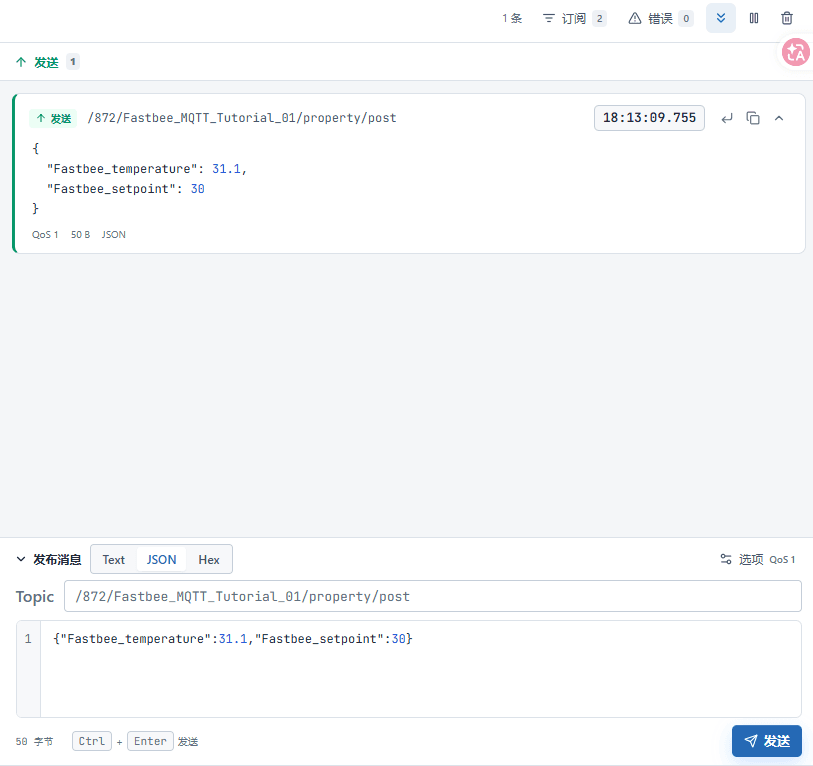
The first 31.1, setpoint 30, the correct report topic, the 18:13:09 send card, and the edit box are visible.
Key Points in the Screenshot
| Field / Control | Notes |
|---|---|
| Report Topic | The topic the device uses to report properties to the platform. Required · Enter: Per the implementation plan · Example: /872/FastBee_MQTT_Tutorial_01/property/post |
| QoS | The MQTT message delivery level. This article uses 1, so the send record shows the server acknowledgment. Required · Enter: Per the implementation plan · Example: 1 |
| Message Content | Use JSON format; do not quote numbers; field keys must match the Thing Model. Required · Enter: {"FastBee_temperature":31.1,"FastBee_setpoint":30} |
15. Send the Remaining Nine Temperature Readings
Location: FMQX Web*→Messaging→*Send Steps: After the first reading, change the temperature to 31.2, 31.3, and so on up to 32.0; keep the setpoint at 30 and click Send each time.
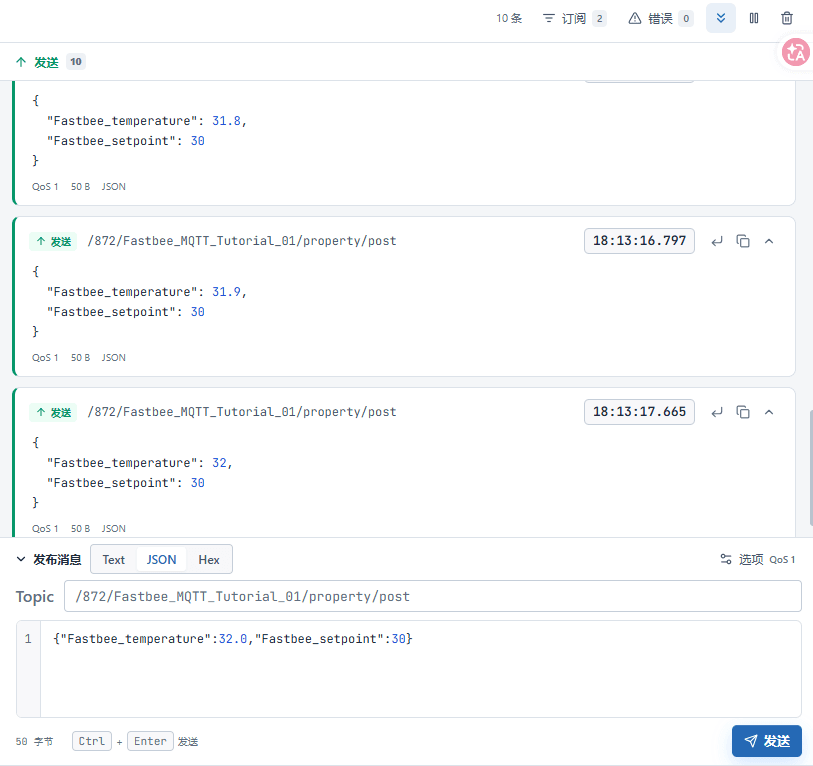
Send count 10 is visible, ending with 31.8, 31.9, and 32 with setpoint 30; the view does not show all ten entries.
Key Points in the Screenshot
| Field / Control | Notes |
|---|---|
| Message Content | Use JSON format; do not quote numbers; field keys must match the Thing Model. Required · Enter: Per the implementation plan · Example: {"FastBee_temperature":31.1,"FastBee_setpoint":30} |
| Temperature Sequence | The first 31.1 has been sent; this step continues with the remaining nine, ten in total. Required · Enter: 31.2, 31.3, 31.4, 31.5, 31.6, 31.7, 31.8, 31.9, 32.0 · Example: 31.1, 31.2, 31.3, 31.4, 31.5, 31.6, 31.7, 31.8, 31.9, 32.0 |
3. View Real-Time and Historical Data
The real-time page shows the device's latest reported values; the history page queries saved records by device, property, and time range. The example screenshots each retain data from their real points in time; when querying your own device, use the reporting period of this run.
16. View the Real-Time Temperature on the Platform
Location: Device Management*→Thermostat→*Running Status Steps: Have the device report one more new temperature, return to the platform, and wait for Temperature to update to the latest value.
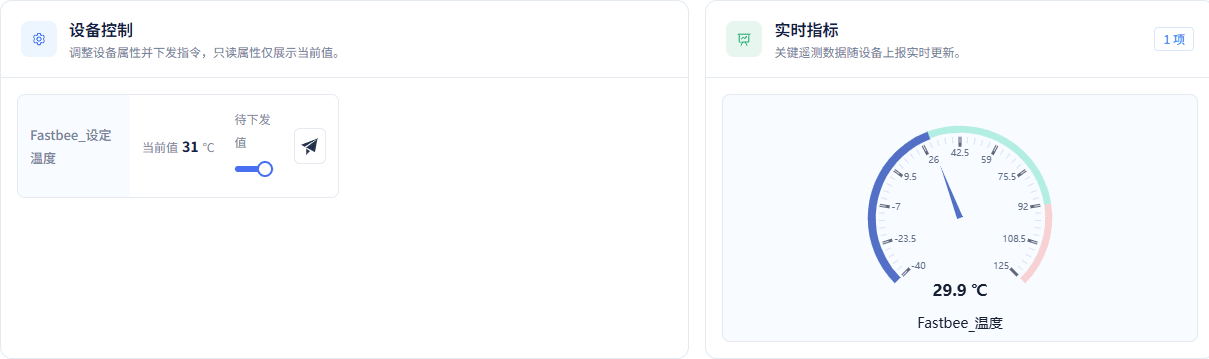
The platform temperature updated to 29.9℃, and the set temperature remains 31℃.
Key Points in the Screenshot
| Field / Control | Notes |
|---|---|
| Real-Time Temperature | The new temperature actually reported by the device; each test uses the current reported value. Required · Enter: 29.9℃ |
17. Query and Recheck the History Records
Location: Data Center*→*Historical Data Steps: Select this device, the required property, and the reporting period, then click Query; after refreshing the page, query again with the same conditions.
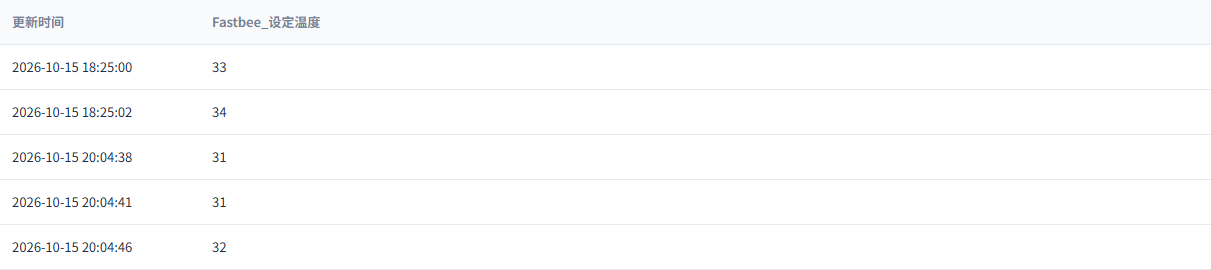
After selecting the device and property, the history table shows the corresponding report times and values.
Key Points in the Screenshot
| Field / Control | Notes |
|---|---|
| Device / Property | Query only the current example device and the target temperature field. Required · Enter: Per the implementation plan · Example: FastBee_Thermostat / FastBee_Setpoint |
| Device / Field | Query by this device and property; the date used is 2026-10-15. Required · Enter: FastBee_Thermostat / FastBee_Setpoint |
4. Adjust the Temperature and Report the Actual Status
The pending value indicates the target about to be sent. After sending the command, continue to watch the message the device receives and the actual report after execution, then return to the platform to verify the current value.
18. Adjust the Set Temperature to 32℃
Location: Device Management*→Thermostat→*Running Status Steps: Select 32 on the Set Temperature slider, verify the pending value, and click the send icon.

Current 31℃; the slider indicates a pending 32℃.
Key Points in the Screenshot
| Field / Control | Notes |
|---|---|
| Pending Set Temperature | After the device receives and executes it, check the actual status report again. Required · Enter: 32℃ |
19. Confirm the Device Actually Received the Command
Location: FMQX Web*→Thermostat→*Received Content Steps: Expand the latest received message and verify that the downlink value of Set Temperature is 32.
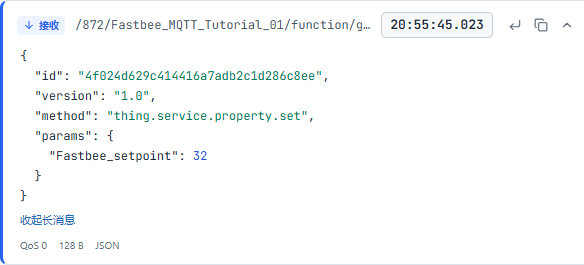
The device actually received the complete downlink of set temperature 32℃.
20. Independently Report the Device's Actual Status
Location: FMQX Web*→Thermostat→*Publish Message Steps: After the device executes, send the property JSON with actual temperature 27.4 and setpoint 32 on the report topic.
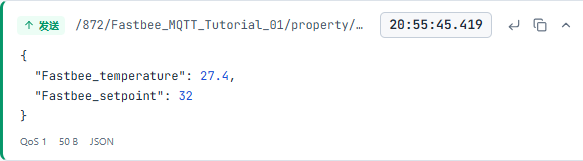
Independent property report after execution: temperature 27.4℃, setpoint 32℃.
Key Points in the Screenshot
| Field / Control | Notes |
|---|---|
| Report Topic | The topic the device uses to report properties to the platform. Required · Enter: Per the implementation plan · Example: /872/FastBee_MQTT_Tutorial_01/property/post |
| Message Content | Use JSON format; do not quote numbers; field keys must match the Thing Model. Required · Enter: {"FastBee_temperature":27.4,"FastBee_setpoint":32} |
21. Verify the Platform Shows 32℃
Location: Device Management*→Thermostat→*Running Status Steps: Return to the platform, view the Current Value, and confirm that the set temperature has updated to 32.

The platform's current set temperature has updated to 32℃.
Independent property report after device execution json
{"temperature":27.4,"setpoint":32}Fill in the device's actual temperature and setpoint. The execution response and the property report serve different purposes and should be verified separately. Replaceable customer template names are used here; check against the replacement list in this section before importing or sending.
5. View the Temperature Curve
22. Open Statistics to View the Temperature Curve
Location: Device Management*→Thermostat→*Device Statistics Steps: Open Device Statistics and wait for the temperature curve of the selected period to load; change the date and click query again.
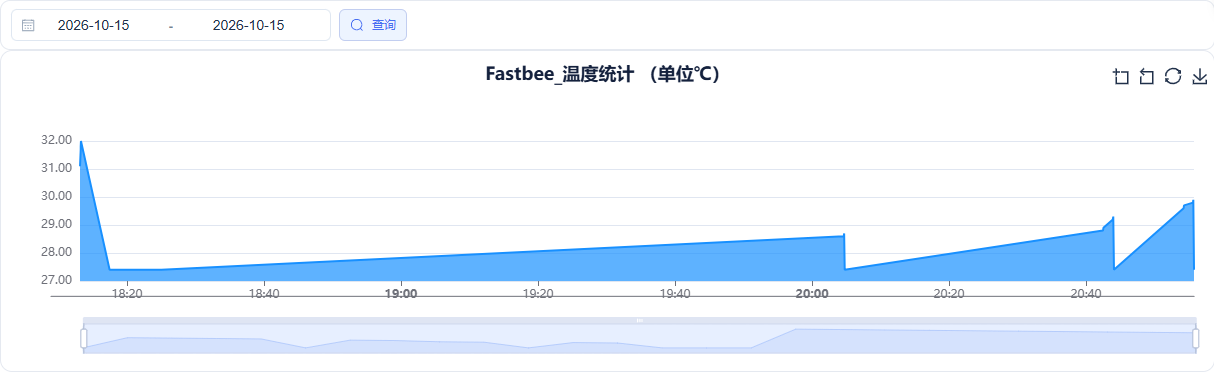
After opening Device Statistics, the temperature curve displays automatically.
6. Restore the Connection When Needed
When the connection drops, reconnect with the original session configuration retained, and check whether the subscription is restored. The following uses one independent real recovery example to illustrate the buttons and connection states.
23. Disconnect the Session Before Reconnecting
Location: FMQX Web*→*Thermostat Steps: When a reconnect is needed, click Disconnect, keep the connection configuration, and confirm Disconnected.

The session configuration is retained and the status shows Disconnected.
24. Restore the Same Retained Session
Location: FMQX Web*→*Thermostat Steps: Select the retained session, click Connect, wait for Connected, then check this device's subscription.

The same retained session is restored to Connected.
7. Finish the Test
25. End the Test and Keep the Configuration
Location: FMQX Web*→*Thermostat Steps: After stopping sending and receiving, click Disconnect, confirm Disconnected, and keep the connection configuration for next time.

This round is finished; the thermostat session is disconnected with its configuration retained.
Field and Parameter Reference
Device Access Wizard
| Field / Control | How to Fill |
|---|---|
| Access Source | New Product is used for the first-time access of a device type; Existing Product is used to add more devices of the same model. Required · Enter: New ProductExisting Product: reuses the protocol and Thing Model of an existing product; reuses the protocol and Thing Model of an existing product.New Product: creates a device access configuration for a new model; creates a device access configuration for a new model.Copy Product: modifies the configuration starting from an existing product; modifies the configuration starting from an existing product.Use Template: starts from preset capabilities or models; starts from preset capabilities or models. |
| Product Name | All devices of the same model share one product. Required · Enter: FastBee_Thermostat |
| JSON Sample | Fill in the JSON object the device will actually report, used to identify fields. Required · Enter: {"FastBee_temperature":26.5,"FastBee_setpoint":30} |
| Parse and Preview | Parses the fields in the JSON sample into the collection point table; then check types and paths. |
| Data Format / Transport | This article uses a JSON object sent and received over an MQTT connection. Required · Enter: JSON / MQTT |
| Identifier | Must match the JSON key, case-sensitive. Required · Enter: FastBee_temperature / FastBee_setpoint |
| Field Name | The name displayed on the page. Required · Enter: FastBee_Temperature / FastBee_Setpoint |
| Data Type | Temperature keeps decimals; set temperature uses an integer. Required · Enter: Decimal / Integer |
| Unit | Fill in the unit of measurement. Required · Enter: ℃ |
| JSON Path | Fill in the value path; $ denotes the whole JSON object. Required · Enter: $.FastBee_temperature / $.FastBee_setpoint |
| Device Number | A unique number per device, used for connection authentication and publish/subscribe topics. Required · Enter: FastBee_MQTT_Tutorial_01 |
| Create and Access | After the pre-check passes, save and publish the access configuration. |
| Next, Complete Information | Enters the access information page to continue filling in the message sample and selecting the access method. |
Product Feature Definition
| Field / Control | How to Fill |
|---|---|
| Read-only Data | When checked, only reports are received; when cleared, the property can be controlled in the device running status. Required · Enter: On for temperature; off for set temperatureMust be published after modification. |
| History Storage | When enabled, reported property values are saved for history queries. Required · Enter: Enabled for both fieldsMust be published after modification. |
| Chart Display / Real-time Monitor | In this article only temperature enables these two; set temperature disables them but keeps the control entry. Required · Enter: On for temperature; off for set temperatureMust be published after modification. |
| Range / Step | Limits the selectable range of control values and the adjustment size per step. Required · Enter: Temperature -40~125 / 0.1; set temperature 16~35 / 1Must be published after modification. |
| English Name | When modifying the Thing Model, fill in the English name as required by the page. Required · Enter: Temperature / SetpointMust be published after modification. |
Product Publishing
| Field / Control | How to Fill |
|---|---|
| Publish / Effective | After saving the fields, publish the product; continue connecting the device only after the access configuration shows Effective. |
Device Connection Parameters
| Field / Control | How to Fill |
|---|---|
| Authentication Info | The entry in the device detail's basic information; clicking it opens the connection parameters drawer. |
| Host / IP | The MQTT access address reachable by the device. Required · Enter: 127.0.0.1 (same-machine demo in this article)Platform: Device Details → Connection Parameters; the network address is confirmed by the deployment administrator. |
| Port | The MQTT listening port. Required · Enter: 1883Platform: Device Details → Connection Parameters; the network address is confirmed by the deployment administrator. |
| Client ID | Copy the full client ID; do not click random generation. Required · Enter: S&FastBee_MQTT_Tutorial_01&872&1Platform: Device Details → Connection Parameters; the network address is confirmed by the deployment administrator. |
| Username | Copy the username from the device connection parameters. Required · Enter: adminPlatform: Device Details → Connection Parameters; the network address is confirmed by the deployment administrator. |
| Password | Copy the connection password of this device from the platform; the platform login password is not needed. Required · Enter: Copy from the device connection parameters; not disclosed in the manualPlatform: Device Details → Connection Parameters; the network address is confirmed by the deployment administrator. |
FMQX Connection and Subscription
| Field / Control | How to Fill |
|---|---|
| Import Configuration | Import the example JSON file below to create the thermostat example connection with real state execution capability. Must reconnect after modification. |
| MQTT Version | Select an MQTT version supported by both the device and the service. Required · Enter: 3.1.1Must reconnect after modification.3.1: an earlier version; choose based on device support; an earlier version; choose based on device support.3.1.1: the version verified in this article; the version verified in this article.5.0: choose when both the device and the access service support it; choose when both the device and the access service support it. |
| Keep Alive | Connection keep-alive check interval, in seconds. Required · Enter: 60Must reconnect after modification. |
| Clean Session | A new session is enabled in this article; after reconnecting, still confirm that the correct topic is subscribed. Required · Enter: OnMust reconnect after modification. |
| TLS / SSL | Whether to use an encrypted connection; must match the server-side listening mode. Required · Enter: Off for local 1883 in this articleMust reconnect after modification. |
| Connect Timeout / Reconnect Interval | The timeout is in milliseconds; the reconnect interval is only used when auto reconnect is enabled. Required · Enter: 5000 / 3000Must reconnect after modification. |
| Auto Reconnect | Disabled in this article, to explicitly observe disconnect and reconnect. Required · Enter: OffMust reconnect after modification. |
| Connect / Disconnect | Starts or stops the current device connection; does not delete the product or historical data. Must reconnect after modification. |
| Subscription Topic | When the platform sends a command down, the device receives it on this topic. Required · Enter: /872/FastBee_MQTT_Tutorial_01/function/getMust reconnect after modification. |
FMQX Messaging
| Field / Control | How to Fill |
|---|---|
| Report Topic | The topic the device uses to report properties to the platform. Required · Enter: /872/FastBee_MQTT_Tutorial_01/property/post |
| QoS | The MQTT message delivery level. This article uses 1, so the send record shows the server acknowledgment. Required · Enter: 10: does not wait for message acknowledgment; does not wait for message acknowledgment.1: waits for acknowledgment; the device still needs business-result verification; waits for acknowledgment; the device still needs business-result verification.2: uses two-phase delivery when supported by both sides; uses two-phase delivery when supported by both sides. |
| Message Content | Use JSON format; do not quote numbers; field keys must match the Thing Model. Required · Enter: {"FastBee_temperature":31.1,"FastBee_setpoint":30} |
| Received Content / Execution Response | Match the same command number and verify the received set temperature against the status value in the execution response. |
Device Running Status
| Field / Control | How to Fill |
|---|---|
| Data Collection Current Value | Verify the latest reported value and its update time. |
| Set Temperature / Send Command | Move the slider to the target temperature and click Send Command; verify the current value again after receiving the actual status report. |
Historical Data
| Field / Control | How to Fill |
|---|---|
| Device / Property | Query only the current example device and the target temperature field. Required · Enter: FastBee_Thermostat / FastBee_Setpoint |
| Time Range / Details | Query the time window containing the device send times, and verify values by update time. |
Connection Retention and Recovery
| Field / Control | How to Fill |
|---|---|
| Connection / Saved Sessions | When finished, disconnect and keep the configuration; for the next verification, select the corresponding connection under the Access Tutorial group. |
Where to Check First When Problems Occur
| Symptom | Possible Cause | Where to Check First | How to Recover |
|---|---|---|---|
| Connection failed | Connection credentials or device identity do not match. | Check the address, port, client identifier, and authentication info against the platform's current device connection parameters. | Fix them and reconnect the retained session. |
| Sent but the platform shows no new value | The report topic, fields, or current device do not match. | First check the topic and numbers in the send card, then check whether the same device is selected on the platform. | Fix them, send a distinguishable new value, and wait for the page to update. |
| Command sent but the device did not change | The downlink subscription was not restored, or the device did not execute. | Check the real receive card; then verify the device's actual status and the independent property report. | After restoring the subscription, issue a new command and check the actual result. |
| No new records found in history | The query target, property, or time range does not match, or storage is not enabled for that property. | Verify the current device, the property storage switch, and the reporting period of this run. | Refresh and re-query with the same conditions, keeping the actual send times. |