


JSON and MQTT WebSocket Web Thermostat Access
This article is compiled from an existing operations manual into an online operations reference. Operations marked as expected or not executed in the original text must still be verified against the actual environment.
WebSocket carries MQTT property reporting, downlink replies, status, history, and reconnection.
Before you start: you have product, device, model, publish, control, and history permissions; the local application, single-node FMQ, and FMQX Web are available; the connection parameters and subscription are confirmed
Before You Start
For first-time access, follow the configuration chapters; when the same product and device already exist, reuse the retained configuration and start from reporting and send/receive verification. The configuration screenshots and recovery examples retain the original operation timestamps; the current re-verification is checked separately.
This article uses one web thermostat device to complete JSON messages reported over MQTT WebSocket, downlink subscription, demo replies, independent property re-reporting, history refresh, and disconnect/reconnect. It suits clients and device integration tools that need to carry MQTT messages over a WebSocket entry.
FastBee handles the product, device, control, and history; FMQ is the device access service; FMQX Web plays the demo device in this article. Its JSON state machine accepts the setpoint and replies automatically; the status is then reported manually and independently by the operator in the publish box. This does not represent a real physical thermostat's actions or automatic continuous sampling.
The account needs product, device, model editing, publish, control, and history permissions. Prepare this device's MQTT connection parameters, the WebSocket address, port and path, the correct up/downlink topics, and the allowed control range; the configuration JSON contains no device password — fill it in securely and save after the first import.
Functional relationship diagram
Responsibilities and data directions; not a running screenshot.
Replace These Parameters Before Copying the Templates
The code in this article uses generic template names; the screenshots retain the actual historical resources. Complete the following checks before saving as a UTF-8 file or sending any message.
- temperature and setpoint are the template property identifiers for temperature and set temperature; you may keep them when generating a Thing Model for the first time, but when reusing an existing product you must replace them with that product's real identifiers and update all messages and the initialState keys accordingly.
- demo-device is the Device Number template. Replace the device number in clientId, the device number in every publish/subscribe topic, and the clientId of TCP reports together with the platform device number for this device; the product number and tenant number in the MQTT identity must also be replaced with the current device connection parameters.
- The host, port, and listening direction in the connection file must be changed to the actual address of the current environment; 127.0.0.1 means the local machine running FMQX. When MQTT is involved, also verify the product number, username, subscription topic, and responseRoute; enter the password only on the connection page, securely.
- Group, session, and subscription ids are internal references of the import file; if you rename them, groupId must match the corresponding group id. Verify before importing, and do not create a same-named connection again on a retained session.
- The code blocks are customer templates rewritten from existing password-free assets or original code; it has not been proven that this version of the template imports successfully. Historical screenshots, send times, and business pass scope are still governed by the records of each step; do not treat template names as the actual resource names in the old evidence.
Verify the Connection Identity and Topics First
The platform product protocol is JSON/MQTT, and the device tool's transport channel is WebSocket. In this example the FMQ address is 127.0.0.1, port 8084, path /mqtt; 127.0.0.1 is usable for same-machine demos, and across machines switch to the reachable address provided by the administrator. A plain MQTT TCP port cannot be used directly as a WebSocket entry.
The Device Number, product number, and tenant compose the MQTT Client ID given by the platform; in this article it is S&FastBee_WS_Tutorial_01&876&1. Both the username and Password are obtained from this device's MQTT connection parameters; do not randomly generate the identity or borrow other devices' credentials. The password is not echoed after saving, and neither the manual nor the configuration file stores the real password.
The correct downlink topic is /876/FastBee_WS_Tutorial_01/function/get; properties and demo replies are published to /876/FastBee_WS_Tutorial_01/property/post. The correct subscription is enabled; the wrong default topic S&FastBee_WS_Tutorial_01&876&1/function/get is retained but disabled. After the wrong default entry is deleted, reconnecting regenerates it and the subscription confirmation rejects it; this article actually recovers successfully by keeping the disabled entry.
1. Create the Product, Fields, and Device
1. Create a Dedicated Web Thermostat Product
Location: IoT*→Device Access→*Where to Start Steps: Select New Product and enter Product Name FastBee_Web_Thermostat. Reuse the retained resources directly when re-verifying.
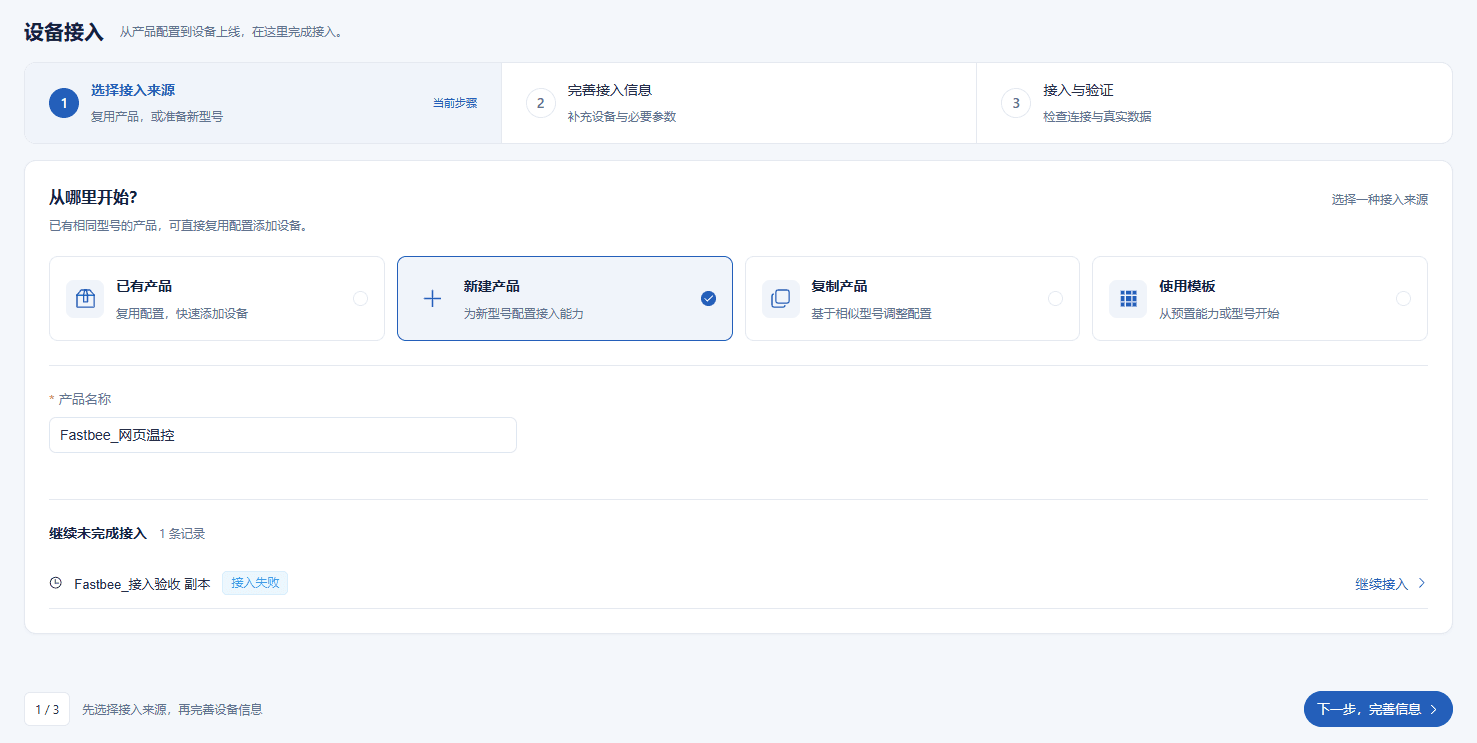
The other unfinished access records below do not belong to this article; do not click their Continue Access.
Key Points in the Screenshot
| Field / Control | Notes |
|---|---|
| Access Source | This article creates a dedicated product; when this article's resources already exist, re-verification reuses them directly. Required · Enter: New Product |
| Product Name | Give this type of web thermostat device a clear business name. Required · Enter: FastBee_Web_Thermostat |
2. Generate Fields from the JSON Sample
Location: Device Access Wizard*→*Product and Protocol Steps: Paste the JSON Sample below and click Parse and Preview.

The wizard sample's temperature 29 and setpoint 30 are only used to extract fields; the setpoint baseline of the formal ten samples is 32.
Key Points in the Screenshot
| Field / Control | Notes |
|---|---|
| JSON Sample | Extract drafts of the two properties from the device's actual message. Required · Enter: {"FastBee_temperature":29,"FastBee_setpoint":30} |
JSON sample from which the wizard generates fields json
{

  "temperature": 29,

  "setpoint": 30

}Used to extract fields; the formal session samples use 20~29 with setpoint 32 below. Replaceable customer template names are used here; check against the replacement list in this section before importing or sending.
3. Verify the Two Integer Properties and Paths
Location: Device Access Wizard*→*Collection Fields Steps: Verify Temperature, Set Temperature, their integer types, and the corresponding JSON paths.
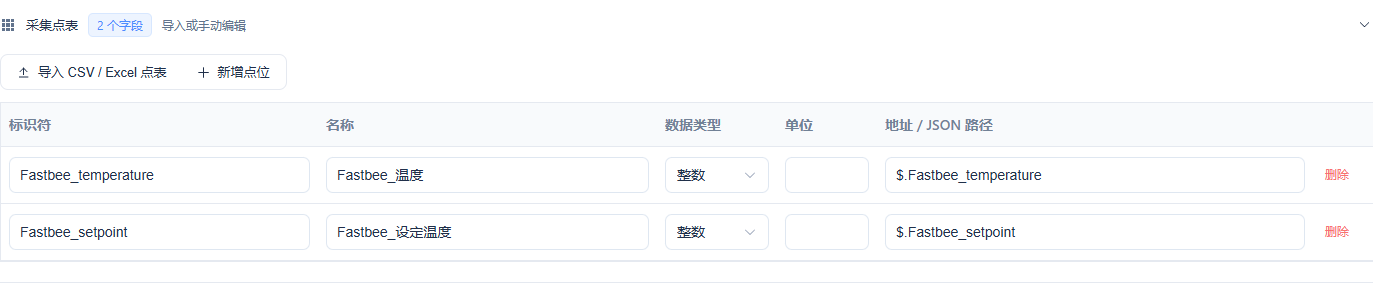
Units are filled in as ℃ later in Feature Definition; the two fields' identifiers must not be swapped.
Key Points in the Screenshot
| Field / Control | Notes |
|---|---|
| Fields, Integer Types, and Paths | The two properties correspond one-to-one with the actual JSON keys. Required · Enter: $.FastBee_temperature; $.FastBee_setpoint |
4. Enter the Unique Device Number
Location: Device Access Wizard*→*Add Device Steps: Fill in the Device Name and Device Identifier FastBee_WS_Tutorial_01.

The MQTT connection parameters and up/downlink topics use this device number; the FMQX session number is not the platform device number.
Key Points in the Screenshot
| Field / Control | Notes |
|---|---|
| Device Identifier | Both the MQTT connection identity and the up/downlink topics are composed from this number; it must not be randomly replaced. Required · Enter: FastBee_WS_Tutorial_01 |
| Device Name | Used to locate the current platform device; the final FMQX session name is Web Thermostat. Required · Enter: FastBee_Web_Thermostat |
5. Verify the JSON and MQTT Base Access
Location: Device Access Wizard*→*Access Confirmation Steps: Verify the product, JSON/MQTT, one device, and two fields, then complete the creation.

WebSocket carries MQTT messages, so the platform protocol still shows JSON/MQTT; the transport must be verified separately in the FMQX details.
Key Points in the Screenshot
| Field / Control | Notes |
|---|---|
| Access Protocol | The platform uses JSON/MQTT; WebSocket is MQTT's transport channel. Required · Enter: JSON/MQTT |
| Access Overview | Verify the current product, one device, and two fields. Required · Enter: 1 device, 2 fields |
2. Configure the Properties and Publish
6. Save the Writable Setpoint and History Configuration
Location: Product Management*→Web Thermostat→Feature Definition→*Set Temperature Steps: Fill in Setpoint for the model translation, clear Read-only Data, enable History Storage, then click Modify.
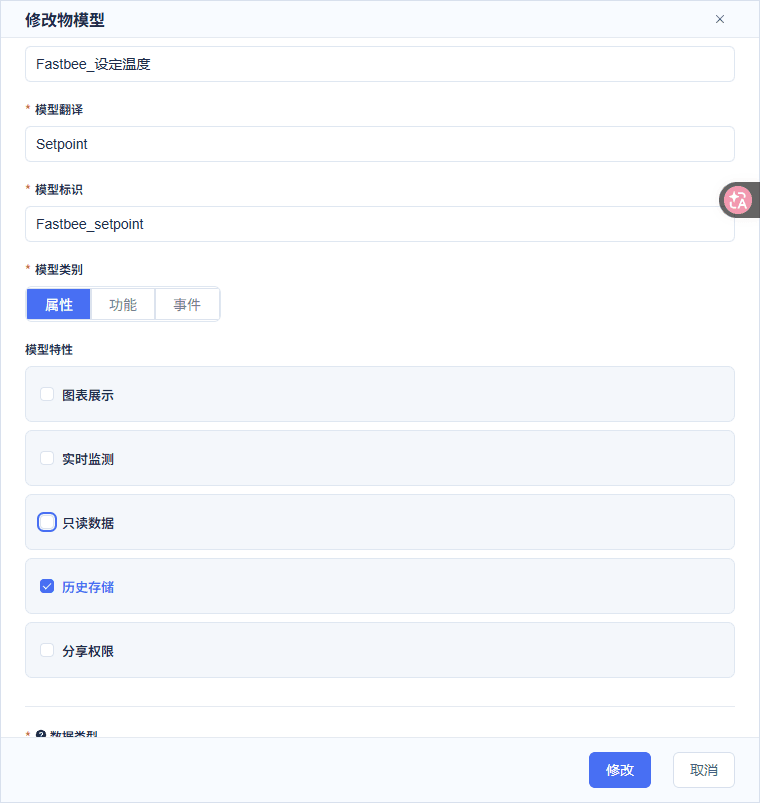
Setpoint 16~35℃, step 1, writable, history on, chart and real-time monitor off; verify after saving.
Key Points in the Screenshot
| Field / Control | Notes |
|---|---|
| Model Translation | Fill in a clear English name; modify and save after completing the required items. Required · Enter: Temperature/Setpoint |
| Model Identifier | The report keys must match the model identifiers verbatim. Required · Enter: FastBee_temperature/FastBee_setpoint |
| Model Category | Both the reading and the setpoint in this article use properties. Required · Enter: Property |
| Read-only Data | Checked for temperature; setpoint clears read-only to provide the control entry. Required · Enter: Checked for temperature; unchecked for setpoint |
| History Storage | Both fields are enabled, saving subsequent report history. Required · Enter: Checked |
| Chart Display / Real-time Monitor | On for temperature, off for setpoint; recheck the read-only linkage. Required · Enter: On for temperature; off for setpoint |
| Sharing Permission | This article is used within its tenant; sharing is not opened. Required · Enter: Unchecked |
| Integer Range, Unit, and Step | Temperature -40~100℃; setpoint 16~35℃; step 1. Required · Enter: Temperature -40~100; setpoint 16~35; ℃; step 1 |
| Modify / Cancel | Modify saves the current model; Cancel does not submit. Required · Enter: Modify |
7. Save the Read-Only Temperature and Integer Range
Location: Product Management*→Web Thermostat→Feature Definition→*Temperature Steps: Keep Read-only Data and History Storage, set -40~100, ℃, step 1, and click Modify to save.
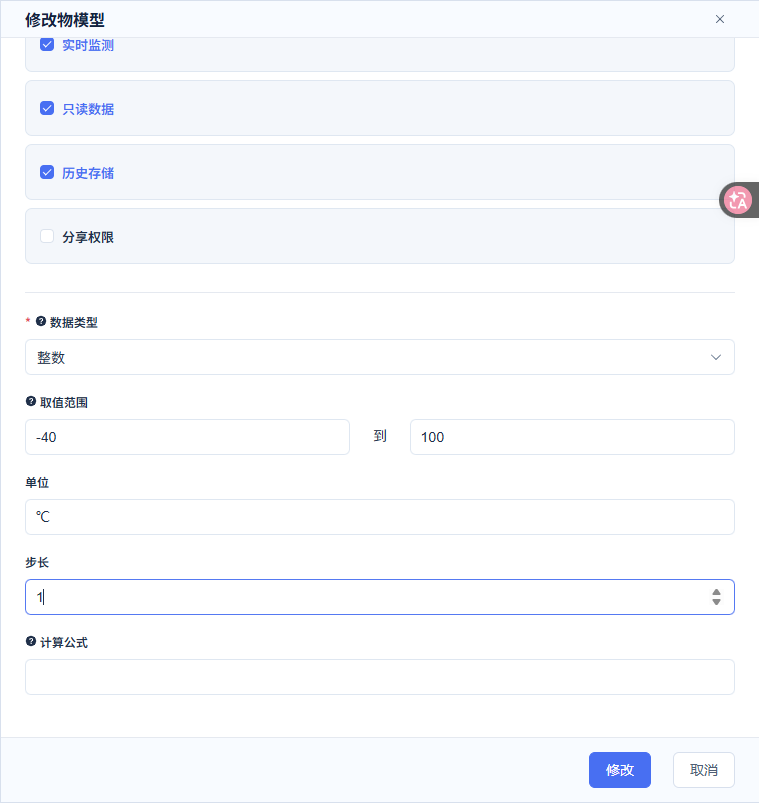
Temperature is read-only, chart and real-time monitor on, history on; the calculation formula is left blank.
Key Points in the Screenshot
| Field / Control | Notes |
|---|---|
| Read-only Data | Checked for temperature; setpoint clears read-only to provide the control entry. Required · Enter: Checked for temperature; unchecked for setpoint |
| History Storage | Both fields are enabled, saving subsequent report history. Required · Enter: Checked |
| Chart Display / Real-time Monitor | On for temperature, off for setpoint; recheck the read-only linkage. Required · Enter: On for temperature; off for setpoint |
| Sharing Permission | This article is used within its tenant; sharing is not opened. Required · Enter: Unchecked |
| Integer Range, Unit, and Step | Temperature -40~100℃; setpoint 16~35℃; step 1. Required · Enter: Temperature -40~100; setpoint 16~35; ℃; step 1 |
| Calculation Formula | This example uses integers directly, with no formula conversion. Optional · Enter: Leave blank |
| Modify / Cancel | Modify saves the current model; Cancel does not submit. Required · Enter: Modify |
8. Confirm Publishing the Current Product Configuration
Location: Product Management*→Web Thermostat→*Publish Update Steps: After verifying the draft is saved, click Publish Update and click Confirm in the confirmation box.
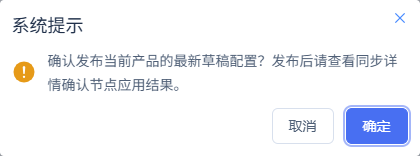
After the success prompt, continue to check the sync details and confirm the access node has applied the configuration.
Key Points in the Screenshot
| Field / Control | Notes |
|---|---|
| Publish Product | Publish after saving; when editing a published product, unpublish first. Required · Enter: Confirm publish |
9. Confirm the Access Side Takes Effect After Publishing
Location: Product Management*→Web Thermostat→*Access Configuration Sync Steps: Publish the saved configuration, expand the sync result, and confirm APPLIED with an empty Failure Reason.
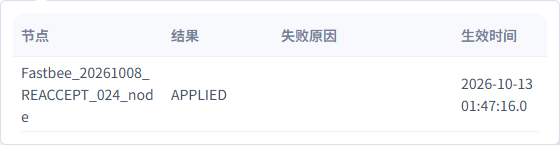
This access configuration has been applied on the node with 0 failures; the real device send/receive and history verification below are still required.
Key Points in the Screenshot
| Field / Control | Notes |
|---|---|
| Access Sync Result | APPLIED means the access node has applied this configuration. Required · Enter: APPLIED, 0 failures |
| Publish Product | Publish after saving; when editing a published product, unpublish first. Required · Enter: Confirm publish |
Temperature is read-only with range -40~100℃; setpoint is writable with range 16~35℃, step 1. Both properties have history on; temperature has chart and real-time monitor on, setpoint off; reopen after saving to verify. When modifying a published product, unpublish first, then republish to APPLIED after finishing modifications.
3. Configure and Confirm the WebSocket Connection
Formal FMQX Web connection configuration json
{

  "schemaVersion": 3,

  "groups": [

    {

      "id": "tutorial_ws_group",

      "name": "网页教程",

      "sortOrder": 53,

      "isSystem": false

    }

  ],

  "sessions": [

    {

      "id": "3d65382b266b40e38e77e8178f0af68d",

      "groupId": "tutorial_ws_group",

      "name": "网页温控器",

      "protocol": "MQTT",

      "transport": "WebSocket",

      "host": "127.0.0.1",

      "port": 8084,

      "mqttWebSocketPath": "/mqtt",

      "mqttProtocolVersion": "3.1.1",

      "clientId": "S&demo-device&876&1",

      "username": "admin",

      "autoReconnect": false,

      "qos": 1,

      "subscriptions": [

        {

          "id": "platform_downlink",

          "topic": "/876/demo-device/function/get",

          "qos": 1,

          "active": true

        },

        {

          "id": "legacy_default",

          "topic": "S&demo-device&876&1/function/get",

          "qos": 1,

          "active": false

        }

      ],

      "jsonDevice": {

        "format": "JSON",

        "responseRoute": "/876/demo-device/property/post",

        "initialState": {

          "temperature": 29,

          "setpoint": 32

        }

      }

    }

  ]

}Save as a UTF-8 JSON and import; there is no password. After the first import, securely fill in this device's Password, keep the wrong default subscription active=false, and do not delete it. Replaceable customer template names are used here; check against the replacement list in this section before importing or sending.
10. Configure the MQTT WebSocket Connection Identity
Location: FMQX Web*→WebSocket Tutorial→Web Thermostat→*Connection Configuration Steps: Import the configuration below, verify the Host, port 8084, and Client ID, securely fill in this device's Password, and save.
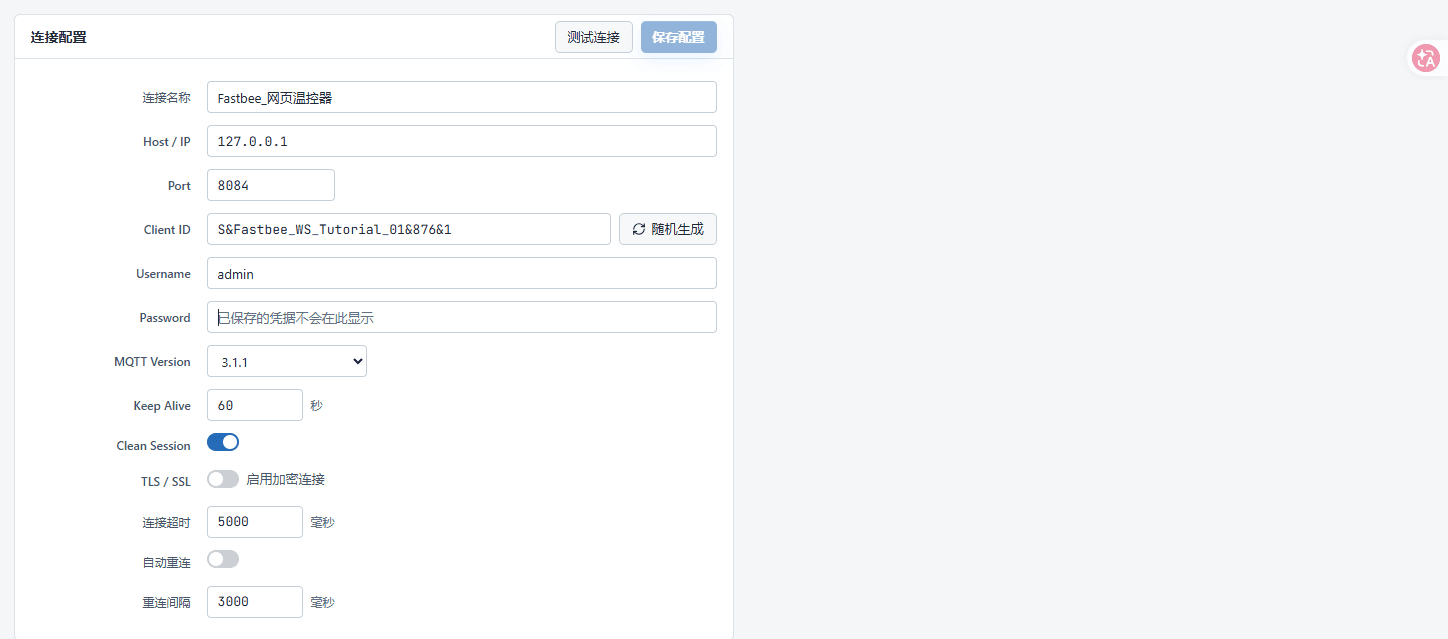
The actual configuration is MQTT 3.1.1, Keep Alive 60 seconds, Clean Session on, TLS off, timeout 5000 ms, auto reconnect off; saved credentials are not echoed.
Key Points in the Screenshot
| Field / Control | Notes |
|---|---|
| Connection Name | Identifies this article's final retained session. Required · Enter: FastBee_Web_Thermostat |
| Host / IP | Fill in the FMQ WebSocket access address; 127.0.0.1 only applies to the same machine. Required · Enter: 127.0.0.1 |
| Port | Use the WebSocket listening port; do not mix in the plain MQTT port. Required · Enter: 8084 |
| WebSocket Path | The imported configuration's path matches the FMQ entry. Required · Enter: /mqtt |
| Client ID | Use the platform MQTT connection identity of this device; do not click random generation to replace it. Required · Enter: S&FastBee_WS_Tutorial_01&876&1 |
| Username | Fill in the device connection username provided by the platform. Required · Enter: admin (subject to the device connection parameters) |
| Password | Obtain it securely from the platform's connection parameters of this device and fill it in; saved credentials are not echoed here. Required · Enter: Fill in this device's credential; do not write it into the manual |
| MQTT Version | This article selects 3.1.1. Required · Enter: 3.1.1 |
| Keep Alive | The MQTT keep-alive interval, in seconds. Required · Enter: 60 seconds |
| Clean Session | Enabled in this article; recheck the subscription after recovery. Required · Enter: On |
| TLS / SSL | This article uses an unencrypted WebSocket locally; for external environments, follow the administrator's entry requirements. Required · Enter: Off |
| Connect Timeout | The connection wait limit, in milliseconds. Required · Enter: 5000 ms |
| Auto Reconnect | Disabled in this article; disconnect and recovery are performed manually. Required · Enter: Off |
| Reconnect Interval | Only participates in retries when auto reconnect is enabled; not enabled in this article. Required · Enter: 3000 ms |
| Import Configuration | Import the password-free UTF-8 JSON below into the WebSocket tutorial group. Required · Enter: MQTT/WebSocket session |
| Random Generation | This article uses a fixed device identity and does not use random generation. Required · Enter: Do not click |
| Test Connection | A connection test does not replace real report, subscription, and downlink verification. Required · Enter: Test Connection |
| Save Configuration | Save the correct connection and credentials; reuse this article's session later. Required · Enter: Save Configuration |
11. Connect and Confirm the WebSocket Transport
Location: FMQX Web*→*Connection Details Steps: Click Connect, expand the details, and verify the Transport Channel is WebSocket with this device's Client ID.

Do not rely only on the header MQTT label or port reachability; the details explicitly show the actual WebSocket channel.
Key Points in the Screenshot
| Field / Control | Notes |
|---|---|
| Connection Details | The header MQTT denotes the application protocol; the details' transport channel should be WebSocket. Required · Enter: WebSocket |
| Client ID | Use the platform MQTT connection identity of this device; do not click random generation to replace it. Required · Enter: S&FastBee_WS_Tutorial_01&876&1 |
| Connect / Disconnect | After connecting, confirm the real details show WebSocket; clear any error prompt before continuing. Required · Enter: Connected/Disconnected |
After connecting successfully, check the transport channel WebSocket and this device's Client ID in the actual details. The correct downlink topic must be subscribed; Connected with the subscription rejected still does not count as up/downlink pass. MQTT 3.1.1, report QoS 1, Keep Alive 60 seconds, Clean Session on, auto reconnect off.
4. Send Ten Different Samples
First property report of the formal session json
{

  "id": "WS_Tutorial_retry_sample_01",

  "temperature": 20,

  "setpoint": 32

}Publish to this device's property/post topic; temperatures 20~29 in sequence with message numbers 01~10. A new acceptance uses a completely new set of ids. Replaceable customer template names are used here; check against the replacement list in this section before importing or sending.
12. Fill in This Device's Report Topic and the First Sample
Location: FMQX Web*→Messaging→*Publish Message Steps: Change the Topic to this device's correct report topic, fill in temperature 20, setpoint 32, and a new message number, then click Send.
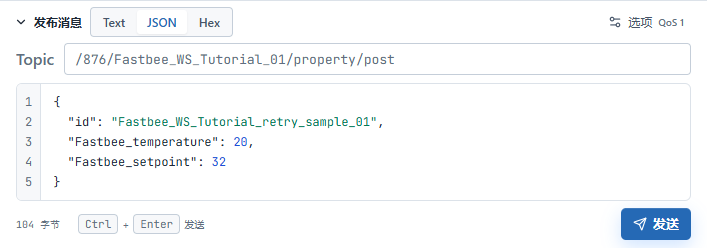
After reopening the page, verify the Topic first; do not keep the default topic starting with S&. Use new numbers when re-verifying; do not replay the old samples in the screenshots.
Key Points in the Screenshot
| Field / Control | Notes |
|---|---|
| Report and Reply Topic | Both properties and demo replies in this article are published to this device's report topic. Required · Enter: /876/FastBee_WS_Tutorial_01/property/post |
| Message Number | Each new report uses an independent id; re-verification uses completely new numbers. Required · Enter: Independent ids; do not replay processed numbers |
| QoS | Property reports and the subscription configuration use 1; the platform's actual downlink card shows 0. Required · Enter: Report 1; downlink actually received 0 |
| Publish Content and Send | Send complete JSON; in this scenario the device identity is determined by the MQTT connection and topic. Required · Enter: Temperature 20~29, setpoint 32 |
13. Send Ten Different Temperatures Through the Report Topic
Location: FMQX Web*→Messaging→*Publish Content and Send Records Steps: Select the correct report topic, keep setpoint 32, change the temperature in sequence through 20~29, and send each with a new Message Number.
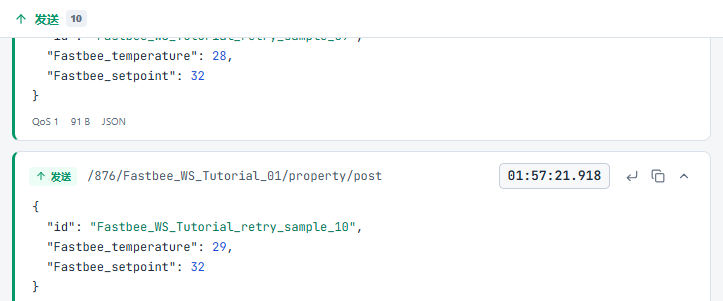
Actually sent ten entries, ending with 29/32; the previous step separately showed the correct report topic and the first sample preparation.
Key Points in the Screenshot
| Field / Control | Notes |
|---|---|
| Report and Reply Topic | Both properties and demo replies in this article are published to this device's report topic. Required · Enter: /876/FastBee_WS_Tutorial_01/property/post |
| QoS | Property reports and the subscription configuration use 1; the platform's actual downlink card shows 0. Required · Enter: Report 1; downlink actually received 0 |
| Message Number | Each new report uses an independent id; re-verification uses completely new numbers. Required · Enter: Independent ids; do not replay processed numbers |
| Publish Content and Send | Send complete JSON; in this scenario the device identity is determined by the MQTT connection and topic. Required · Enter: Temperature 20~29, setpoint 32 |
Each time, send a complete JSON to the correct report topic, and wait for the platform to read the current one before continuing. The device identity is determined by the MQTT connection and topic; avoid mixing the UDP identity datagram style into this example. The formal ten samples occurred at 01:57:12~01:57:21, with the set temperature at 32 throughout.
Send 32℃ and Confirm the Actual Status
Confirm item by item: the pending value, actual receipt, device execution, independent status report, and the platform current value. The examples in this section are new commands of this round; the counts are cumulative values of the retained session. The FMQX state machine demo does not replace physical device execution.
14. Adjust the Pending Setpoint to 32℃
Location: Device Management*→Web Thermostat→*Running Status Steps: Select 32 on the set temperature slider, verify the indicated value, and click Send Command.

Adjust the pending setpoint to 32℃
Key Points in the Screenshot
| Field / Control | Notes |
|---|---|
| Setpoint Slider and Paper Plane | Verify the pending indicated value and send once; do not treat the slider's pending value as the device's current value. Required · Enter: Per the implementation plan · Example: This run 32℃; the original October 13 reference 34℃, post-recovery 35℃ |
| Pending Set Temperature | The slider indication is the value about to be sent; the current value beside it comes from device reports. Required · Enter: 32 |
15. Confirm the Device Received the 32℃ Command
Location: Platform Running Status / FMQX Web*→*Receive Records Steps: Expand this device's latest received message and verify the Set Temperature is 32.
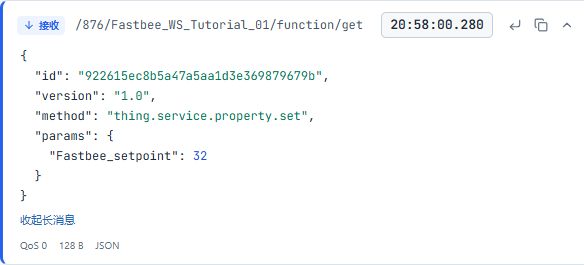
Confirm the device received the 32℃ command
Key Points in the Screenshot
| Field / Control | Notes |
|---|---|
| Setpoint Slider and Paper Plane | Verify the pending indicated value and send once; do not treat the slider's pending value as the device's current value. Required · Enter: This run 32℃ |
| Downlink Subscription Topic | The correct downlink topic stays enabled, used to receive platform property setpoints. Required · Enter: /876/FastBee_WS_Tutorial_01/function/get |
| Receive Records | Expand the complete message and verify the topic, target value, time, and byte count. Required · Enter: This run 32℃; corresponding to the same command number |
16. Verify the Same-Numbered 32℃ Execution Response
Location: Platform Running Status / FMQX Web*→*Receive Records Steps: Expand the same-numbered response in the send records, and verify the success result, setpoint 32, and cumulative execution count 5.
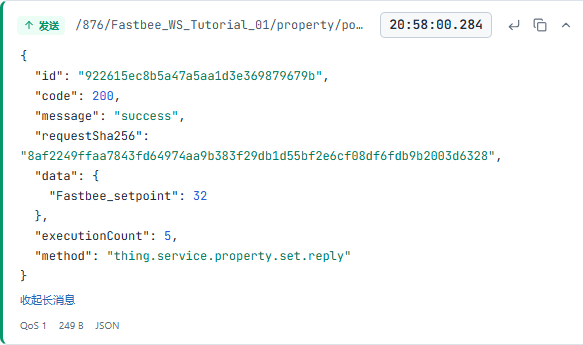
Verify the same-numbered 32℃ execution response and cumulative count 5
Key Points in the Screenshot
| Field / Control | Notes |
|---|---|
| Execution Response of This Run | This run adds only one execution; the count is the cumulative value of the retained device state machine. Required · Enter: Per the implementation plan · Example: Same command number; success 200; setpoint 32; cumulative count 5 |
17. Independently Report the Actual Status After Execution
Location: FMQX Web*→Messaging→*Publish Message Steps: In this device's report entry, send the JSON with actual temperature 29 and set temperature 32.
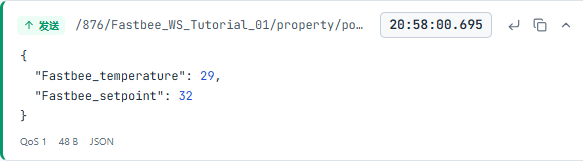
Independently report the actual status after execution
Key Points in the Screenshot
| Field / Control | Notes |
|---|---|
| Report and Reply Topic | Both properties and demo replies in this article are published to this device's report topic. Required · Enter: Per the implementation plan · Example: /876/FastBee_WS_Tutorial_01/property/post |
| Message Number | Each new report uses an independent id; re-verification uses completely new numbers. Required · Enter: Per the implementation plan · Example: Independent ids; do not replay processed numbers |
| Actual Property JSON | TCP must also carry the device number clientId; MQTT WebSocket uses the current device's report topic. Required · Enter: {"FastBee_temperature":29,"FastBee_setpoint":32} |
18. View the Current 32℃ After the Independent Report
Location: FMQX Publish Content / Device Management*→*Running Status Steps: Return to Running Status and verify the Current Value shows 32.

View the current 32℃ after the independent report
Key Points in the Screenshot
| Field / Control | Notes |
|---|---|
| Platform Current Value | The actual current value after the independent property status report. Required · Enter: This run temperature 29℃, setpoint 32℃ |
19. Open Statistics to View the History Curve
Location: Device Management*→Current Device→*Device Statistics Steps: Enter Device Statistics and verify the temperature after the curve loads for the first time.
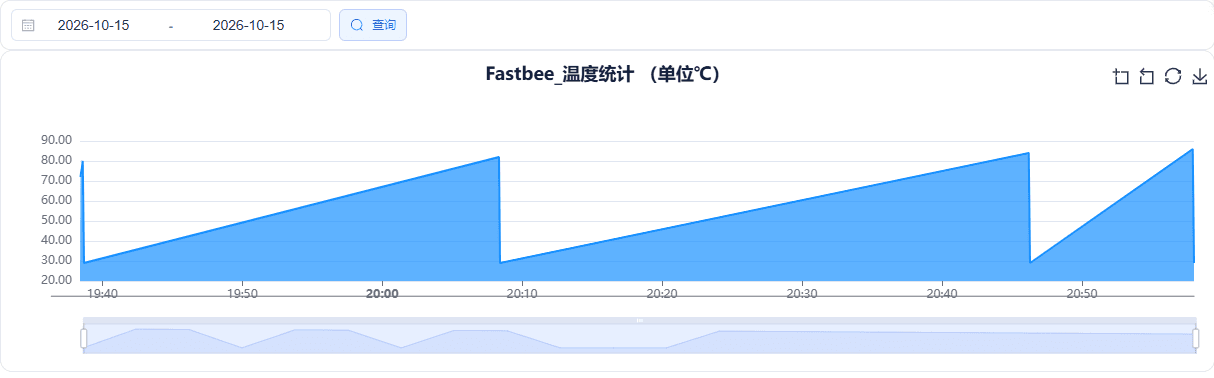
Open statistics to view the history curve
Key Points in the Screenshot
| Field / Control | Notes |
|---|---|
| Device Statistics and History Curve | After entering for the first time, wait for the history curve to load, then verify data by field and time. Required · Enter: Per the implementation plan · Example: The curve loads on first entry into Device Statistics |
20. Select the Time Window of This 32℃ Report
Location: Data Center*→*Historical Data Steps: Select this device's set temperature, enter 2026-10-15 20:58:00 ~ 2026-10-15 20:59:00, and click Query.

Query the time range of this setpoint 32
Key Points in the Screenshot
| Field / Control | Notes |
|---|---|
| Query Time of This Run | Use the full date and start/end times; screenshot input boxes may display in abbreviated form. Required · Enter: Per the implementation plan · Example: 2026-10-15 20:58:00 ~ 2026-10-15 20:59:00 |
21. Refresh This Set Temperature History
Location: Data Center*→*Historical Data Steps: Confirm the device and field are correct, then click Refresh Results.

Refresh this device's set temperature history
Key Points in the Screenshot
| Field / Control | Notes |
|---|---|
| Query Time of This Run | Use the full date and start/end times; screenshot input boxes may display in abbreviated form. Required · Enter: Per the implementation plan · Example: 2026-10-15 20:58:00 ~ 2026-10-15 20:59:00 |
22. Verify the 32℃ Record Still Exists After Refresh
Location: Data Center*→*Historical Data Steps: Verify the Set Temperature is 32 at 20:58:00.

After refresh, verify the 32 from the independent status report
Key Points in the Screenshot
| Field / Control | Notes |
|---|---|
| History Records of This Run | Verify the times and values of the independent status reports; different messages with the same value are not automatically considered duplicates. Required · Enter: Per the implementation plan · Example: Setpoint 32℃, still present after refresh |
Restore the Connection When Needed (Original Operation Example)
The following is an independent operation example of restoring the connection from the original batch, retaining the original times and the 34 or 35 values. Execute it when recovery is needed; it and the new 32℃ command above are two independent verifications.
23. Disconnect and Stop This Round of Sending/Receiving
Location: FMQX Web*→*Web Thermostat Steps: Click Disconnect, confirm Disconnected, and retain the session and history.

This picture shows the stopped state before the formal session recovery; the top prompt partially covers the right-side buttons, while the Disconnected state on the left is clear.
Key Points in the Screenshot
| Field / Control | Notes |
|---|---|
| Finish and Retain | Only disconnect and stop sending; retain the product, device, session, and history. Required · Enter: Finally Disconnected; last 29/35 |
| Connect / Disconnect | After connecting, confirm the real details show WebSocket; clear any error prompt before continuing. Required · Enter: Connected/Disconnected |
24. Reuse the Formal Session to Restore the Connection
Location: FMQX Web*→*Web Thermostat Steps: Keep the wrong default subscription disabled without deleting it, click Connect, and confirm Connected.

The correct topic stays enabled; deleting the wrong default entry causes it to be auto-created again after reconnect and then rejected, so this article recovered successfully by keeping the disabled entry.
Key Points in the Screenshot
| Field / Control | Notes |
|---|---|
| Downlink Subscription Topic | The correct downlink topic stays enabled, used to receive platform property setpoints. Required · Enter: /876/FastBee_WS_Tutorial_01/function/get |
| Wrong Default Topic | Keep the automatic default entry but disabled, to avoid it being auto-generated again after deletion and reconnect. Required · Enter: S&FastBee_WS_Tutorial_01&876&1/function/get; active=false |
| Connect / Disconnect | After connecting, confirm the real details show WebSocket; clear any error prompt before continuing. Required · Enter: Connected/Disconnected |
Publish the 29/34 status first after recovery json
{

  "id": "WS_Tutorial_final_resume",

  "temperature": 29,

  "setpoint": 34

}After reconnecting, confirm the correct subscription and property report first, then send down the new setpoint 35. Replaceable customer template names are used here; check against the replacement list in this section before importing or sending.
25. Send Down the 35℃ Target After Recovery
Location: Device Management*→Web Thermostat→*Running Status Steps: After restoring the connection and reporting the new status, set the slider to 35, verify the indication, and click Send Command.

After recovery, also verify the device's actual receipt, the automatic reply, and the independent property report.
Key Points in the Screenshot
| Field / Control | Notes |
|---|---|
| Setpoint Slider and Paper Plane | Verify the pending indicated value and send once; do not treat the slider's pending value as the device's current value. Required · Enter: 34; after recovery 35 |
26. Confirm Actual Receipt of Setpoint 35 After Recovery
Location: FMQX Web*→Messaging→*Receive Records Steps: Send the recovery 29/34 status below first, then send down 35, and expand the new Receive Records to verify 35.
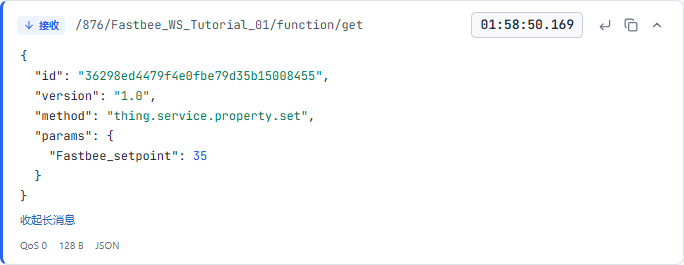
Actually received the 128-byte setpoint 35 on this device's downlink topic at 01:58:50.169; the old failed-recovery 34 card must not be treated as the actual receipt of 35.
Key Points in the Screenshot
| Field / Control | Notes |
|---|---|
| Report and Reply Topic | Both properties and demo replies in this article are published to this device's report topic. Required · Enter: /876/FastBee_WS_Tutorial_01/property/post |
| Message Number | Each new report uses an independent id; re-verification uses completely new numbers. Required · Enter: Independent ids; do not replay processed numbers |
| Setpoint Slider and Paper Plane | Verify the pending indicated value and send once; do not treat the slider's pending value as the device's current value. Required · Enter: 34; after recovery 35 |
| Receive Records | Expand the complete message and verify the topic, target value, time, and byte count. Required · Enter: 34; after recovery 35 |
27. Verify the Demo Reply for Setpoint 35 After Recovery
Location: FMQX Web*→Messaging→*Send Records Steps: Verify Setpoint 35, code 200, and executionCount 2.
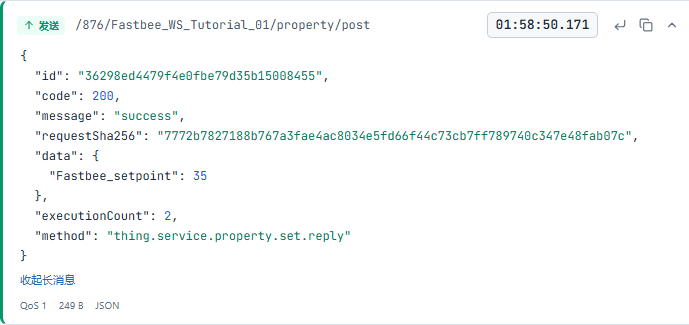
The demo reply's received-request summary matches this 35 command; afterwards, the property status still needs to be reported manually and independently.
Key Points in the Screenshot
| Field / Control | Notes |
|---|---|
| Demo Automatic Reply | FMQX jsonDevice accepts the setpoint and replies; the status is then re-reported independently by the operator. Required · Enter: 34 count 1; 35 count 2 |
| Report and Reply Topic | Both properties and demo replies in this article are published to this device's report topic. Required · Enter: /876/FastBee_WS_Tutorial_01/property/post |
Independent 29/35 status after recovery json
{

  "id": "WS_Tutorial_final_after35",

  "temperature": 29,

  "setpoint": 35

}After the demo replies 35, manually publish this property status; use a new message number when re-accepting. Replaceable customer template names are used here; check against the replacement list in this section before importing or sending.
28. Independently Report the 35℃ Status After Recovery
Location: FMQX Web*→Messaging→*Publish Message Steps: Verify the correct report topic, fill in temperature 29 and setpoint 35, use a new Message Number, and click Send.
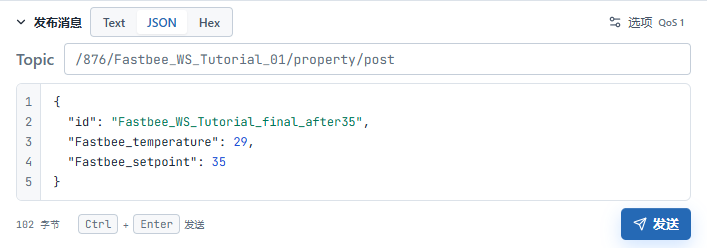
Re-report the actual status, then go to the platform to verify the current value and the refreshed history; the old numbers in the screenshots are for identification only.
Key Points in the Screenshot
| Field / Control | Notes |
|---|---|
| Report and Reply Topic | Both properties and demo replies in this article are published to this device's report topic. Required · Enter: /876/FastBee_WS_Tutorial_01/property/post |
| Message Number | Each new report uses an independent id; re-verification uses completely new numbers. Required · Enter: Independent ids; do not replay processed numbers |
| Publish Content and Send | Send complete JSON; in this scenario the device identity is determined by the MQTT connection and topic. Required · Enter: Original October 13 recovery example: temperature 29, setpoint 35, using a new message number |
29. Return to the Platform to Verify the Reported 35℃ Status
Location: Device Management*→Device Details→*Running Status / Historical Data Steps: After completing the previous send, return to the platform, refresh the Current Value, verify temperature 29 and setpoint 35, then check history with the original recovery time window.
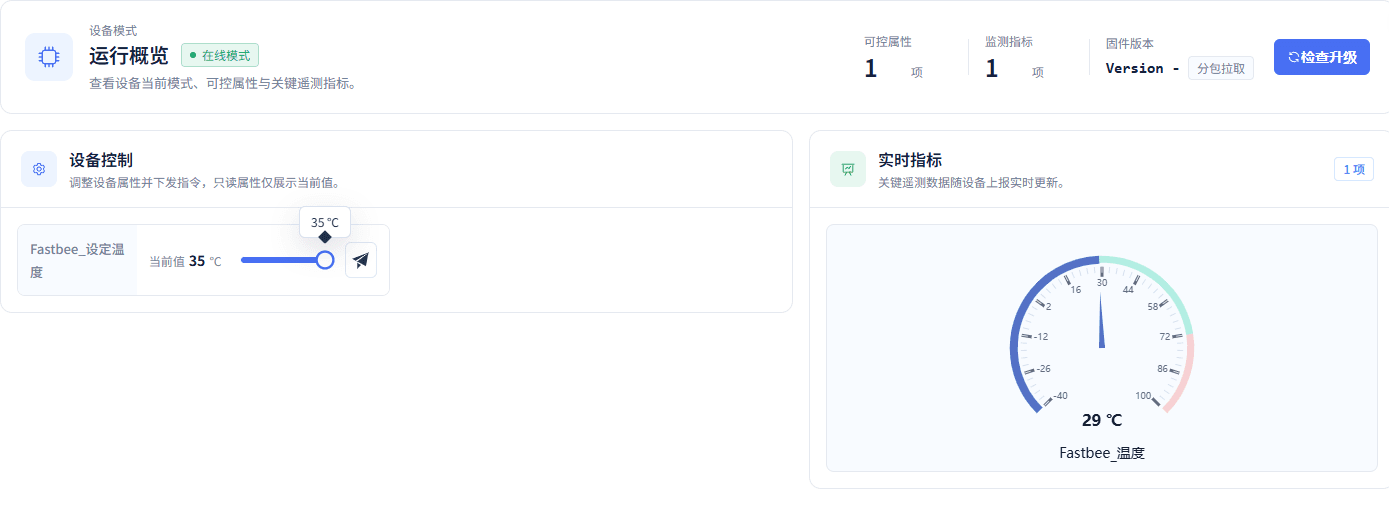
Final temperature 29, setpoint 35; the independent property at 01:58:50 entered the actual history; the demo reply and the manual status report are clearly distinguished.
Key Points in the Screenshot
| Field / Control | Notes |
|---|---|
| Platform Current Value | The actual current value after the independent property status report. Required · Enter: Temperature 29, setpoint 35 |
This article's formal session recovery passed; the setpoint 35 demo execution count increased to 2, and the platform's final values are temperature 29, setpoint 35. An earlier separate session once only received the old recovery 34 command without producing an execution reply or new status; it remains retained as a failure and must not be mixed into this article's success conclusion.
History of the Original Samples and Recovery Example (Separate Old Time Window)
This chapter continues to show the history records of the first ten samples and the original recovery operations, retaining the original dates and values; the history of the new 32℃ command above has its own separate time window. For re-verification, use the actual times of the current run and do not copy the old dates.
30. Query the Ten Samples of the Formal Session
Location: Data Center*→*Historical Data Steps: Select this article's device and Temperature, cover 01:57~01:58 in time, and verify 20~29.
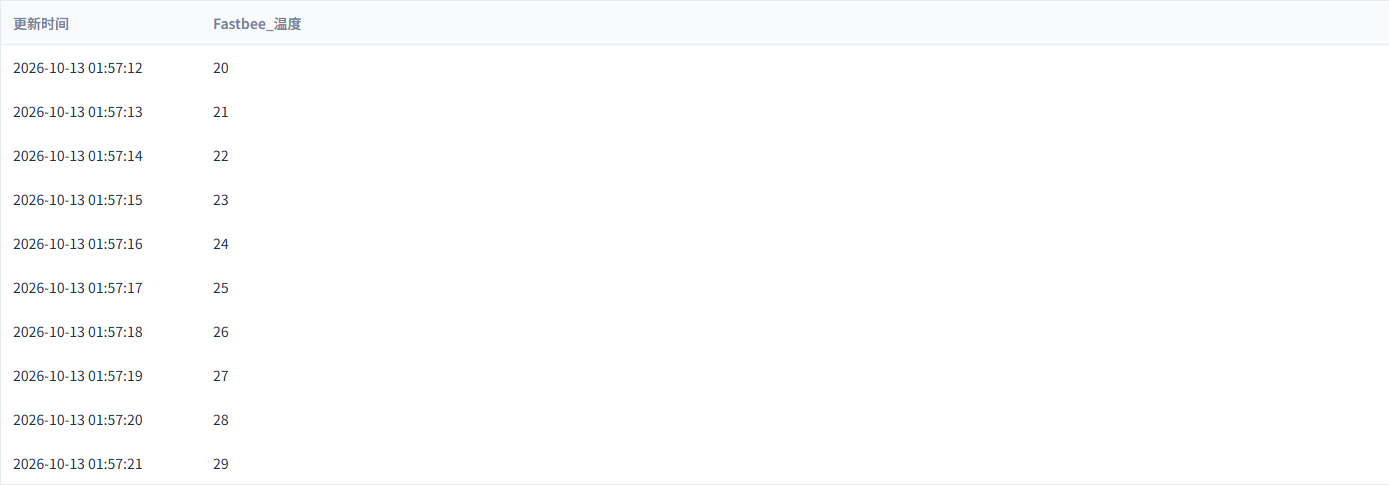
The ten values are from 01:57:12 to 01:57:21; this is not the sample table of the earlier failed session.
Key Points in the Screenshot
| Field / Control | Notes |
|---|---|
| Device and Field | Select the platform web thermostat device and temperature or set temperature. Required · Enter: Web Thermostat / Temperature, Set Temperature |
| Time Range | Cover this round's actual samples and status report times. Required · Enter: 2026-10-13 01:57~02:00 |
| Query / Refresh / Reset | After refresh, re-select the same conditions and query; Reset clears the filters. Required · Enter: Verify after loading completes |
31. Select Set Temperature and the Status Time Window
Location: Data Center*→*Historical Data Steps: Select this article's device and Set Temperature, set the Time Range to 01:58~02:00, then query.

The screenshot's date input is partially truncated horizontally; the full date is 2026-10-13, and re-verification uses a new full start/end time.
Key Points in the Screenshot
| Field / Control | Notes |
|---|---|
| Device and Field | Select the platform web thermostat device and temperature or set temperature. Required · Enter: Web Thermostat / Temperature, Set Temperature |
| Time Range | Cover this round's actual samples and status report times. Required · Enter: 2026-10-13 01:57~02:00 |
| Query / Refresh / Reset | After refresh, re-select the same conditions and query; Reset clears the filters. Required · Enter: Verify after loading completes |
32. Refresh and Re-Query the Actual History from 34 to 35
Location: Data Center*→*Historical Data Steps: After refresh, re-select the same conditions, wait for loading to finish, and verify 34→34→35.

01:58:41 is 34, the recovery report at 01:58:49 is still 34, and 01:58:50 is 35; the two 34s are different independent messages, not duplicate entries.
Key Points in the Screenshot
| Field / Control | Notes |
|---|---|
| Device and Field | Select the platform web thermostat device and temperature or set temperature. Required · Enter: Web Thermostat / Temperature, Set Temperature |
| Time Range | Cover this round's actual samples and status report times. Required · Enter: 2026-10-13 01:57~02:00 |
| Query / Refresh / Reset | After refresh, re-select the same conditions and query; Reset clears the filters. Required · Enter: Verify after loading completes |
Querying temperature for 2026-10-13 01:57~01:58 shows 20~29. Querying set temperature for 01:58~02:00 shows 34 at 01:58:41, still 34 in the recovery report at 01:58:49, and 35 at 01:58:50. After refresh, re-select the same conditions and wait for loading to finish before verifying.
The two 34s are independent statuses from different messages, not duplicate entries. A new acceptance records a new time window and new ids, and retains the old history; do not substitute the tool's send/receive counts or the row count of identical page values for per-message correlation.
8. Finish and Re-Accept
33. End Sending/Receiving and Retain the Session
Location: FMQX Web*→Web Thermostat→*Statistics Steps: Stop sending, click Disconnect, and confirm Disconnected.

End sending/receiving and retain the session
Key Points in the Screenshot
| Field / Control | Notes |
|---|---|
| Finish and Retain | Only disconnect and stop sending; retain the product, device, session, and history. Required · Enter: Currently Disconnected; this run's last temperature 29 / setpoint 32, old history still retained |
| Connect / Disconnect | After connecting, confirm the real details show WebSocket; clear any error prompt before continuing. Required · Enter: Connected/Disconnected |
Ending only disconnects FMQX and stops sending; the product, device, the two models, the saved session, and history are all retained. This run's last values are temperature 29 and setpoint 32; the 35 from the original recovery example can still be queried in the old history. The presence of a current value does not mean the session is still connected.
A new acceptance reuses this article's formal session and product; verify the actual WebSocket channel, MQTT identity, the correct subscription enabled, and the wrong default subscription disabled. Use new ids to send at least ten different samples one by one, send down a new in-range target, confirm device actual receipt, the demo reply, the manual independent status, and the platform real-time and history, refresh and re-query, then perform disconnect and reconnect; when finished, disconnect again and retain the resources.
Field and Parameter Reference
JSON Access Wizard
| Field / Control | How to Fill |
|---|---|
| Access Source | This article creates a dedicated product; when this article's resources already exist, re-verification reuses them directly. Required · Enter: New ProductExisting Product: reuses the same-model configuration to add devices; reuses the same-model configuration to add devices.New Product: creates this article's dedicated model; creates this article's dedicated model.Copy Product: copies from an existing configuration; copies from an existing configuration.Use Template: starts from a template; starts from a template. |
| Product Name | Give this type of web thermostat device a clear business name. Required · Enter: FastBee_Web_Thermostat |
| JSON Sample | Extract drafts of the two properties from the device's actual message. Required · Enter: {"FastBee_temperature":29,"FastBee_setpoint":30} |
| Fields, Integer Types, and Paths | The two properties correspond one-to-one with the actual JSON keys. Required · Enter: $.FastBee_temperature; $.FastBee_setpoint |
| Device Identifier | Both the MQTT connection identity and the up/downlink topics are composed from this number; it must not be randomly replaced. Required · Enter: FastBee_WS_Tutorial_01 |
| Device Name | Used to locate the current platform device; the final FMQX session name is Web Thermostat. Required · Enter: FastBee_Web_Thermostat |
| Access Protocol | The platform uses JSON/MQTT; WebSocket is MQTT's transport channel. Required · Enter: JSON/MQTT |
| Access Overview | Verify the current product, one device, and two fields. Required · Enter: 1 device, 2 fields |
Feature Definition
| Field / Control | How to Fill |
|---|---|
| Model Translation | Fill in a clear English name; modify and save after completing the required items. Required · Enter: Temperature/SetpointMust be published after modification. |
| Model Identifier | The report keys must match the model identifiers verbatim. Required · Enter: FastBee_temperature/FastBee_setpointMust be published after modification. |
| Model Category | Both the reading and the setpoint in this article use properties. Required · Enter: PropertyMust be published after modification.Property: stores readings or writable setpoints; stores readings or writable setpoints.Function: this article does not use a standalone function model; this article does not use a standalone function model.Event: this article does not use an event model; this article does not use an event model. |
| Read-only Data | Checked for temperature; setpoint clears read-only to provide the control entry. Required · Enter: Checked for temperature; unchecked for setpointMust be published after modification.Checked: only displays reported readings; only displays reported readings.Unchecked: allows setpoints to be sent down per permissions; allows setpoints to be sent down per permissions. |
| History Storage | Both fields are enabled, saving subsequent report history. Required · Enter: CheckedMust be published after modification.Checked: records subsequent property values; records subsequent property values.Unchecked: subsequent history cannot be verified per this article; subsequent history cannot be verified per this article. |
| Chart Display / Real-time Monitor | On for temperature, off for setpoint; recheck the read-only linkage. Required · Enter: On for temperature; off for setpointMust be published after modification.Checked: displays readings; note the read-only linkage; displays readings; note the read-only linkage.Unchecked: the display mode adopted for the setpoint in this article; the display mode adopted for the setpoint in this article. |
| Sharing Permission | This article is used within its tenant; sharing is not opened. Required · Enter: UncheckedMust be published after modification.Checked: the sharing scope is decided by tenant business; the sharing scope is decided by tenant business.Unchecked: keeps this article's current permissions; keeps this article's current permissions. |
| Integer Range, Unit, and Step | Temperature -40~100℃; setpoint 16~35℃; step 1. Required · Enter: Temperature -40~100; setpoint 16~35; ℃; step 1Must be published after modification. |
| Calculation Formula | This example uses integers directly, with no formula conversion. Optional · Enter: Leave blankMust be published after modification. |
| Modify / Cancel | Modify saves the current model; Cancel does not submit. Must be published after modification. |
Publish and Effectiveness
| Field / Control | How to Fill |
|---|---|
| Publish Product | Publish after saving; when editing a published product, unpublish first. |
| Access Sync Result | APPLIED means the access node has applied this configuration. Required · Enter: APPLIED, 0 failures |
FMQX Web MQTT WebSocket
| Field / Control | How to Fill |
|---|---|
| Import Configuration | Import the password-free UTF-8 JSON below into the WebSocket tutorial group. Must reconnect after modification. |
| Connection Name | Identifies this article's final retained session. Required · Enter: FastBee_Web_ThermostatMust reconnect after modification. |
| Host / IP | Fill in the FMQ WebSocket access address; 127.0.0.1 only applies to the same machine. Required · Enter: 127.0.0.1Must reconnect after modification. |
| Port | Use the WebSocket listening port; do not mix in the plain MQTT port. Required · Enter: 8084Must reconnect after modification. |
| WebSocket Path | The imported configuration's path matches the FMQ entry. Required · Enter: /mqttMust reconnect after modification. |
| Client ID | Use the platform MQTT connection identity of this device; do not click random generation to replace it. Required · Enter: S&FastBee_WS_Tutorial_01&876&1Must reconnect after modification. |
| Random Generation | This article uses a fixed device identity and does not use random generation. Must reconnect after modification. |
| Username | Fill in the device connection username provided by the platform. Required · Enter: admin (subject to the device connection parameters)Must reconnect after modification. |
| Password | Obtain it securely from the platform's connection parameters of this device and fill it in; saved credentials are not echoed here. Required · Enter: Fill in this device's credential; do not write it into the manualMust reconnect after modification. |
| MQTT Version | This article selects 3.1.1. Required · Enter: 3.1.1Must reconnect after modification.3.1: not verified in this article; not verified in this article.3.1.1: the MQTT version verified in this article; the MQTT version verified in this article.5.0: not verified in this article; compatibility must be checked separately; not verified in this article; compatibility must be checked separately. |
| Keep Alive | The MQTT keep-alive interval, in seconds. Required · Enter: 60 secondsMust reconnect after modification. |
| Clean Session | Enabled in this article; recheck the subscription after recovery. Required · Enter: OnMust reconnect after modification.On: uses the configuration verified in this article and re-establishes the current subscription; uses the configuration verified in this article and re-establishes the current subscription.Off: persistent session behavior is not verified in this article; persistent session behavior is not verified in this article. |
| TLS / SSL | This article uses an unencrypted WebSocket locally; for external environments, follow the administrator's entry requirements. Required · Enter: OffMust reconnect after modification.Off: the local ws entry is verified; the local ws entry is verified.On: requires a wss entry and certificate parameters; not verified in this article; requires a wss entry and certificate parameters; not verified in this article. |
| Connect Timeout | The connection wait limit, in milliseconds. Required · Enter: 5000 msMust reconnect after modification. |
| Auto Reconnect | Disabled in this article; disconnect and recovery are performed manually. Required · Enter: OffMust reconnect after modification.Off: recover manually per this article and verify; recover manually per this article and verify.On: the automatic retry behavior needs further acceptance; the automatic retry behavior needs further acceptance. |
| Reconnect Interval | Only participates in retries when auto reconnect is enabled; not enabled in this article. Required · Enter: 3000 msMust reconnect after modification. |
| Test Connection | A connection test does not replace real report, subscription, and downlink verification. Must reconnect after modification. |
| Save Configuration | Save the correct connection and credentials; reuse this article's session later. Must reconnect after modification. |
| Connect / Disconnect | After connecting, confirm the real details show WebSocket; clear any error prompt before continuing. Must reconnect after modification. |
| Connection Details | The header MQTT denotes the application protocol; the details' transport channel should be WebSocket. Required · Enter: WebSocketMust reconnect after modification. |
| Message Number | Each new report uses an independent id; re-verification uses completely new numbers. Required · Enter: Independent ids; do not replay processed numbersMust reconnect after modification. |
| Publish Content and Send | Send complete JSON; in this scenario the device identity is determined by the MQTT connection and topic. Must reconnect after modification. |
| Receive Records | Expand the complete message and verify the topic, target value, time, and byte count. Required · Enter: This run's 32℃ command; the original recovery example's 35℃ command, verified by number separatelyMust reconnect after modification. |
| Demo Automatic Reply | FMQX jsonDevice accepts the setpoint and replies; the status is then re-reported independently by the operator. Required · Enter: 34 count 1; 35 count 2Must reconnect after modification. |
Subscription and Report Topics
| Field / Control | How to Fill |
|---|---|
| Downlink Subscription Topic | The correct downlink topic stays enabled, used to receive platform property setpoints. Required · Enter: /876/FastBee_WS_Tutorial_01/function/getMust reconnect after modification. |
| Wrong Default Topic | Keep the automatic default entry but disabled, to avoid it being auto-generated again after deletion and reconnect. Required · Enter: S&FastBee_WS_Tutorial_01&876&1/function/get; active=falseMust reconnect after modification. |
| Report and Reply Topic | Both properties and demo replies in this article are published to this device's report topic. Required · Enter: /876/FastBee_WS_Tutorial_01/property/postMust reconnect after modification. |
| QoS | Property reports and the subscription configuration use 1; the platform's actual downlink card shows 0. Required · Enter: Report 1; downlink actually received 0Must reconnect after modification.0: no MQTT confirmed delivery; this article's downlink actual receipt shows this; no MQTT confirmed delivery; this article's downlink actual receipt shows this.1: at-least-once delivery semantics; used for this article's reports; at-least-once delivery semantics; used for this article's reports.2: not verified in this article; not verified in this article. |
Device Running Status
| Field / Control | How to Fill |
|---|---|
| Setpoint Slider and Paper Plane | Verify the pending indicated value and send once; do not treat the slider's pending value as the device's current value. Required · Enter: This run 32℃; the original October 13 reference 34℃, post-recovery 35℃ |
| Platform Current Value | The actual current value after the independent property status report. Required · Enter: This run temperature 29, setpoint 32; the original recovery example temperature 29, setpoint 35 |
Historical Data
| Field / Control | How to Fill |
|---|---|
| Device and Field | Select the platform web thermostat device and temperature or set temperature. Required · Enter: Web Thermostat / Temperature, Set Temperature |
| Time Range | Cover this round's actual samples and status report times. Required · Enter: 2026-10-13 01:57~02:00 |
| Query / Refresh / Reset | After refresh, re-select the same conditions and query; Reset clears the filters. |
Stop and Recovery
| Field / Control | How to Fill |
|---|---|
| Finish and Retain | Only disconnect and stop sending; retain the product, device, session, and history. Required · Enter: Currently Disconnected; this run's last temperature 29 / setpoint 32, old history still retained |
| Device Statistics and History Curve | After entering for the first time, wait for the history curve to load, then verify data by field and time. Required · Enter: The curve loads on first entry into Device Statistics |
| History Records of This Run | Verify the times and values of the independent status reports; different messages with the same value are not automatically considered duplicates. Required · Enter: Setpoint 32℃, still present after refresh |
| Query Time of This Run | Use the full date and start/end times; screenshot input boxes may display in abbreviated form. Required · Enter: 2026-10-15 20:58:00 ~ 2026-10-15 20:59:00 |
| Execution Response of This Run | This run adds only one execution; the count is the cumulative value of the retained device state machine. Required · Enter: Same command number; success 200; setpoint 32; cumulative count 5 |
Where to Check First When Problems Occur
| Symptom | Possible Cause | Where to Check First | How to Recover |
|---|---|---|---|
| WebSocket connection failed | The entry address, port, path, TLS, or MQTT identity does not match. | In this example: 8084, /mqtt, MQTT 3.1.1, TLS off; the identity comes from this device's connection parameters. | Fix and save, reconnect, then verify the details show WebSocket and the device identity. |
| Connected but the downlink subscription is rejected | The automatic default topic does not match the downlink topic allowed by the platform. | The correct /876/.../function/get is enabled; the wrong S&.../function/get is disabled but retained. | Do not delete the wrong default entry and reconnect directly; keep active=false per this configuration and then recover. |
| The wrong default subscription reappears after disconnect/reconnect | This article observed that the interface auto-recreates the default entry after deletion. | Check that the imported configuration keeps both the correct enabled entry and the wrong disabled entry. | Reuse the formal session; after re-verifying the subscription, report a new status first before controlling. |
| Command actually received but no reply or status update | The demo state machine or the connection has gone abnormal; receipt alone is not enough to pass. | Verify the automatic reply's corresponding id, target, success code, and execution count, then check the independent property status. | Stop repeated downlink sending and save the failure time; after fixing the connection and configuration, close the loop again with a new command. |
| Automatic reply succeeded but the platform current value did not change | In this article the reply and the property status are sent separately; a manual independent status report is still needed. | After the reply, whether a 29/target-value message with a new id was published to property/post. | Publish the current status independently, then verify real-time and history; do not treat the demo as physical action. |
| Still not authenticated after entering the Password | The credential comes from another device, the identity was randomly changed, or it was not saved. | Client ID, Username, and Password all come from the same device's connection parameters. | Securely re-enter and save, then test again; do not write the real password into screenshots, configuration files, or the manual. |
| Missing values in the ten-sample history | The topic, message numbers, fields, or query time do not match. | This device's property/post topic, new ids, temperatures 20~29, and the correct date. | Retain the old data, retest in a targeted way with new numbers, and continue after confirming platform receipt. |
| Cannot find 34 or 35 after refresh | The wrong field or device was selected, or the time window does not cover the independent reports. | This device's set temperature, 01:58~02:00, waiting for loading to finish. | Re-select the same conditions and query; the history switch only guarantees subsequent collection and does not backfill old data automatically. |