


JSON and TCP Thermostat Terminal Access
This article is compiled from an existing operations manual into an online operations reference. Operations marked as expected or not executed in the original text must still be verified against the actual environment.
Report temperature, adjust temperature remotely, verify history and recovery, and retain data for re-verification.
Before you start: you are logged in to the platform with product, device, Thing Model, publish, control, and history query permissions; the local application, single-node FMQ, and FMQX Web are available, and the administrator has provided the TCP entry
Before You Start
For first-time access, follow the configuration chapters; when the same product and device already exist, reuse the retained configuration and start from reporting and send/receive verification. The configuration screenshots and recovery examples retain the original operation timestamps; the current re-verification is checked separately.
This article uses one thermostat terminal to demonstrate JSON-format access over TCP: create the product, report temperature, receive temperature adjustment, report back after execution, view real-time and historical data, and verify recovery after a disconnect. It suits devices that can actively connect to a TCP server and send JSON objects as agreed.
The platform handles the product, device, and history display; FMQ is the device access service; FMQX Web is the device debugging tool in this article. The FMQX demo state machine actually receives commands, changes its internal setpoint, and replies automatically; actual property reports are triggered manually. This article does not mean a specific physical thermostat has completed access.
Log in to the platform first and obtain product, device, Thing Model editing, product publishing, device control, and history query permissions. The platform and FMQX web entries, and the TCP address and port reachable by the device, are provided by the deployment administrator. The screenshots use a same-machine local application and a single-node access service; RabbitMQ handles message handoff, and history uses the configured data storage.
For first-time access, create everything in order. This run retains product number 873, device number 1230, and Device Number FastBee_TCP_Tutorial_01; subsequent acceptance directly reuses the existing resources. Both the product and the device are named FastBee_Thermostat_Terminal; when searching, prefer the device number to avoid mixing in other tutorials.
Functional relationship diagram
The arrows illustrate the report path; downlink is first handed by the platform to FMQ, then returned along the device's existing TCP connection. This diagram explains responsibilities and is not a page screenshot.
Replace These Parameters Before Copying the Templates
The code in this article uses generic template names; the screenshots retain the actual historical resources. Complete the following checks before saving as a UTF-8 file or sending any message.
- temperature and setpoint are the template property identifiers for temperature and set temperature; you may keep them when generating a Thing Model for the first time, but when reusing an existing product you must replace them with that product's real identifiers and update all messages and the initialState keys accordingly.
- demo-device is the Device Number template. Replace the device number in clientId, the device number in every publish/subscribe topic, and the clientId of TCP reports together with the platform device number for this device; the product number and tenant number in the MQTT identity must also be replaced with the current device connection parameters.
- The host, port, and listening direction in the connection file must be changed to the actual address of the current environment; 127.0.0.1 means the local machine running FMQX. When MQTT is involved, also verify the product number, username, subscription topic, and responseRoute; enter the password only on the connection page, securely.
- Group, session, and subscription ids are internal references of the import file; if you rename them, groupId must match the corresponding group id. Verify before importing, and do not create a same-named connection again on a retained session.
- The code blocks are customer templates rewritten from existing password-free assets or original code; it has not been proven that this version of the template imports successfully. Historical screenshots, send times, and business pass scope are still governed by the records of each step; do not treat template names as the actual resource names in the old evidence.
1. Create the Product, Device, and Fields
Business JSON sample used by the wizard json
{

  "temperature": 20,

  "setpoint": 30

}The sample only generates two business fields. The actual TCP first frame also needs clientId; see the first frame after connecting. Replaceable customer template names are used here; check against the replacement list in this section before importing or sending.
1. Create the Thermostat Terminal Product
Location: IoT*→*Device Access Steps: Select New Product and enter Product Name FastBee_Thermostat_Terminal.
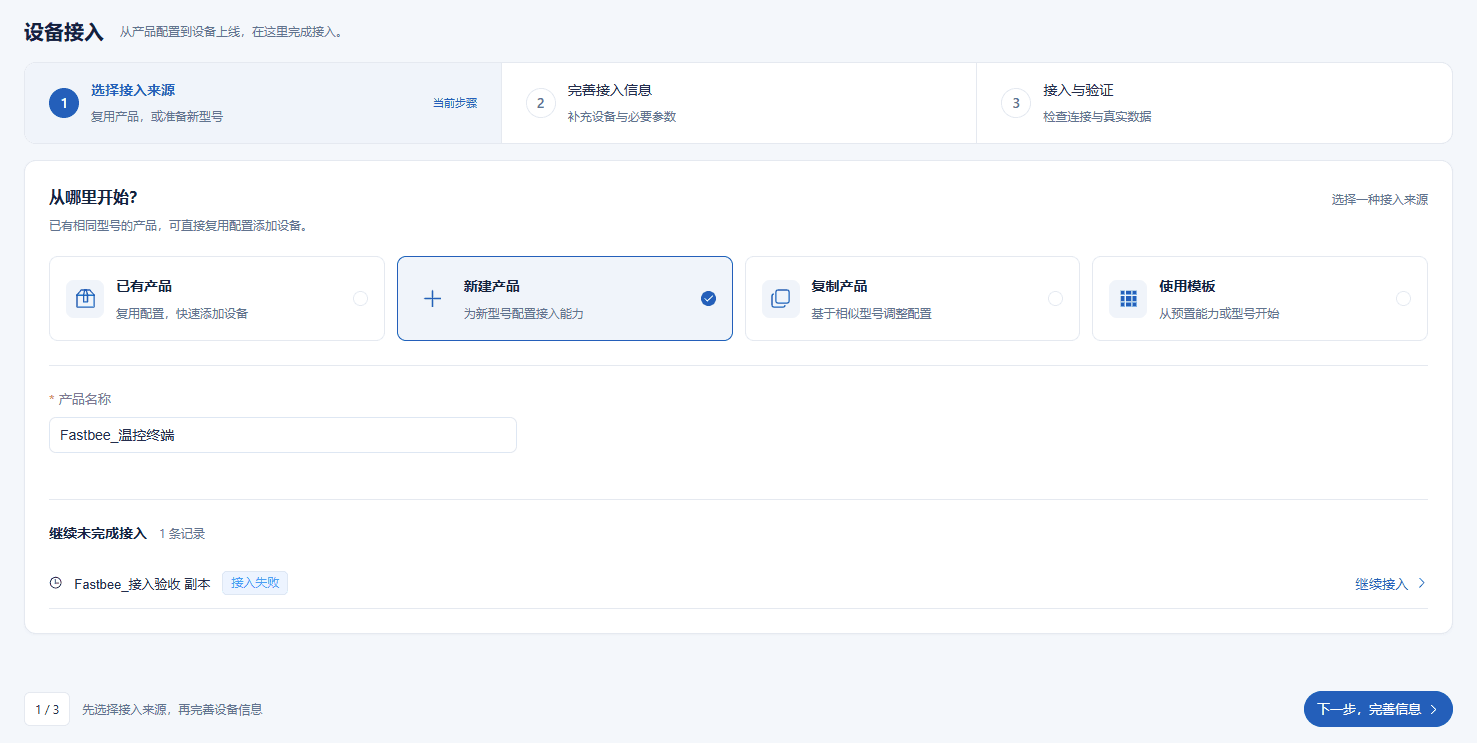
Create a dedicated product for this article. The old unfinished access record below does not belong to this article; keep New Product selected.
Key Points in the Screenshot
| Field / Control | Notes |
|---|---|
| Access Source | Create a product for a new model for the first time; Existing Product is used to add devices of the same model. Required · Enter: New Product |
| Product Name | Devices of the same model share one product; this article is created separately from other tutorials. Required · Enter: FastBee_Thermostat_Terminal |
2. Generate Fields from the Report Sample
Location: Device Access*→*Complete Access Information Steps: Paste the sample below into Generate Fields from JSON Sample and click Parse and Preview.

Only business fields are identified here; the device identity clientId is added in the actual TCP report later and is not modeled as a temperature Thing Model.
Key Points in the Screenshot
| Field / Control | Notes |
|---|---|
| JSON Sample and Field Format | A plain JSON object; the two business fields use integers and numbers are not written as strings. Required · Enter: {"FastBee_temperature":20,"FastBee_setpoint":30} |
| Parse and Preview | Generates field drafts from the business JSON sample; then verify item by item. Required · Enter: Parse and Preview |
3. Verify the Two Collection Points
Location: Device Access*→*Collection Point Table Steps: Set the Data Type of both items to Integer, and verify the names, units, and JSON paths.
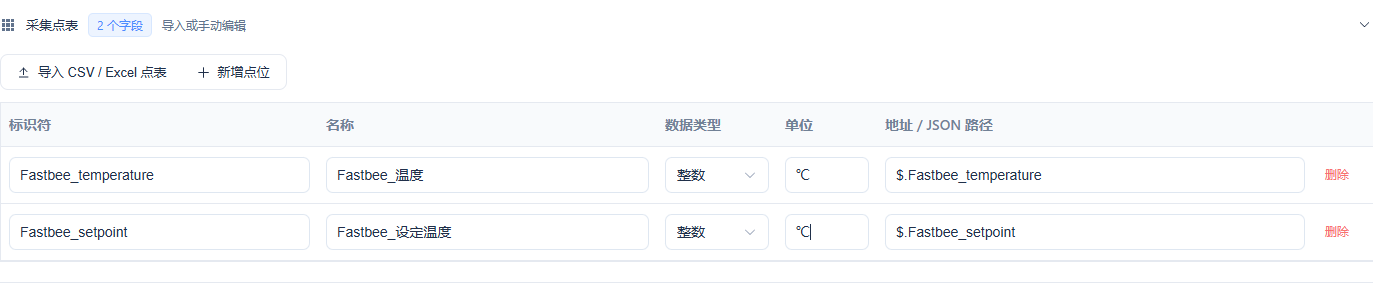
The temperature path is $.FastBee_temperature and the set temperature path is $.FastBee_setpoint; both use ℃ as the unit.
Key Points in the Screenshot
| Field / Control | Notes |
|---|---|
| Identifier / Name | The identifier must match the message key, case-sensitive; the name is used for page display. Required · Enter: FastBee_temperature / FastBee_Temperature; FastBee_setpoint / FastBee_Setpoint |
| Address / JSON Path | $ denotes the object root node; fields must match the actual keys. Required · Enter: $.FastBee_temperature / $.FastBee_setpoint |
| Data Type / Unit | Both fields use integers; the unit is degrees Celsius. Required · Enter: Integer / ℃ |
4. Enter the Unique Device Number
Location: Device Access*→*Device Information Steps: Enter Device Identifier FastBee_TCP_Tutorial_01 and device name FastBee_Thermostat_Terminal.

The clientId in the actual first frame must equal this number; do not use the device number from other tutorials.
Key Points in the Screenshot
| Field / Control | Notes |
|---|---|
| Device Identifier / clientId | A unique number per device; the clientId in the first complete TCP object uses the same number. Required · Enter: FastBee_TCP_Tutorial_01 |
| Device Name | A business name for page search, separate from the device's unique number. Required · Enter: FastBee_Thermostat_Terminal |
5. Complete the Wizard Creation
Location: Device Access*→*Confirm Access Configuration Steps: Verify the product, 1 device, and 2 fields; after the pre-check passes, click Create and Access.

The wizard currently shows JSON / MQTT first. This is the initial state of the creation process; the device is connected only after the next step withdraws the publish and switches to TCP.
Key Points in the Screenshot
| Field / Control | Notes |
|---|---|
| Create and Access | Created after the pre-check passes; the current wizard first generates a JSON/MQTT product, and TCP is switched in the next step. Required · Enter: Create after the pre-check passes |
2. Switch to TCP and Publish
The wizard currently creates JSON / MQTT first. After creation completes, enter this article's product details, withdraw the publish first, then edit it to JSON / TCP, and set the two Thing Model items; finally republish. Complete this adjustment only on the product newly created in this article; retained devices for re-verification do not need to repeat the withdrawal.
Temperature: integer, read-only, range -40~100℃, step 1, with chart display, real-time monitor, and history storage enabled. Set temperature: integer, writable, range 16~35℃, step 1, with chart display and real-time monitor disabled and history storage kept. Set the range first, then clear read-only; the two screenshots illustrate these two operation stages respectively.
6. Switch to JSON and TCP Access
Location: Product Management*→FastBee_Thermostat_Terminal→*Product Details Steps: Withdraw the publish first, then edit; select JSON as the data format and TCP as the transport, and save.
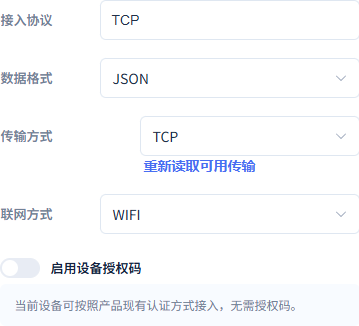
The final access protocol shows TCP. This article uses a complete JSON containing clientId to identify the identity; there is no extra 7E registration packet.
Key Points in the Screenshot
| Field / Control | Notes |
|---|---|
| Access Protocol / Data Format / Transport | The final configuration uses TCP access, JSON data format, and TCP transport. Required · Enter: TCP / JSON / TCP |
| Device Identity Location and Registration Method | This article locates the device at the administrator-designated entry with the first complete JSON containing clientId, and processes that business data once. Required · Enter: First frame clientId=FastBee_TCP_Tutorial_01; no extra 7E registration packet |
7. Set the Temperature Adjustment Range and Step
Location: Product Details*→Feature Definition→*FastBee_Setpoint Steps: Set the Value Range to 16~35, step 1, keep History Storage, and save.
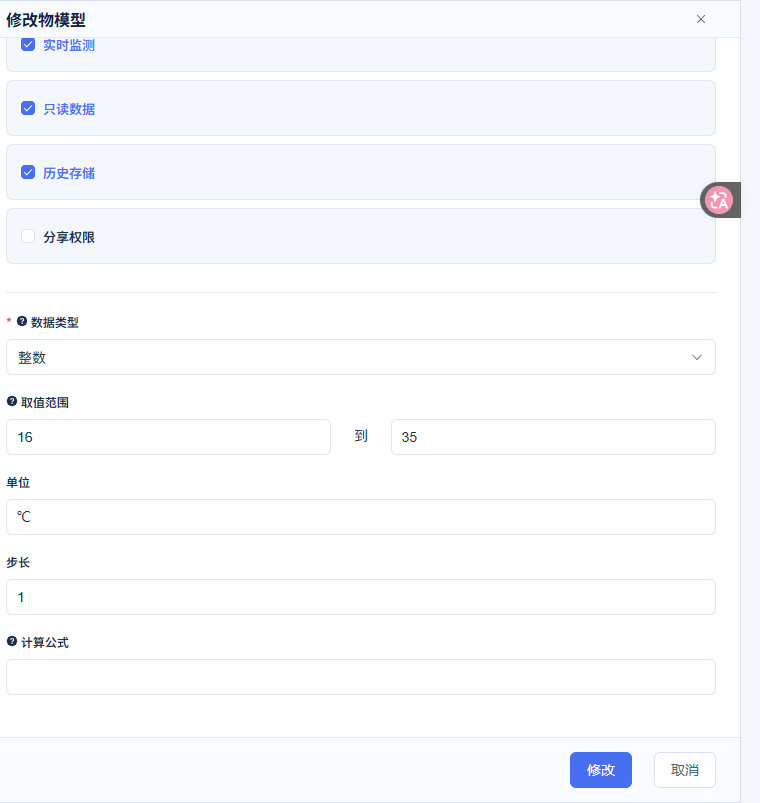
The picture shows the range-setting stage with read-only still checked; the next step completes the temperature field and then separately clears the set temperature read-only flag.
Key Points in the Screenshot
| Field / Control | Notes |
|---|---|
| Value Range / Step | Limits the control value and adjustment size; the integer step is 1. Required · Enter: Temperature -40~100℃; set temperature 16~35℃; step 1 for both |
| History Storage | When enabled, newly reported property values are saved for history queries. Required · Enter: Enabled for both fields |
8. Set Temperature Read-Only and History
Location: Product Details*→Feature Definition→*FastBee_Temperature Steps: Keep Read-only Data and History Storage enabled, with integer range -40~100 and step 1.
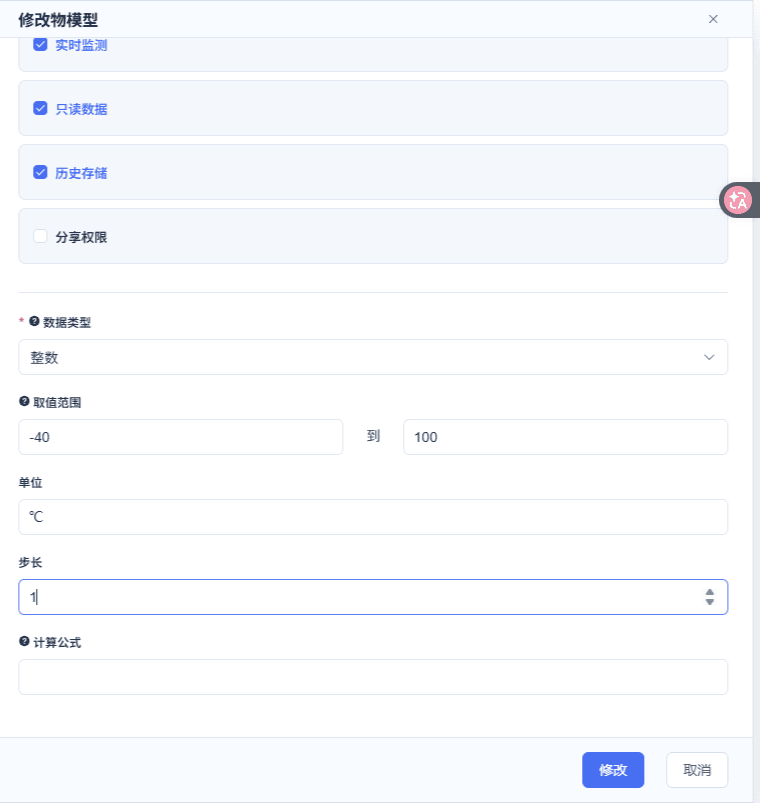
Temperature is used for collection, with chart display and real-time monitor enabled; the unit is ℃, and the model translation is Temperature.
Key Points in the Screenshot
| Field / Control | Notes |
|---|---|
| Read-only Data | Enabled means only reports are received; temperature adjustment can only be sent down after the set temperature clears read-only. Required · Enter: On for temperature; off for set temperature |
| History Storage | When enabled, newly reported property values are saved for history queries. Required · Enter: Enabled for both fields |
| Chart Display / Real-time Monitor | Enabled for temperature in this article; disabled for set temperature, which keeps the writable control card. Required · Enter: On for temperature; off for set temperature |
| Value Range / Step | Limits the control value and adjustment size; the integer step is 1. Required · Enter: Temperature -40~100℃; set temperature 16~35℃; step 1 for both |
9. Open Set Temperature Control
Location: Product Details*→Feature Definition→*FastBee_Setpoint Steps: Clear Read-only Data, chart display, and real-time monitor; keep History Storage; save.
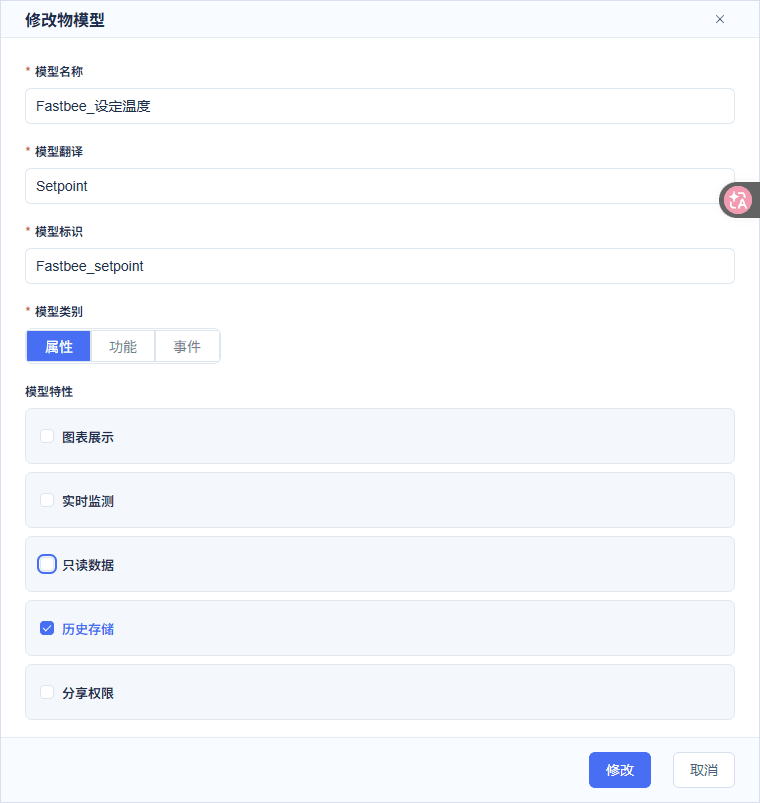
The final set temperature is writable, range 16~35℃ with step 1, and the model translation is Setpoint; do not use the out-of-range 42 when sending down.
Key Points in the Screenshot
| Field / Control | Notes |
|---|---|
| Read-only Data | Enabled means only reports are received; temperature adjustment can only be sent down after the set temperature clears read-only. Required · Enter: On for temperature; off for set temperature |
| History Storage | When enabled, newly reported property values are saved for history queries. Required · Enter: Enabled for both fields |
| Chart Display / Real-time Monitor | Enabled for temperature in this article; disabled for set temperature, which keeps the writable control card. Required · Enter: On for temperature; off for set temperature |
| Model Translation | When editing a field, fill in the English name as required by the page. Required · Enter: Temperature / Setpoint |
10. Publish and Confirm the Access Configuration Takes Effect
Location: Product Details*→*Publish and Sync Steps: Republish the product, confirm the protocol is TCP, and the access configuration shows Effective.

Save and publish prompts cannot replace the access configuration taking effect; this article has obtained the single-node application success receipt.
Key Points in the Screenshot
| Field / Control | Notes |
|---|---|
| Publish / Effective | Republish after saving, and confirm the access configuration is effective; do not rely on save success alone. Required · Enter: Effective |
3. Connect FMQX Web
The connection direction is FMQX actively connecting to FMQ's TCP listening entry. In this article both are on the same machine, address 127.0.0.1, port 8888. If the debugging tool is on another computer, 127.0.0.1 points to that computer itself and must be changed to the reachable address provided by the deployment administrator; do not fill in the platform web page or the MQTT port.
Copy the configuration below into a text file, save it as a UTF-8 file named "FastBee_TCP-connection-config.json", and import it into FMQX. The configuration is saved with a group; when finished, keep the session in the FastBee_TCP_Tutorial group. Later, select the saved session directly and do not import a same-named session again.
The initial state is temperature 29 and setpoint 30 inside the FMQX demo state machine. The first manually sent 20/30 is an independent business message and does not change the state machine temperature to 20; therefore the actual temperature read after execution is still 29. When switching to your own device, replace clientId and the two Thing Model keys accordingly, and implement execution and reporting according to the physical device.
TCP device demo connection configuration json
{

  "schemaVersion": 3,

  "groups": [

    {

      "id": "tutorial_tcp_group",

      "name": "TCP教程",

      "sortOrder": 51,

      "isSystem": false

    }

  ],

  "sessions": [

    {

      "id": "tutorial_tcp_01",

      "groupId": "tutorial_tcp_group",

      "name": "温控终端",

      "protocol": "TCP",

      "transport": "TCP",

      "host": "127.0.0.1",

      "port": 8888,

      "clientId": "demo-device",

      "tcpLineMode": false,

      "autoReconnect": false,

      "jsonDevice": {

        "format": "JSON",

        "responseRoute": "",

        "initialState": {

          "temperature": 29,

          "setpoint": 30

        }

      }

    }

  ]

}Contains no account password; before use, confirm the identity location and authentication conventions of this TCP entry with the deployment administrator. Replaceable customer template names are used here; check against the replacement list in this section before importing or sending.
11. Import the Device Demo Connection
Location: FMQX Web*→*More Actions Steps: Check the complete connection JSON of this section against the replacement list, save it as a UTF-8 file TCP-connection-config.json, then select Import Configuration.
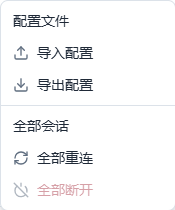
The imported configuration contains a real demo state machine: initial temperature 29, setpoint 30; the first business report is still sent manually as 20/30. The configuration contains no credentials.
Key Points in the Screenshot
| Field / Control | Notes |
|---|---|
| Import Configuration | Import the UTF-8 JSON below to create a TCP device demo session saved in the group. Required · Enter: TCP-connection-config.json |
| Retain Session and Stop Sending | When finished, close sending or scheduled tasks and disconnect; retain the group, product, device, and history. Required · Enter: FastBee_TCP_Tutorial → FastBee_Thermostat_Terminal |
12. Verify the Connection Direction and Address
Location: FMQX Web*→FastBee_Thermostat_Terminal→*Connection Configuration Steps: Verify Host / IP and Port, save the configuration, click Connect, and wait for Connected.
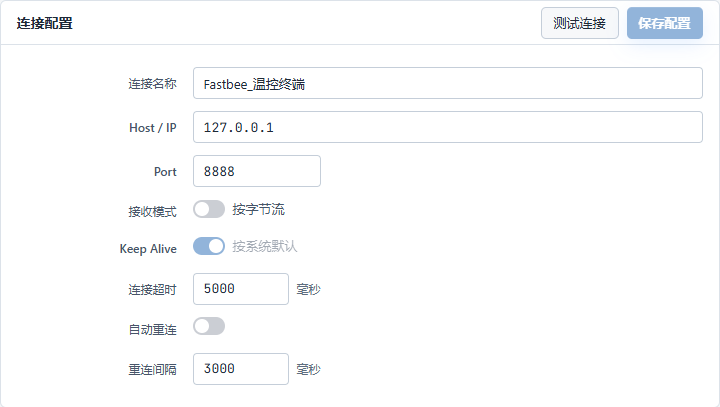
FMQX is the active connecting side and FMQ is the listening side; this article uses same-machine 127.0.0.1:8888, byte-stream mode, with auto reconnect off.
Key Points in the Screenshot
| Field / Control | Notes |
|---|---|
| Host / IP | The address of the FMQ access service that FMQX actively connects to. Required · Enter: 127.0.0.1 (same-machine demo in this article only) |
| Port | The TCP listening port of the access service; the connection direction is FMQX → FMQ. Required · Enter: 8888 (this article's deployment) |
| Receive Mode | This article sends and receives as a byte stream and does not enable line-based framing. Required · Enter: tcpLineMode=false |
| Keep Alive | Uses the system default TCP keep-alive check; it does not equal automatically sending business heartbeats or properties. Required · Enter: System default |
| Connect Timeout | The wait time for establishing a connection, in milliseconds. Required · Enter: 5000 ms |
| Auto Reconnect / Reconnect Interval | Auto reconnect is disabled in this article to observe disconnects and manual recovery; when disabled, the interval does not apply. Required · Enter: Off; interval shows 3000 ms |
| Connect / Disconnect | Starts or stops the current TCP connection; does not delete the product or history. Required · Enter: Connect |
4. Identity Location and Ten Temperature Reports
This article's entry uses the first complete JSON object containing clientId to locate the device; this frame is also processed once as ordinary business data. clientId must equal the platform Device Number. This article has no separate registration packet and does not send 7E registration or heartbeat; 7E has a separate supplementary tutorial. If your own device has independent TCP registration authentication enabled, configure it according to that product's formal rules.
First frame: device identity plus business properties json
{

  "clientId": "demo-device",

  "temperature": 20,

  "setpoint": 30

}clientId is the device number; temperature and set temperature are integers; the JSON must be completely closed. Replaceable customer template names are used here; check against the replacement list in this section before importing or sending.
13. Send the First Frame with Device Identity
Location: FMQX Web*→Messaging→*Send Data Steps: Select Text, fill in the first-frame complete JSON, and click Send.
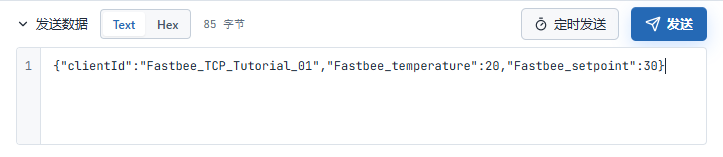
At 2026-10-12 23:31:32, reported temperature 20 and setpoint 30. The first frame both locates the device and processes business; each field is stored only once.
Key Points in the Screenshot
| Field / Control | Notes |
|---|---|
| Send Data | Select Text and fill in the complete JSON containing the device number; do not quote numbers. Required · Enter: {"clientId":"FastBee_TCP_Tutorial_01","FastBee_temperature":20,"FastBee_setpoint":30} |
| Device Identifier / clientId | A unique number per device; the clientId in the first complete TCP object uses the same number. Required · Enter: FastBee_TCP_Tutorial_01 |
| Device Identity Location and Registration Method | This article locates the device at the administrator-designated entry with the first complete JSON containing clientId, and processes that business data once. Required · Enter: First frame clientId=FastBee_TCP_Tutorial_01; no extra 7E registration packet |
14. Complete Ten Distinguishable Temperature Samples
Location: FMQX Web*→Messaging→*Send Steps: The first reading 20 has been sent; then change only the temperature each time, sending 21 through 29 in sequence, keeping the set temperature at 30.
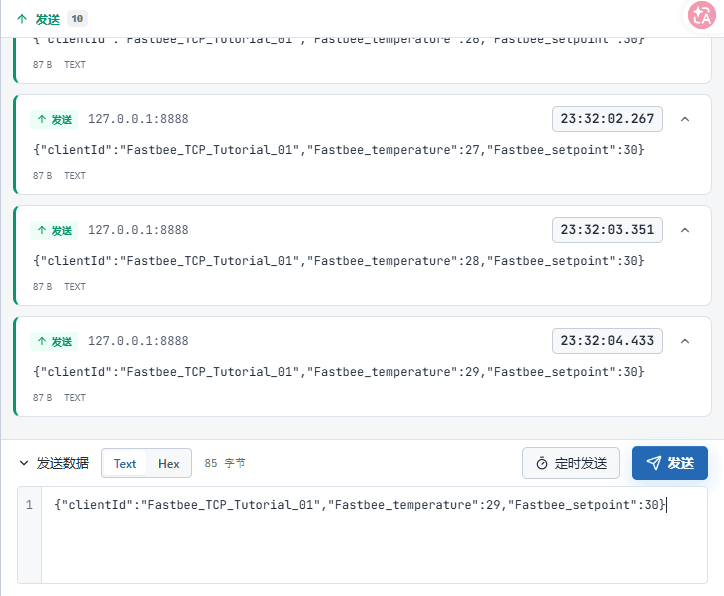
Ten base samples in total, from 23:31:32 to 23:32:04. The send list only means the messages were sent; the platform and history still need to be verified afterwards.
Key Points in the Screenshot
| Field / Control | Notes |
|---|---|
| Send Data | Select Text and fill in the complete JSON containing the device number; do not quote numbers. Required · Enter: {"clientId":"FastBee_TCP_Tutorial_01","FastBee_temperature":20,"FastBee_setpoint":30} |
The ten base samples this run are temperatures 20, 21, 22, 23, 24, 25, 26, 27, 28, 29, all with setpoint 30, from 2026-10-12 23:31:32 to 23:32:04 (Beijing time). For re-verification, also change each reading to a distinguishable value and record the new start and end times; do not take the send-list count as the number stored on the platform.
5. Verify Fragmentation, Packet Coalescing, and Single Processing
TCP transmits a continuous byte stream and does not guarantee that one send corresponds to one complete received message: one object may arrive in two parts, and two objects may arrive back to back. This article identifies boundaries by complete JSON objects and does not require each object to end with a newline; when demonstrating fragmentation and coalescing, set the line ending to None.
Send the first segment first, then verify that the platform does not prematurely produce a temperature 30; after completing the second segment, there should be only one 30. Then send the two consecutive objects 31 and 32 at once, each producing one record. Do not "patch success" by repeatedly clicking send, otherwise it becomes hard to tell omissions from duplicates.
Fragmentation first segment: sent only up to the middle of a field name text
{"clientId":"demo-device","temperSelect None as the line ending; this segment is not complete JSON and is not treated as a device property on its own. Replaceable customer template names are used here; check against the replacement list in this section before importing or sending.
15. Send Only Half a JSON Object
Location: FMQX Web*→Messaging→*Send Data Steps: Select None as the Line Ending, send only the first segment below, and do not append the tail yet.
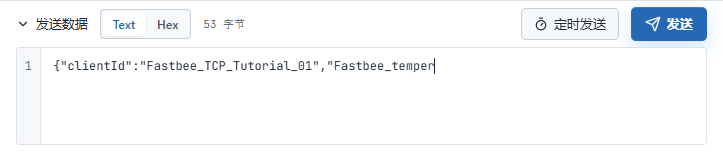
The first segment stops at FastBee_temper and the JSON is not yet closed; at this point no complete business record of temperature 30 should be generated.
Key Points in the Screenshot
| Field / Control | Notes |
|---|---|
| Message Boundaries and Fragmentation/Coalescing | TCP does not guarantee that one send corresponds to one receive; this article splits by complete JSON object boundaries and a half object waits for completion. Required · Enter: Fragmented 30; two consecutive objects 31 and 32 |
| Line Ending | Determines whether a newline is appended to each manual send. Required · Enter: Select None for fragmentation and coalescing |
Fragmentation second segment: appended after the first segment text
ature":30,"setpoint":30}Keep the same connection with line ending None; the two segments join into temperature 30, setpoint 30. Replaceable customer template names are used here; check against the replacement list in this section before importing or sending.
16. Complete the Fragment and Confirm Single Processing
Location: FMQX Web*→Messaging→*Send Data Steps: Keep None, send the second segment so the two parts join into one complete object.
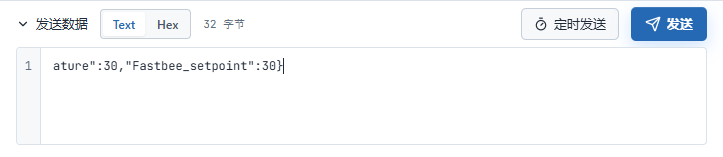
The second segment starts with ature; after completion, temperature 30 is processed only once. Do not resend the first segment, otherwise this boundary verification is invalidated.
Key Points in the Screenshot
| Field / Control | Notes |
|---|---|
| Message Boundaries and Fragmentation/Coalescing | TCP does not guarantee that one send corresponds to one receive; this article splits by complete JSON object boundaries and a half object waits for completion. Required · Enter: Fragmented 30; two consecutive objects 31 and 32 |
| Line Ending | Determines whether a newline is appended to each manual send. Required · Enter: Select None for fragmentation and coalescing |
Coalescing: send two adjacent JSON objects at once text
{"clientId":"demo-device","temperature":31,"setpoint":30}{"clientId":"demo-device","temperature":32,"setpoint":30}No comma between the two objects, no wrapping array, no newline; each carries the same device clientId. Replaceable customer template names are used here; check against the replacement list in this section before importing or sending.
17. Send Two Consecutive Objects at Once
Location: FMQX Web*→Messaging→*Send Data Steps: Keep None, place the two JSON objects below directly adjacent to each other, and click Send.
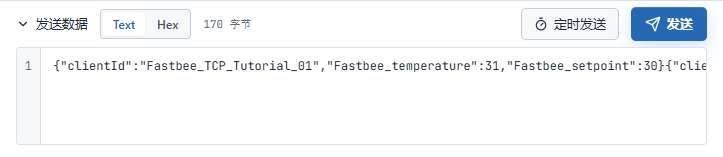
Send the two objects with temperatures 31 and 32 at once; the access service identifies them separately and stores each value only once; see the adjacent copyable message for the full content.
Key Points in the Screenshot
| Field / Control | Notes |
|---|---|
| Message Boundaries and Fragmentation/Coalescing | TCP does not guarantee that one send corresponds to one receive; this article splits by complete JSON object boundaries and a half object waits for completion. Required · Enter: Fragmented 30; two consecutive objects 31 and 32 |
| Line Ending | Determines whether a newline is appended to each manual send. Required · Enter: Select None for fragmentation and coalescing |
This run, the fragmented 30 at 23:35:00 and the coalesced 31 and 32 were each processed once, and the first frame 20 was also processed only once. At 23:36:27 an additional temperature 33 was sent for continuity verification, with setpoint still 30. When the history page displays by second, it may merge same-second data into one row; do not infer loss or duplication from page row count alone.
Send 32℃ and Confirm the Actual Status
Confirm item by item: the pending value, actual receipt, device execution, independent status report, and the platform current value. The examples in this section are new commands of this round; the counts are cumulative values of the retained session. The FMQX state machine demo does not replace physical device execution.
18. Adjust the Pending Setpoint to 32℃
Location: Device Management*→FastBee_Thermostat_Terminal→*Running Status Steps: Select 32 on the set temperature slider, verify the indicated value, and click Send Command.

Adjust the pending setpoint to 32℃
Key Points in the Screenshot
| Field / Control | Notes |
|---|---|
| Pending Set Temperature | The slider indication is the value about to be sent; the current value beside it comes from device reports. Required · Enter: 32 |
19. Confirm the Device Received the 32℃ Command
Location: FMQX Web*→Messaging→*Receive Steps: Expand this device's latest received message and verify the Set Temperature is 32.
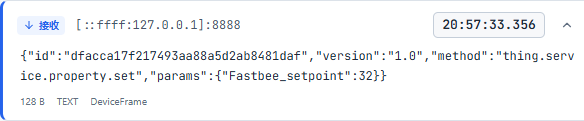
Confirm the device received the 32℃ command
Key Points in the Screenshot
| Field / Control | Notes |
|---|---|
| Receive / Send Log | Verify the command and response of the same number together; System and DeviceFrame are two kinds of display records. Required · Enter: Verify by command id; do not treat the receive-list row count as the execution count |
| Device Execution and Actual Status Report | The state machine executes upon receiving the command and replies automatically; actual properties are reported manually in this article. Required · Enter: This run 32℃, cumulative execution count 5; corresponding to the same command number |
20. Verify the Execution Response with the Same Number
Location: FMQX Web*→Messaging→*Send Steps: Read the Execution Response with the same number as the received request, and confirm success and set temperature 32.
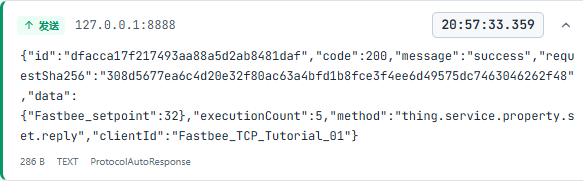
Verify the execution response with the same number
Key Points in the Screenshot
| Field / Control | Notes |
|---|---|
| Device Execution and Actual Status Report | The state machine executes upon receiving the command and replies automatically; actual properties are reported manually in this article. Required · Enter: This run 32℃, cumulative execution count 5; corresponding to the same command number |
| Receive / Send Log | Verify the command and response of the same number together; System and DeviceFrame are two kinds of display records. Required · Enter: Verify by command id; do not treat the receive-list row count as the execution count |
21. Independently Report the Actual Status After Execution
Location: FMQX Web*→FastBee_Thermostat_Terminal→*Messaging Steps: In this device's report entry, send the JSON with actual temperature 29 and set temperature 32.
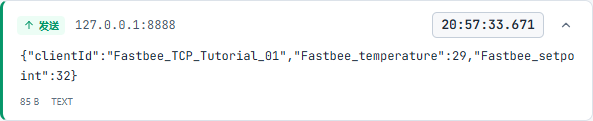
Independently report the actual status after execution
Key Points in the Screenshot
| Field / Control | Notes |
|---|---|
| Send Data | Select Text and fill in the complete JSON containing the device number; do not quote numbers. Required · Enter: Per the implementation plan · Example: {"clientId":"FastBee_TCP_Tutorial_01","FastBee_temperature":20,"FastBee_setpoint":30} |
| Actual Property JSON | TCP must also carry the device number clientId; MQTT WebSocket uses the current device's report topic. Required · Enter: {"FastBee_temperature":29,"FastBee_setpoint":32} |
22. View the Current 32℃ After the Independent Report
Location: Device Management*→FastBee_Thermostat_Terminal→*Running Status Steps: Return to Running Status and verify the Current Value shows 32.

View the current 32℃ after the independent report
Key Points in the Screenshot
| Field / Control | Notes |
|---|---|
| Current Value / Update Time | View the actual current value after the device's independent report. Required · Enter: This run temperature 29℃, setpoint 32℃ |
23. Open Statistics to View the History Curve
Location: Device Management*→Current Device→*Device Statistics Steps: Enter Device Statistics and verify the temperature after the curve loads for the first time.
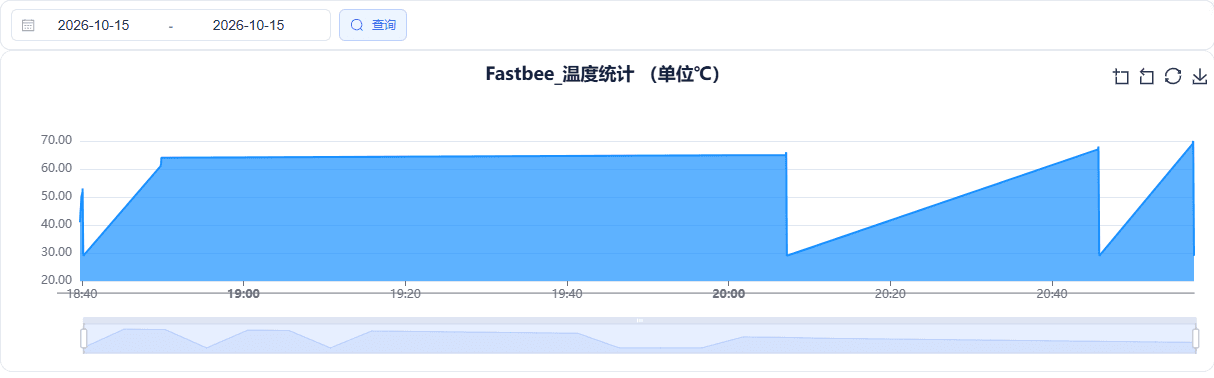
Open statistics to view the history curve
24. Select the Time Window of This 32℃ Report
Location: Data Center*→*Historical Data Steps: Select this device's set temperature, enter 2026-10-15 20:57:00 ~ 2026-10-15 20:58:00, and click Query.

Query the time range of this setpoint 32
25. Refresh This Set Temperature History
Location: Data Center*→*Historical Data Steps: Confirm the device and field are correct, then click Refresh Results.

Refresh this device's set temperature history
26. Verify the 32℃ Record Still Exists After Refresh
Location: Data Center*→*Historical Data Steps: Verify the Set Temperature is 32 with its corresponding report time; the earlier 31 belongs to a different message.

After refresh, verify the 32 from the independent status report
Restore the Connection When Needed (Original Operation Example)
The following is an independent operation example of restoring the connection from the original batch, retaining the original times and the 34 or 35 values. Execute it when recovery is needed; it and the new 32℃ command above are two independent verifications.
This connection was observed to drop after about 90 seconds of idleness. If the connection has dropped during re-verification, click Connect first, then restore the device identity with a complete object containing clientId; the deployment's idle policy may differ, so do not assume the connection stays up permanently. The state machine's setpoint 32 is retained after this reconnect.
The first property after recovery was sent manually at 23:44:32, temperature 29 and setpoint 32. Then a new target 34 was sent down; after verifying the new command and the actual execution response, the temperature 29 and setpoint 34 were reported manually at 23:45:27. There is no automatic periodic reporting here.
Actual 32℃ status reported manually after recovery json
{

  "clientId": "demo-device",

  "temperature": 29,

  "setpoint": 32

}Verify the state machine's real current value first, then click send manually. Replaceable customer template names are used here; check against the replacement list in this section before importing or sending.
27. Send Down the 34℃ Target After Recovery
Location: Device Management*→FastBee_Thermostat_Terminal→*Running Status Steps: Confirm the current value is 32, then adjust the target to 34 and click Send Command.

At 23:45:08 a new command was sent with target 34; the current value in the picture is still the previously reported actual 32.
Key Points in the Screenshot
| Field / Control | Notes |
|---|---|
| FastBee_Setpoint / Send Command | The slider is the target about to be sent; after clicking send, still verify device execution and the real report. Required · Enter: Original October 12 recovery example: 34℃ |
28. Confirm the New Command Is Received After Recovery
Location: FMQX Web*→Messaging→*Receive Steps: View the newly received message and verify the new id and FastBee_setpoint is 34.
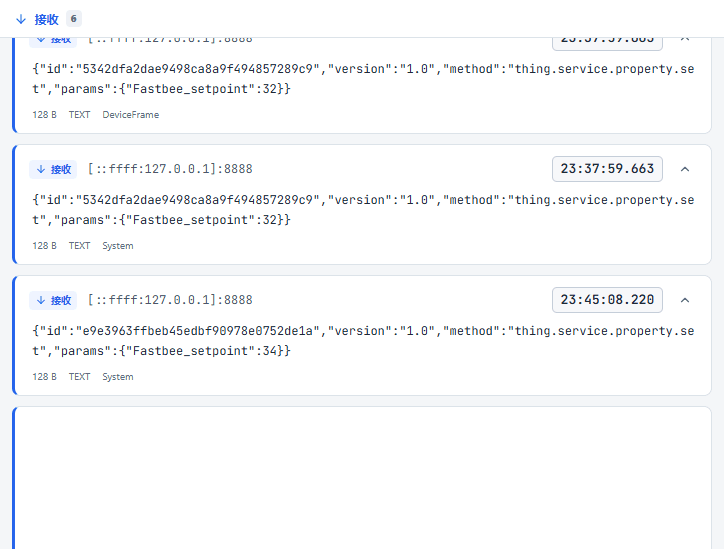
The new id is e9e3963ffbeb45edbf90978e0752de1a, different from the previous 32℃ command.
Key Points in the Screenshot
| Field / Control | Notes |
|---|---|
| Receive / Send Log | Verify the command and response of the same number together; System and DeviceFrame are two kinds of display records. Required · Enter: Verify by command id; do not treat the receive-list row count as the execution count |
| Device Execution and Actual Status Report | The state machine executes upon receiving the command and replies automatically; actual properties are reported manually in this article. Required · Enter: 32℃ response count 2; 34℃ response count 3; actual values reported manually for each |
29. Verify the 34℃ Execution Response
Location: FMQX Web*→Messaging→*Send Steps: Verify the response with the same number has code 200, data 34, and the execution count increased to 3.
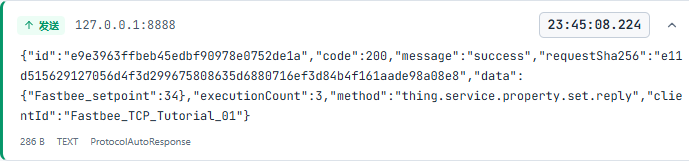
The real automatic response at 23:45:08.224; the state machine setpoint changed from 32 to 34; the three executions are preparation 30, formal 32, and post-recovery 34.
Key Points in the Screenshot
| Field / Control | Notes |
|---|---|
| Device Execution and Actual Status Report | The state machine executes upon receiving the command and replies automatically; actual properties are reported manually in this article. Required · Enter: 32℃ response count 2; 34℃ response count 3; actual values reported manually for each |
| Receive / Send Log | Verify the command and response of the same number together; System and DeviceFrame are two kinds of display records. Required · Enter: Verify by command id; do not treat the receive-list row count as the execution count |
Manual actual status report after the second execution json
{

  "clientId": "demo-device",

  "temperature": 29,

  "setpoint": 34

}A hardware device must execute and read back before generating this message; do not substitute the pending target value for the real status. Replaceable customer template names are used here; check against the replacement list in this section before importing or sending.
30. Manually Report the Actual 34℃ Status After Execution
Location: FMQX Web*→Messaging→*Send Data Steps: Fill in temperature 29 and setpoint 34 according to the real status, keep the JSON complete, and click Send.
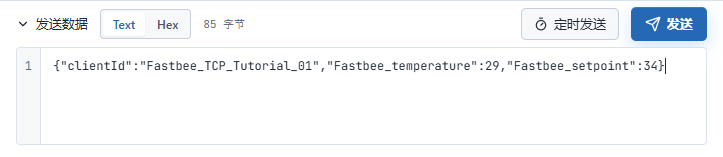
Manually triggered property report at 23:45:27. A hardware device must execute and read back first, then report the actual value; it cannot always reply success unconditionally.
Key Points in the Screenshot
| Field / Control | Notes |
|---|---|
| Send Data | Select Text and fill in the complete JSON containing the device number; do not quote numbers. Required · Enter: {"clientId":"FastBee_TCP_Tutorial_01","FastBee_temperature":29,"FastBee_setpoint":34} |
| Device Execution and Actual Status Report | The state machine executes upon receiving the command and replies automatically; actual properties are reported manually in this article. Required · Enter: 32℃ response count 2; 34℃ response count 3; actual values reported manually for each |
31. Verify the Platform's Actual Current Value
Location: Device Management*→FastBee_Thermostat_Terminal→*Running Status Steps: Refresh the device details, verify the FastBee_Setpoint current value is 34, and check the temperature and update time.

The latest actual temperature is 29 and setpoint 34, updated at 23:45:27. The gray slider in the picture is the state after the connection has stopped; the current value is still retained.
Key Points in the Screenshot
| Field / Control | Notes |
|---|---|
| Current Value / Update Time | Verify the latest actual property values and update time; the slider target cannot substitute for the execution result. Required · Enter: Temperature 29℃, setpoint 34℃; 2026-10-12 23:45:27 |
History of the Original Samples and Recovery Example (Separate Old Time Window)
This chapter continues to show the history records of the first ten samples and the original recovery operations, retaining the original dates and values; the history of the new 32℃ command above has its own separate time window. For re-verification, use the actual times of the current run and do not copy the old dates.
32. Select the Device Field and History Period
Location: Data Center*→*Historical Data Steps: Select this article's device and FastBee_Setpoint, set the time range to cover 2026-10-12 23:30~23:46, then query.

The screenshot's query window covers the actual send times. Later, switch to FastBee_Temperature when viewing temperature; old records require manually selecting 2026-10-12.
Key Points in the Screenshot
| Field / Control | Notes |
|---|---|
| Device / Property | On the history page, select this article's device and the temperature property to view. Required · Enter: FastBee_Thermostat_Terminal / FastBee_Setpoint |
| Time Range / Query / Paging | Query the window containing the send times; later pages of this article's screenshots show 32 and 34. Required · Enter: 2026-10-12 23:30~23:46 (Beijing time) |
33. Verify the History Values of the Execution Reports
Location: Data Center*→Historical Data→*Later Pages Steps: Turn to later pages and find the 32 at 23:44:32 and the 34 at 23:45:27.

These two values come from manual property reports, not automatically written from command targets or success responses. The page displays by second; multiple records in the same second may be merged for display.
Key Points in the Screenshot
| Field / Control | Notes |
|---|---|
| Time Range / Query / Paging | Query the window containing the send times; later pages of this article's screenshots show 32 and 34. Required · Enter: 2026-10-12 23:30~23:46 (Beijing time) |
34. Query History Again After Refresh
Location: Data Center*→*Historical Data Steps: Refresh the page, re-select the device, field, and the same time window, and Query again.

After refresh, 32 and 34 can still be found. This article actually has 16 records per field; the page presents 14 time rows, with the three 23:35:00 messages shown in the same second.
Key Points in the Screenshot
| Field / Control | Notes |
|---|---|
| Refresh History | After refreshing the page, re-select the device, field, and time window, and confirm the records can still be queried. Required · Enter: 23:44:32 is 32; 23:45:27 is 34 |
This article ends with 16 property history records per field: ten base samples, fragmented 30, coalesced 31 and 32, supplementary frame 33, actual 32 report, and actual 34 report, 32 property values in total. The three 23:35:00 messages occurred in the same second and the page presents 14 rows by time; technical verification compared each message by its independent correlation number one by one and confirmed no duplicate storage.
Query the set temperature first, then switch to temperature, and verify the actual values at the corresponding times; the latest actual temperature 29 and setpoint 34 must match. After refresh, re-select the same device, field, and time range; the records should still exist. Seeing only the current value or one success response cannot replace a history query.
9. Stop, Retain, and Re-Accept
35. Stop Business Sending and Retain the Data
Location: FMQX Web*→*FastBee_Thermostat_Terminal Steps: After completing the last property report, click Disconnect and retain the current session and device.

The last property at 23:45:27 has been stored, and the connection was then disconnected; this article did not enable scheduled sending or polling.
Key Points in the Screenshot
| Field / Control | Notes |
|---|---|
| Connect / Disconnect | Starts or stops the current TCP connection; does not delete the product or history. Required · Enter: Connect |
| Retain Session and Stop Sending | When finished, close sending or scheduled tasks and disconnect; retain the group, product, device, and history. Required · Enter: FastBee_TCP_Tutorial → FastBee_Thermostat_Terminal |
36. Recheck That the Saved Session Can Connect Again
Location: FMQX Web*→FastBee_TCP_Tutorial→*FastBee_Thermostat_Terminal Steps: Use the retained session, click Connect, and confirm Connected.

This picture is a status recheck of reconnecting after business verification completed; the 23:44 recovery send/receive was verified separately above and is not mixed into the same evidence.
Key Points in the Screenshot
| Field / Control | Notes |
|---|---|
| Connect / Disconnect | Starts or stops the current TCP connection; does not delete the product or history. Required · Enter: Connect |
| Retain Session and Stop Sending | When finished, close sending or scheduled tasks and disconnect; retain the group, product, device, and history. Required · Enter: FastBee_TCP_Tutorial → FastBee_Thermostat_Terminal |
37. End Sending/Receiving and Retain the Session
Location: FMQX Web*→*FastBee_Thermostat_Terminal Steps: Stop sending, click Disconnect, and confirm Disconnected.

End sending/receiving and retain the session
Key Points in the Screenshot
| Field / Control | Notes |
|---|---|
| Connect / Disconnect | Starts or stops the current TCP connection; does not delete the product or history. Required · Enter: Connect |
| Retain Session and Stop Sending | When finished, close sending or scheduled tasks and disconnect; retain the group, product, device, and history. Required · Enter: This run: FastBee_Common_Recheck → FastBee_Terminal_Recheck; the original tutorial group remains retained |
Product 873, device 1230, the two Thing Models, and all history have been retained. In FMQX, select FastBee_Thermostat_Terminal under the FastBee_TCP_Tutorial group; the Device Number must be FastBee_TCP_Tutorial_01. Ending only stops sending and closes the connection; it does not delete business resources.
When querying old data, select 2026-10-12 23:30~23:46. For a new acceptance, record a new start time first: connect, send at least 10 distinguishable samples, redo fragmentation and coalescing with None, send down a new target within 16~35℃, verify the execution response of the new id, then manually report the actual status; check the current value, history, records after refresh, and recovery send/receive.
Re-verification will add more history; count the new quantity separately from this article's 32-property-value baseline. Each field of each JSON object should be stored only once; if duplicates are found, stop sending first, retain the command ids, messages, pages, and times, and do not delete existing records. Finally close sending, polling, and the connection, and continue to retain the group and history.
Field and Parameter Reference
Device Access Wizard
| Field / Control | How to Fill |
|---|---|
| Access Source | Create a product for a new model for the first time; Existing Product is used to add devices of the same model. Required · Enter: New ProductExisting Product: reuses the protocol and Thing Model of an existing product; reuses the protocol and Thing Model of an existing product.New Product: creates a dedicated configuration for a new model; creates a dedicated configuration for a new model.Copy Product: adjusts after copying from an existing product; adjusts after copying from an existing product.Use Template: starts from a preset model or capability; starts from a preset model or capability. |
| Product Name | Devices of the same model share one product; this article is created separately from other tutorials. Required · Enter: FastBee_Thermostat_Terminal |
| JSON Sample and Field Format | A plain JSON object; the two business fields use integers and numbers are not written as strings. Required · Enter: {"FastBee_temperature":20,"FastBee_setpoint":30} |
| Parse and Preview | Generates field drafts from the business JSON sample; then verify item by item. |
| Identifier / Name | The identifier must match the message key, case-sensitive; the name is used for page display. Required · Enter: FastBee_temperature / FastBee_Temperature; FastBee_setpoint / FastBee_Setpoint |
| Address / JSON Path | $ denotes the object root node; fields must match the actual keys. Required · Enter: $.FastBee_temperature / $.FastBee_setpoint |
| Data Type / Unit | Both fields use integers; the unit is degrees Celsius. Required · Enter: Integer / ℃ |
| Device Identifier / clientId | A unique number per device; the clientId in the first complete TCP object uses the same number. Required · Enter: FastBee_TCP_Tutorial_01 |
| Device Name | A business name for page search, separate from the device's unique number. Required · Enter: FastBee_Thermostat_Terminal |
| Create and Access | Created after the pre-check passes; the current wizard first generates a JSON/MQTT product, and TCP is switched in the next step. |
Product Protocol Settings
| Field / Control | How to Fill |
|---|---|
| Access Protocol / Data Format / Transport | The final configuration uses TCP access, JSON data format, and TCP transport. Required · Enter: TCP / JSON / TCPMust be published after modification. |
| Device Identity Location and Registration Method | This article locates the device at the administrator-designated entry with the first complete JSON containing clientId, and processes that business data once. Required · Enter: First frame clientId=FastBee_TCP_Tutorial_01; no extra 7E registration packetMust be published after modification. |
Product Feature Definition
| Field / Control | How to Fill |
|---|---|
| Read-only Data | Enabled means only reports are received; temperature adjustment can only be sent down after the set temperature clears read-only. Required · Enter: On for temperature; off for set temperatureMust be published after modification. |
| History Storage | When enabled, newly reported property values are saved for history queries. Required · Enter: Enabled for both fieldsMust be published after modification. |
| Chart Display / Real-time Monitor | Enabled for temperature in this article; disabled for set temperature, which keeps the writable control card. Required · Enter: On for temperature; off for set temperatureMust be published after modification. |
| Value Range / Step | Limits the control value and adjustment size; the integer step is 1. Required · Enter: Temperature -40~100℃; set temperature 16~35℃; step 1 for bothMust be published after modification. |
| Model Translation | When editing a field, fill in the English name as required by the page. Required · Enter: Temperature / SetpointMust be published after modification. |
Publish and Effectiveness
| Field / Control | How to Fill |
|---|---|
| Publish / Effective | Republish after saving, and confirm the access configuration is effective; do not rely on save success alone. |
FMQX Connection Configuration
| Field / Control | How to Fill |
|---|---|
| Import Configuration | Import the UTF-8 JSON below to create a TCP device demo session saved in the group. Must reconnect after modification. |
| Host / IP | The address of the FMQ access service that FMQX actively connects to. Required · Enter: 127.0.0.1 (same-machine demo in this article only)Must reconnect after modification. |
| Port | The TCP listening port of the access service; the connection direction is FMQX → FMQ. Required · Enter: 8888 (this article's deployment)Must reconnect after modification. |
| Receive Mode | This article sends and receives as a byte stream and does not enable line-based framing. Required · Enter: tcpLineMode=falseMust reconnect after modification.Byte stream: keeps the TCP stream; complete JSON boundaries are identified by the access service; used in this article; keeps the TCP stream; complete JSON boundaries are identified by the access service; used in this article.By line: used only when the device and the access protocol agree on a line ending; not enabled in this article; used only when the device and the access protocol agree on a line ending; not enabled in this article. |
| Keep Alive | Uses the system default TCP keep-alive check; it does not equal automatically sending business heartbeats or properties. Required · Enter: System defaultMust reconnect after modification. |
| Connect Timeout | The wait time for establishing a connection, in milliseconds. Required · Enter: 5000 msMust reconnect after modification. |
| Auto Reconnect / Reconnect Interval | Auto reconnect is disabled in this article to observe disconnects and manual recovery; when disabled, the interval does not apply. Required · Enter: Off; interval shows 3000 msMust reconnect after modification. |
| Connect / Disconnect | Starts or stops the current TCP connection; does not delete the product or history. Must reconnect after modification. |
FMQX Messaging
| Field / Control | How to Fill |
|---|---|
| Send Data | Select Text and fill in the complete JSON containing the device number; do not quote numbers. Required · Enter: {"clientId":"FastBee_TCP_Tutorial_01","FastBee_temperature":20,"FastBee_setpoint":30} |
| Message Boundaries and Fragmentation/Coalescing | TCP does not guarantee that one send corresponds to one receive; this article splits by complete JSON object boundaries and a half object waits for completion. Required · Enter: Fragmented 30; two consecutive objects 31 and 32 |
| Line Ending | Determines whether a newline is appended to each manual send. Required · Enter: Select None for fragmentation and coalescingNone: appends no characters; must be selected for fragmentation and coalescing in this article; appends no characters; must be selected for fragmentation and coalescing in this article.CRLF: appends the two characters carriage return and line feed; used only when agreed by the device; appends the two characters carriage return and line feed; used only when agreed by the device.LF: appends one line feed character; used per the device convention; appends one line feed character; used per the device convention.CR: appends one carriage return character; used per the device convention; appends one carriage return character; used per the device convention. |
| Device Execution and Actual Status Report | The state machine executes upon receiving the command and replies automatically; actual properties are reported manually in this article. |
| Receive / Send Log | Verify the command and response of the same number together; System and DeviceFrame are two kinds of display records. |
Platform Running Status
| Field / Control | How to Fill |
|---|---|
| FastBee_Setpoint / Send Command | The slider is the target about to be sent; after clicking send, still verify device execution and the real report. |
| Current Value / Update Time | Verify the latest actual property values and update time; the slider target cannot substitute for the execution result. |
Platform Historical Data
| Field / Control | How to Fill |
|---|---|
| Device / Property | On the history page, select this article's device and the temperature property to view. Required · Enter: FastBee_Thermostat_Terminal / FastBee_Setpoint |
| Time Range / Query / Paging | Query the window containing the send times; later pages of this article's screenshots show 32 and 34. Required · Enter: 2026-10-12 23:30~23:46 (Beijing time) |
| Refresh History | After refreshing the page, re-select the device, field, and time window, and confirm the records can still be queried. |
Stop and Recovery
| Field / Control | How to Fill |
|---|---|
| Retain Session and Stop Sending | When finished, close sending or scheduled tasks and disconnect; retain the group, product, device, and history. |
| Device Statistics and History Curve | After entering for the first time, wait for the history curve to load, then verify data by field and time. |
| History Records of This Run | Verify the times and values of the independent status reports; different messages with the same value are not automatically considered duplicates. |
| Query Time of This Run | Use the full date and start/end times; screenshot input boxes may display in abbreviated form. |
Where to Check First When Problems Occur
| Symptom | Possible Cause | Where to Check First | How to Recover |
|---|---|---|---|
| Cannot connect, or the device is not recognized after connecting | The address, port, connection direction, or device number does not match. | FMQX actively connects to the TCP entry provided by the administrator; other computers must not use 127.0.0.1; the first frame must be complete and contain the correct clientId. | Fix and save, reconnect, then send only one complete sample. |
| The wizard in the picture is still MQTT and it is unclear which entry to connect to | This article's current wizard first creates an MQTT product; TCP is switched later. | Confirm the publish has been withdrawn, switched to JSON / TCP, and republished; the product header shows TCP and the access configuration is effective. | Complete the settings in Section 2 and use TCP entry 8888 or the port given by the administrator of this environment. |
| Sending works, but the platform temperature does not update | Field paths, clientId, product effectiveness, or JSON format do not match. | The key names equal the Thing Model identifiers and the values are integers; confirm the JSON is closed and the product is effective. | Send the first-frame sample one at a time, verify the device update time, then continue. |
| A half frame is processed early, or only one record appears for coalescing | A line ending was appended on send, the connection dropped, or the entry's message boundary configuration does not match. | Use None on the same TCP connection; verify the joining of the first and second segments; coalescing is two adjacent complete objects. | Stop repeated sending, record the actual raw text and period, fix, then test again with new distinguishable values. |
| No temperature adjustment entry, or the set value is outside the selectable range | The set temperature is still read-only, the display mode does not match, or the configuration was not republished. | Clear read-only, chart, and real-time monitor on the setpoint field; range 16~35, step 1; the product is effective. | Save and republish, refresh the device details, then send down a new in-range target. |
| Received two entries with the same id and thought it executed twice | The same message is displayed separately in System and DeviceFrame. | Verify the same id, that executionCount increases only once, and the actual status before and after execution. | Keep the logs for verification; do not resend the same temperature adjustment repeatedly to dispel doubts. |
| Received a success response, but the current value is unchanged | Only the execution response was returned; the actual property has not been reported yet. | First verify the same id, code=200, and the post-execution value, then check whether the actual property was sent manually or read back and reported by hardware. | Send the property message with the real current status, then refresh the current value and history. |
| History has only 14 rows and there is concern that 16 samples were lost | The page displays by second, and the three fragmentation and coalescing messages occurred in the same second, 23:35:00. | Verify the sample values, time window, paging, and message correlation numbers; do not substitute the page row count for per-message checks. | Keep the original send records and inspect the actual history; this article has uniquely matched 32 property values per field. |
| Real-time has a value but history cannot be found, or it disappears after refresh | History is not enabled, or the query time or field is wrong. | Check the history storage switches, device number, the 2026-10-12 date, and later pages. | Enable history and publish, then send new samples; reports before enabling are not backfilled automatically. |
| Disconnected after a period of inactivity | The entry's idle policy or the network ended the TCP connection. | Check the Connected status in FMQX; Keep Alive does not equal automatically sending business heartbeats. | Reconnect and send a complete object containing clientId, then redo report and new-command verification. |