

7E Registration and Heartbeat Access
This article is compiled from existing operation manuals as an online operation reference. Operations marked as expected or not executed in the source material must still be verified against the actual environment.
Configure the registration identity and complete ten-sample reporting, two rounds of temperature control, disconnect recovery, and stop-and-retain.
Before you start: You need permissions for products, models, devices, publishing, control, and history queries; you have obtained the TCP listen address, the platform device number, the raw HEX identity, and the real temperature property key; the FMQX web version is accessible; the physical device must implement execution and state readback
How 7E Registration, Heartbeat, and the Temperature Business Relate
This tutorial applies to devices that connect over TCP, use the 7E registration envelope as the first packet, and use JSON for business data. First create the product and a writable temperature model, then have the device register, report temperature, receive control, and independently report its post-execution state to the platform.
7E is not the name of the business protocol in this article: 7E80 plus the device's raw identity bytes plus 7E is used for registration; 7E817E is used for the heartbeat. Temperature is still carried by the real property key in JSON; registration and heartbeat do not automatically produce temperature history.
The FMQX web version provides a temperature control demo state machine, making it easy to observe actually received commands, execution events, responses, and the independent post-execution temperature report. In the web demo, a state change does not mean the physical hardware has executed; a real device must implement its own execution and readback logic.
One complete temperature control loop
Registration establishes the identity; both business temperature and post-execution state are carried over JSON.
Replace These Parameters Before Copying the Templates
The code in this article uses generic template names; the screenshots retain the actual historical resources. Complete the following checks before saving as a UTF-8 file or sending messages.
- In the YAML, device is the session alias of this flow; demo-session-id must be replaced with the real ID of this article's target session through session binding, while the session of action nodes remains device.
- Paste the definition in full first, validate it, and save the version; saving only proves the configuration was saved—runtime and device results are verified separately per step.
- runTag and reportTag are filled in by the user in the YAML variables or the GUI variable panel: both must start with FastBee followed by an underscore, then English letters, digits, underscores, or hyphens; reportTag uses a brand-new value for each independent report. The example placeholder words cannot be run directly.
- Parameter keys with Unicode escapes are the standard string syntax of the saved file—copy them exactly; replacing variables does not mean modifying the 7E registration frame, the heartbeat frame, or property identifiers. The registration identity and property names are still verified against the official configuration of the corresponding device in this article.
- The host, port, and listen direction in the connection file must be changed to the actual addresses of the current environment; 127.0.0.1 means the local machine running FMQX. When MQTT is involved, also verify the product number, username, subscription topics, and responseRoute; enter passwords only securely on the connection page.
- Group, session, and subscription ids are internal references of the import file; if you rename them, groupId must match the corresponding group id. Verify before importing, and do not create duplicate connections with the same name on a retained session.
- The code blocks are customer templates rewritten from existing password-free assets or original code; this version of the templates has not yet been proven to import successfully. Historical screenshots, send times, and business pass scope are still subject to the records of each step; do not treat template names as the actual resource names in the old evidence.
Prepare the Account and Connection Details Before Starting
The account needs permissions for product creation and editing, model editing, device adding and viewing, publishing, device control, and history queries. If you cannot see an entry, have the administrator grant the corresponding permissions before continuing with the original steps.
Obtain from the administrator the platform address, the TCP runtime node address and port, the device's platform number, the device's raw HEX registration identity, and the temperature property key. The device-side address must be reachable from the network where the device resides; 127.0.0.1 can only be used for same-machine demos.
Prepare an accessible FMQX web version and the temperature control demo connection material. For re-verification, reuse the retained official connection; when querying history, fill in the time range of this operation.
FMQX Web Version → Connection Management
| Field / Control | How to Fill In |
|---|---|
| Import Configuration | Import the temperature control demo connection material into the FMQX web version. |
| Temperature Control Demo Connection | Complete reporting, control, and recovery within the same official session. Required · Enter: Temperature Control Demo Connection |
| Initial Temperature Control Definition in the Imported Material | Describes the demo temperature starting point defined by the first imported material. |
FMQX Web Version → Official Temperature Control Connection Configuration
| Field / Control | How to Fill In |
|---|---|
| TCP Connection Address and Port | Connect the device session to the runtime node that provides the TCP listener. Required · Enter: <tcp-host>:<tcp-port>The reachable TCP listen address and port provided by the platform administrator. Reconnect after changing. |
| Receive Mode | Read downlink commands without newlines as a raw TCP byte stream. Required · Enter: Byte StreamReconnect after changing. Byte Stream: downlink bytes can participate in parsing as soon as they arrive, with no need to wait for a newline; downlink bytes can participate in parsing as soon as they arrive, with no need to wait for a newline. By Line: the message is output only after a line terminator arrives; not used in this scenario; the message is output only after a line terminator arrives; not used in this scenario. |
| Auto Reconnect | Determines whether to reconnect automatically after a disconnection. Required · Enter: OffReconnect after changing. |
| Connect | Establish the TCP connection of the selected official session. |
Create the JSON/TCP Temperature Product
The product defines the business parsing first. In this scenario, save the product draft first; the device record is then added manually in Device Management. Failure prompts for create-and-access in the TCP wizard are for troubleshooting only and are not the successful device creation path.
Replaceable temperature samplejson
{

  "<temperature-identifier>": 40

}Replace <temperature-identifier> with the device's real JSON key, such as temperature in the device documentation; do not treat a Chinese name as a protocol field. Replaceable customer template names are used here; verify against this section's replacement checklist before importing or sending.
1. Open the New Product Wizard
Location: Product Management*→*New Product Wizard Steps: In Product Management, click New Product.
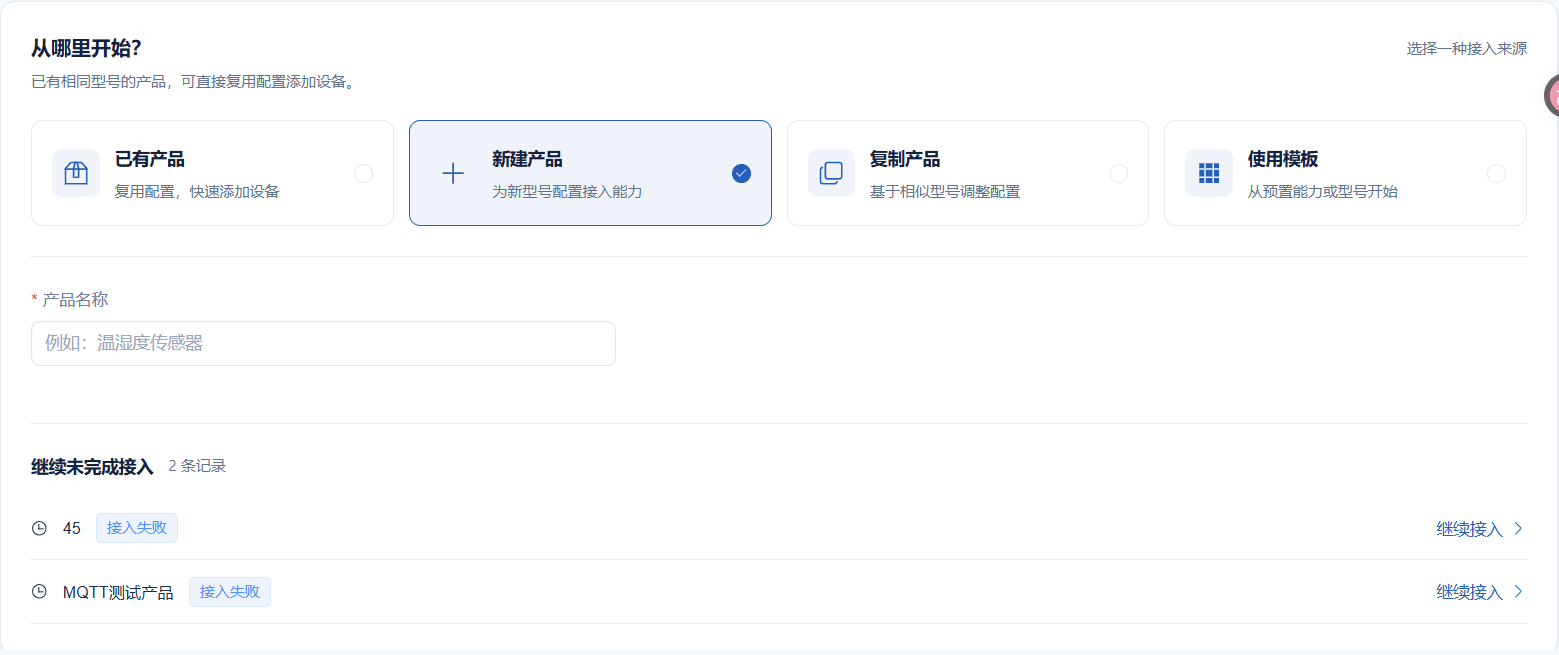
The wizard shows the New Product entry.
Screenshot Key Points
| Field / Control | Description |
|---|---|
| New Product | Open the New Product wizard and start defining an independent temperature product. Required · Enter: New Product |
2. Enter the Product Name
Location: Product Management*→*New Product Wizard Steps: In Product Name, enter Registered Temperature.
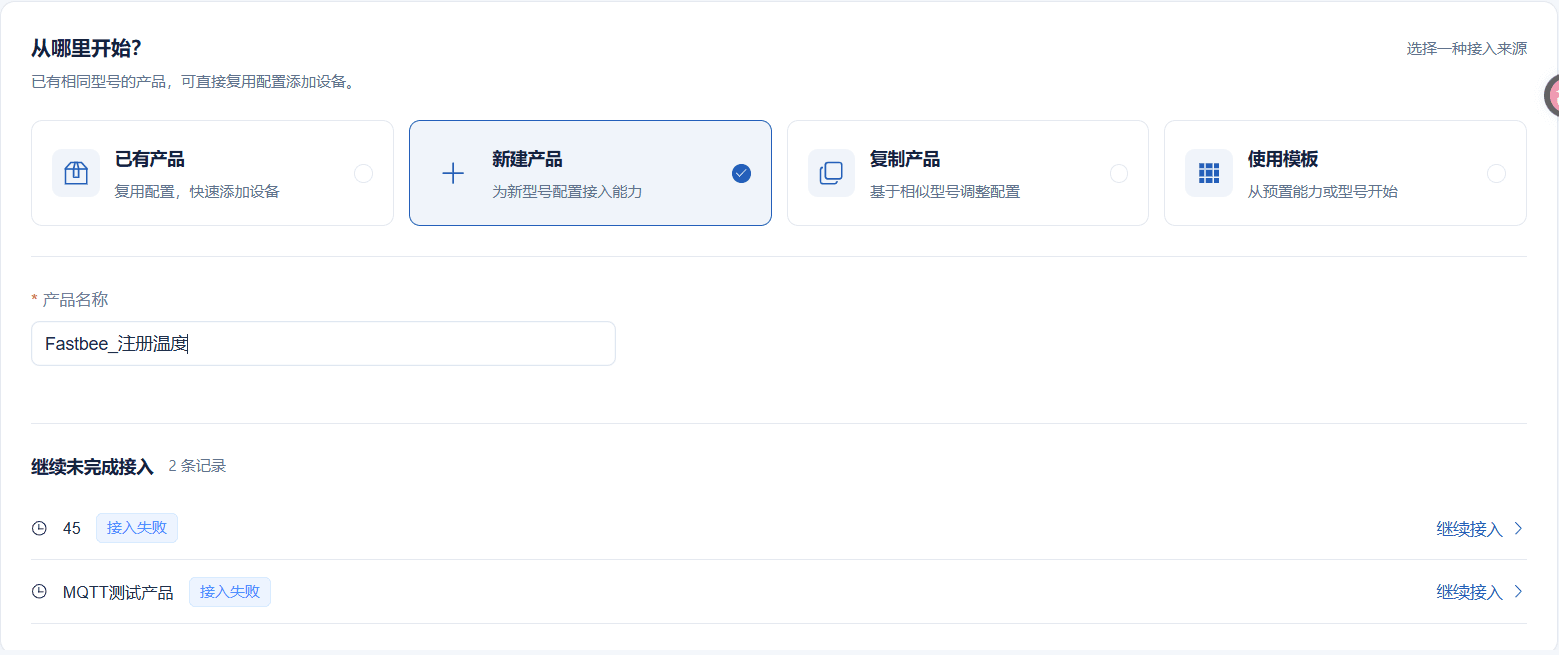
The form retains the new product name.
Screenshot Key Points
| Field / Control | Description |
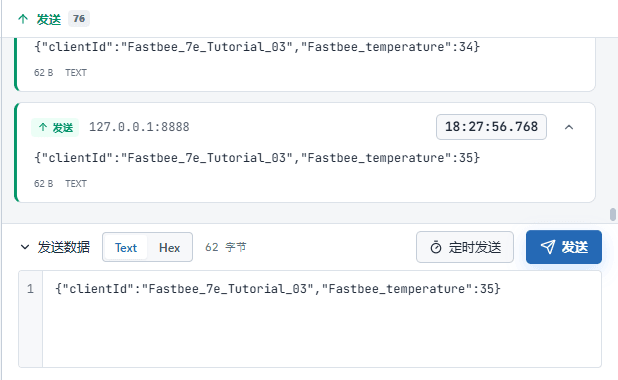
|---|---|
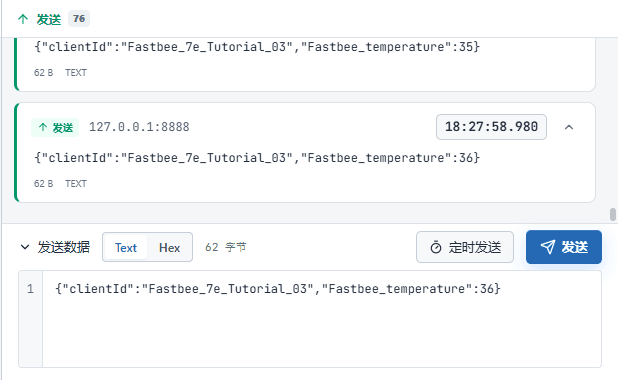
| Product Name | Use a recognizable name to distinguish the temperature product. Required · Enter: Registered Temperature |
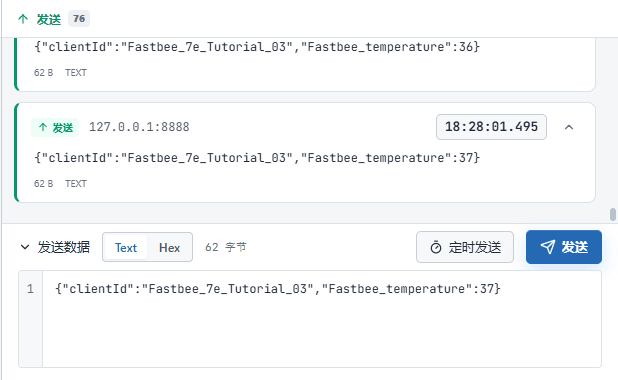
3. Select the JSON Business Protocol
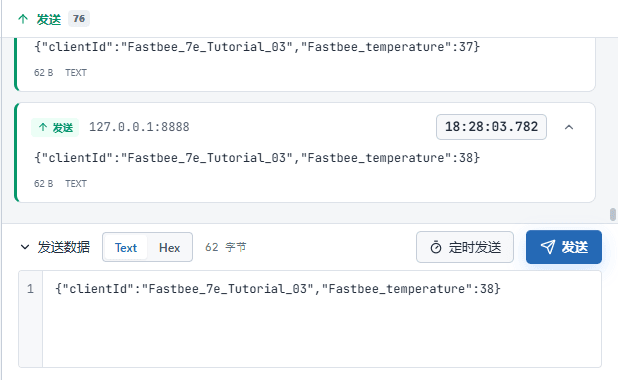
Location: Product Management*→*New Product Wizard Steps: In Business Protocol, select JSON.
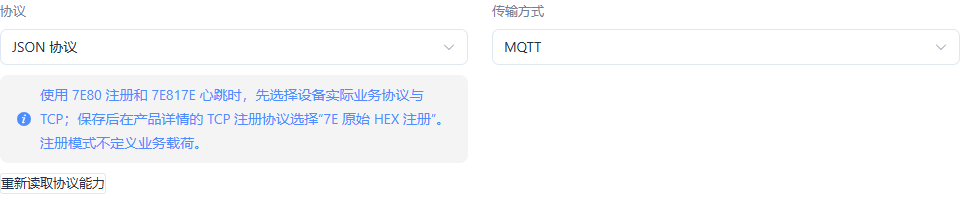
The business protocol shows JSON; 7E serves only as the later registration envelope.
Screenshot Key Points
| Field / Control | Description |
|---|---|
| Business Protocol | Determines how business messages are parsed into properties. Required · Enter: JSON |
4. Select TCP Transport
Location: Product Management*→*New Product Wizard Steps: In Transport Mode, select TCP.
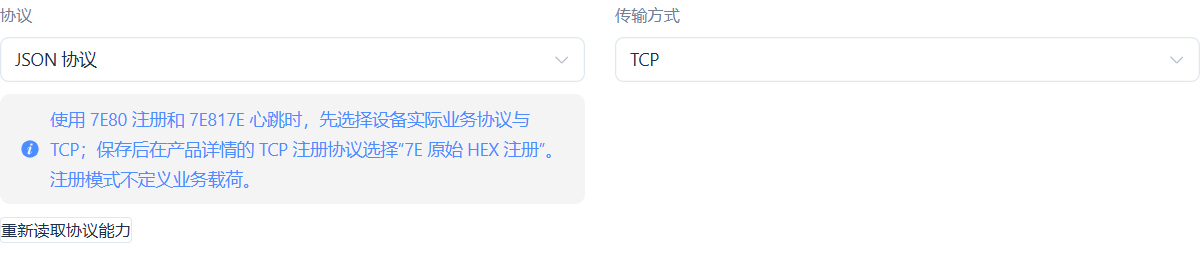
The transport mode shows TCP.
Screenshot Key Points
| Field / Control | Description |
|---|---|
| Transport Mode | Determines the transport channel the device connection uses. Required · Enter: TCP |
5. Enter the Real JSON Sample
Location: Product Management*→*New Product Wizard Steps: Fill the JSON sample with the replaced temperature identifier into Device JSON Sample.
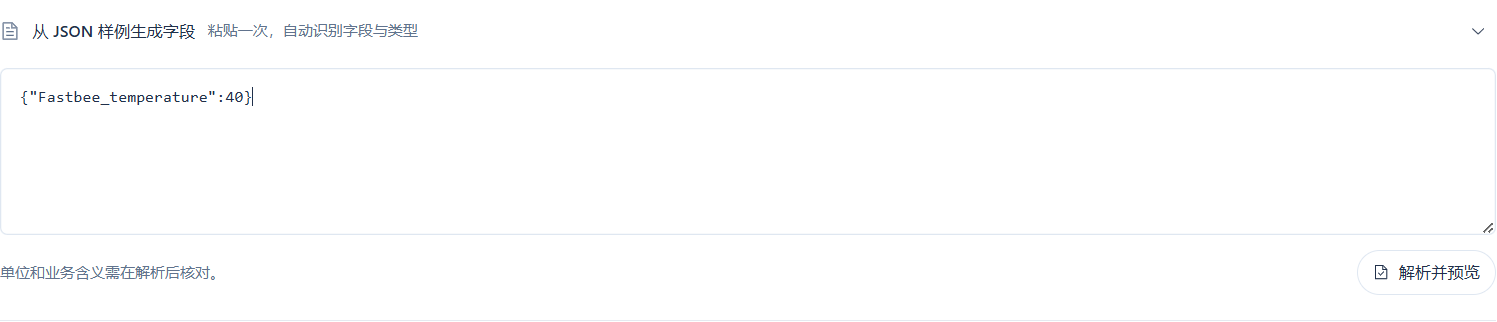
The sample contains one numeric temperature field.
Screenshot Key Points
| Field / Control | Description |
|---|---|
| Device JSON Sample | Parse the real business sample to generate a temperature field draft. Required · Enter: {"<temperature-identifier>":40} |
6. Parse the Sample
Location: Product Management*→*New Product Wizard Steps: Click Parse and Preview.
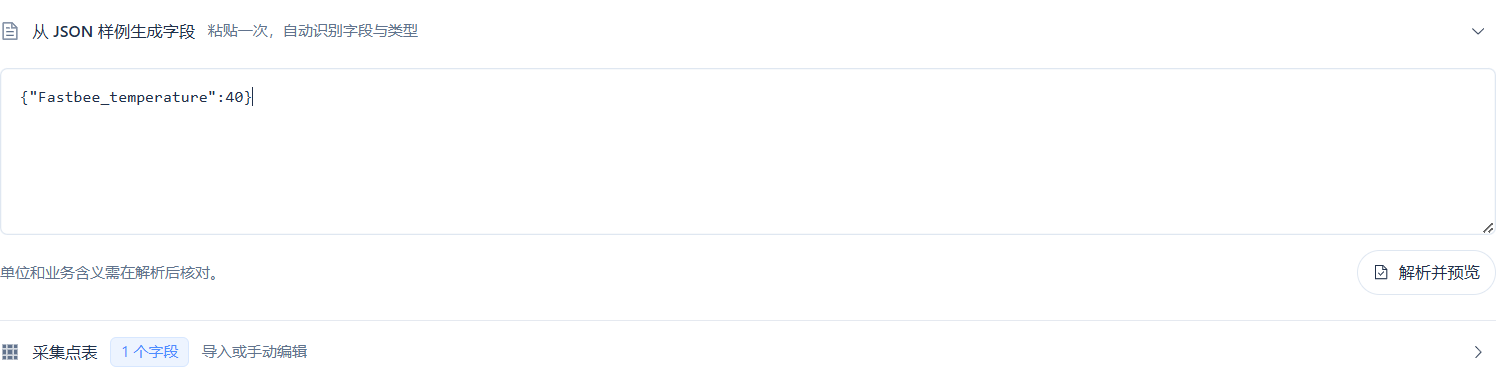
The data point table generates one temperature field.
Screenshot Key Points
| Field / Control | Description |
|---|---|
| Parse and Preview | Convert the sample keys and values into a checkable data point table. Required · Enter: Parse and Preview |
7. Verify the Temperature Data Point
Location: Product Management*→*New Product Wizard Steps: In Temperature Data Point, verify the identifier, integer type, Celsius unit, and JSON path.

The field corresponds to the device's actual temperature key.
Screenshot Key Points
| Field / Control | Description |
|---|---|
| Temperature Data Point | Corresponds to the property identifier, integer type, Celsius unit, and JSON path. Required · Enter: Temperature / integer / ℃ / $.<temperature-identifier> |
8. Check the Product Configuration
Location: Product Management*→*New Product Wizard Steps: Go to the confirmation page and check the Configuration Pre-check.
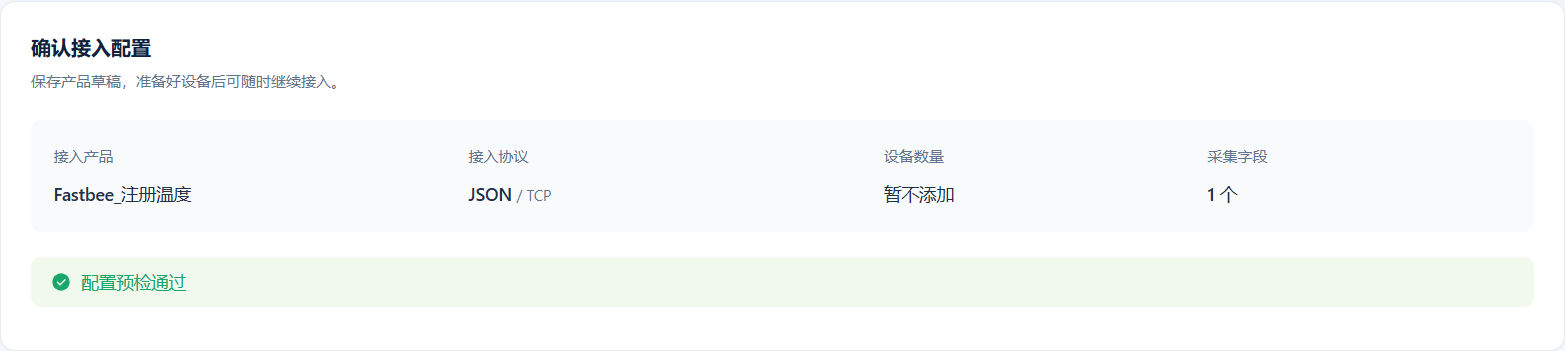
The product name, JSON/TCP, and one temperature field pass the pre-check.
Screenshot Key Points
| Field / Control | Description |
|---|---|
| Configuration Pre-check | Shows whether the product, protocol, transport, and fields are complete before submission. Required · Enter: Configuration Pre-check Passed |
9. Save the Product Draft
Location: Product Management*→*New Product Wizard Steps: Click Save Product Draft.

This submission only saves the product; the device is added manually afterwards.
Screenshot Key Points
| Field / Control | Description |
|---|---|
| Save Product Draft | Save the product first for later model configuration and manual device adding. Required · Enter: Save Product Draft |
10. Confirm the Product Is Saved
Location: Product Management*→*New Product Wizard Steps: Read the Product Draft Result.
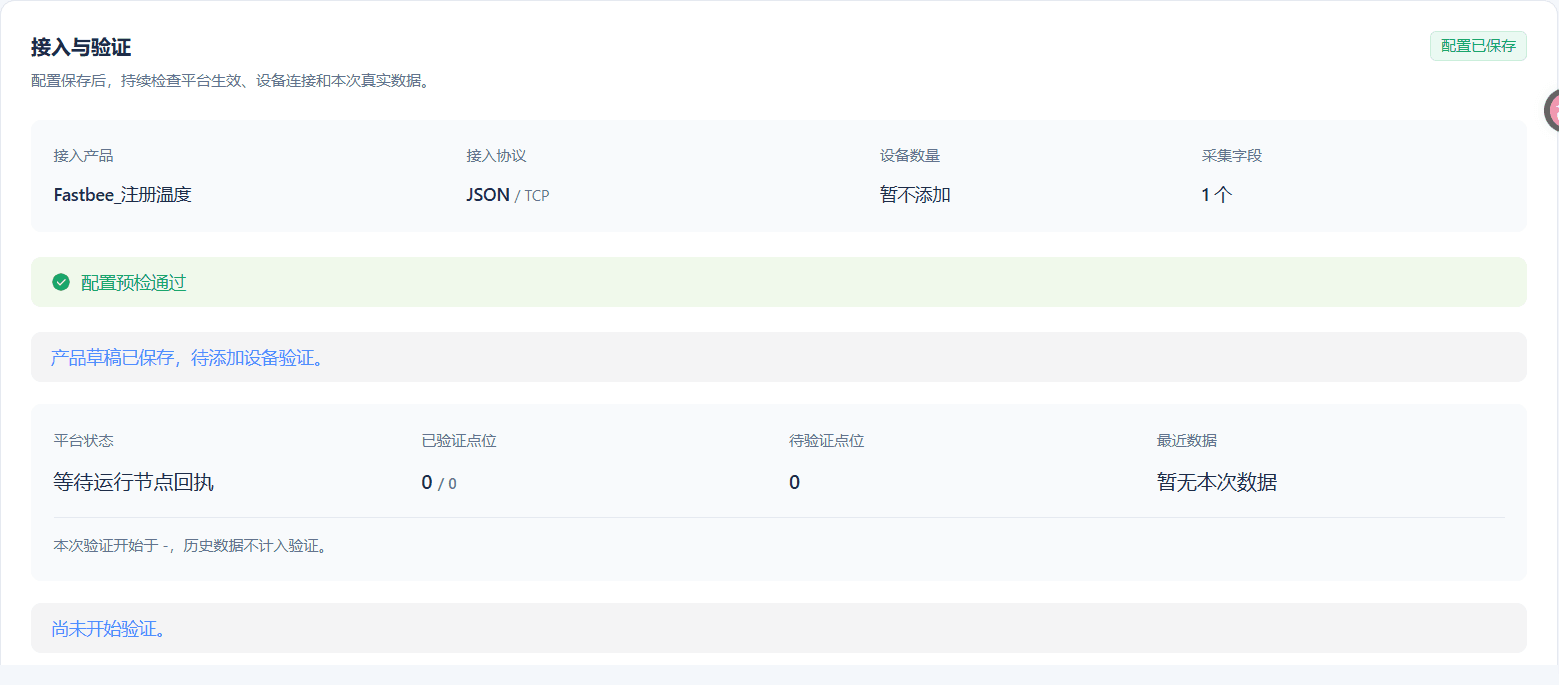
Feedback appears that the product draft has been saved and a device is pending to be added.
Screenshot Key Points
| Field / Control | Description |
|---|---|
| Product Draft Result | Indicates the product has been created and a device still needs to be added and verified. Required · Enter: Product Draft Saved |
11. Open the Saved Product
Location: Product Management*→*New Product Wizard Steps: In the product list, open the Registered Temperature product just saved.
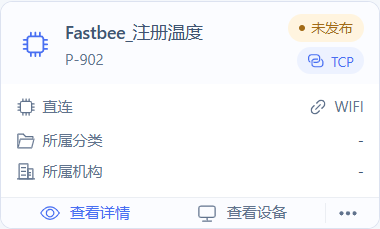
The list and details point to this article's independent product.
Screenshot Key Points
| Field / Control | Description |
|---|---|
| Product Draft Result | Indicates the product has been created and a device still needs to be added and verified. Required · Enter: Product Draft Saved |
Product Management → New Product Wizard
| Field / Control | How to Fill In |
|---|---|
| New Product | Open the New Product wizard and start defining an independent temperature product. |
| Product Name | Use a recognizable name to distinguish the temperature product. Required · Enter: Registered Temperature |
| Business Protocol | Determines how business messages are parsed into properties. Required · Enter: JSONJSON: map the temperature key in the JSON object to a property; map the temperature key in the JSON object to a property. |
| Transport Mode | Determines the transport channel the device connection uses. Required · Enter: TCPTCP: carry registration, heartbeat, and JSON business messages over a persistent TCP connection; carry registration, heartbeat, and JSON business messages over a persistent TCP connection. |
| Device JSON Sample | Parse the real business sample to generate a temperature field draft. Required · Enter: {"<temperature-identifier>":40} |
| Parse and Preview | Convert the sample keys and values into a checkable data point table. |
| Temperature Data Point | Corresponds to the property identifier, integer type, Celsius unit, and JSON path. Required · Enter: Temperature / integer / ℃ / $.<temperature-identifier> |
| Configuration Pre-check | Shows whether the product, protocol, transport, and fields are complete before submission. |
| Save Product Draft | Save the product first for later model configuration and manual device adding. |
| Product Draft Result | Indicates the product has been created and a device still needs to be added and verified. |
Confirm the Temperature Is Writable and History Is Retained
The demo model is actually saved as integer, minimum 0, maximum 100, unit ℃, history on, and read-only off. The range and unit for a real device should be filled in according to the device specifications; before turning off read-only, confirm that the device supports property setting.
When this demo clears read-only, the page also turns off chart display and real-time monitoring at the same time. The downlink and this round's current value 52 are verified through the device running status; the property report time and the actual history are correlated separately. The unit and value range are subject to the saved model details.
12. Open the Temperature Model
Location: Product Details*→Function Definition→*Temperature Property Steps: In Function Definition, open Modify Temperature Property.
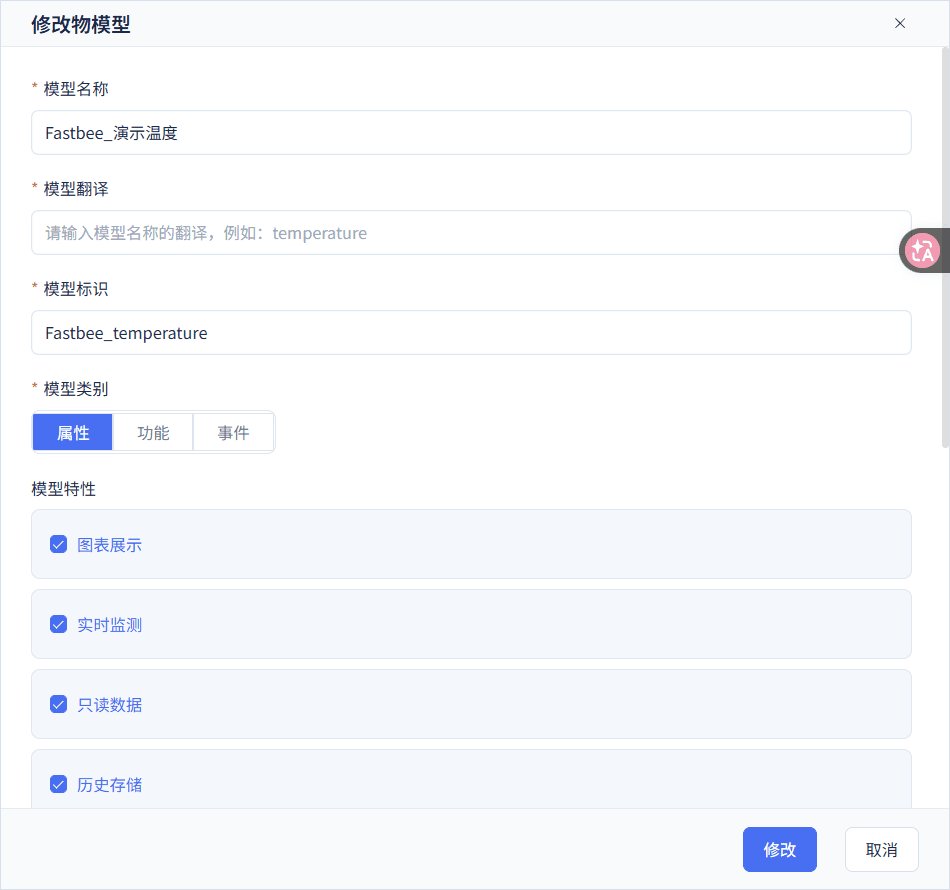
The edit window shows the generated temperature property.
Screenshot Key Points
| Field / Control | Description |
|---|---|
| Modify Temperature Property | Open the edit window of the generated temperature Thing Model. Required · Enter: Temperature Property |
13. Clear Read-Only and Keep History
Location: Product Details*→Function Definition→*Temperature Property Steps: Uncheck Read-Only Data and keep History Storage On.
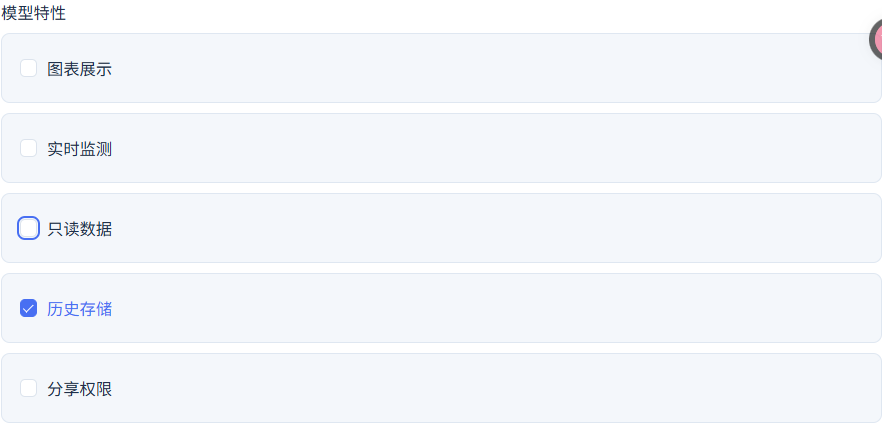
The temperature can be sent down and business history is retained; this round also turns off charts and real-time monitoring at the same time, and the result is verified from the running status.
Screenshot Key Points
| Field / Control | Description |
|---|---|
| Read-Only Data | Determines whether the platform can send temperature property settings down to the device. Required · Enter: Read-Only Off |
| History Storage | Retain temperature events for history queries and re-verification. Required · Enter: On |
14. Set the Integer Value Range
Location: Product Details*→Function Definition→*Temperature Property Steps: Set the integer value range to minimum 0 and maximum 100.

The real configuration screenshot shows minimum 0 and maximum 100; fill in the real-device range according to the device specifications.
Screenshot Key Points
| Field / Control | Description |
|---|---|
| Integer Minimum | Limits the minimum value allowed for the temperature property. Required · Enter: 0 |
| Integer Maximum | Limits the maximum value allowed for the temperature property. Required · Enter: 100 |
15. Save the Model Settings
Location: Product Details*→Function Definition→*Temperature Property Steps: Click Modify to save the model.

Submit the history, writable, and integer range settings.
Screenshot Key Points
| Field / Control | Description |
|---|---|
| Modify | Save the temperature model's history, write, range, and unit settings. Required · Enter: Modify |
16. Read Back the Saved Model
Location: Product Details*→Function Definition→*Temperature Property Steps: Return to Function Definition and verify the Model Saved Values.

History on, writable, integer 0 to 100, and unit ℃ are all subject to the read-back values.
Screenshot Key Points
| Field / Control | Description |
|---|---|
| History Storage | Retain temperature events for history queries and re-verification. Required · Enter: On |
| Read-Only Data | Determines whether the platform can send temperature property settings down to the device. Required · Enter: Read-Only Off |
| Integer Minimum | Limits the minimum value allowed for the temperature property. Required · Enter: 0 |
| Integer Maximum | Limits the maximum value allowed for the temperature property. Required · Enter: 100 |
| Temperature Unit | Attach the Celsius unit to the temperature display and history values. Required · Enter: ℃ |
| Model Saved Values | Verify that history on, writable, integer 0 to 100, and unit ℃ have actually been saved. Required · Enter: History on; writable; 0 to 100; ℃ |
Product Details → Function Definition → Temperature Property
| Field / Control | How to Fill In |
|---|---|
| Modify Temperature Property | Open the edit window of the generated temperature Thing Model. |
| History Storage | Retain temperature events for history queries and re-verification. Required · Enter: OnPublish after changing. |
| Read-Only Data | Determines whether the platform can send temperature property settings down to the device. Required · Enter: Read-Only OffPublish after changing. |
| Integer Minimum | Limits the minimum value allowed for the temperature property. Required · Enter: 0Publish after changing. |
| Integer Maximum | Limits the maximum value allowed for the temperature property. Required · Enter: 100Publish after changing. |
| Temperature Unit | Attach the Celsius unit to the temperature display and history values. Required · Enter: ℃Publish after changing. |
| Modify | Save the temperature model's history, write, range, and unit settings. Publish after changing. |
| Model Saved Values | Verify that history on, writable, integer 0 to 100, and unit ℃ have actually been saved. |
Manually Add the Device from Device Management
In the device list, move the mouse to the dropdown arrow area of Access Device, expand the menu, and select Manual Add; clicking the main button directly enters the device wizard.
The platform device number is the same as the JSON clientId; FABC0003 in the registration frame is the device's raw HEX identity, which is mapped to the platform record through a device-level override. Both should be jointly confirmed from the device documentation and the administrator.
17. Expand the Manual Add Device Menu
Location: Device Management*→Access Device→*Manual Add Steps: In Device Management, move the mouse to the dropdown arrow area of Access Device to expand the menu.

The Manual Add menu appears on hover; clicking the main button enters the wizard.
Screenshot Key Points
| Field / Control | Description |
|---|---|
| Access Device | Hover over the dropdown arrow area to expand the device creation method menu. Required · Enter: Dropdown arrow of Access Device |
18. Select Manual Add
Location: Device Management*→Access Device→*Manual Add Steps: In the access menu, select Manual Add.

Select the manual add path for a device of an existing product.
Screenshot Key Points
| Field / Control | Description |
|---|---|
| Manual Add | Create a device record for an existing JSON/TCP product. Required · Enter: Manual Add |
19. View the Manual Add Window
Location: Device Management*→Access Device→*Manual Add Steps: In the Manual Add window, locate Device Name.
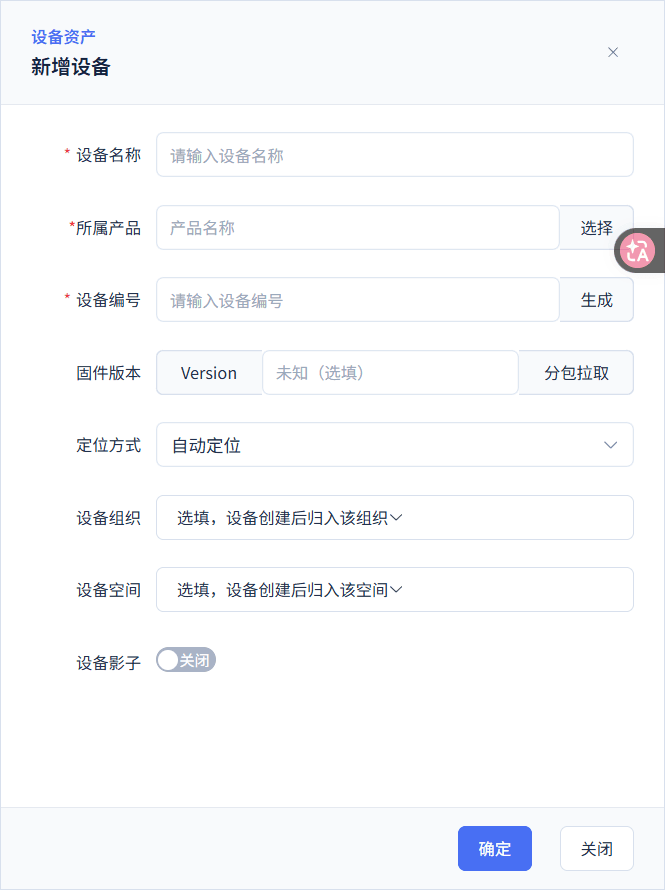
The window shows the name, number, and product fields.
Screenshot Key Points
| Field / Control | Description |
|---|---|
| Device Name | Give the device a recognizable business name. Required · Enter: Registered Temperature Controller |
20. Enter the Device Name
Location: Device Management*→Access Device→*Manual Add Steps: In Device Name, enter the recognizable name Registered Temperature Controller.

The device name has been entered but not yet submitted.
Screenshot Key Points
| Field / Control | Description |
|---|---|
| Device Name | Give the device a recognizable business name. Required · Enter: Registered Temperature Controller |
21. Enter the Platform Device Number
Location: Device Management*→Access Device→*Manual Add Steps: In Platform Device Number, enter the unique number of the current device.
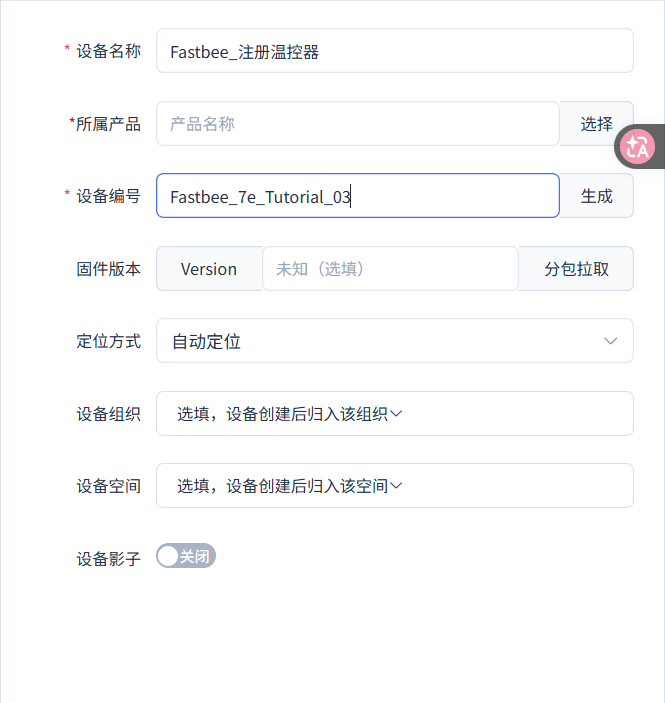
The number meets the 9-to-64-character requirement and stays consistent with the JSON clientId.
Screenshot Key Points
| Field / Control | Description |
|---|---|
| Platform Device Number | Serves as the shared identity of the platform device record and the JSON clientId. Required · Enter: <device-number> |
22. Find the Owning Product
Location: Device Management*→Access Device→*Manual Add Steps: In Owning Product, find the Registered Temperature product just saved.

This article's temperature product appears in the candidate list.
Screenshot Key Points
| Field / Control | Description |
|---|---|
| Owning Product | Bind the device to the correct JSON/TCP temperature product. Required · Enter: The Registered Temperature product just saved |
23. Select the Owning Product
Location: Device Management*→Access Device→*Manual Add Steps: In the product candidates, select the Registered Temperature product just saved.

The owning product is set to the correct JSON/TCP product.
Screenshot Key Points
| Field / Control | Description |
|---|---|
| Owning Product | Bind the device to the correct JSON/TCP temperature product. Required · Enter: The Registered Temperature product just saved |
24. Verify the Device–Product Relationship
Location: Device Management*→Access Device→*Manual Add Steps: Before submitting, verify the Platform Device Number and Owning Product, and also check the validation prompt under the number.
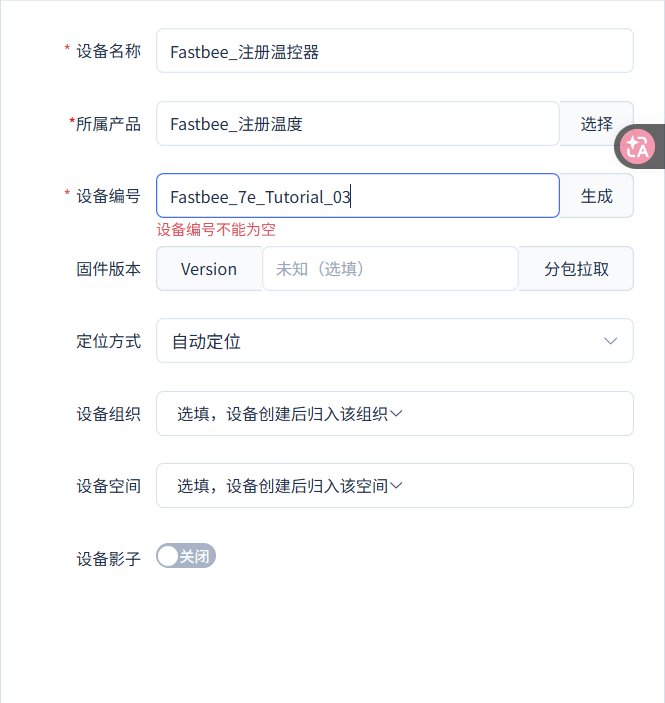
The number and owning product have been filled in; the screenshot still shows the red prompt "Device number cannot be empty".
Screenshot Key Points
| Field / Control | Description |
|---|---|
| Platform Device Number | Serves as the shared identity of the platform device record and the JSON clientId. Required · Enter: <device-number> |
| Owning Product | Bind the device to the correct JSON/TCP temperature product. Required · Enter: The Registered Temperature product just saved |
25. Save the Device
Location: Device Management*→Access Device→*Manual Add Steps: Click OK.

Save the current device relationship.
Screenshot Key Points
| Field / Control | Description |
|---|---|
| OK | Save the current device and its owning product relationship. Required · Enter: OK |
26. Confirm the Device Record Is Saved
Location: Device Management*→Access Device→*Manual Add Steps: In the device details, verify the Device Save Result.

This article's device record can be opened, and the number and owning product match.
Screenshot Key Points
| Field / Control | Description |
|---|---|
| Device Save Result | Shows the saved device number, product, and device record. Required · Enter: Device details can be opened |
Device Management → Access Device → Manual Add
| Field / Control | How to Fill In |
|---|---|
| Access Device | Hover over the dropdown arrow area to expand the device creation method menu. |
| Manual Add | Create a device record for an existing JSON/TCP product. |
| Device Name | Give the device a recognizable business name. Required · Enter: Registered Temperature Controller |
| Platform Device Number | Serves as the shared identity of the platform device record and the JSON clientId. Required · Enter: <device-number>The unique number from the device hardware documentation or assigned by the administrator. |
| Owning Product | Bind the device to the correct JSON/TCP temperature product. Required · Enter: The Registered Temperature product just saved |
| OK | Save the current device and its owning product relationship. |
| Device Save Result | Shows the saved device number, product, and device record. |
Configure the 7E Identity and Publish to the Runtime Node
The demo device's raw identity is FABC0003, and the registration packet is 7E80FABC00037E, 7 bytes in total. Hex sending transmits the bytes 7E, 80, FA, BC, 00, 03, 7E; the displayed string must not be re-encoded as ASCII.
The registration mode in this article has no registration ACK configured. No separate registration reply after sending does not directly mean failure; continue verifying the session identity, business reporting, and node status. Both save and publish prompts are intermediate results; only APPLIED on the target node proves the current node has applied it.
Registration envelope templatetext
7E80<identity-hex>7EObtain <identity-hex> from the device vendor and replace it; the demo FABC0003 corresponds to 7E80FABC00037E, sent as Hex. Replaceable customer template names are used here; verify against this section's replacement checklist before importing or sending.
Heartbeat raw bytestext
7E817EComplete registration first, then send as Hex; the heartbeat carries no temperature value. Replaceable customer template names are used here; verify against this section's replacement checklist before importing or sending.
27. Enter TCP Registration Manual Configuration
Location: Product Details*→TCP Registration→*Manual Configuration Steps: On the product TCP Registration page, click Manual Configuration.

Open the TCP registration draft editing.
Screenshot Key Points
| Field / Control | Description |
|---|---|
| Manual Configuration | Enter the product TCP registration draft configuration. Required · Enter: Manual Configuration |
28. Select the Built-in 7E Raw HEX
Location: Product Details*→TCP Registration→*Manual Configuration Steps: In Registration Mode and Identity Format, select 7E Raw HEX Registration.

The identity is parsed as raw HEX bytes.
Screenshot Key Points
| Field / Control | Description |
|---|---|
| Registration Mode and Identity Format | Recognize the first packet by the built-in 7E envelope; the device number is read as raw HEX bytes. Required · Enter: 7E Raw HEX Registration / HEX |
29. Bind the Device-Level HEX Identity
Location: Product Details*→TCP Registration→*Manual Configuration Steps: Set the current device's Raw Hexadecimal Bytes of the Device Number to the demo value FABC0003.

The current device-level override is the same as the identity in the registration frame.
Screenshot Key Points
| Field / Control | Description |
|---|---|
| Raw Hexadecimal Bytes of the Device Number | Map the current device record override to the raw identity bytes in the registration frame. Required · Enter: FABC0003 |
30. Enter the Registration Validation Vector
Location: Product Details*→TCP Registration→*Manual Configuration Steps: In Registration Validation Vector, enter the raw registration frame and the expected identity.
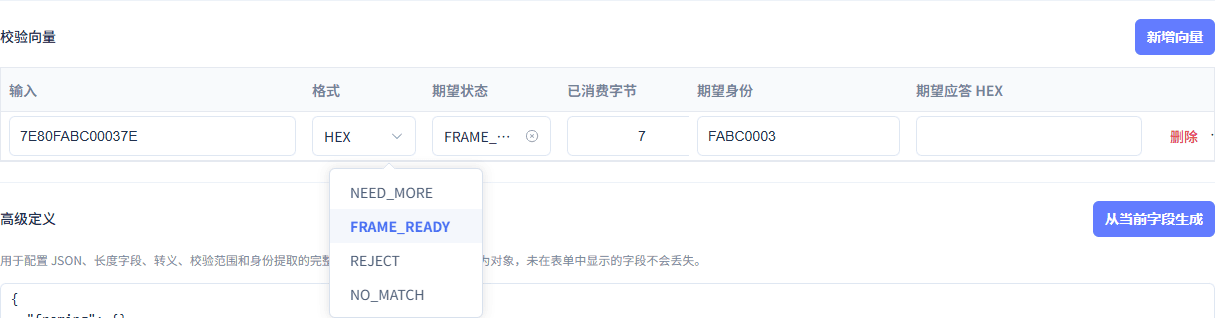
The raw registration frame, 7 bytes, identity FABC0003, and the dropdown option FRAME_READY are all readable.
Screenshot Key Points
| Field / Control | Description |
|---|---|
| Registration Validation Vector | Use the raw registration frame to check identity extraction and the complete frame length. Required · Enter: 7E80FABC00037E → FABC0003 / 7 bytes / FRAME_READY |
31. Save the Registration Draft
Location: Product Details*→TCP Registration→*Manual Configuration Steps: Click Save Draft.

The device override and validation vector are written into the draft.
Screenshot Key Points
| Field / Control | Description |
|---|---|
| Save Draft | Save the registration mode, device-level override, and test vector. Required · Enter: Save Draft |
32. Verify the Draft Version
Location: Product Details*→*Publish and Sync Details Steps: Read the draft version in the current Draft and Published Versions.

This article has saved registration draft version 6.
Screenshot Key Points
| Field / Control | Description |
|---|---|
| Draft and Published Versions | Verify that the current registration draft and the published version are the same. Required · Enter: 6 / 6 |
33. Run the Real Registration Validation
Location: Product Details*→TCP Registration→*Manual Configuration Steps: Run the Real Validation and read the result returned by the node.

The real validation passes and the definition summary matches the current draft.
Screenshot Key Points
| Field / Control | Description |
|---|---|
| Real Validation | The runtime node actually checks the current registration definition. Required · Enter: Validation Passed |
34. Confirm Publishing the Product
Location: Product Details*→*Publish and Sync Details Steps: In the publish confirmation window, click OK.
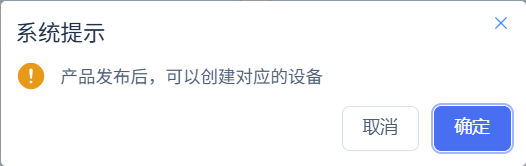
The publish confirmation window uses "OK" to submit the current product.
Screenshot Key Points
| Field / Control | Description |
|---|---|
| OK | Confirm submission of the publish of the current product and registration configuration. Required · Enter: OK |
35. Read the Publish Feedback
Location: Product Details*→*Publish and Sync Details Steps: Read the Publish Result.
The publish success prompt appears; next continue verifying the node's actual application.
Screenshot Key Points
| Field / Control | Description |
|---|---|
| Publish Result | Read the publish task completion feedback and continue checking the node's actual effect. Required · Enter: Publish Succeeded |
36. View the Product Publish and Access Configuration Summary
Location: Product Details*→*Publish and Sync Details Steps: At the top of the product details, view the Product Publish and Access Configuration Summary.

The top of the product shows "Published" and "Access Configuration Effective"; see step 38 for node application details.
Screenshot Key Points
| Field / Control | Description |
|---|---|
| Product Publish and Access Configuration Summary | Read the publish and access configuration summary status at the top of the product. Required · Enter: Published; Access Configuration Effective |
37. Verify the Publish Version Matches
Location: Product Details*→*Publish and Sync Details Steps: Verify that both Draft and Published Versions are 6.

Draft 6 and published 6 are the same.
Screenshot Key Points
| Field / Control | Description |
|---|---|
| Draft and Published Versions | Verify that the current registration draft and the published version are the same. Required · Enter: 6 / 6 |
38. Verify the Runtime Node Is Available
Location: Product Details*→*Publish and Sync Details Steps: Check the target node's Node Application Status and its ability to accept new connections.

The current local single node is available and has loaded the corresponding registration and JSON definitions.
Screenshot Key Points
| Field / Control | Description |
|---|---|
| Node Application Status | Indicates that the current target node has applied this product snapshot. Required · Enter: APPLIED |
Product Details → TCP Registration → Manual Configuration
| Field / Control | How to Fill In |
|---|---|
| Manual Configuration | Enter the product TCP registration draft configuration. |
| Registration Mode and Identity Format | Recognize the first packet by the built-in 7E envelope; the device number is read as raw HEX bytes. Required · Enter: 7E Raw HEX Registration / HEXPublish after changing. 7E Raw HEX Registration: raw hexadecimal byte identity; the displayed characters are not re-encoded as ASCII; raw hexadecimal byte identity; the displayed characters are not re-encoded as ASCII. |
| Raw Hexadecimal Bytes of the Device Number | Map the current device record override to the raw identity bytes in the registration frame. Required · Enter: FABC0003The raw HEX identity given by the device vendor and the device relationship confirmed by the administrator. Publish after changing. |
| Registration Validation Vector | Use the raw registration frame to check identity extraction and the complete frame length. Required · Enter: 7E80FABC00037E → FABC0003 / 7 bytes / FRAME_READYPublish after changing. |
| Save Draft | Save the registration mode, device-level override, and test vector. Publish after changing. |
| Real Validation | The runtime node actually checks the current registration definition. |
| Registration Frame Boundaries and Capability Limits | The registration envelope is 7E80 plus the raw identity bytes plus 7E; the heartbeat is 7E817E. |
Product Details → Publish and Sync Details
| Field / Control | How to Fill In |
|---|---|
| OK | Hand the product, model, and registration configuration to the runtime node for application. |
| Publish Result | Read the publish task completion feedback and continue checking the node's actual effect. |
| Node Application Status | Indicates that the current target node has applied this product snapshot. |
| Draft and Published Versions | Verify that the current registration draft and the published version are the same. |
| Product Publish and Access Configuration Summary | Read the publish and access configuration summary status at the top of the product. |
Set Up the Official Temperature Control Demo Connection
The first initial definition of the temperature control connection is written in the imported material; the connection configuration page has no initial-value input box. The earlier part retains the October 14 reference screenshot of read-only state 52 with 8 executions; the later October 15 new run's internal initial value 40 with 0 executions is verified separately by that round's independent state record.
Select Byte Stream for the receive mode. By-line reception waits for a newline, and in this scenario the downlink JSON has no newline, causing a wait timeout. After changing the receive mode, save first, then reconnect and register.
Below is the portable connection material: replace the TCP host, port, device number, and property key before importing; 40 is only the temperature control starting point of the first import. The scheduled heartbeat is disabled by default; start it after registration and content verification.
Replaceable temperature control connection materialjson
{

  "schemaVersion": 3,

  "sessions": [

    {

      "name": "Registered Temperature Control Demo",

      "protocol": "TCP",

      "host": "<tcp-host>",

      "port": 8888,

      "clientId": "<device-number>",

      "timeoutMs": 5000,

      "autoReconnect": false,

      "tcpLineMode": false,

      "jsonDevice": {

        "format": "JSON",

        "initialState": {

          "<temperature-identifier>": 40

        },

        "responseRoute": ""

      },

      "scheduledSend": {

        "enabled": false,

        "intervalMs": 30000,

        "repeatCount": 0,

        "sendOnConnect": false,

        "sendImmediately": true,

        "payload": "7E817E",

        "format": "Hex",

        "retryCount": 0,

        "continueOnError": false

      }

    }

  ]

}Replace four kinds of environment values: host, port, clientId, and the property key in initialState. Port 8888 is a demo value; modify it according to the administrator's actual material. Keeping false means receiving by byte stream; initialState is the first-import definition, and the current value for re-verification is read separately. Replaceable customer template names are used here; verify against this section's replacement checklist before importing or sending.
39. Open the Connection Import Entry
Location: FMQX Web Version*→*Connection Management Steps: In the FMQX Connection Management menu, select Import Configuration.
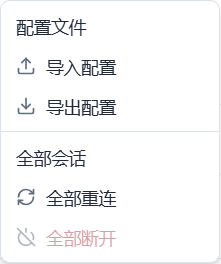
The Import Configuration menu is actually visible.
Screenshot Key Points
| Field / Control | Description |
|---|---|
| Import Configuration | Import the temperature control demo connection material into the FMQX web version. Required · Enter: Import Configuration |
40. Select the Official Temperature Control Demo Connection
Location: FMQX Web Version*→*Connection Management Steps: After importing the temperature control connection material, select Temperature Control Demo Connection.
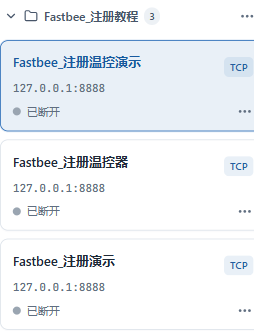
The official temperature control demo connection appears in the connection list; the receive mode is verified in the next step.
Screenshot Key Points
| Field / Control | Description |
|---|---|
| Temperature Control Demo Connection | Complete reporting, control, and recovery within the same official session. Required · Enter: Temperature Control Demo Connection |
41. Verify the Official Connection Address
Location: FMQX Web Version*→*Official Temperature Control Connection Configuration Steps: In the official connection configuration, verify the TCP Connection Address and Port.
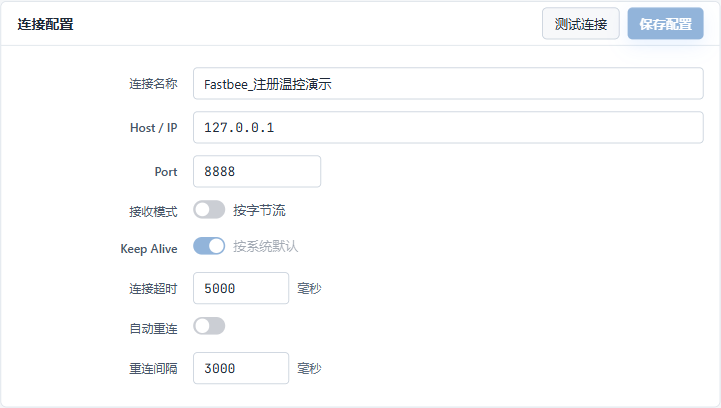
The official connection address comes from the current administrator; auto reconnect is off.
Screenshot Key Points
| Field / Control | Description |
|---|---|
| TCP Connection Address and Port | Connect the device session to the runtime node that provides the TCP listener. Required · Enter: <tcp-host>:<tcp-port> |
| Auto Reconnect | Determines whether to reconnect automatically after a disconnection. Required · Enter: Off |
42. Verify Byte-Stream Reception
Location: FMQX Web Version*→*Official Temperature Control Connection Configuration Steps: Confirm that Receive Mode is Byte Stream.
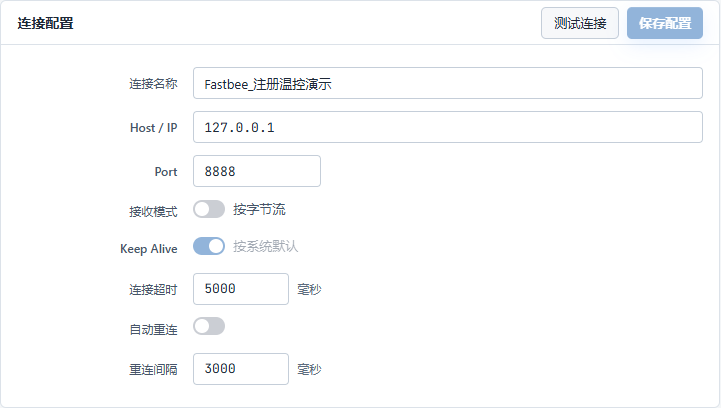
The receive mode is Byte Stream, which can handle downlink JSON without newlines.
Screenshot Key Points
| Field / Control | Description |
|---|---|
| Receive Mode | Read downlink commands without newlines as a raw TCP byte stream. Required · Enter: Byte Stream |
Prepare the read-only state check flow: open "Automated Testing" → "YAML" in the FMQX top bar, paste the definition below in full, click "Validate" and then "Save Version". Then, in session binding, point device to the session just imported and verified in this article; after verifying the runtime node and current state, click Run per the following steps. Do not use the Import Flow File button here.
Complete read-only YAML template with only device.state.getyaml
"schemaVersion": 2

"name": "State Check"

"sessions":

  "device":

    "sessionId": "demo-session-id"

    "isolation": "temporary"

"variables": {}

"steps":

  -

    "id": "current_state"

    "kind": "action"

    "enabled": true

    "action": "device.state.get"

    "session": "device"

    "timeoutMs": 5000

    "retries": 0

    "parameters": {}

    "assertions": []

"finally": []

"description": "Only reads the current state of the FMQX demo device; does not reset initial values, connect the device, or send business data."

"id": "state-check"Only reads the current state; does not connect, send, or reset the device. The old evidence 52 and 8 executions are not fixed assertions for a new session; this read's actual values prevail. Replaceable customer template names are used here; verify against this section's replacement checklist before importing or sending.
43. Read the Current State of the Temperature Control Demo
Location: FMQX Web Version*→Automated Testing→*Flow, Node Properties, and Run Console Steps: In Automated Testing → YAML, paste the read-only definition above in full, validate and save the version, and bind device to this article's official temperature control demo session; click Run and read the current state and execution count.
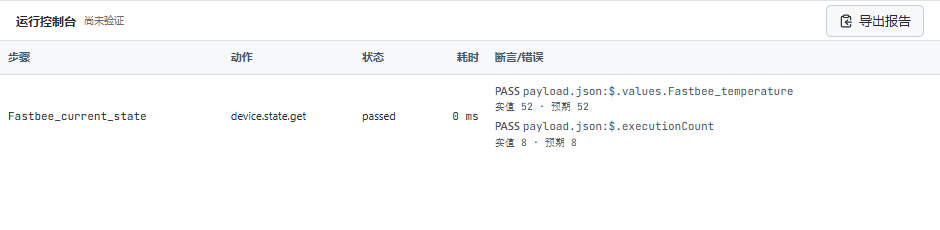
At 21:38, the read-only supplementary capture shows actual temperature 52 and actual execution count 8; the initial 40 is only described in the imported material.
Screenshot Key Points
| Field / Control | Description |
|---|---|
| Run | Run the state check case containing only device.state.get, reading the current state without connecting or sending business messages. Required · Enter: Run |
| Current State Actual Values | Read the actual temperature and execution count assertions in the run console. Required · Enter: Temperature 52; 8 executions |
44. Connect the Official Session
Location: FMQX Web Version*→*Official Temperature Control Connection Configuration Steps: Select the official temperature control connection and click Connect.

This connection uses the official temperature control session.
Screenshot Key Points
| Field / Control | Description |
|---|---|
| Connect | Establish the TCP connection of the selected official session. Required · Enter: Connect |
45. Confirm the Official Session Is Connected
Location: FMQX Web Version*→*Connection Management Steps: In the connection title, verify the connected state.

The official temperature control session shows Connected and a Disconnect button.
Screenshot Key Points
| Field / Control | Description |
|---|---|
| Temperature Control Demo Connection | Complete reporting, control, and recovery within the same official session. Required · Enter: Temperature Control Demo Connection |
46. Prepare the Raw Registration Frame
Location: FMQX Web Version*→*Send and Session Messages Steps: In the registration send area, verify that the Registration Packet is 7E80FABC00037E.

The raw identity FABC0003 sits between 7E80 and the closing 7E.
Screenshot Key Points
| Field / Control | Description |
|---|---|
| Registration Packet | Send the current device's raw HEX identity into the 7E first-packet registration envelope. Required · Enter: 7E80FABC00037E |
| Registration Frame Boundaries and Capability Limits | The registration envelope is 7E80 plus the raw identity bytes plus 7E; the heartbeat is 7E817E. Required · Enter: 7E80 + <identity-hex> + 7E; 7E817E |
47. Actually Send the Registration Frame
Location: FMQX Web Version*→*Send and Session Messages Steps: Send the current Registration Packet as Hex.

The official session sends the 7-byte raw registration frame 7E80FABC00037E.
Screenshot Key Points
| Field / Control | Description |
|---|---|
| Registration Packet | Send the current device's raw HEX identity into the 7E first-packet registration envelope. Required · Enter: 7E80FABC00037E |
48. Actually Send the Heartbeat
Location: FMQX Web Version*→*Send and Session Messages Steps: Send the Heartbeat Packet 7E817E as Hex.

The official session sends the 3-byte 7E817E, adding no new temperature business value.
Screenshot Key Points
| Field / Control | Description |
|---|---|
| Heartbeat Packet | Keep the registered TCP connection alive. Required · Enter: 7E817E |
FMQX Web Version → Send and Session Messages
| Field / Control | How to Fill In |
|---|---|
| Registration Packet | Send the current device's raw HEX identity into the 7E first-packet registration envelope. Required · Enter: 7E80FABC00037E |
| Heartbeat Packet | Keep the registered TCP connection alive. Required · Enter: 7E817E |
| Temperature JSON Report | Carry the platform device number and temperature key-value to update the business state. Required · Enter: {"clientId":"<device-number>","<temperature-identifier>":31} |
| Send | Actually send the message in the current send area to the selected session. |
| Downlink Actually Received Frame | Shows the property set request actually received by the device session. |
| Execution Response | Shows the response returned after the web state machine processes the command. |
| Independent State Report | Reports the read device temperature state separately from the response. |
Report the Ten Temperature Samples 31 to 40 One by One
Replace the two placeholders with your own platform device number and temperature identifier. Change only the temperature number each time, sending one by one in the order 31, 32, 33, 34, 35, 36, 37, 38, 39, 40; each send needs an independently observable message.
The first ten-sample send record is retained. If you send again to supplement images, create a separate independent re-verification time window and record, and do not backfill new screenshots as the first action. History verification must also select the same new window.
Replaceable temperature business reportjson
{

  "clientId": "<device-number>",

  "<temperature-identifier>": 31

}After replacing the placeholders, send the JSON as Text; afterwards only change the number to 32 through 40. Do not append the ℃ character to the temperature number, and do not wrap the JSON in a 7E envelope. Replaceable customer template names are used here; verify against this section's replacement checklist before importing or sending.
49. Prepare the Temperature JSON Report
Location: FMQX Web Version*→*Send and Session Messages Steps: Fill the real device number and temperature identifier into Temperature JSON Report.
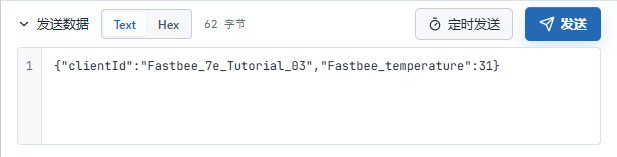
The send area uses the JSON business format; temperature 31 is the first sample.
Screenshot Key Points
| Field / Control | Description |
|---|---|
| Temperature JSON Report | Carry the platform device number and temperature key-value to update the business state. Required · Enter: {"clientId":"<device-number>","<temperature-identifier>":31} |
50. Send Temperature Sample 31
Location: FMQX Web Version*→*Send and Session Messages Steps: Set the current temperature to 31 and click Send, then verify the actual sent message.
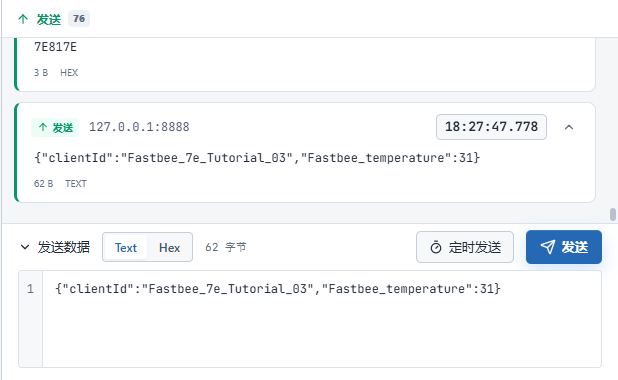
The actual sent message of this independent step contains temperature 31; verify history against the corresponding window.
Screenshot Key Points
| Field / Control | Description |
|---|---|
| Temperature JSON Report | Carry the platform device number and temperature key-value to update the business state. Required · Enter: {"clientId":"<device-number>","<temperature-identifier>":31} |
| Send | Actually send the message in the current send area to the selected session. Required · Enter: Send |
51. Send Temperature Sample 32
Location: FMQX Web Version*→*Send and Session Messages Steps: Set the current temperature to 32 and click Send, then verify the actual sent message.
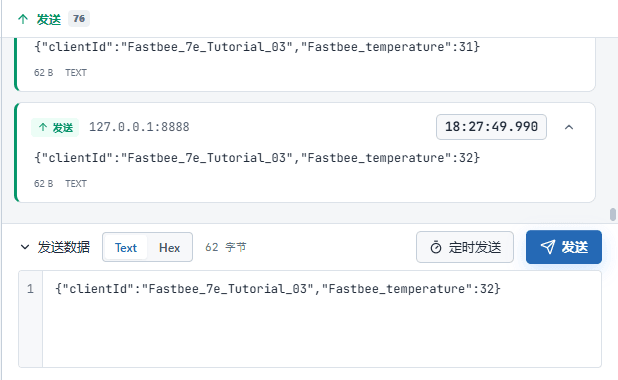
The actual sent message of this independent step contains temperature 32; verify history against the corresponding window.
Screenshot Key Points
| Field / Control | Description |
|---|---|
| Temperature JSON Report | Carry the platform device number and temperature key-value to update the business state. Required · Enter: {"clientId":"<device-number>","<temperature-identifier>":31} |
| Send | Actually send the message in the current send area to the selected session. Required · Enter: Send |
52. Send Temperature Sample 33
Location: FMQX Web Version*→*Send and Session Messages Steps: Set the current temperature to 33 and click Send, then verify the actual sent message.
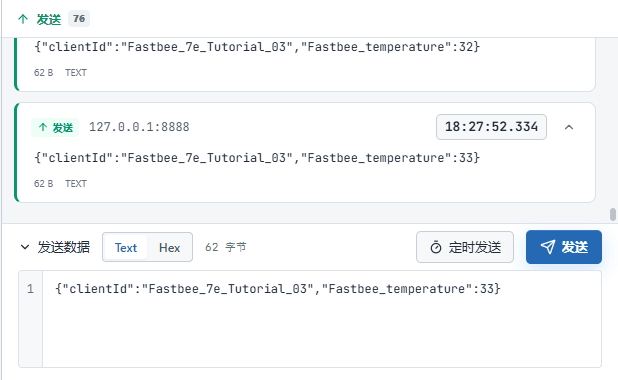
The actual sent message of this independent step contains temperature 33; verify history against the corresponding window.
Screenshot Key Points
| Field / Control | Description |
|---|---|
| Temperature JSON Report | Carry the platform device number and temperature key-value to update the business state. Required · Enter: {"clientId":"<device-number>","<temperature-identifier>":31} |
| Send | Actually send the message in the current send area to the selected session. Required · Enter: Send |
53. Send Temperature Sample 34
Location: FMQX Web Version*→*Send and Session Messages Steps: Set the current temperature to 34 and click Send, then verify the actual sent message.
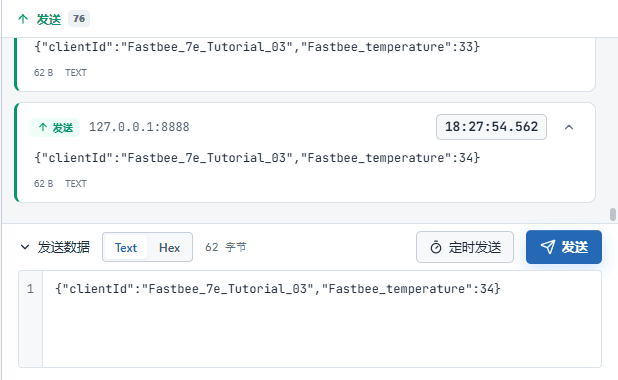
The actual sent message of this independent step contains temperature 34; verify history against the corresponding window.
Screenshot Key Points
| Field / Control | Description |
|---|---|
| Temperature JSON Report | Carry the platform device number and temperature key-value to update the business state. Required · Enter: {"clientId":"<device-number>","<temperature-identifier>":31} |
| Send | Actually send the message in the current send area to the selected session. Required · Enter: Send |
54. Send Temperature Sample 35
Location: FMQX Web Version*→*Send and Session Messages Steps: Set the current temperature to 35 and click Send, then verify the actual sent message.
The actual sent message of this independent step contains temperature 35; verify history against the corresponding window.
Screenshot Key Points
| Field / Control | Description |
|---|---|
| Temperature JSON Report | Carry the platform device number and temperature key-value to update the business state. Required · Enter: {"clientId":"<device-number>","<temperature-identifier>":31} |
| Send | Actually send the message in the current send area to the selected session. Required · Enter: Send |
55. Send Temperature Sample 36
Location: FMQX Web Version*→*Send and Session Messages Steps: Set the current temperature to 36 and click Send, then verify the actual sent message.
The actual sent message of this independent step contains temperature 36; verify history against the corresponding window.
Screenshot Key Points
| Field / Control | Description |
|---|---|
| Temperature JSON Report | Carry the platform device number and temperature key-value to update the business state. Required · Enter: {"clientId":"<device-number>","<temperature-identifier>":31} |
| Send | Actually send the message in the current send area to the selected session. Required · Enter: Send |
56. Send Temperature Sample 37
Location: FMQX Web Version*→*Send and Session Messages Steps: Set the current temperature to 37 and click Send, then verify the actual sent message.
The actual sent message of this independent step contains temperature 37; verify history against the corresponding window.
Screenshot Key Points
| Field / Control | Description |
|---|---|
| Temperature JSON Report | Carry the platform device number and temperature key-value to update the business state. Required · Enter: {"clientId":"<device-number>","<temperature-identifier>":31} |
| Send | Actually send the message in the current send area to the selected session. Required · Enter: Send |
57. Send Temperature Sample 38
Location: FMQX Web Version*→*Send and Session Messages Steps: Set the current temperature to 38 and click Send, then verify the actual sent message.
The actual sent message of this independent step contains temperature 38; verify history against the corresponding window.
Screenshot Key Points
| Field / Control | Description |
|---|---|
| Temperature JSON Report | Carry the platform device number and temperature key-value to update the business state. Required · Enter: {"clientId":"<device-number>","<temperature-identifier>":31} |
| Send | Actually send the message in the current send area to the selected session. Required · Enter: Send |
58. Send Temperature Sample 39
Location: FMQX Web Version*→*Send and Session Messages Steps: Set the current temperature to 39 and click Send, then verify the actual sent message.
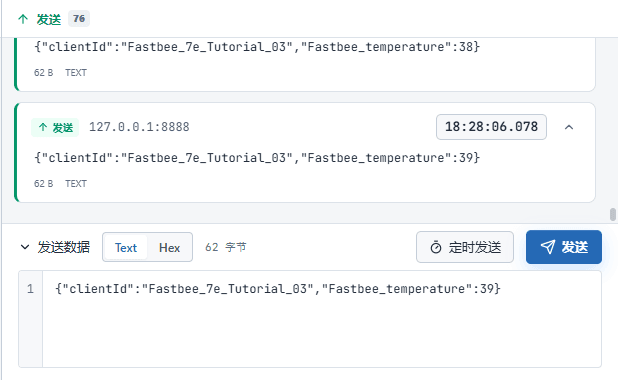
The actual sent message of this independent step contains temperature 39; verify history against the corresponding window.
Screenshot Key Points
| Field / Control | Description |
|---|---|
| Temperature JSON Report | Carry the platform device number and temperature key-value to update the business state. Required · Enter: {"clientId":"<device-number>","<temperature-identifier>":31} |
| Send | Actually send the message in the current send area to the selected session. Required · Enter: Send |
59. Send Temperature Sample 40
Location: FMQX Web Version*→*Send and Session Messages Steps: Set the current temperature to 40 and click Send, then verify the actual sent message.
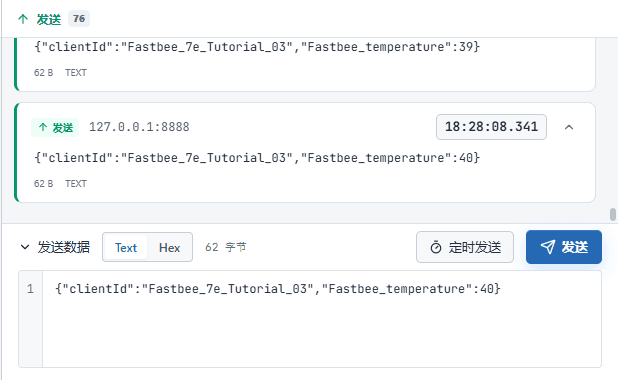
The actual sent message of this independent step contains temperature 40; verify history against the corresponding window.
Screenshot Key Points
| Field / Control | Description |
|---|---|
| Temperature JSON Report | Carry the platform device number and temperature key-value to update the business state. Required · Enter: {"clientId":"<device-number>","<temperature-identifier>":31} |
| Send | Actually send the message in the current send area to the selected session. Required · Enter: Send |
Run the Scheduled Heartbeat and Verify Real-Time and History
Only the 7E817E heartbeat is configured for scheduled sending. Before starting, read back the Hex format, 30-second interval, and zero retries again to avoid inheriting the default text message. Platform online status and current temperature are judged separately; being online itself does not prove business data has been updated.
The start button and the 0-count use the independent October 15 GUI supplementary screenshot, and the 1-count after running has its own record; the platform temperature 40 and the 31–40 ten-sample history still belong to the original October 14 window. They are operation and viewing examples from different times and cannot be merged into one continuous run.
60. Read Back the Correct Scheduled Heartbeat
Location: FMQX Web Version*→*Scheduled Send Steps: Verify that the Scheduled Heartbeat Content is Hex, 7E817E, and 30000 milliseconds.
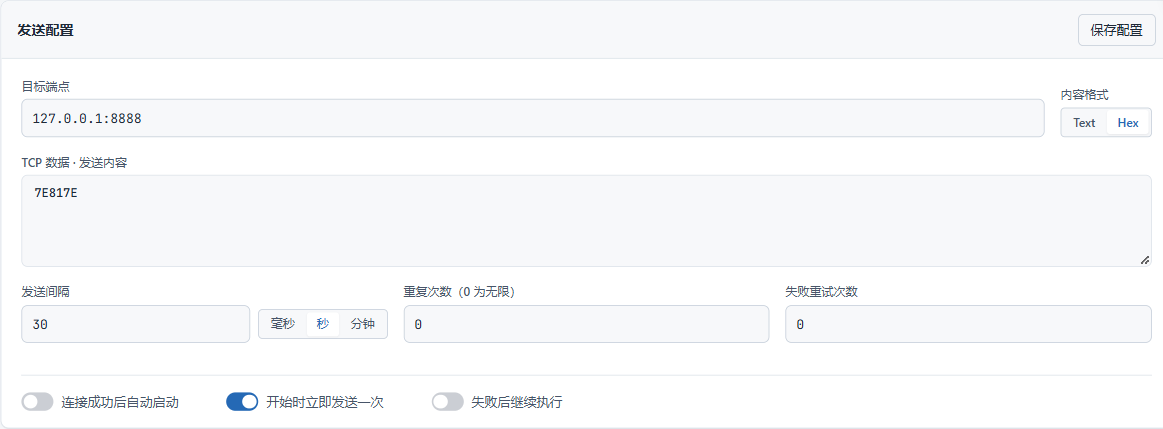
Only the heartbeat runs, with zero retries and the correct content retained.
Screenshot Key Points
| Field / Control | Description |
|---|---|
| Scheduled Heartbeat Content | Repeatedly send only the raw HEX heartbeat instead of temperature samples. Required · Enter: Hex / 7E817E / 30000 ms |
61. Start the Scheduled Heartbeat
Location: FMQX Web Version*→*Scheduled Send Steps: Confirm the current session connection is normal, click Start Scheduled Send, then observe the status and count.

The state is ready before starting with a send count of 0; click Start Scheduled Send.
Screenshot Key Points
| Field / Control | Description |
|---|---|
| Start Scheduled Send | Verify the current session and heartbeat content before starting. Required · Enter: 0 times before start; 1 time after running |
62. Verify the Platform's Latest Temperature 40
Location: Device Details*→*Running Status Steps: In Running Status, read the Current Temperature.
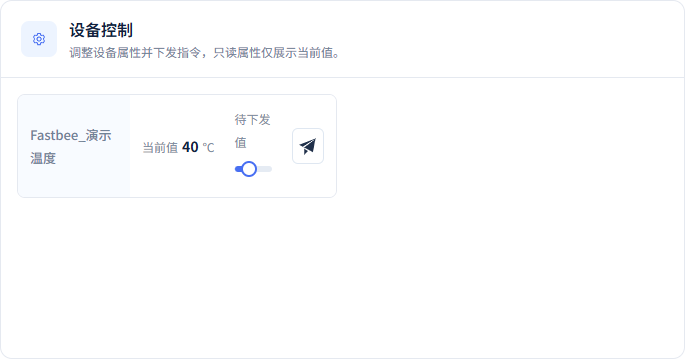
After the selected ten-sample window completes, the current value is 40℃.
Screenshot Key Points
| Field / Control | Description |
|---|---|
| Current Temperature | Shows the most recently reported temperature of the device and its update time. Required · Enter: 40 |
63. Verify the Online Status
Location: Device Details*→*Running Status Steps: Read the device Online Status.
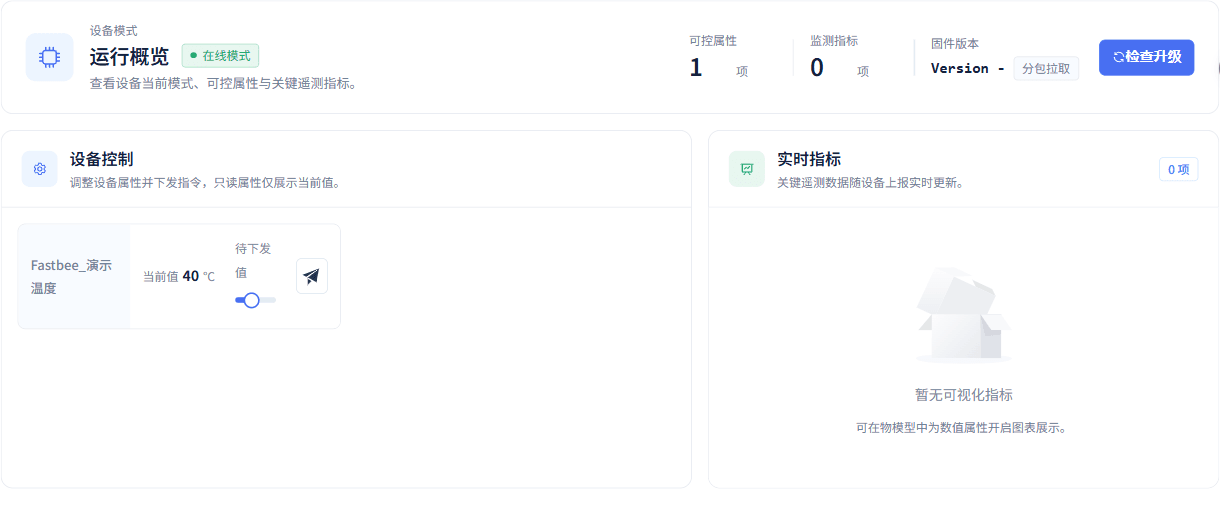
While the connection and heartbeat are running, the platform shows this device online.
Screenshot Key Points
| Field / Control | Description |
|---|---|
| Online Status | Shows the connection state observed by the platform. Required · Enter: Online; offline after stop |
64. Query the Ten-Sample Time Window
Location: Historical Data*→*Temperature Query Steps: Select the current product, device, and temperature property, choose the Query window according to your own send time, then click Query.
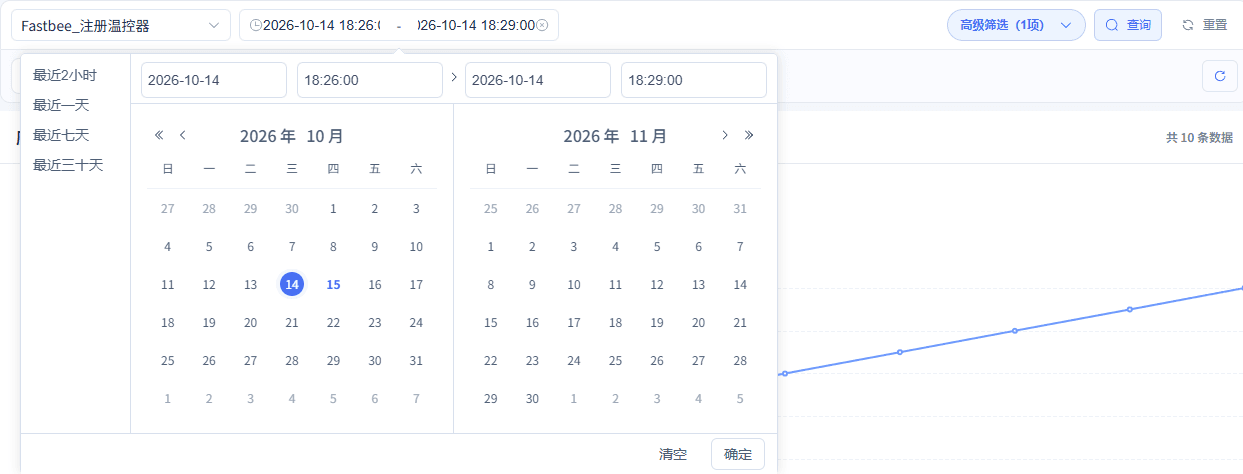
Expanded time · Range: 2026-10-14 18:26:00 to 18:29:00, for the 31–40 ten-sample history.
Screenshot Key Points
| Field / Control | Description |
|---|---|
| Historical Product, Device, and Property | Restrict the query to the current device's temperature records. Required · Enter: Current product / current device / temperature |
| Historical Time Range | Distinguish the independent windows of the ten samples, the historical recovery, and this round's new 52. Required · Enter: A small time window around this operation |
| Query | Read historical data for the current object and time window. Required · Enter: Query |
65. Verify the Ten Samples One by One
Location: Historical Data*→*Temperature Query Steps: Read the Temperature History Details and verify 31 through 40 one by one.
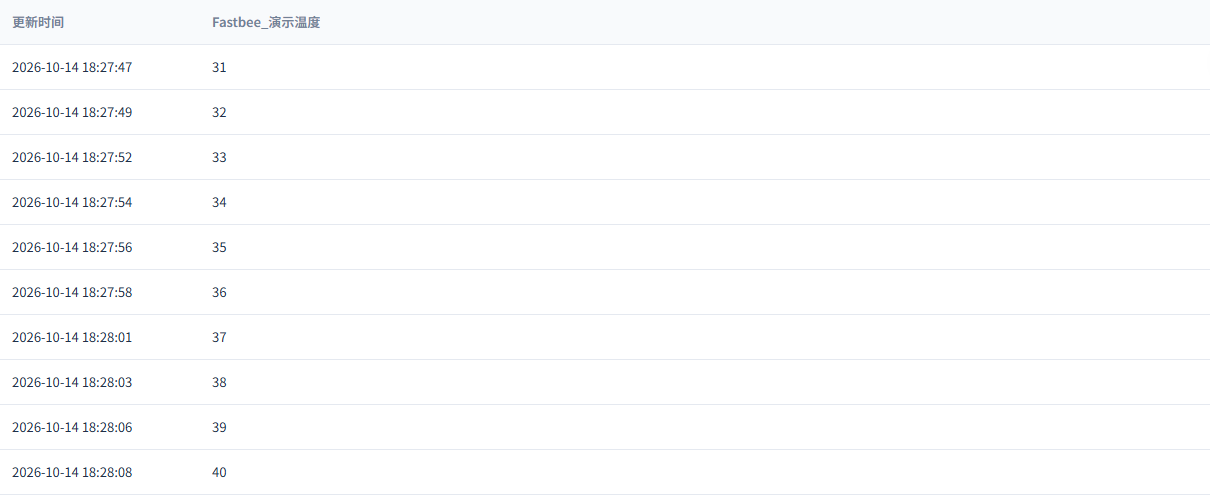
The corresponding window contains ten distinguishable business samples from 31 to 40; registration and heartbeat are not temperature history.
Screenshot Key Points
| Field / Control | Description |
|---|---|
| Temperature History Details | Verify the temperature values and event times of the original ten-sample window one by one. Required · Enter: 2026-10-14 18:26–18:29; ten records from 31 to 40 |
FMQX Web Version → Scheduled Send
| Field / Control | How to Fill In |
|---|---|
| Scheduled Heartbeat Content | Repeatedly send only the raw HEX heartbeat instead of temperature samples. Required · Enter: Hex / 7E817E / 30000 ms |
| Start Scheduled Send | Run the heartbeat scheduled send on the registered connection. |
| Scheduled Run Status | Read the current schedule run status, the cumulative send count on the interface, and the most recent execution time. |
Device Details → Running Status
| Field / Control | How to Fill In |
|---|---|
| Current Temperature | Shows the most recently reported temperature of the device and its update time. |
| Online Status | Shows the connection state observed by the platform. |
| Retained Device Details | Read the device number, offline state, and owning product at the top of the retained device details. |
Historical Data → Temperature Query
| Field / Control | How to Fill In |
|---|---|
| Historical Product, Device, and Property | Restrict the query to the current device's temperature records. Required · Enter: Current product / current device / temperature |
| Historical Time Range | Distinguish the independent windows of the ten samples, the historical recovery, and this round's new 52. Required · Enter: A small time window around this operationThis round's send records and the history storage time zone. |
| Query | Read historical data for the current object and time window. |
| Refresh Results | Re-fetch the latest history under the selected conditions. |
| Temperature History Details | Show each temperature value and event time within the selected time window. |
Send 53 Down and Verify the Post-Execution State
Start the temperature control scenario first; when you see the step that only waits for a new command running, send 53 from the platform within 30 seconds. One complete loop should connect the new command ID, the device's actual reception, the execution event, the execution response, the independent state report, and the platform's latest value.
The parameter entry is the flow page of Automated Testing: select the Capture New Command node, then verify futureOnly is true in the node properties on the right. The complete match object is verified against the retained case definition; the page showing [object Object] does not prove the complete object content.
The independent state report must read the device's post-execution state. Copying the platform target value directly into the report only proves a JSON was sent, not that the device executed. In the web demo state machine, execution changes the state from 52 to 53; a physical device needs its own driver to complete execution and readback.
Prepare the temperature control execution and independent report flow: open "Automated Testing" → "YAML" in the FMQX top bar, paste the definition below in full, click "Validate" and then "Save Version". Then, in session binding, point device to the session just imported and verified in this article; after verifying the runtime node and current state, click Run per the following steps. Do not use the Import Flow File button here.
Complete YAML template for temperature control execution and independent state reportyaml
schemaVersion: 2

id: temperature-control

name: Registration Supplementary Capture

description: ''

tags: []

variables:

  runTag: "replace-with-your-run-tag"

  reportTag: "replace-with-unique-report-tag"

requiredEnvironment: []

sessions:

  device:

    sessionId: demo-session-id

    isolation: temporary

steps:

- id: disconnect

  kind: action

  enabled: true

  action: session.disconnect

  session: device

  timeoutMs: 5000

  retries: 0

  continueOnFailure: false

  repeat: 1

  format: Text

  qos: 0

  retain: false

  durationMs: 0

  maxConcurrency: 4

  parameters: {}

  assertions: []

  steps: []

  else: []

  parallel: []

- id: connect

  kind: action

  enabled: true

  action: session.connect

  session: device

  timeoutMs: 5000

  retries: 0

  continueOnFailure: false

  repeat: 1

  format: Text

  qos: 0

  retain: false

  durationMs: 0

  maxConcurrency: 4

  parameters: {}

  assertions: []

  steps: []

  else: []

  parallel: []

- id: register

  kind: action

  enabled: true

  action: message.send

  session: device

  timeoutMs: 5000

  retries: 0

  continueOnFailure: false

  repeat: 1

  format: Hex

  payload: 7E80FABC00037E

  qos: 0

  retain: false

  durationMs: 0

  maxConcurrency: 4

  parameters: {}

  assertions: []

  steps: []

  else: []

  parallel: []

- id: initial_state

  kind: action

  enabled: true

  action: device.state.get

  session: device

  timeoutMs: 5000

  retries: 0

  continueOnFailure: false

  repeat: 1

  format: Text

  qos: 0

  retain: false

  durationMs: 0

  maxConcurrency: 4

  parameters: {}

  assertions: []

  steps: []

  else: []

  parallel: []

- id: keepalive

  kind: action

  enabled: true

  action: message.send

  session: device

  timeoutMs: 5000

  retries: 0

  continueOnFailure: false

  repeat: 1

  format: Hex

  payload: 7E817E

  qos: 0

  retain: false

  durationMs: 0

  maxConcurrency: 4

  parameters: {}

  assertions: []

  steps: []

  else: []

  parallel: []

- id: capture_command

  kind: action

  enabled: true

  action: message.capture

  session: device

  timeoutMs: 30000

  retries: 0

  continueOnFailure: false

  repeat: 1

  format: Text

  qos: 0

  retain: false

  durationMs: 0

  maxConcurrency: 4

  parameters:

    direction: in

    futureOnly: true

    match:

      message.source: DeviceFrame

      payload.json:$.method: thing.service.property.set

    path: $.id

    source: json

    storeAs: commandId

  assertions: []

  steps: []

  else: []

  parallel: []

- id: wait_execution

  kind: action

  enabled: true

  action: message.wait

  session: device

  timeoutMs: 5000

  retries: 0

  continueOnFailure: false

  repeat: 1

  format: Text

  qos: 0

  retain: false

  durationMs: 0

  maxConcurrency: 4

  parameters:

    direction: event

    match:

      message.source: DeviceState

      payload.json:$.requestId: ${commandId}

  assertions: []

  steps: []

  else: []

  parallel: []

- id: report

  kind: action

  enabled: true

  action: device.state.report

  session: device

  timeoutMs: 5000

  retries: 0

  continueOnFailure: false

  repeat: 1

  format: Text

  qos: 0

  retain: false

  durationMs: 0

  maxConcurrency: 4

  parameters:

    "batch\u0049d": "${runTag}"

    commandId: ${commandId}

    reportId: "${reportTag}"

  assertions: []

  steps: []

  else: []

  parallel: []

- id: readback

  kind: action

  enabled: true

  action: device.state.get

  session: device

  timeoutMs: 5000

  retries: 0

  continueOnFailure: false

  repeat: 1

  format: Text

  qos: 0

  retain: false

  durationMs: 0

  maxConcurrency: 4

  parameters: {}

  assertions: []

  steps: []

  else: []

  parallel: []

finally: []Copy the escaped parameter keys exactly; only replace runTag, reportTag, and the session binding. After starting, wait for the capture node to show running, then send the new target from the platform within 30 seconds. This definition follows the saved structure of the independent new-52 supplementary verification; the old 53 and the current 52 are each verified against their own time windows and are not spliced into one run. Replaceable customer template names are used here; verify against this section's replacement checklist before importing or sending.
66. Check the Capture New Command Node
Location: FMQX Web Version*→Automated Testing→*Flow, Node Properties, and Run Console Steps: In Automated Testing → YAML, paste the complete temperature control definition above, fill in this round's runTag and a brand-new reportTag, validate and save the version, and bind device to this article's temperature control session; go to the flow page, select the Capture New Command node, and verify futureOnly is true.
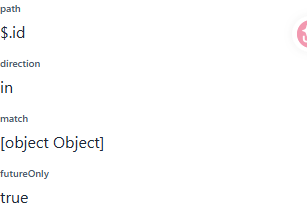
The node's futureOnly is true; the complete object match conditions and the independent report are verified against the retained case definition, and the GUI's [object Object] does not replace the full text.
Screenshot Key Points
| Field / Control | Description |
|---|---|
| futureOnly | Only capture new commands after startup, avoiding treating historical downlinks as this round's new downlink. Required · Enter: true |
| Node Properties | After selecting the Capture New Command flow node, read its action, session alias, timeout, and parameters on the right. Required · Enter: message.capture; device; 30000 ms |
67. Open This Round's Temperature Control Scenario
Location: FMQX Web Version*→Automated Testing→*Flow, Node Properties, and Run Console Steps: Select the temperature control flow just validated and saved, verify the device binding and that both variables are filled in; locate the Run button to start in the next step.

The real run entry of the new 53 re-verification scenario is open.
Screenshot Key Points
| Field / Control | Description |
|---|---|
| Run | Start the selected temperature control scenario and wait for this round's new command. Required · Enter: Run |
68. Start and Wait for a New Command
Location: FMQX Web Version*→Automated Testing→*Flow, Node Properties, and Run Console Steps: Click Run and wait until the capture step shows running.
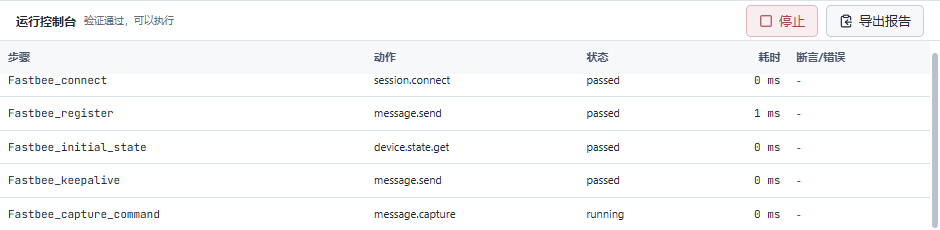
This round's wait limit is 30 seconds and only accepts new commands after startup.
Screenshot Key Points
| Field / Control | Description |
|---|---|
| futureOnly | Only capture new commands after startup, avoiding treating historical downlinks as this round's new downlink. Required · Enter: true |
| Run | Start the selected temperature control scenario and wait for this round's new command. Required · Enter: Run |
69. Send Temperature 53 from the Platform
Location: Device Details*→Temperature Control→*Send Command Steps: Set Temperature to Send to 53 and click Send Command.
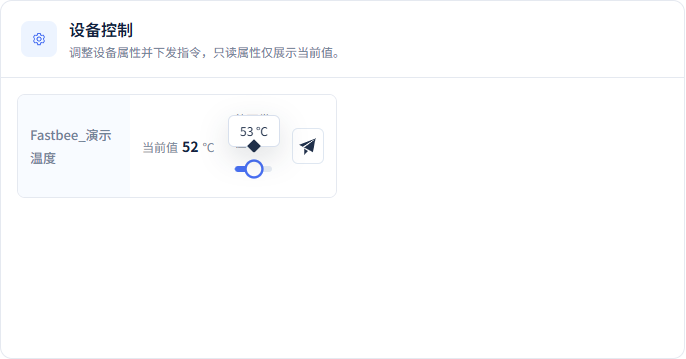
The current round sends one new 53 property set command.
Screenshot Key Points
| Field / Control | Description |
|---|---|
| Temperature to Send | Specify the target value of this property set. Required · Enter: 53 |
| Send Command | Send the target temperature to the device as a new property set request. Required · Enter: Send Command |
70. Verify the 53 Device Execution Response
Location: FMQX Web Version*→*Send and Session Messages Steps: In the official session send area, read the Execution Response message card of the original 17:57 round.
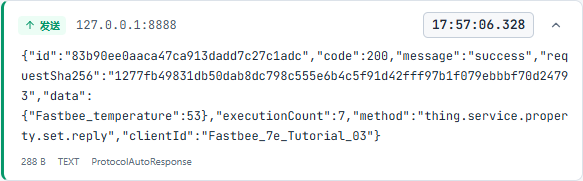
The original 53 response has code=200, temperature 53, 7 executions, aligned with that round's command ID and request summary; this step is a read-only review of an old message.
Screenshot Key Points
| Field / Control | Description |
|---|---|
| Execution Response | Shows the response returned after the web state machine processes the command. Required · Enter: code=200; temperature=53 |
71. Verify the 53 Independent State Report
Location: FMQX Web Version*→Automated Testing→*Flow, Node Properties, and Run Console Steps: In the run console, read this round's Execution and Report Results.
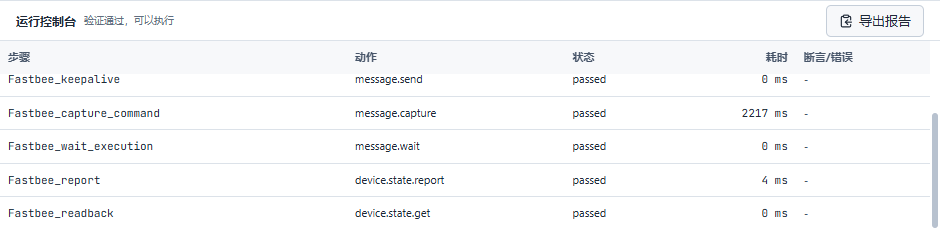
The independent state report step passes; this round's web state changed from 52 to 53.
Screenshot Key Points
| Field / Control | Description |
|---|---|
| Execution and Report Results | Shows the results of the new command execution event, the independent state report, and the read step. Required · Enter: This round passed |
72. Read Platform Temperature 53
Location: Device Details*→*Running Status Steps: Read the Current Temperature of the device running status.
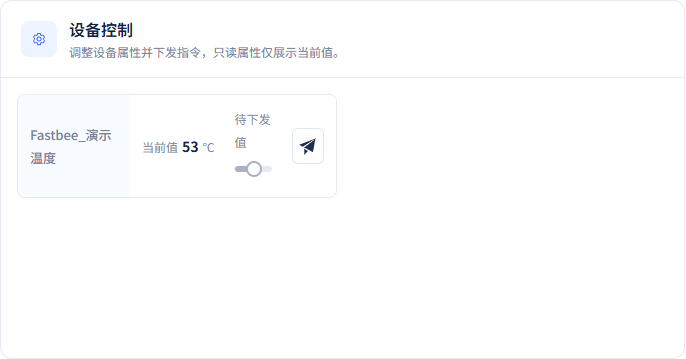
The platform's actual latest temperature is 53, with a time corresponding to this round's independent report.
Screenshot Key Points
| Field / Control | Description |
|---|---|
| Current Temperature | Shows the most recently reported temperature of the device and its update time. Required · Enter: 53 |
FMQX Web Version → Automated Testing → Flow, Node Properties, and Run Console
| Field / Control | How to Fill In |
|---|---|
| Node Properties | After selecting the Capture New Command flow node, read its action, session alias, timeout, and parameters on the right. |
| futureOnly | Only capture new commands after startup, avoiding treating historical downlinks as this round's new downlink. Required · Enter: true |
| Run | Start the selected temperature control scenario and wait for this round's new command. |
| Execution and Report Results | Shows the results of the new command execution event, the independent state report, and the read step. |
| Run | Run the state check case containing only device.state.get, reading the current state without connecting or sending business messages. |
| Current State Actual Values | Read the actual temperature and execution count assertions in the run console. |
| Capture Node Run Status | Read the run row of this Capture New Command node. |
Device Details → Temperature Control → Send Command
| Field / Control | How to Fill In |
|---|---|
| Temperature to Send | Specify the target value of this property set. Required · Enter: 53; 52 after recovery |
| Send Command | Send the target temperature to the device as a new property set request. |
Connection Recovery Reference: Re-register After Disconnect
For connection recovery, reuse the same official session: reconnect, send the raw registration frame as Hex, then send the heartbeat.
The following four steps are the historical recovery reference from 2026-10-14 22:33: the first two screenshots are read-only reviews of the original round's disconnect and connect nodes, and the last two read the original round's registration and heartbeat messages. These steps were not reenacted this time. The original round's complete record of temperature staying at 52 and execution count 11→12 afterwards, together with the final state, is retained separately.
The later 40→52 is an independent new run on October 15; the two segments have different command numbers and run times and cannot be spliced into the same round.
73. Verify the Stopped State Before Re-verification
Location: FMQX Web Version*→Automated Testing→*Flow, Node Properties, and Run Console Steps: In Execution and Report Results, do a read-only review of the node status in the first row of this round's recovery scenario.

The first row shows passed; the image only proves the node passed. That the official session was already disconnected and the timer stopped at that time is independently confirmed by the same round's raw output; this node produced no new offline event.
Screenshot Key Points
| Field / Control | Description |
|---|---|
| Execution and Report Results | Shows the results of the new command execution event, the independent state report, and the read step. Required · Enter: This round passed |
74. Verify the Re-verification Scenario Reconnection
Location: FMQX Web Version*→Automated Testing→*Flow, Node Properties, and Run Console Steps: In the same Execution and Report Results, do a read-only review of the node status in the second row of this round's recovery scenario.

The second row shows passed; the image only proves the node passed. The successful reconnection at 22:33:53 is independently confirmed by this round's raw output; the screenshot does not show the connection generation.
Screenshot Key Points
| Field / Control | Description |
|---|---|
| Execution and Report Results | Shows the results of the new command execution event, the independent state report, and the read step. Required · Enter: This round passed |
75. Resend the Registration Frame
Location: FMQX Web Version*→*Send and Session Messages Steps: After reconnecting, send the Registration Packet as Hex.

This round actually sent the 7-byte 7E80FABC00037E at 22:33:53.
Screenshot Key Points
| Field / Control | Description |
|---|---|
| Registration Packet | Send the current device's raw HEX identity into the 7E first-packet registration envelope. Required · Enter: 7E80FABC00037E |
76. Send the Heartbeat After Reconnection
Location: FMQX Web Version*→*Send and Session Messages Steps: After reconnecting and registering, send the Heartbeat Packet as Hex.

This round's new connection actually sent the 3-byte 7E817E.
Screenshot Key Points
| Field / Control | Description |
|---|---|
| Heartbeat Packet | Keep the registered TCP connection alive. Required · Enter: 7E817E |
Historical Reference: Device Details → Data Collection
| Field / Control | How to Fill In |
|---|---|
| Data Collection Temperature and Time | On the Data Collection page of the device details, filter temperature and verify the current value and data update time. |
Independent Re-verification: Change Device Temperature from 40 to 52
This section is an independent new run at 2026-10-15 21:18. The device's internal initial temperature is 40 with 0 executions; first wait for a new command, then send 52 from the platform, and the device internally reads back 52 with 1 execution. The platform already showed current value 52 before sending, so the internal 40 comes from the same round's device initial-value record and cannot be replaced by a platform screenshot.
Verify the device's actual reception, the same-ID execution response, the independent property report, and the history record separately. The platform's send success or received reply alone does not prove device execution; this example cross-checks with the web state machine execution event and the independent state report.
The new history record belongs to October 15 21:18:43.920; the old ten samples, 53, and the October 14 recovery 52 each keep their own windows. The results shown are limited to the local single node and the FMQX web version state machine.

This new run's configuration: futureOnly=true, only waiting for new commands after startup.
FMQX Web Version → Automated Testing → Flow, Node Properties, and Run Console
| Field / Control | How to Fill In |
|---|---|
| Node Properties | After selecting the Capture New Command flow node, read its action, session alias, timeout, and parameters on the right. |
| futureOnly | Only capture new commands after startup, avoiding treating historical downlinks as this round's new downlink. Required · Enter: true |
| Run | Start the selected temperature control scenario and wait for this round's new command. |
| Execution and Report Results | Shows the results of the new command execution event, the independent state report, and the read step. |
| Run | Run the state check case containing only device.state.get, reading the current state without connecting or sending business messages. |
| Current State Actual Values | Read the actual temperature and execution count assertions in the run console. |
| Capture Node Run Status | Read the run row of this Capture New Command node. |
77. Wait for This Round's New 52 Command
Location: FMQX Web Version*→Automated Testing→*Flow, Node Properties, and Run Console Steps: Start this temperature control scenario, confirm the Capture Node Run Status is running, then send a new command from the platform.

October 15 independent new run: the Capture New Command node is running.
Screenshot Key Points
| Field / Control | Description |
|---|---|
| Capture Node Run Status | This image directly shows the capture node waiting for a new command. Required · Enter: running |
78. Send Temperature 52 from the Platform
Location: Device Details*→Temperature Control→*Send Command Steps: Set Temperature to Send to 52 and click Send Command.

The tooltip of the temperature to send clearly shows 52℃; the platform's current value before sending is also 52.
Screenshot Key Points
| Field / Control | Description |
|---|---|
| Temperature to Send | Specify the target value of this property set. Required · Enter: 52 |
| Send Command | Send the target temperature to the device as a new property set request. Required · Enter: Send Command |
79. Read the Actually Received 52 Frame
Location: FMQX Web Version*→*Send and Session Messages Steps: In the session received messages, read the Downlink Actually Received Frame.
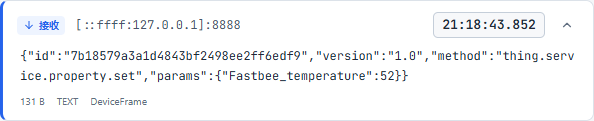
At 21:18:43.852 the new 52 command is actually received; the message number corresponds to this execution record.
Screenshot Key Points
| Field / Control | Description |
|---|---|
| Downlink Actually Received Frame | Shows the property set request actually received by the device session. Required · Enter: method=thing.service.property.set; temperature=52 |
80. Read the 52 Execution Response
Location: FMQX Web Version*→*Send and Session Messages Steps: Read the Execution Response with the same ID as the received frame.
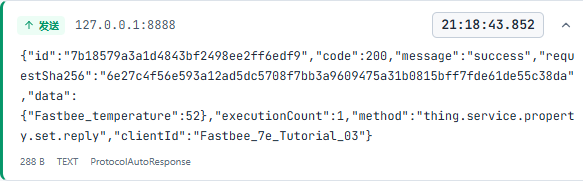
The execution response of the same new 52 command: code 200, temperature 52, 1 execution.
Screenshot Key Points
| Field / Control | Description |
|---|---|
| Execution Response | Shows the response returned after the web state machine processes the command. Required · Enter: code=200; temperature=52 |
81. Read the 52 Independent State Report
Location: FMQX Web Version*→*Send and Session Messages Steps: Read the Independent State Report sent separately after execution.

At 21:18:43.919 the independent property report 52, separate from the same-ID execution response.
Screenshot Key Points
| Field / Control | Description |
|---|---|
| Independent State Report | Reports the read device temperature state separately from the response. Required · Enter: {"clientId":"<device-number>","<temperature-identifier>":52} |
82. Verify the Platform's Current Temperature 52
Location: Device Details*→*Running Status Steps: In Running Status, read the Current Temperature and verify it against this round's device independent report.

After the new command executes and reports independently, the platform running status current temperature is 52℃.
Screenshot Key Points
| Field / Control | Description |
|---|---|
| Current Temperature | Read the platform's current value after this report. Required · Enter: 52℃ |
83. Query This Round's New 52 Time Window
Location: Historical Data*→*Temperature Query Steps: Go to Historical Data, select the current product, device, and temperature, set this round's start and end times, then click Query.

Querying this round's 52: 2026-10-15 21:18:00 to 21:19:00; the date box is thumbnail-sized in the screenshot.
Screenshot Key Points
| Field / Control | Description |
|---|---|
| Historical Product, Device, and Property | Restrict the query to the current device's temperature records. Required · Enter: FastBee_Registered Temperature Controller / FastBee_Demo Temperature |
| Historical Time Range | Distinguish the independent windows of the ten samples, the historical recovery, and this round's new 52. Required · Enter: 2026-10-15 21:18:00 to 21:19:00 (Asia/Shanghai) |
| Query | Query by the current device, property, and time window. Required · Enter: Query |
84. Refresh the Current Window's History
Location: Historical Data*→*Temperature Query Steps: Keep the current device, temperature, and time window, and click Refresh Results.

Keep the same device and temperature filter and click Refresh Results; the current window has 1 record in total.
Screenshot Key Points
| Field / Control | Description |
|---|---|
| Refresh Results | Re-fetch the latest history under the selected conditions. Required · Enter: Refresh Results |
85. Verify the Single 52 History Record After Refresh
Location: Historical Data*→*Temperature Query Steps: Read the refreshed Temperature History Details.
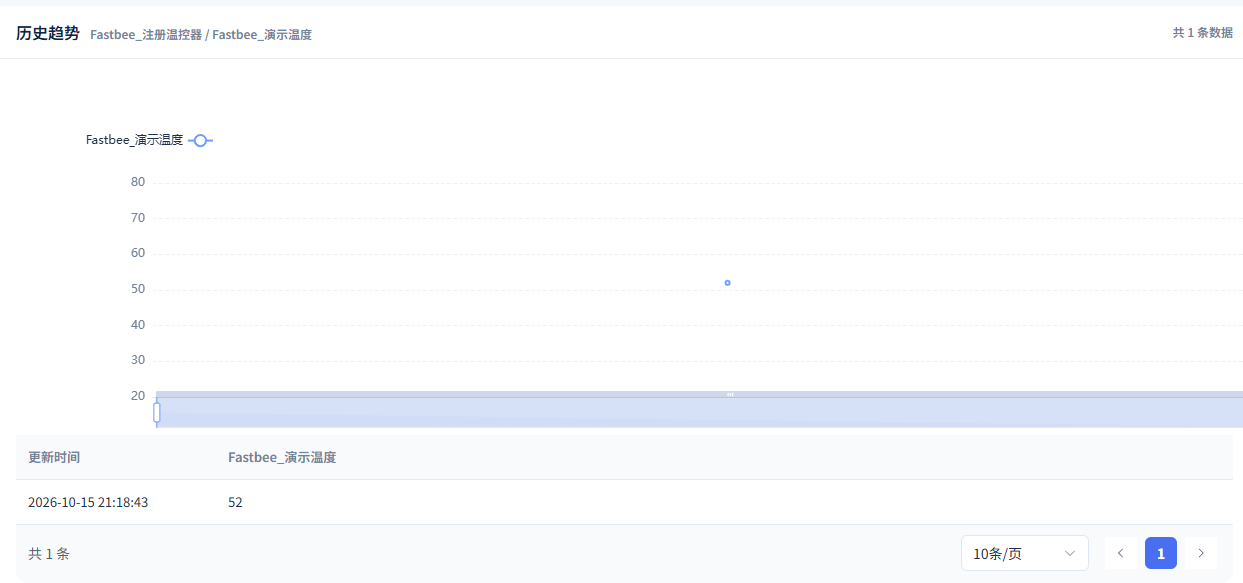
This window has only 1 record: 2026-10-15 21:18:43, temperature 52.
Screenshot Key Points
| Field / Control | Description |
|---|---|
| Temperature History Details | Shows the only temperature record in this narrow window. Required · Enter: 2026-10-15 21:18:43; 52; 1 record in total |
Stop Sending and Disconnect, Keeping Resources for Re-verification
At the end, stop the scheduled send first, then save the disabled schedule and disconnect the official session. The product, device, model, registration configuration, connection definition, and history are retained for re-verification.
The first scripted wrap-up of this 21:18 new-52 run once failed because the button was covered, and the original record is fully retained. The scheduled send was then started, stopped, and disabled separately from the real web page, and the final record shows the official session disconnected with timerRunning, autoReconnect, and autoReply all false. The interface run count of 1 is only a GUI observation and does not by itself prove the platform received a new heartbeat.
86. Stop the Scheduled Send
Location: FMQX Web Version*→*Stop and Retain Steps: While the scheduled send is running, click Stop Scheduled Send; when already stopped, verify it has not been restarted.

The scheduled send is running with 1 message sent; click Stop to end the schedule.
Screenshot Key Points
| Field / Control | Description |
|---|---|
| Stop Scheduled Send | Stop sending the heartbeat while keeping the schedule content. Required · Enter: Timer stopped |
87. Keep the Disabled Heartbeat Configuration
Location: FMQX Web Version*→*Stop and Retain Steps: Save the disabled heartbeat plan; when already disabled, read back the saved disabled heartbeat plan.

After saving, the state is not enabled; the plan is retained and no longer sends automatically on a timer.
Screenshot Key Points
| Field / Control | Description |
|---|---|
| Save the Disabled Heartbeat Plan | Keep 7E817E and the 30-second interval while disabling automatic scheduled sending. Required · Enter: enabled=false |
88. Verify the Official Session Is Disconnected
Location: FMQX Web Version*→*Stop and Retain Steps: Read the official session's Retained Stopped State and confirm the name is correct, it is disconnected, and a Connect button appears.

The official session is disconnected; the title and Connect button are clear with no save prompt covering them.
Screenshot Key Points
| Field / Control | Description |
|---|---|
| Retained Stopped State | Read the final state of the official session. Required · Enter: FastBee_Registered Temperature Control Demo; Disconnected; Connect |
89. Verify Configuration Save and Wrap-Up
Location: FMQX Web Version*→*Stop and Retain Steps: In the Retained Stopped State, view the save success prompt and the session disconnected state.

Retained wrap-up record: the scheduled send configuration has been saved and the official session is disconnected.
Screenshot Key Points
| Field / Control | Description |
|---|---|
| Retained Stopped State | Retain the real save prompt and session state in the 21:23 wrap-up screenshot. Required · Enter: Scheduled send configuration saved; Disconnected |
90. View the Retained Device Details
Location: FMQX Web Version*→*Stop and Retain Steps: View the Retained Device Details and verify the device number, offline state, and owning product.

The top of the device details shows the device number, offline state, and owning product; this screenshot only shows the top content.
Screenshot Key Points
| Field / Control | Description |
|---|---|
| Retained Device Details | Read the device number, offline state, and owning product at the top of the retained device details. Required · Enter: Device number readable; Offline; Owning product readable |
FMQX Web Version → Stop and Retain
| Field / Control | How to Fill In |
|---|---|
| Disconnect | Stop the official TCP connection; recovery requires re-registration. |
| Stop Scheduled Send | Stop sending the heartbeat while keeping the schedule content. |
| Save the Disabled Heartbeat Plan | Keep 7E817E and the 30-second interval while disabling automatic scheduled sending. Required · Enter: enabled=false |
| Retained Stopped State | Retain the product, device, temperature model, connection definition, scenarios, and history for re-verification. |
Common Errors and Recovery Methods
| What You See | Possible Cause | Where to Check First | How to Recover |
|---|---|---|---|
| The device wizard says JSON/TCP creation is not supported | The wizard's creation entry does not support this combination. | Whether the product draft is saved; whether Device Management has the Manual Add permission. | Keep the product draft and add manually from the Device Management Access Device menu. |
| TCP connected but the business has no identity or no temperature | The registration identity override, platform device number, or JSON property key is inconsistent. | The raw HEX identity and registration packet; the clientId and platform device number; the business temperature key and the model. | Fix the identity mapping and publish to APPLIED, then reconnect, register, and send one new temperature JSON. |
| Cannot register after sending HEX characters | The HEX display text was sent as ASCII, or the registration envelope is wrong. | The actual send format must be Hex; whether the raw frame is 7E80 plus the identity HEX plus 7E. | Select Hex sending; after replacing the real identity, validate the vector first, then resend the registration. |
| Downlink wait times out and the device state does not change | The receive mode is By Line, the wait has already timed out, or the platform send happened before the wait started. | Byte Stream; futureOnly=true; the current run is still waiting. | Save the Byte Stream configuration and reconnect and register; start a new round of waiting before sending a new command. |
| The scheduled send produces default text instead of the heartbeat | The schedule read-back value does not match, or the old default configuration is still enabled. | Content 7E817E, format Hex, 30 seconds, and zero retries. | Stop first, fix and save the schedule, then read back before starting; wrong sends are retained as failure records. |
| The response succeeds but the platform's latest temperature does not change | There is only an execution response and no independent business state report. | Whether the post-execution state read and the independent JSON report belong to the same new command. | Have the device read the post-execution state and report it independently; then query the current value and that window's history. |
| History has no result for this round or mixes in old values | The device, property, or time range is wrong, or it was not refreshed. | The current device number, temperature property, and this operation's time window. | Re-query with a narrow window and refresh, then compare each record against the actual business times and values. |
How to Confirm Results During Re-acceptance
First confirm the retained official connection uses Byte Stream, the heartbeat plan is disabled, and the platform model range is correct; read the device's current state in the real-time run console. The initial 40 in the imported definition is only a configuration reference; the actual initial value of each re-verification is subject to the same round's read result. Then check the published version and the target node APPLIED, and verify with new commands and new time windows. The original samples and original control rounds remain retained.
After reconnecting and registering, send 31 through 40 one by one and query the same window's ten business history records. Start the scenario that only waits for a new command and send 53 down; after disconnecting, reconnecting, and registering, send 52 down. In every round, verify the actual reception, execution response, independent state, platform latest value, and refreshed history.
Finally, stop the schedule, disable the plan, and disconnect, keeping the product, device, and historical data. For the next verification, reconnect, register, and query a new time range.