

JSON and UDP Wireless Thermostat Access
This article is compiled from an existing operations manual into an online operations reference. Operations marked as expected or not executed in the original text must still be verified against the actual environment. This article is a supplementary reference with applicability limits; the missing-item status in the original manual remains in place.
Each datagram carries identity for reporting, downlink returns, status re-reporting, history, and stop-and-recovery.
Before you start: you have product, device, Thing Model, publish, control, and history permissions; the local application, single-node FMQ, and FMQX Web are available; the UDP parameters and device number are confirmed
Before You Start
This article uses one wireless thermostat device to complete JSON/UDP reporting, platform setpoint downlink, device reply, independent status re-reporting, history refresh, and recovery after stopping. It suits devices that can send complete JSON datagrams to a designated UDP entry and receive returned commands on the source port.
FastBee handles the product, device, control, and history; FMQ is the device access service; FMQX Web plays the demo device in this article. FMQX's JSON demo state machine accepts the setpoint and replies automatically; the status is then manually re-reported by the operator in the send box. This does not represent a real physical thermostat's actions or automatic continuous sampling.
The account needs product, device, Thing Model editing, publish, control, and history query permissions. Prepare the Device Number, the two field definitions, the UDP access address and port, and the allowed setpoint range; use a dedicated product and session.
Functional relationship diagram
Direction explanation; not a running screenshot.
Distinguish the Two UDP Endpoint Addresses First
In this example FMQ listens on UDP 8889; FMQX listens locally on 0.0.0.0:15021 and sends to 127.0.0.1:8889. 0.0.0.0 indicates the local NIC listening scope and cannot be used as a remote target; 127.0.0.1 only applies when the device tool and FMQ are on the same computer. Across machines, use the reachable access address provided by the administrator.
Each UDP datagram independently carries a complete JSON; the top-level clientId of each equals the platform Device Number, and the id stays unique for each new message. UDP is not processed as a TCP byte stream; it needs none of the TCP registration frame, fragment reassembly, or packet coalescing handling outside this article. The network may lose packets or deliver them out of order; verify against the platform's actual values and history.
The access service uses the source IP and source port of the most recent identity-carrying datagram as the downlink return address. After a disconnect, restart, or network address change, send a new identity datagram first, then send commands down; FMQX showing Connected only means local sending and receiving are ready.
1. Create the Product, Fields, and Device
1. Start from New Product
Location: IoT*→Device Access→*Where to Start Steps: Select New Product and enter Product Name FastBee_Wireless_Thermostat. When re-verifying with this article's resources already in place, reuse them directly.
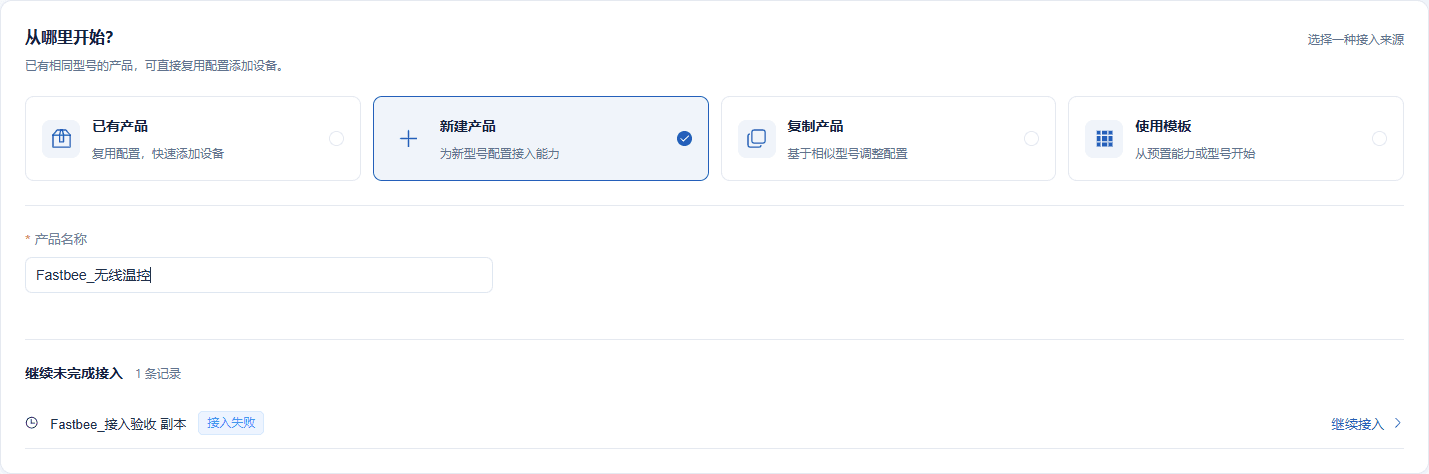
Use a dedicated product and device, to retain data and isolate this article's operations.
Key Points in the Screenshot
| Field / Control | Notes |
|---|---|
| Access Source | Create a dedicated model for this article; reuse existing resources directly when re-verifying. Required · Enter: New Product |
| Product Name | Give this type of wireless thermostat device a clear business name. Required · Enter: FastBee_Wireless_Thermostat |
2. Generate Field Drafts from the JSON Sample
Location: Device Access Wizard*→*Product and Protocol Steps: Paste the complete JSON Sample below and continue to preview the fields.

The sample is only used to extract the two properties; the device's actual reports must also carry the method, device identity, and an independent message number.
Key Points in the Screenshot
| Field / Control | Notes |
|---|---|
| JSON Sample | Take the two properties from the device's actual message; the wizard extracts field drafts first. Required · Enter: {"FastBee_temperature":20,"FastBee_setpoint":30} |
JSON sample used by the wizard to generate fields json
{

  "FastBee_temperature": 20,

  "FastBee_setpoint": 30

}This sample only extracts properties; actual UDP reports use the complete datagrams later.
3. Verify the Two Properties and JSON Paths
Location: Device Access Wizard*→*Collection Fields Steps: Verify that Temperature and Set Temperature are Integers, with paths corresponding to their respective fields.
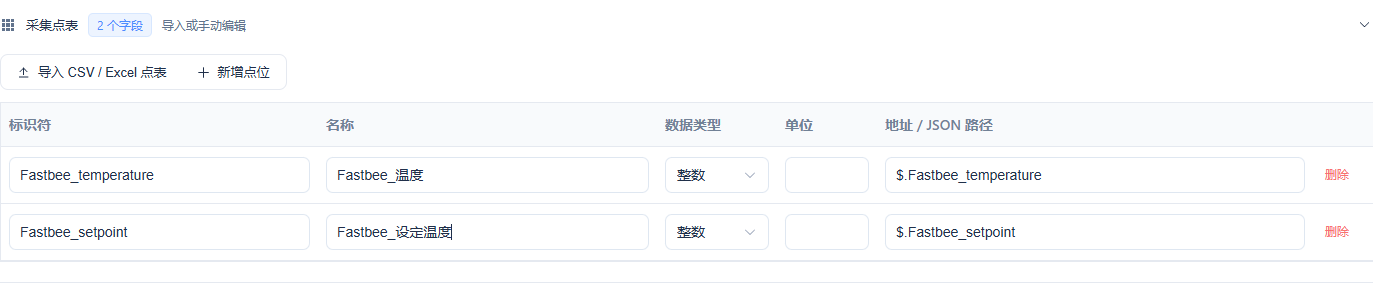
Units are not yet filled in at this stage; degrees Celsius, read/write, and history are set later in Feature Definition.
Key Points in the Screenshot
| Field / Control | Notes |
|---|---|
| Fields and JSON Paths | The two properties correspond to temperature and set temperature respectively; the identifiers must match the keys in params. Required · Enter: $.FastBee_temperature; $.FastBee_setpoint |
| Data Type | Both fields are integers in this article; units and read/write are completed in Feature Definition. Required · Enter: Integer |
4. Enter the Unique Device Number
Location: Device Access Wizard*→*Add Device Steps: Fill in the Device Name and Device Identifier; the number is FastBee_UDP_Tutorial_01.

This number must be written verbatim into the clientId of every UDP datagram; it is not the FMQX temporary session number.
Key Points in the Screenshot
| Field / Control | Notes |
|---|---|
| Device Identifier | The clientId of every UDP message matches this number exactly, case-sensitive. Required · Enter: FastBee_UDP_Tutorial_01 |
| Device Name | Locates the current demo device in lists. Required · Enter: FastBee_Wireless_Thermostat |
5. Verify the Base Product and Device
Location: Device Access Wizard*→*Access Confirmation Steps: Verify this article's product, 1 device, and 2 collection fields, then complete the base creation.

The wizard overview in the picture is still the initial JSON/MQTT; the next step changes it to JSON/UDP; this picture does not mean UDP is already effective.
Key Points in the Screenshot
| Field / Control | Notes |
|---|---|
| Access Overview | This screenshot is the wizard's initial JSON/MQTT overview; the next section changes it to JSON/UDP. Required · Enter: 1 device, 2 collection fields |
| Device Identifier | The clientId of every UDP message matches this number exactly, case-sensitive. Required · Enter: FastBee_UDP_Tutorial_01 |
2. Switch to JSON and UDP and Configure the Properties
6. Explicitly Switch the Product to JSON and UDP
Location: Product Management*→Wireless Thermostat→*Protocol Settings Steps: Set the access protocol to UDP, data format JSON, transport UDP, and save.
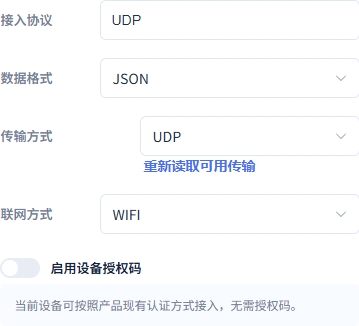
This article ends with JSON/UDP, WIFI, and authorization code off; do not keep the wizard's initial MQTT transport.
Key Points in the Screenshot
| Field / Control | Notes |
|---|---|
| Access Protocol | This article finally selects UDP. Required · Enter: UDP |
| Data Format | This article uses a plain JSON object, not JSON Array or Alink. Required · Enter: JSON |
| Transport | It must finally be UDP; the wizard's MQTT must not be kept. Required · Enter: UDP |
| Network Mode | This article's business device uses WIFI as its network mode identifier. Required · Enter: WIFI |
| Authorization Code | Off in this article's demo; do not copy authorization info from other products. Required · Enter: Off |
7. Configure Set Temperature as Writable and Keep History
Location: Product Management*→Wireless Thermostat→Feature Definition→*Set Temperature Steps: Clear Read-only Data, enable History Storage, set the integer range 16~35 and degrees Celsius, then save.
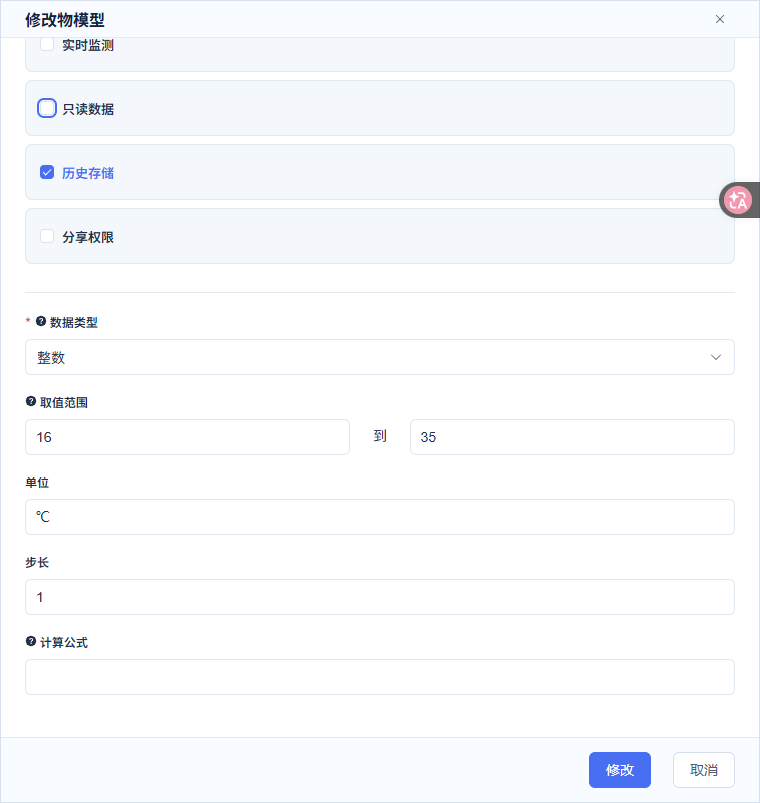
Set temperature is writable, history on, chart display and real-time monitor off, step 1; reopen after saving to verify.
Key Points in the Screenshot
| Field / Control | Notes |
|---|---|
| Model Translation | Fill in a clear English name; complete the required items before saving. Required · Enter: Temperature/Setpoint |
| Model Identifier | The reported property keys must match the model identifiers verbatim. Required · Enter: FastBee_temperature/FastBee_setpoint |
| Model Category | Both the reading and the writable setpoint use properties. Required · Enter: Property |
| Read-only Data | Temperature is read-only; set temperature clears read-only to provide the control entry. Required · Enter: Checked for temperature; unchecked for setpoint |
| History Storage | Both fields are enabled so later reports can be queried in history. Required · Enter: Checked |
| Chart Display / Real-time Monitor | On for temperature, off for setpoint; after changing the display switches, recheck the read-only status. Required · Enter: On for temperature; off for setpoint |
| Sharing Permission | Used per tenant permissions; sharing is not opened in this article. Required · Enter: Unchecked |
| Integer Range and Step | Temperature -40~100, setpoint 16~35, step 1 for both. Required · Enter: Temperature -40~100; setpoint 16~35; step 1 |
| Unit | Both properties use degrees Celsius. Required · Enter: ℃ |
8. Configure Temperature as Read-Only and Keep History
Location: Product Management*→Wireless Thermostat→Feature Definition→*Temperature Steps: Keep Read-only Data, enable History Storage, set the integer range -40~100 and unit ℃.
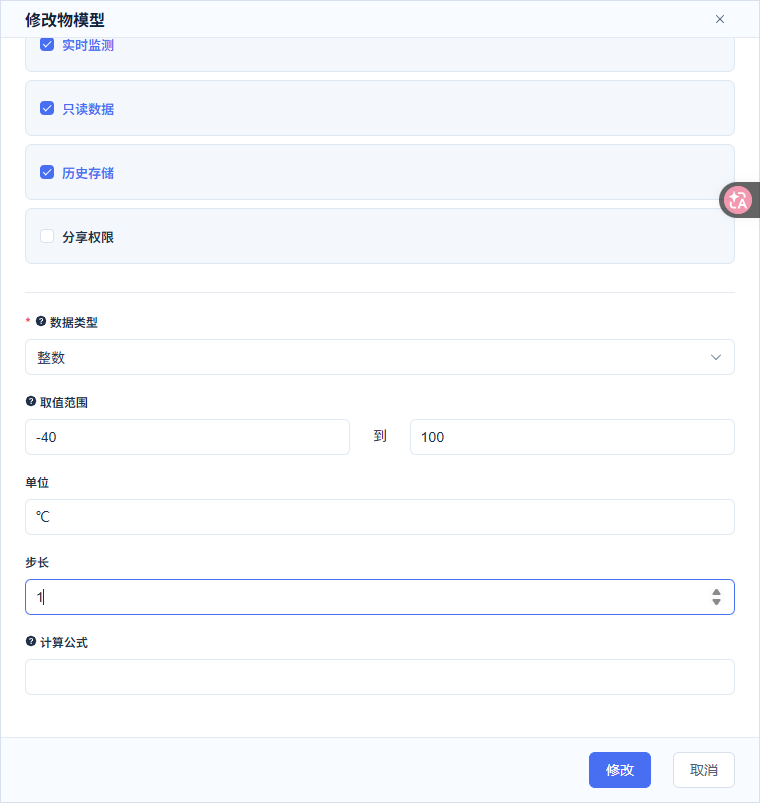
Temperature is read-only, chart display and real-time monitor on, history on, step 1.
Key Points in the Screenshot
| Field / Control | Notes |
|---|---|
| Model Identifier | The reported property keys must match the model identifiers verbatim. Required · Enter: FastBee_temperature/FastBee_setpoint |
| Read-only Data | Temperature is read-only; set temperature clears read-only to provide the control entry. Required · Enter: Checked for temperature; unchecked for setpoint |
| History Storage | Both fields are enabled so later reports can be queried in history. Required · Enter: Checked |
| Chart Display / Real-time Monitor | On for temperature, off for setpoint; after changing the display switches, recheck the read-only status. Required · Enter: On for temperature; off for setpoint |
| Integer Range and Step | Temperature -40~100, setpoint 16~35, step 1 for both. Required · Enter: Temperature -40~100; setpoint 16~35; step 1 |
| Unit | Both properties use degrees Celsius. Required · Enter: ℃ |
9. Reopen the Corresponding Device to Verify Its Identity
Location: Device Management*→Wireless Thermostat→*Edit Steps: Open this article's device, first verify the Device Name, then check its owning product and device number.

After the product transport changes from MQTT to UDP, you must confirm you are working on the same device; this picture shows the actual device name.
Key Points in the Screenshot
| Field / Control | Notes |
|---|---|
| Device Name and Owning Product | Open this article's device and confirm the name and number, to avoid re-saving another device. Required · Enter: FastBee_Wireless_Thermostat |
| Device Identifier | The clientId of every UDP message matches this number exactly, case-sensitive. Required · Enter: FastBee_UDP_Tutorial_01 |
10. Re-save the Device and Confirm Success
Location: Device Management*→Wireless Thermostat→*Edit Steps: After completing the checks, click Modify, and close the prompt after seeing Modification Successful.
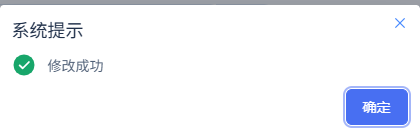
This article observed that UDP downlink recovered after re-saving the device; publish effectiveness, identity datagrams, and device actual receipt still need verification.
Key Points in the Screenshot
| Field / Control | Notes |
|---|---|
| Modify / Save | After the product changes from MQTT to UDP, re-save the corresponding device and confirm the modification succeeds. Required · Enter: Modification Successful |
11. Confirm Publishing the Saved Configuration
Location: Product Management*→Wireless Thermostat→*Publish Update Steps: Confirm the draft parameters are saved, click Publish Update, and click Confirm in the prompt box.
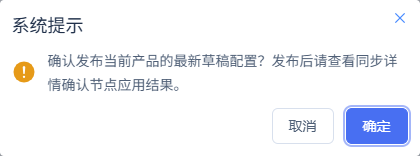
After the publish prompt succeeds, continue to check the access node receipt; you cannot judge that the device has accessed based on the prompt alone.
Key Points in the Screenshot
| Field / Control | Notes |
|---|---|
| Publish Product | Publish after saving the configuration; when editing a published product, unpublish first. Required · Enter: Confirm publish |
12. Confirm the Access Configuration Actually Takes Effect After Publishing
Location: Product Management*→Wireless Thermostat→*Access Configuration Sync Steps: Publish the saved configuration, expand the sync result, and confirm APPLIED with an empty Failure Reason.
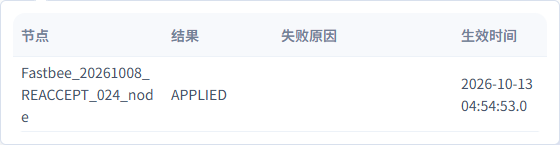
After the supplementary collection of the same product configuration was published, the current access node is APPLIED with 0 failures; the original acceptance uplink/downlink and history evidence is retained separately.
Key Points in the Screenshot
| Field / Control | Notes |
|---|---|
| Access Configuration Sync Result | Confirm the access node has applied this configuration; do not rely on save success alone. Required · Enter: APPLIED, 0 failures |
| Publish Product | Publish after saving the configuration; when editing a published product, unpublish first. Required · Enter: Confirm publish |
Temperature is a read-only integer with range -40~100℃; set temperature is a writable integer with range 16~35℃ and step 1; both have history storage enabled. Save after finishing modifications; a published product must be unpublished before editing, then republished with the access configuration sync confirmed as APPLIED.
This article's actual test first created the base JSON fields in the wizard, then changed the product transport to UDP. The first downlink still went over the old transport, and UDP actual receipt succeeded after re-saving the corresponding device; therefore follow this section to re-save the device, then publish, verify effectiveness, and verify device actual receipt. Re-saving is an observed recovery operation and cannot replace actual verification.
This publish has been applied on the access node with 0 failures. The sync result together with the subsequent real reports and device actual receipt jointly verify access; do not rely on save or publish prompts alone.
3. Configure FMQX Web
Import the UTF-8 JSON below into the UDP tutorial group in FMQX Web; when re-verifying with this article's session already in place, reuse it directly and avoid same-named sessions. Auto reconnect off, broadcast off. The screenshot of the import menu action is pending; the real connection configuration picture is used below.
Complete FMQX Web UDP configuration json
{

  "schemaVersion": 3,

  "groups": [

    {

      "id": "FastBee_tutorial_udp_group",

      "name": "FastBee_UDP教程",

      "sortOrder": 52,

      "isSystem": false

    }

  ],

  "sessions": [

    {

      "id": "FastBee_tutorial_udp_01",

      "groupId": "FastBee_tutorial_udp_group",

      "name": "FastBee_无线温控",

      "protocol": "UDP",

      "transport": "UDP",

      "host": "127.0.0.1",

      "port": 8889,

      "udpLocalPort": 15021,

      "udpTargetAddress": "127.0.0.1",

      "udpTargetPort": 8889,

      "clientId": "FastBee_UDP_Tutorial_01",

      "autoReconnect": false,

      "jsonDevice": {

        "format": "JSON",

        "responseRoute": "",

        "initialState": {

          "FastBee_temperature": 29,

          "FastBee_setpoint": 30

        }

      }

    }

  ]

}Save as a UTF-8 JSON and import; the actual session is created by FMQX, and the imported configuration identifier is not the running session number.
13. Open the FMQX Import Menu
Location: FMQX Web*→*More Actions Steps: Click More Actions, select Import Configuration, and import this article's connection configuration.
Import this article's UDP session from the real menu; when a session already exists for re-verification, reuse it directly and do not import again.
Key Points in the Screenshot
| Field / Control | Notes |
|---|---|
| Import Configuration | Import this article's UTF-8 configuration into the UDP tutorial group in FMQX Web. Required · Enter: Wireless Thermostat UDP session |
14. Verify the Two UDP Endpoint Addresses in FMQX
Location: FMQX Web*→UDP Tutorial→Wireless Thermostat→*Connection Configuration Steps: Import the configuration below and verify local port 15021, remote address 127.0.0.1, and remote port 8889.
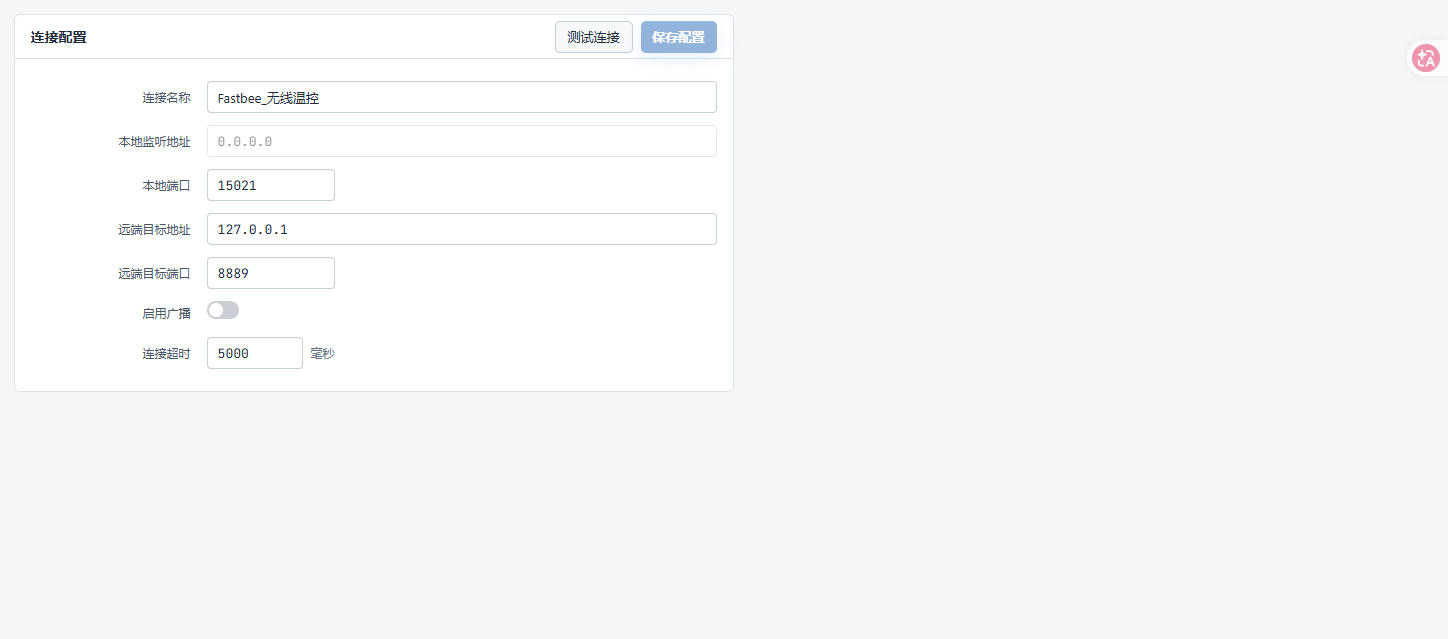
Local listening 0.0.0.0:15021, remote target 127.0.0.1:8889, broadcast off, timeout 5000 ms; use 127.0.0.1 only for same-machine demos.
Key Points in the Screenshot
| Field / Control | Notes |
|---|---|
| Connection Name | Identifies this article's retained session. Required · Enter: FastBee_Wireless_Thermostat |
| Local Listen Address | The NIC address on the FMQX machine that receives returned datagrams. Required · Enter: 0.0.0.0 |
| Local Port | The UDP source port on which the device tool receives downlink; it must not be occupied on this machine. Required · Enter: 15021 |
| Remote Target Address | Fill in the reachable address of the FMQ UDP entry. 127.0.0.1 is only usable for same-machine demos. Required · Enter: 127.0.0.1 |
| Remote Target Port | Must match the FMQ UDP listening port. Required · Enter: 8889 |
| Enable Broadcast | This article uses a point-to-point target and does not enable broadcast. Required · Enter: Off |
| Connect Timeout | The interface unit is milliseconds; it is not a UDP delivery guarantee. Required · Enter: 5000 ms |
| Import Configuration | Import this article's UTF-8 configuration into the UDP tutorial group in FMQX Web. Required · Enter: Wireless Thermostat UDP session |
| Test Connection | Can check configuration readiness; the business still must be verified by actual reporting. Required · Enter: Test Connection |
| Save Configuration | After saving, reuse this article's session; resume sending and receiving after configuration changes. Required · Enter: Save Configuration |
15. Start Local UDP Sending and Receiving
Location: FMQX Web*→UDP Tutorial→*Wireless Thermostat Steps: Click Connect and confirm the session shows Connected.

UDP Connected only means local sending and receiving are ready; it does not guarantee the remote is reachable or every datagram is delivered; verify with real reporting in the next step.
Key Points in the Screenshot
| Field / Control | Notes |
|---|---|
| Connect / Disconnect | A UDP connection means the local send/receive port is ready; it does not mean a reliable remote connection or business pass. Required · Enter: Send an identity datagram first after connecting |
4. Report Ten Distinguishable Samples
The first complete UDP report json
{

  "id": "FastBee_UDP_Tutorial_sample_01",

  "version": "1.0",

  "method": "thing.event.property.post",

  "clientId": "FastBee_UDP_Tutorial_01",

  "params": {

    "FastBee_temperature": 20,

    "FastBee_setpoint": 30

  }

}Change the temperature one at a time from 20 to 29, with message numbers 01 to 10 in sequence; a new acceptance must use a completely new set of numbers.
16. Send the First Identity-Carrying Datagram
Location: FMQX Web*→*Send Content Steps: Fill the sample message below into the send box, verify the clientId, and click Send.
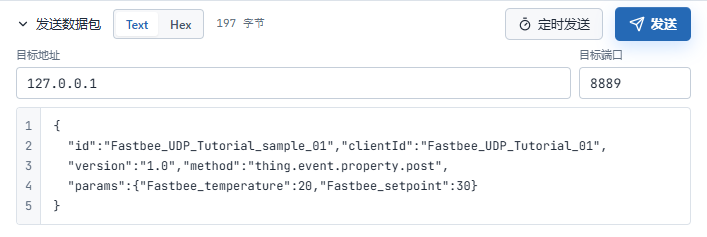
One whole JSON is sent as one UDP datagram; every datagram carries the device number — identity cannot be placed only in the first one.
Key Points in the Screenshot
| Field / Control | Notes |
|---|---|
| Datagram Device Identity | The top-level clientId of each datagram equals the platform device identifier. Required · Enter: FastBee_UDP_Tutorial_01 |
| Datagram Message Number | Each report uses an independent id; use new serial numbers when re-verifying to avoid replaying processed numbers. Required · Enter: Assign a new number to each new message |
| Send Content / Send | Send one whole JSON datagram in text format; click Send or press Ctrl+Enter. Required · Enter: Complete JSON; each contains clientId |
17. Send Ten Distinguishable Samples in Sequence
Location: FMQX Web*→*Send Records Steps: Keep the setpoint at 30, change the temperature in sequence through 20~29, and send each with a new Message Number.
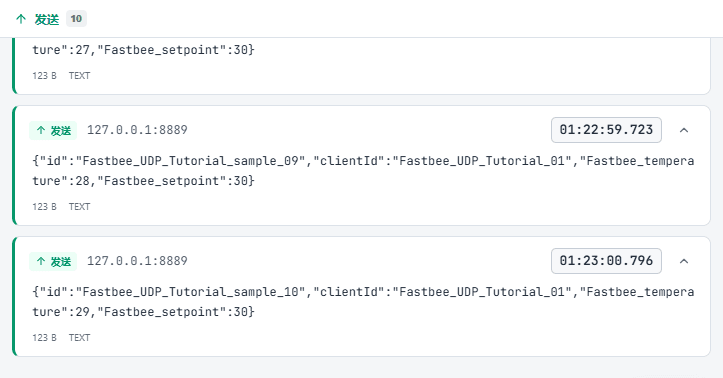
The send records show ten different entries; then verify every value on the platform and in history, without substituting the tool's send count for receive results.
Key Points in the Screenshot
| Field / Control | Notes |
|---|---|
| Datagram Message Number | Each report uses an independent id; use new serial numbers when re-verifying to avoid replaying processed numbers. Required · Enter: Assign a new number to each new message |
| Send Content / Send | Send one whole JSON datagram in text format; click Send or press Ctrl+Enter. Required · Enter: Complete JSON; each contains clientId |
18. Verify the Platform's Latest Properties
Location: Device Management*→Wireless Thermostat→*Running Status Steps: Refresh the details and verify temperature 29, set temperature 30, and the update time.
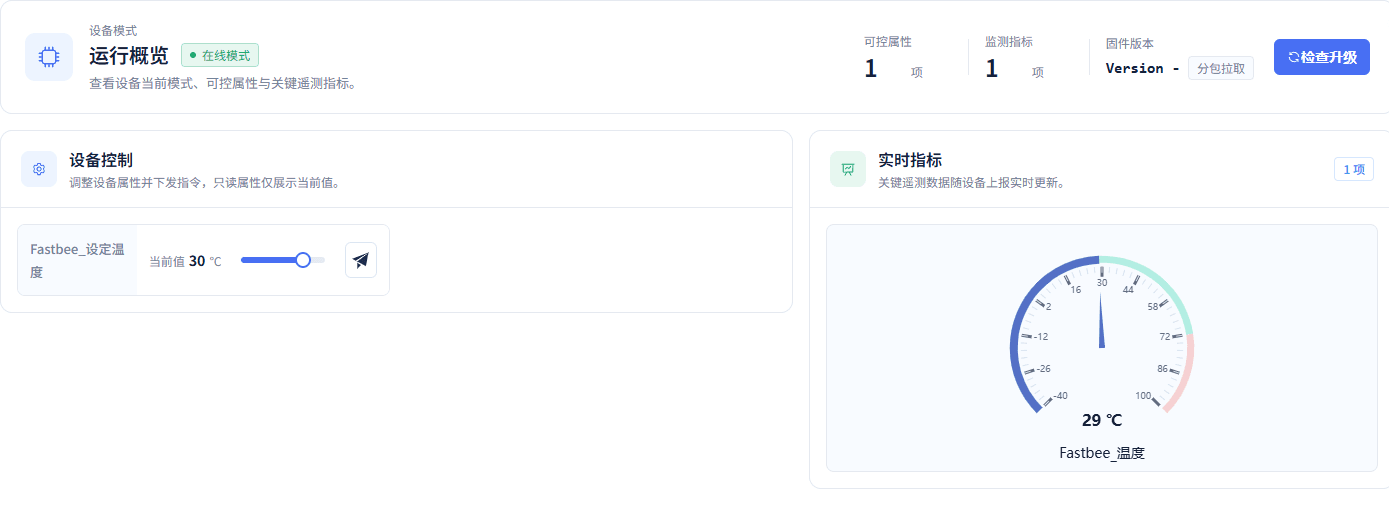
The actual latest temperature is 29 and setpoint 30 after the ten-sample report; later control must not treat the slider's pending value as the current value.
Key Points in the Screenshot
| Field / Control | Notes |
|---|---|
| Platform Current Value | The current value comes from property re-reporting; it cannot be replaced by the pending slider value or a dispatched prompt. Required · Enter: Temperature 29, setpoint 34 |
The ten samples have a fixed setpoint of 30 and temperatures 20 through 29 in sequence. Send one complete JSON each time; after sending, wait for the platform to see the current one before continuing to the next. Do not reuse the same id for new values, and do not substitute the tool's send count for platform receipt.
5. Send Down the Setpoint and Independently Report Status
19. Prepare the 32℃ Target and Send
Location: Device Management*→Wireless Thermostat→*Running Status Steps: Move the setpoint slider to 32, verify the slider indication, and click Send Command.

The slider's 32 is the pending target; the current value beside it still comes from device reports; the two can differ.
Key Points in the Screenshot
| Field / Control | Notes |
|---|---|
| Setpoint Slider and Paper Plane | Move the slider to an allowed target, verify the indicated value, then click the paper plane; do not resend repeatedly. Required · Enter: First 32; after recovery 34 |
20. Confirm the Device Received the Setpoint 32 Command
Location: Platform Running Status / FMQX Web*→*Receive Records Steps: After the platform moves the setpoint slider to 32 and sends, verify property setpoint 32 in the FMQX Receive Records.
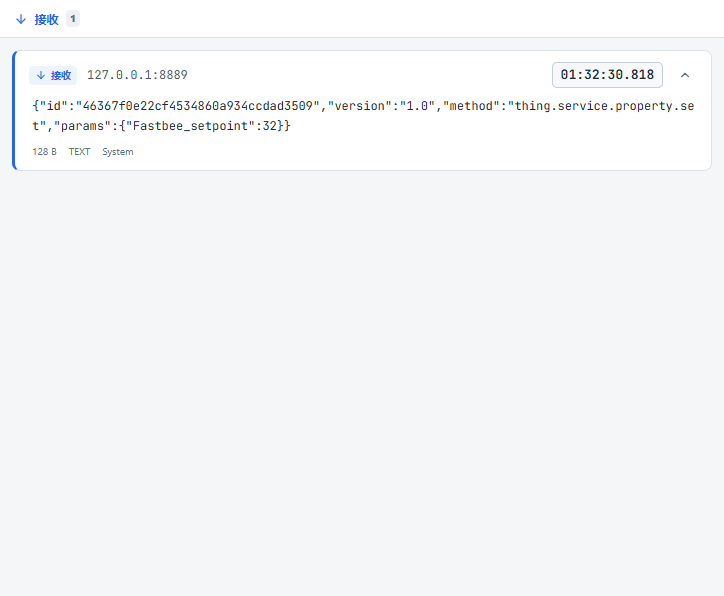
The device side actually received the 128-byte setpoint command; this picture is the real receipt of the original acceptance command; the previous preparation picture is a supplementary shot from this device's re-verification.
Key Points in the Screenshot
| Field / Control | Notes |
|---|---|
| Setpoint Slider and Paper Plane | Move the slider to an allowed target, verify the indicated value, then click the paper plane; do not resend repeatedly. Required · Enter: First 32; after recovery 34 |
| Receive Records | Check the actually received command content, setpoint value, and time. Required · Enter: 32; after recovery 34 |
21. Verify the FMQX Demo Execution and Automatic Reply
Location: FMQX Web*→*Send Records Steps: View the demo state machine's automatic reply and verify Setpoint 32, the success result, and Execution Count 1.
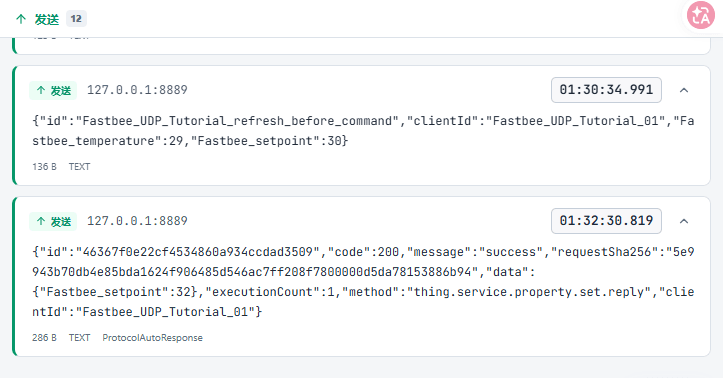
The FMQX jsonDevice demo accepts the setpoint and replies; the platform's top-level execution confirmation is still false, so dispatch or reply alone cannot prove physical action.
Key Points in the Screenshot
| Field / Control | Notes |
|---|---|
| Demo State Machine Reply | FMQX jsonDevice accepts the setpoint and replies automatically; the property status is then re-reported manually and independently. Required · Enter: Execution count 1/2, result 32/34 |
Independent status report after setpoint 32 json
{

  "id": "FastBee_UDP_Tutorial_after32",

  "version": "1.0",

  "method": "thing.event.property.post",

  "clientId": "FastBee_UDP_Tutorial_01",

  "params": {

    "FastBee_temperature": 29,

    "FastBee_setpoint": 32

  }

}After the FMQX automatic reply, the operator sends this property status in the GUI; use a new number for each re-verification.
22. Manually and Independently Report the Status After Setpoint 32
Location: FMQX Web*→*Send Content Steps: Fill in temperature 29 and setpoint 32 per the status message below, switch to an independent message number, and click Send.
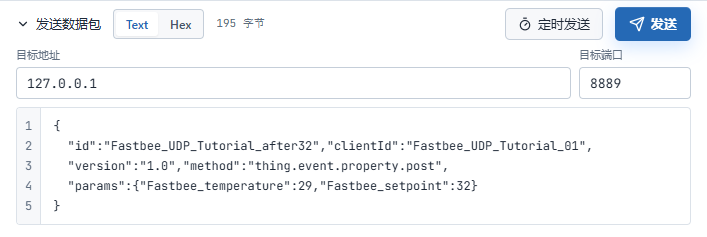
This is the operator independently re-reporting the property in the GUI, distinct from the previous automatic reply; it is not the device's automatic continuous telemetry.
Key Points in the Screenshot
| Field / Control | Notes |
|---|---|
| Datagram Device Identity | The top-level clientId of each datagram equals the platform device identifier. Required · Enter: FastBee_UDP_Tutorial_01 |
| Datagram Message Number | Each report uses an independent id; use new serial numbers when re-verifying to avoid replaying processed numbers. Required · Enter: Assign a new number to each new message |
| Send Content / Send | Send one whole JSON datagram in text format; click Send or press Ctrl+Enter. Required · Enter: Complete JSON; each contains clientId |
23. Confirm the Platform Value 32 After Re-Reporting
Location: Device Management*→Wireless Thermostat→*Running Status Steps: Refresh the details and verify the Current Value is 32.
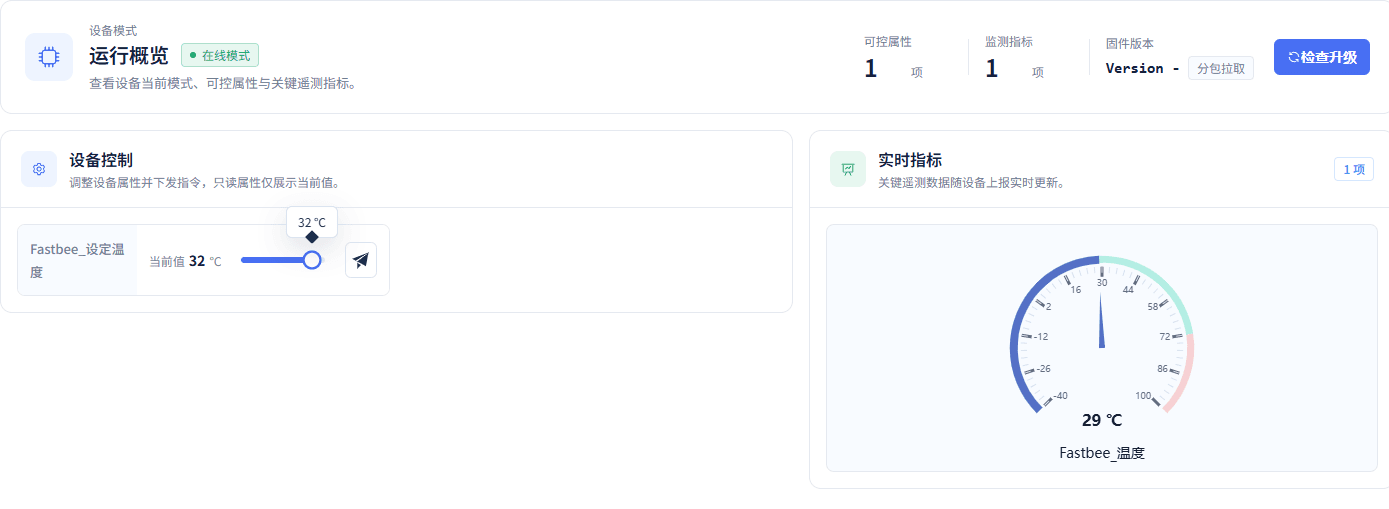
Setpoint 32 comes from the independent property status report; the device reply, current value, and history must be verified separately.
Key Points in the Screenshot
| Field / Control | Notes |
|---|---|
| Platform Current Value | The current value comes from property re-reporting; it cannot be replaced by the pending slider value or a dispatched prompt. Required · Enter: Temperature 29, setpoint 34 |
Distinguish in order: platform dispatch, device actual receipt, FMQX demo automatic reply, and independent property status report. The current value 32 comes from the latter property message; the platform still does not treat the automatic reply alone as a complete execution confirmation. The preparation picture of moving to 32 before control is pending; the device's actual receipt of 32 already has a separate screenshot in this section.
6. Recover After Stopping and Receive a New Command
24. Stop UDP Sending/Receiving and Retain the Session
Location: FMQX Web*→UDP Tutorial→*Wireless Thermostat Steps: Click Disconnect, confirm Disconnected, and stop this round of sending.

Retain the product, device, model, session, and history; this run only stops the connection and deletes no business resources.
Key Points in the Screenshot
| Field / Control | Notes |
|---|---|
| Retention and Re-Acceptance | When finished, disconnect FMQX and retain the product, device, model, session, and history. Required · Enter: Disconnected; last 29/34 retained |
| Connect / Disconnect | A UDP connection means the local send/receive port is ready; it does not mean a reliable remote connection or business pass. Required · Enter: Send an identity datagram first after connecting |
25. Restore the Original UDP Session
Location: FMQX Web*→UDP Tutorial→*Wireless Thermostat Steps: Reuse the retained session, click Connect, and confirm Connected.

Restore the same local port and remote target; after recovery completes, send an identity-carrying datagram first before sending down a new setpoint.
Key Points in the Screenshot
| Field / Control | Notes |
|---|---|
| Local Port | The UDP source port on which the device tool receives downlink; it must not be occupied on this machine. Required · Enter: 15021 |
| Remote Target Port | Must match the FMQ UDP listening port. Required · Enter: 8889 |
| Connect / Disconnect | A UDP connection means the local send/receive port is ready; it does not mean a reliable remote connection or business pass. Required · Enter: Send an identity datagram first after connecting |
New identity datagram sent first after recovery json
{

  "id": "FastBee_UDP_Tutorial_resume",

  "version": "1.0",

  "method": "thing.event.property.post",

  "clientId": "FastBee_UDP_Tutorial_01",

  "params": {

    "FastBee_temperature": 29,

    "FastBee_setpoint": 32

  }

}Register the current actual source IP and port first, then send down 34; change the message number when re-verifying.
26. Send an Identity-Carrying Datagram First After Recovery
Location: FMQX Web*→*Send Content Steps: Send the recovery message below, keep temperature 29 and setpoint 32, and carry the clientId and a new Message Number.
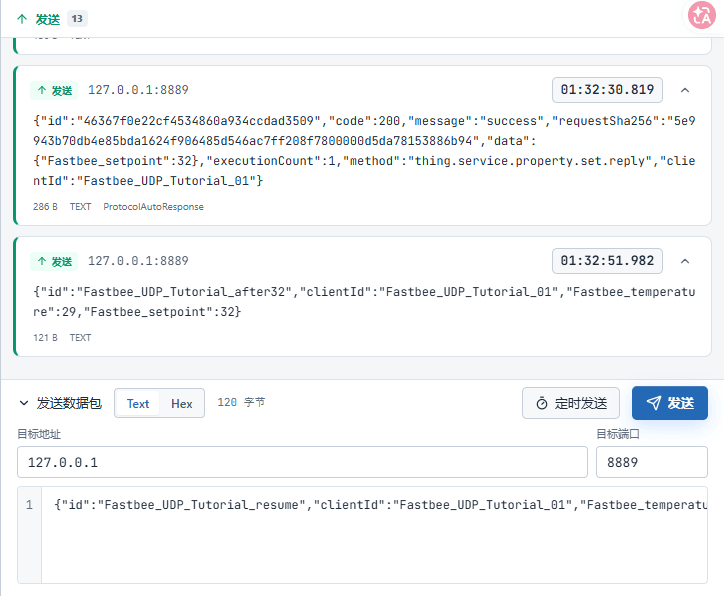
This message lets the access service re-register the current source IP and source port, to which downlink is returned; UDP has no TCP registration frame or connection handshake.
Key Points in the Screenshot
| Field / Control | Notes |
|---|---|
| Datagram Device Identity | The top-level clientId of each datagram equals the platform device identifier. Required · Enter: FastBee_UDP_Tutorial_01 |
| Datagram Message Number | Each report uses an independent id; use new serial numbers when re-verifying to avoid replaying processed numbers. Required · Enter: Assign a new number to each new message |
| Send Content / Send | Send one whole JSON datagram in text format; click Send or press Ctrl+Enter. Required · Enter: Complete JSON; each contains clientId |
27. Prepare the 34℃ Target After Recovery
Location: Device Management*→Wireless Thermostat→*Running Status Steps: Move the setpoint slider to 34, verify the indication, and click Send Command.

Restore UDP sending/receiving and register the return address with a new identity datagram first, then send down 34.
Key Points in the Screenshot
| Field / Control | Notes |
|---|---|
| Setpoint Slider and Paper Plane | Move the slider to an allowed target, verify the indicated value, then click the paper plane; do not resend repeatedly. Required · Enter: First 32; after recovery 34 |
28. Confirm Actual Receipt of Setpoint 34 After Recovery
Location: Platform Running Status / FMQX Web*→*Receive Records Steps: The platform moves the setpoint to 34 and sends; verify the new command 34 in the FMQX Receive Records.
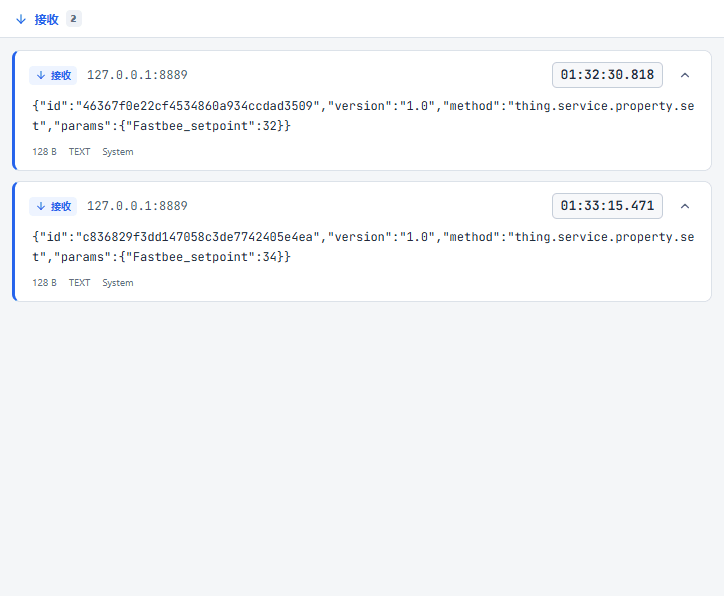
The list retains both the earlier 32 and the post-recovery 34 receipts; the post-recovery receipt proves the return address is still usable.
Key Points in the Screenshot
| Field / Control | Notes |
|---|---|
| Setpoint Slider and Paper Plane | Move the slider to an allowed target, verify the indicated value, then click the paper plane; do not resend repeatedly. Required · Enter: First 32; after recovery 34 |
| Receive Records | Check the actually received command content, setpoint value, and time. Required · Enter: 32; after recovery 34 |
29. Verify the Demo Reply After Recovery
Location: FMQX Web*→*Send Records Steps: Verify Setpoint 34 and Execution Count 2 in the automatic reply.
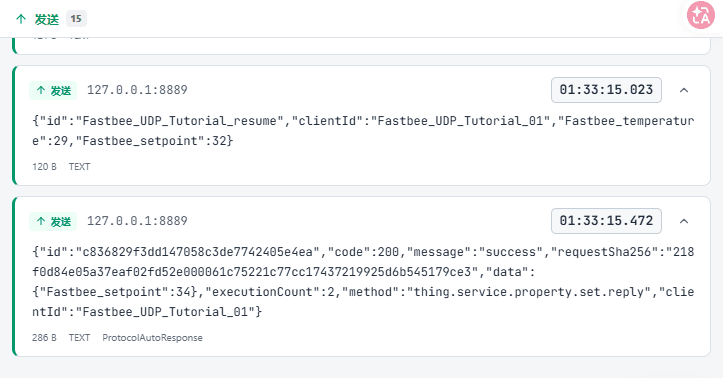
The second one is still an FMQX demo state machine reply; the operator then independently reports 29/34, without using the reply to substitute for the property status.
Key Points in the Screenshot
| Field / Control | Notes |
|---|---|
| Demo State Machine Reply | FMQX jsonDevice accepts the setpoint and replies automatically; the property status is then re-reported manually and independently. Required · Enter: Execution count 1/2, result 32/34 |
Independent status report for setpoint 34 after recovery json
{

  "id": "FastBee_UDP_Tutorial_after34",

  "version": "1.0",

  "method": "thing.event.property.post",

  "clientId": "FastBee_UDP_Tutorial_01",

  "params": {

    "FastBee_temperature": 29,

    "FastBee_setpoint": 34

  }

}After the automatic reply of 34, the operator sends this complete status message.
30. Independently Report the 34℃ Status After Recovery
Location: FMQX Web*→*Send Content Steps: Fill in this device's complete status message with setpoint 34, use a new Message Number each time, and click Send.
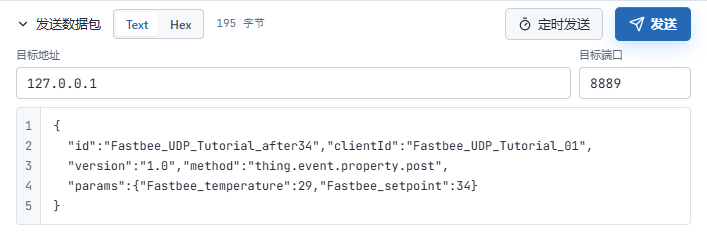
The device status re-report and the command success reply are two different messages; use your own new numbers when re-verifying and do not replay the old numbers in this picture.
Key Points in the Screenshot
| Field / Control | Notes |
|---|---|
| Datagram Device Identity | The top-level clientId of each datagram equals the platform device identifier. Required · Enter: FastBee_UDP_Tutorial_01 |
| Datagram Message Number | Each report uses an independent id; use new serial numbers when re-verifying to avoid replaying processed numbers. Required · Enter: Assign a new number to each new message |
| Send Content / Send | Send one whole JSON datagram in text format; click Send or press Ctrl+Enter. Required · Enter: Complete JSON; each contains clientId |
31. Re-Report and Confirm Platform 34
Location: FMQX Send Content / Device Management*→*Running Status Steps: Manually send the independent 29/34 status message below, then refresh the platform and confirm the Current Value is 34.
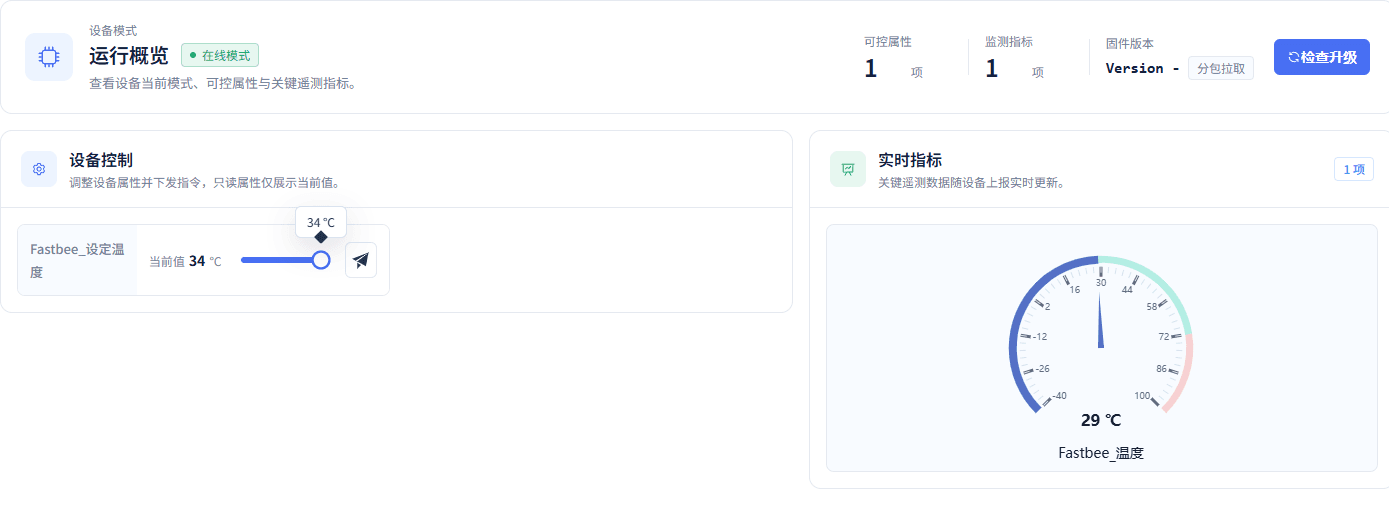
Final temperature 29, setpoint 34; the property status was re-reported at 01:33:52 and entered the actual history.
Key Points in the Screenshot
| Field / Control | Notes |
|---|---|
| Datagram Device Identity | The top-level clientId of each datagram equals the platform device identifier. Required · Enter: FastBee_UDP_Tutorial_01 |
| Datagram Message Number | Each report uses an independent id; use new serial numbers when re-verifying to avoid replaying processed numbers. Required · Enter: Assign a new number to each new message |
| Platform Current Value | The current value comes from property re-reporting; it cannot be replaced by the pending slider value or a dispatched prompt. Required · Enter: Temperature 29, setpoint 34 |
| Send Content / Send | Send one whole JSON datagram in text format; click Send or press Ctrl+Enter. Required · Enter: Complete JSON; each contains clientId |
Recovery uses the same saved session and local port: first send a datagram containing the Device Number, then change the platform setpoint to 34. Verify the device actually received 34, the demo execution count increased, the independent status report, and the platform current value 34, then verify history.
7. Query History and Refresh to Confirm
32. Query the Ten Temperature Samples
Location: Data Center*→*Historical Data Steps: Select this article's device and Temperature, cover 01:22~01:24 in time, and verify the ten values 20~29.
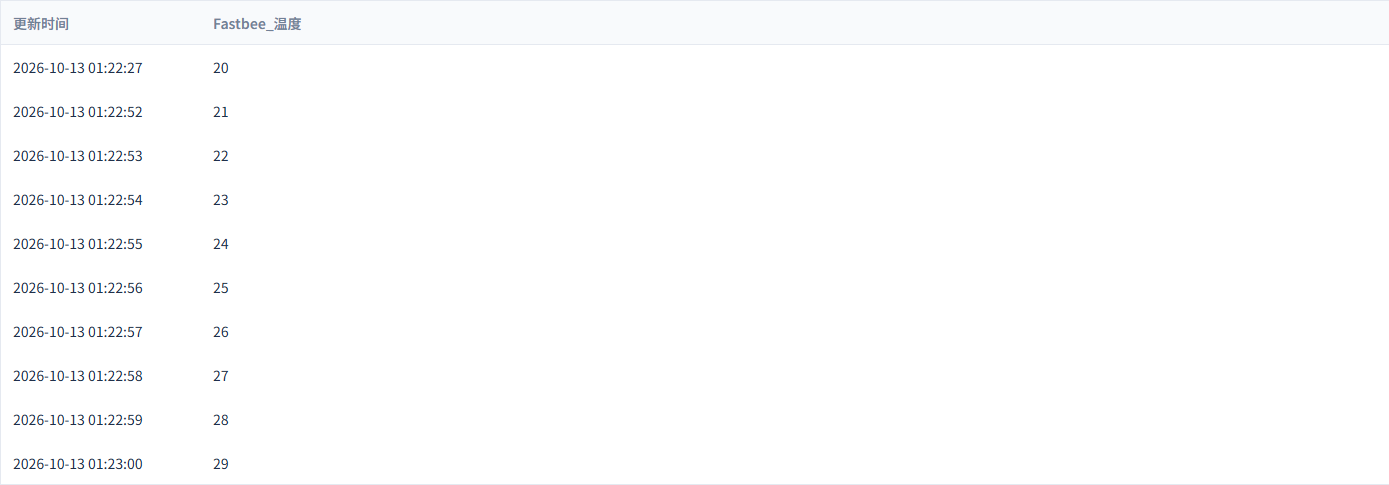
The ten rows each correspond to an independent message; the table picture does not include the filter area, so re-verification must confirm the device, field, and date.
Key Points in the Screenshot
| Field / Control | Notes |
|---|---|
| Device and Field | Select this article's device, then temperature or set temperature. Required · Enter: Wireless Thermostat / Temperature, Set Temperature |
| Time Range | Cover this round's reports and command status report times of the current device. Required · Enter: 2026-10-13 01:22~01:35 |
| Query and Refresh | Refresh the page and re-query with the same conditions; verify after loading finishes. Required · Enter: Temperature 20~29; setpoint 32→34 |
33. Refresh and Re-Query Setpoint 32 to 34
Location: Data Center*→*Historical Data Steps: After refreshing the page, re-select the device, Set Temperature, and 01:32~01:35, wait for loading to finish, then click Query.

01:32:51 is 32, still 32 after the recovery identity message, and 01:33:52 is 34; this picture was taken after the loading mask disappeared.
Key Points in the Screenshot
| Field / Control | Notes |
|---|---|
| Device and Field | Select this article's device, then temperature or set temperature. Required · Enter: Wireless Thermostat / Temperature, Set Temperature |
| Time Range | Cover this round's reports and command status report times of the current device. Required · Enter: 2026-10-13 01:22~01:35 |
| Query and Refresh | Refresh the page and re-query with the same conditions; verify after loading finishes. Required · Enter: Temperature 20~29; setpoint 32→34 |
For temperature select 2026-10-13 01:22~01:24 to find the ten samples 20~29. For set temperature select 01:32~01:35 to find 32, the 32 at recovery, and the final 34. After refresh, re-select the same device, field, and period, and wait for loading to finish before verifying.
The recovery identity message still reports 32, so the other 32 in history is an independent new message, not a duplicate entry. Actual verification correlates each message with its field one by one; same values, tool send counts, and runtime registration counts must not be lumped together directly.
8. Finish and Re-Accept
34. End Sending/Receiving and Retain the Data
Location: FMQX Web*→Wireless Thermostat→*Statistics Steps: Click Disconnect, confirm Disconnected, and retain this article's resources and all history.

The tool's 16 uplink entries consist of 14 properties and 2 replies, with 2 downlink entries; runtime records additionally produced by UDP identity registration are not counted in the tool's uplink count.
Key Points in the Screenshot
| Field / Control | Notes |
|---|---|
| Retention and Re-Acceptance | When finished, disconnect FMQX and retain the product, device, model, session, and history. Required · Enter: Disconnected; last 29/34 retained |
| Connect / Disconnect | A UDP connection means the local send/receive port is ready; it does not mean a reliable remote connection or business pass. Required · Enter: Send an identity datagram first after connecting |
This round finally only disconnects FMQX and stops sending; the product, device, Thing Model, saved session, and all history are retained. The platform retains the last temperature 29 and setpoint 34; this does not mean UDP is still sending/receiving, nor does it guarantee the device goes offline immediately after disconnecting.
A new acceptance reuses this article's resources: first verify the product is JSON/UDP, the Device Number, publish effectiveness, and the local port; after connecting, send a new identity-carrying datagram first. Use new message numbers to send at least ten different samples one by one, then send down a new in-range setpoint, verify device actual receipt, the demo reply, the independent status, real-time and history, refresh and re-query, and do one stop-and-recovery. When finished, disconnect again and retain both old and new history.
Field and Parameter Reference
JSON Access Wizard
| Field / Control | How to Fill |
|---|---|
| Access Source | Create a dedicated model for this article; reuse existing resources directly when re-verifying. Required · Enter: New ProductExisting Product: reuses a product of the same model; reuses a product of the same model.New Product: creates this article's dedicated product; creates this article's dedicated product.Copy Product: adjusts after copying from an existing product; adjusts after copying from an existing product.Use Template: selects an existing template; selects an existing template. |
| Product Name | Give this type of wireless thermostat device a clear business name. Required · Enter: FastBee_Wireless_Thermostat |
| JSON Sample | Take the two properties from the device's actual message; the wizard extracts field drafts first. Required · Enter: {"FastBee_temperature":20,"FastBee_setpoint":30} |
| Fields and JSON Paths | The two properties correspond to temperature and set temperature respectively; the identifiers must match the keys in params. Required · Enter: $.FastBee_temperature; $.FastBee_setpoint |
| Data Type | Both fields are integers in this article; units and read/write are completed in Feature Definition. Required · Enter: Integer |
| Device Identifier | The clientId of every UDP message matches this number exactly, case-sensitive. Required · Enter: FastBee_UDP_Tutorial_01 |
| Device Name | Locates the current demo device in lists. Required · Enter: FastBee_Wireless_Thermostat |
| Access Overview | This screenshot is the wizard's initial JSON/MQTT overview; the next section changes it to JSON/UDP. Required · Enter: 1 device, 2 collection fields |
JSON and UDP Protocol Settings
| Field / Control | How to Fill |
|---|---|
| Access Protocol | This article finally selects UDP. Required · Enter: UDPMust be published after modification.UDP: uses datagrams with independent boundaries, each carrying the device identity; uses datagrams with independent boundaries, each carrying the device identity. |
| Data Format | This article uses a plain JSON object, not JSON Array or Alink. Required · Enter: JSONMust be published after modification.JSON: each complete JSON object carries the method, device number, and properties; each complete JSON object carries the method, device number, and properties. |
| Transport | It must finally be UDP; the wizard's MQTT must not be kept. Required · Enter: UDPMust be published after modification.UDP: downlink returns to the source address and port registered by the most recent identity datagram; downlink returns to the source address and port registered by the most recent identity datagram. |
| Network Mode | This article's business device uses WIFI as its network mode identifier. Required · Enter: WIFIMust be published after modification.WIFI: a network mode classification; the actual send/receive transport is still UDP; a network mode classification; the actual send/receive transport is still UDP. |
| Authorization Code | Off in this article's demo; do not copy authorization info from other products. Required · Enter: OffMust be published after modification.Off: the configuration verified in this article; the configuration verified in this article.On: authorization parameters must be prepared and verified separately; not verified in this article; authorization parameters must be prepared and verified separately; not verified in this article. |
Feature Definition
| Field / Control | How to Fill |
|---|---|
| Model Translation | Fill in a clear English name; complete the required items before saving. Required · Enter: Temperature/SetpointMust be published after modification. |
| Model Identifier | The reported property keys must match the model identifiers verbatim. Required · Enter: FastBee_temperature/FastBee_setpointMust be published after modification. |
| Model Category | Both the reading and the writable setpoint use properties. Required · Enter: PropertyMust be published after modification.Property: stores the current reading or setpoint value; stores the current reading or setpoint value.Function: this article does not use a standalone function model; this article does not use a standalone function model.Event: this article does not use an event model; this article does not use an event model. |
| Read-only Data | Temperature is read-only; set temperature clears read-only to provide the control entry. Required · Enter: Checked for temperature; unchecked for setpointMust be published after modification.Checked: only displays reported values; only displays reported values.Unchecked: allows property setpoints to be sent down per permissions; allows property setpoints to be sent down per permissions. |
| History Storage | Both fields are enabled so later reports can be queried in history. Required · Enter: CheckedMust be published after modification.Checked: records subsequent collected values; records subsequent collected values.Unchecked: subsequent history cannot be verified per this article; subsequent history cannot be verified per this article. |
| Chart Display / Real-time Monitor | On for temperature, off for setpoint; after changing the display switches, recheck the read-only status. Required · Enter: On for temperature; off for setpointMust be published after modification.Checked: used for the corresponding reading display; note the read-only linkage; used for the corresponding reading display; note the read-only linkage.Unchecked: the setpoint can still be controlled via Running Status; the setpoint can still be controlled via Running Status. |
| Sharing Permission | Used per tenant permissions; sharing is not opened in this article. Required · Enter: UncheckedMust be published after modification.Checked: the sharing scope is decided by tenant business; the sharing scope is decided by tenant business.Unchecked: keeps this article's current permission scope; keeps this article's current permission scope. |
| Integer Range and Step | Temperature -40~100, setpoint 16~35, step 1 for both. Required · Enter: Temperature -40~100; setpoint 16~35; step 1Must be published after modification. |
| Unit | Both properties use degrees Celsius. Required · Enter: ℃Must be published after modification. |
Device Identity and Re-Save
| Field / Control | How to Fill |
|---|---|
| Device Name and Owning Product | Open this article's device and confirm the name and number, to avoid re-saving another device. Required · Enter: FastBee_Wireless_Thermostat |
| Modify / Save | After the product changes from MQTT to UDP, re-save the corresponding device and confirm the modification succeeds. |
Publish and Effectiveness
| Field / Control | How to Fill |
|---|---|
| Publish Product | Publish after saving the configuration; when editing a published product, unpublish first. |
| Access Configuration Sync Result | Confirm the access node has applied this configuration; do not rely on save success alone. Required · Enter: APPLIED, 0 failures |
FMQX Web UDP
| Field / Control | How to Fill |
|---|---|
| Import Configuration | Import this article's UTF-8 configuration into the UDP tutorial group in FMQX Web. Must reconnect after modification. |
| Connection Name | Identifies this article's retained session. Required · Enter: FastBee_Wireless_ThermostatMust reconnect after modification. |
| Local Listen Address | The NIC address on the FMQX machine that receives returned datagrams. Required · Enter: 0.0.0.0Must reconnect after modification. |
| Local Port | The UDP source port on which the device tool receives downlink; it must not be occupied on this machine. Required · Enter: 15021Must reconnect after modification. |
| Remote Target Address | Fill in the reachable address of the FMQ UDP entry. 127.0.0.1 is only usable for same-machine demos. Required · Enter: 127.0.0.1Must reconnect after modification. |
| Remote Target Port | Must match the FMQ UDP listening port. Required · Enter: 8889Must reconnect after modification. |
| Enable Broadcast | This article uses a point-to-point target and does not enable broadcast. Required · Enter: OffMust reconnect after modification.Off: sends only to the designated target; sends only to the designated target.On: requires a broadcast scenario and subnet configuration; not verified in this article; requires a broadcast scenario and subnet configuration; not verified in this article. |
| Connect Timeout | The interface unit is milliseconds; it is not a UDP delivery guarantee. Required · Enter: 5000 msMust reconnect after modification. |
| Test Connection | Can check configuration readiness; the business still must be verified by actual reporting. Must reconnect after modification. |
| Save Configuration | After saving, reuse this article's session; resume sending and receiving after configuration changes. Must reconnect after modification. |
| Connect / Disconnect | A UDP connection means the local send/receive port is ready; it does not mean a reliable remote connection or business pass. Must reconnect after modification. |
| Datagram Device Identity | The top-level clientId of each datagram equals the platform device identifier. Required · Enter: FastBee_UDP_Tutorial_01Must reconnect after modification. |
| Datagram Message Number | Each report uses an independent id; use new serial numbers when re-verifying to avoid replaying processed numbers. Required · Enter: Assign a new number to each new messageMust reconnect after modification. |
| Send Content / Send | Send one whole JSON datagram in text format; click Send or press Ctrl+Enter. Must reconnect after modification. |
| Receive Records | Check the actually received command content, setpoint value, and time. Required · Enter: 32; after recovery 34Must reconnect after modification. |
| Demo State Machine Reply | FMQX jsonDevice accepts the setpoint and replies automatically; the property status is then re-reported manually and independently. Required · Enter: Execution count 1/2, result 32/34Must reconnect after modification. |
Device Running Status
| Field / Control | How to Fill |
|---|---|
| Setpoint Slider and Paper Plane | Move the slider to an allowed target, verify the indicated value, then click the paper plane; do not resend repeatedly. Required · Enter: First 32; after recovery 34 |
| Platform Current Value | The current value comes from property re-reporting; it cannot be replaced by the pending slider value or a dispatched prompt. Required · Enter: Temperature 29, setpoint 34 |
Historical Data
| Field / Control | How to Fill |
|---|---|
| Device and Field | Select this article's device, then temperature or set temperature. Required · Enter: Wireless Thermostat / Temperature, Set Temperature |
| Time Range | Cover this round's reports and command status report times of the current device. Required · Enter: 2026-10-13 01:22~01:35 |
| Query and Refresh | Refresh the page and re-query with the same conditions; verify after loading finishes. |
Stop and Recovery
| Field / Control | How to Fill |
|---|---|
| Retention and Re-Acceptance | When finished, disconnect FMQX and retain the product, device, model, session, and history. Required · Enter: Disconnected; last 29/34 retained |
Where to Check First When Problems Occur
| Symptom | Possible Cause | Where to Check First | How to Recover |
|---|---|---|---|
| FMQX connected but the platform shows no new value | UDP local readiness does not equal datagram delivery, or the identity and property keys do not match. | Verify the target IP 8889, each datagram's clientId, the device number, complete JSON, and a new id. | Fix them, send a new sample, and continue after confirming the platform update time. |
| Downlink still fails after switching to UDP | This article observed that the device's old transport state did not take effect after the product change; the root cause is not yet confirmed. | Open the corresponding device and re-save it; verify the product is JSON/UDP and this publish is APPLIED. | After UDP recovers, send an identity message first, then observe device actual receipt once; do not resend repeatedly before receipt. |
| Reports have values but downlink cannot return to the device | The source port of the latest identity datagram differs from the current listening port, or the return channel is blocked. | Local 15021, remote 8889; after recovery, send an identity datagram first and verify the device's actual receipt. | Stop the old session, restore with the correct local port and re-register, then test a new command. |
| Port already occupied or cannot start | Another session or application is using the same local UDP port. | Local 15021 on this machine can only be used by this article's current session; do not start a duplicate copy with the same configuration at the same time. | Close your own duplicate session; if a port change is truly needed, resend the identity message after recovery. |
| Dispatch succeeded or the automatic reply succeeded but the current value did not change | The reply and the property status report are two kinds of messages; the current value needs an independent status message. | The FMQX demo has received the target; check whether a new property status was manually sent after the automatic reply. | Send a complete status message with a new id, and verify the real-time value and history; do not equate the demo with physical action. |
| Missing values or inconsistent order among the ten samples | UDP may lose packets or deliver out of order, or message numbers were reused. | A new id each time, complete datagrams, waiting for platform confirmation, and a history window covering the input times. | Retain the original data and retest the missing samples in a targeted way with new numbers and different values. |
| History is empty or still old values after refresh | The field, device, date, or time range is wrong, or history is not enabled. | Confirm both fields have history enabled, select this device and 01:22~01:35, and wait for loading to finish. | Fix the query conditions and query again; newly enabled history only guarantees subsequent records and does not backfill old data. |
| The platform still shows 34 after disconnecting | The platform retains the last properties; a UDP disconnect does not equal immediate business offline. | Check whether FMQX shows Disconnected and whether the update time keeps changing. | No need to delete data; when recovering, connect the same session and send a new identity datagram first. |