

Rule Engine Feature Guide
Learn every page feature, configuration method, status meaning, and operating boundary of the rule engine in the current version.
How to Read
First confirm the entry point, permissions, and target objects, then follow the numbered steps. Every step includes the expected result; detailed fields and options are collected in expandable reference tables.
About the Screenshots
The screenshots come from the original operation manual. The public edition hides real node addresses, connection addresses, and credentials; the statuses, times, and data shown in the examples do not represent the current production environment.
Before You Start
| Item | Description |
|---|---|
| What you can do | Master the actual capabilities of rule management, configuration, simulation, publishing, and tracing, item by item. |
| Where to enter | Rule Engine → Rule List → Editor |
| Required permissions | Query, edit, test, publish, and delete permissions are configured separately by role. |
| Estimated time | 90 minutes |
Reading Guide and Feature Overview
The FastBee rule engine turns device reports, online status, and time schedules into automated business processes. This volume applies to the current V4 rule workbench and explains entry points, fields, options, runtime states, and limits by feature; the Rule Engine Scenario Guide provides complete configuration tutorials for 18 business goals. First-time users can read this volume's workbench, trigger, condition, and action sections first, then follow the scenario guide to complete a rule.
A rule consists of a trigger entry, entry conditions, an execution flow, and rule policies. The trigger entry answers "when to check", the entry conditions answer "whether to start", the execution flow answers "what to do and in what order", and the policies limit data validity, repeated execution, and handling after failure. Conditional branches can evaluate again during execution; a delay only waits and does not automatically re-check conditions.
This volume was verified against the current-version pages and source code as of September 27, 2026, and includes real page images from this round of feature inspection and the matching scenario verification. The configuration capabilities of device actions, notifications, Webhooks, and AI are described separately from the external execution results. For a complete real-business demonstration, combine this with the scenario guide; external resources that have not been connected are not promised to be reachable.
Find what you need to do by role
- Implementers, first-time configuration: scenario reuse → workbench → triggers and conditions → corresponding actions → simulate → publish. Finish with a rule that is bound to real resources, verified with samples, and confirmed by actual runs
- Business administrators, adjusting existing logic: rule list → drafts and settings → canvas ordering/branches → version publishing. Changes take effect as a new version, and existing execution instances can still be traced by the old version
- Operators, when a rule did not run: execution trace → five-minute diagnosis → FAQ. Be able to distinguish between not triggered, condition not met, undeterminable, waiting, and action failure
- Platform administrators, preparing base resources: product and device thing models, alarm definitions, notification resources, Webhook connectors, AI assistants, role permissions. The relevant resources are available in the current tenant's selection boxes, and field types are compatible with action targets
Complete feature index
- Rule management: name/status filtering, query reset, batch delete, duplicate, pause/resume, restore historical version to draft. Rule list and daily management
- Visual editing: node library, canvas and full form, independent properties panel, group summaries, insert ordering, layout, undo/redo. Workbench; flow orchestration
- Rule logic: 5 trigger types, combined conditions, latest state, 6 action types, sequential/parallel, IF, delay, data references. Sections from triggers to the six action types
- Configuration efficiency: 18 scenarios, resource mapping, centralized parameter adjustment, pending-item locating, AI-generated drafts. Scenario reuse; AI assistance
- Verification and runtime: draft validation, simulation samples, virtual time, pre-publish checks, publish confirmation, versions, tracing, receipts, diagnosis, instance termination. Drafts and settings; simulation; publishing; tracing
Also confirm the following boundaries when using this guide.
- The device, product, and alarm names in the screenshots are demonstration resources; in actual use, select resources that already exist in your tenant.
- The single-file HTML can be read offline; the left catalog is for navigation and page search is for finding feature names; images can be clicked to view, and browser printing can save as PDF.
1. Get to Know the Rule Workbench
Location: Rule Engine → Rule Editor
Check the rule name and save status at the top, and get to know the workbench through the node library on the left, the flow in the middle, and the properties area on the right.
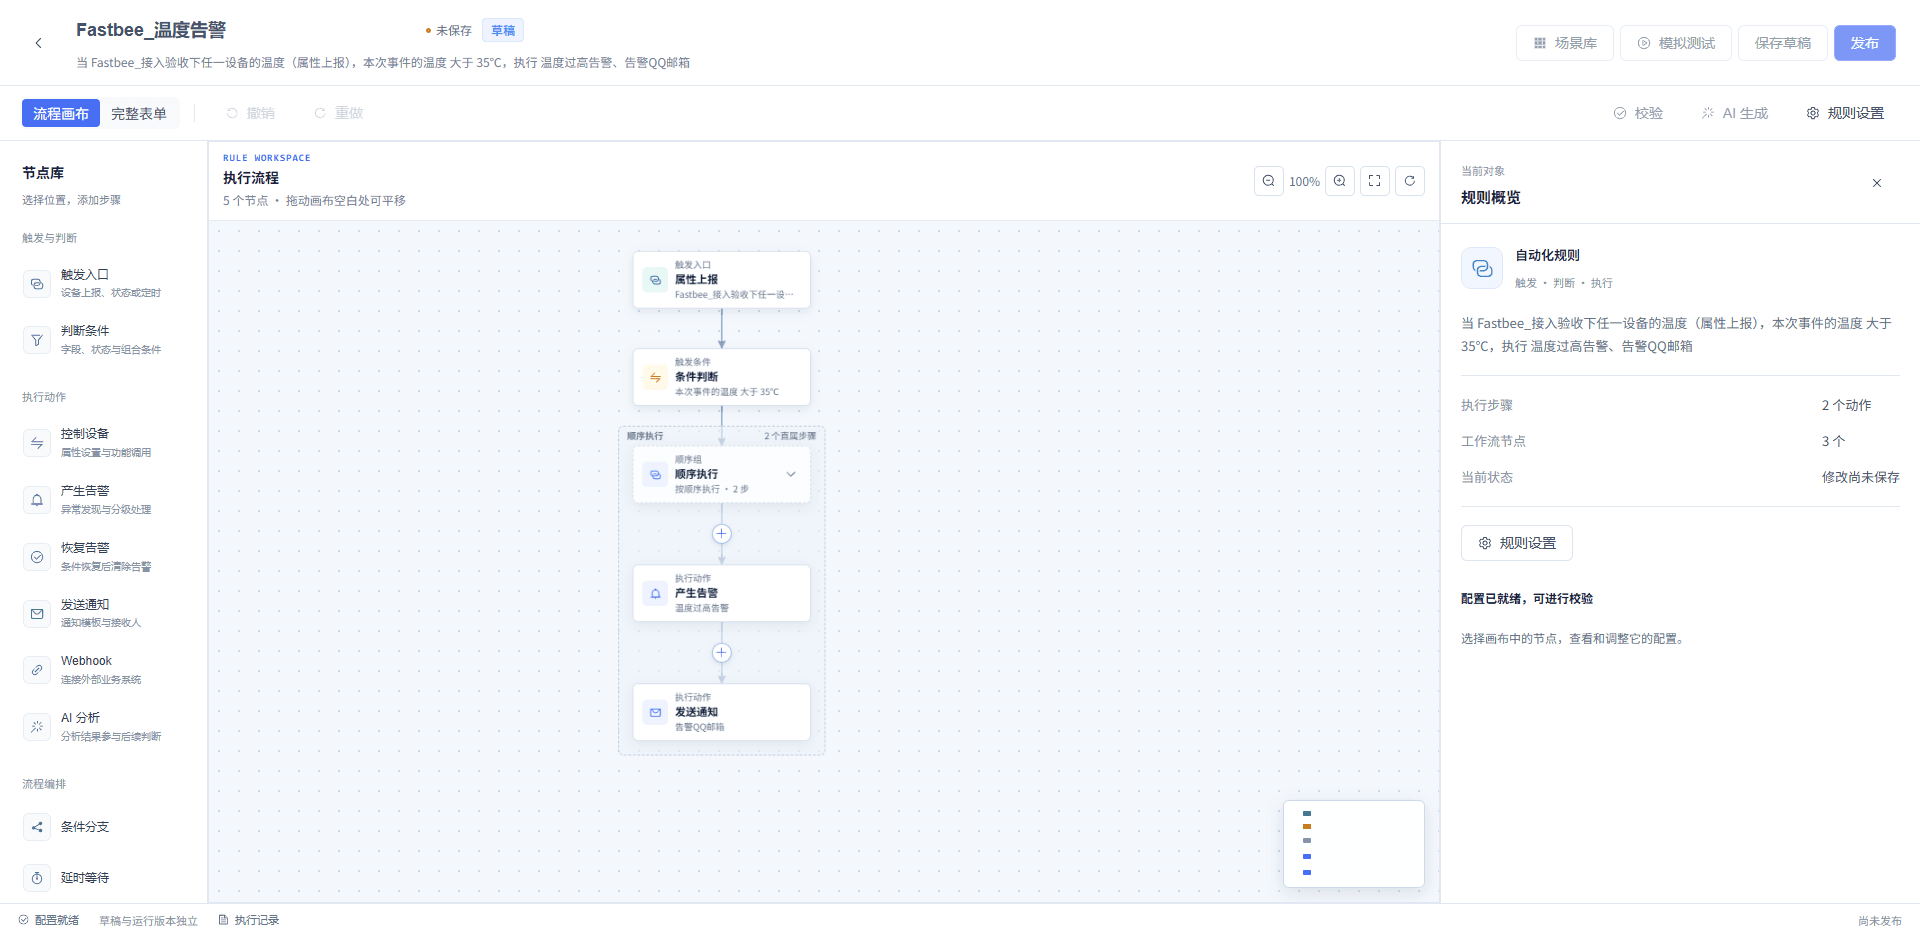
Figure: Get to know the rule workbench
Quick Control Reference
| Option | Purpose and Usage Advice | Effect and Recovery |
|---|---|---|
| Draft and runtime status | The draft status at the top indicates whether edits are saved; the runtime status indicates whether the published version is active; how to read: read the two statuses separately — a saved draft cannot substitute for an active version. | Data · Source: confirmation results from the current draft and runtime nodes; real events are processed by the active version; unpublished drafts do not participate in runtime. |
Rule List and Daily Management
The rule list is the management entry into the rule engine and displays compact cards by default. Each card shows the rule name and status, trigger, scope, recent executions, runtime version, and update time; the upper-right corner can switch to list view. Editing, simulation, publishing, and execution tracing are done on the edit page.
First filter by rule name and status, then decide which rules to handle based on scope, recent executions, and runtime version. Status is not a simple switch: a draft has not yet become a runtime version, a candidate version pending activation means the publish has been submitted but runtime nodes are still confirming, only active versions receive new events, and a paused rule no longer accepts new entries.
Create and manage operations in the list
- Card / List: click "Card" or "List" in the upper-right of the rule area to choose the browsing mode. Switching only changes the display; it keeps the current query conditions and page number while clearing checked items.
- Blank create: click "Blank Create" in the upper-right of the list to configure from triggers, conditions, and actions. You enter a blank draft; before saving there is no rule ID and no effect on runtime.
- Create from scenario: click "Create from Scenario", choose a built-in scenario, then follow the wizard to bind this tenant's resources and adjust parameters. Scenarios only provide a rule skeleton and examples; they do not carry real tenant resource IDs. See the scenario guide for detailed configuration.
- Edit: click "Edit" at the bottom of a card or within a list row. Opens that rule's draft; the runtime status at the top still points to the currently published version.
- Duplicate rule: click "Duplicate Rule" under "More", then check and replace devices, fields, and action resources in the resource-reuse wizard. An independent rule is only formed after saving; the original rule is not modified. Invalid or mismatched resources must be re-bound.
- Pause / Resume: active rules show "Pause"; other resumable states show "Resume". Pausing blocks new rule entries; flows already running or waiting still complete under the originally published version. Resuming uses the published version and does not bring unsaved drafts into runtime.
- Delete: check multiple cards or rows and click delete, or delete a single rule under "More" and confirm. Delete permission is required; before deleting, confirm there are no versions or execution evidence you need to keep.
- Version history: open version history under "More" to view version numbers, checksums, publish status, and publish times. "Restore Version" only restores that historical version as the current draft; it still must be validated, saved, and published again before it affects runtime.
- Execution trace: click "Execution Trace" at the bottom of a card or within a list row, or open detailed tracing at the bottom of the edit page. Reads execution records of the published runtime version; a draft that was never published has no real execution records.
List status explained
- Draft: the definition can be edited or is saved, but has not yet become a runtime version. Complete the pending items, then validate, simulate, and publish.
- Candidate pending activation / publish confirming: the publish request has entered the runtime confirmation phase and the page shows the number of confirmed nodes. Wait for confirmation; the page polls status for a short time. Until "Active" is shown, do not treat it as running.
- Active vN: the published version has been confirmed by runtime nodes and can process new matching events. Verify actual entries, decisions, and action receipts via execution tracing.
- Paused vN: the published version is retained, but new rule entries stop. Resume when you need to keep processing new events; to change logic, edit the draft first and then publish.
- Publish failed: this publish did not become the runtime version. Review the pre-publish check or validation messages and fix them; the current runtime version remains unchanged.
Also confirm the following boundaries when using this guide.
- "Recent Executions" and "In Flight" in the list are only for quick judgment; to confirm action results you must enter execution tracing and check the specific steps and receipt stages.
- List operations are controlled by role permissions; being able to see the list does not necessarily mean you can create, edit, publish, or delete.
2. Find the Rule Management Entry
Location: Rule Engine → Rule List
Enter the rule list, query by name and status first, then view the business summary, runtime version, and recent executions in the cards; the card footer provides edit, execution trace, and more operations.
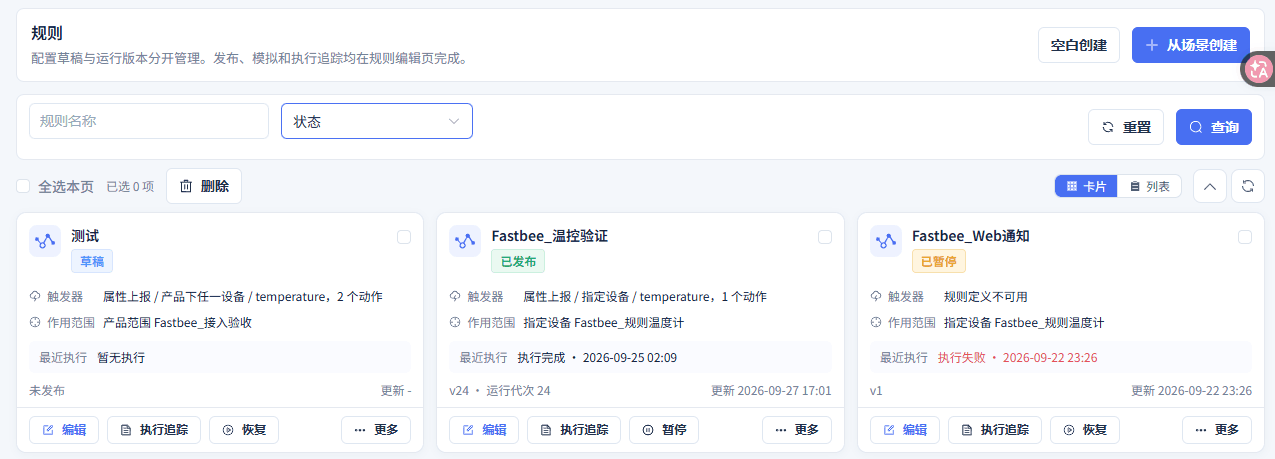
Figure: Compact card view: first-row rules, query conditions, and display-mode switch
3. Switch to List View
Location: Rule Engine → Rule List
Click "List" in the upper-right to compare rules by column; when the window is narrow, scroll horizontally to see the remaining fields. Click "Card" to return to card view.
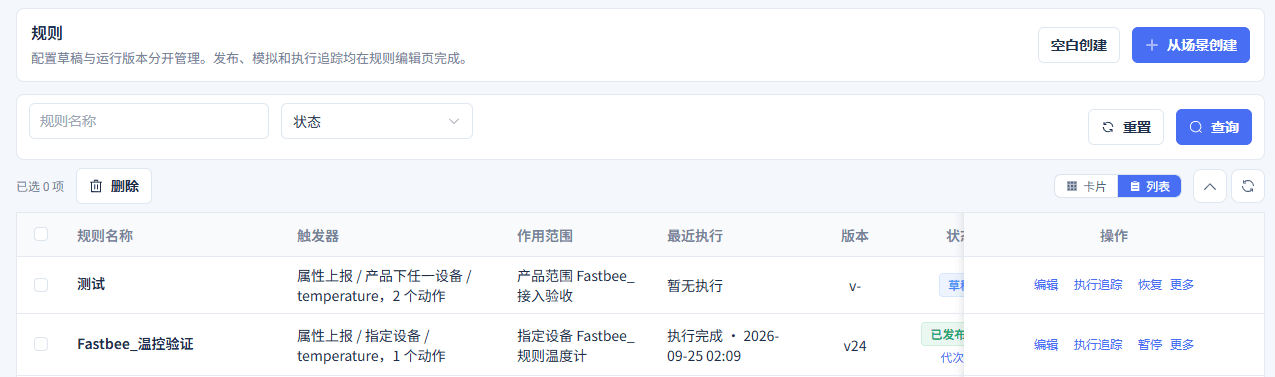
Figure: List view: the same set of rules shown by row; scroll horizontally to see the remaining fields
Quick Control Reference
| Option | Purpose and Usage Advice | Effect and Recovery |
|---|---|---|
| Rule Name / Status | The name input and status dropdown together limit the list query scope; when to use: enter a business keyword, then select Draft, Active, or Paused; click Query to apply, Reset to clear conditions. | Only changes the current list display; does not change rule drafts or runtime status; on failure: re-verify the current status via this section's entry. |
| Card / List | Switches between the two browsing modes; cards are used by default; when to use: cards for daily browsing, list for column comparison; narrow windows can scroll horizontally. | Keeps query conditions and page number, clears checked items, and does not change rules or runtime status; on failure: click Card or List to reselect the display mode. |
Scenario Library, Resource Binding, and Duplicate Reuse
Click "Create from Scenario" in the rule list, or click "Scenario Library" in the workbench. The wizard has three steps: select scenario, bind resources, adjust parameters; when no suitable template exists, click "Blank Create". Scenario cards show the business purpose, a thumbnail of the template flow, required resources, and sample names, and can be filtered by category or searched by name/purpose keywords.
After selecting a scenario, click Next. On the Bind Resources page, first enter the rule name and select the trigger product; the trigger device is optional — if not selected, the product scope is used. Then select trigger or judgment fields, and check the judgment object, condition fields, control object, and writable control fields one by one. Alarm, notification, Webhook, and AI actions also require selecting the corresponding resources of this tenant. In cross-device scenarios, the trigger device, judgment device, and control device can be different; do not finish after binding only the first device.
On the Adjust Parameters page, fill in judgment values, interval upper bounds, wait seconds, execution frequency and time, control parameters, notification variables, request parameters, or AI analysis tasks in one place. Only items that exist in the current scenario are shown; when you need to add conditions, complex mappings, interval scheduling, or more orchestration, continue editing after entering the canvas. Entering the canvas does not equal saving: when resources are missing, the unsaved configuration is kept and "X items still pending" is displayed.
Duplicating a rule enters the same wizard from "More > Duplicate Rule" in the list. Duplication keeps the original flow and this tenant's still-valid resources, and allows centralized replacement of devices, fields, and action resources. The copy has independent node identifiers and the original rule is not modified; an independent record is created only after saving the copy. Duplication does not carry over the original rule's runtime status or execution history.
18 built-in scenarios
- Alarms and recovery (6): temperature over-limit alarm notification, temperature-humidity combined alarm, sustained high-temperature alarm, temperature recovery alarm clearing, device offline alarm, device online alarm clearing. Abnormality detection, sustained determination, and recovery handling
- Device linkage (5): temperature-triggered device control, cross-device linkage of device status, multi-device joint status judgment, notification after multi-device parallel control, tiered threshold alarms. Turn one or more device states into control and tiered handling
- Scheduling and waiting (4): daily scheduled device control, weekly scheduled control, scheduled status inspection, re-judgment after delay. Scheduled execution, periodic checks, or wait-and-recheck
- Events and business integration (3): device event notification, event-invoked Webhook, branching by AI analysis result. Device event handling, external business integration, and intelligent analysis
How to choose wizard fields
- Rule name: up to 50 characters in the wizard; up to 128 characters after entering the editor. Name it by object and handling result; avoid just writing "test" or "rule1"
- Trigger product / trigger device: select the product the event belongs to; select a trigger device only when you need to limit to a single device. After changing the product you must reselect the device and fields
- Judgment conditions / condition fields: select the state source object and its thing-model field separately for each condition. For joint judgment, confirm each entry one by one; do not point fields of different devices all at the trigger device
- Control actions / writable control fields: select the device that actually accepts commands, then a writable property or function. Read-only collection fields such as temperature cannot be used for command delivery
- Notification template / notification channel / recipients: select a template consistent with the channel and recipients who have the corresponding contact method. Missing channel, template not bound to a channel, or missing contact method will block configuration completion
- Missing or unavailable resources: first complete the base resources according to the pending reason, then return to the current configuration to select them. Scenarios do not automatically create products, devices, alarms, connectors, or AI assistants
Also confirm the following boundaries when using this guide.
- The scenario library currently contains built-in scenarios and duplication of existing rules; there is no entry for adding, publishing, or sharing tenant-defined templates.
- Temporary content in the wizard is kept in the current editing session; refreshing, closing, or confirming a switch to a new rule discards unsaved content — it is not auto-saved as a draft.
- Field candidates come from the selected product's thing model and are filtered by property, event, writability, etc.; customers still need to confirm the actual business meaning and units — field matching is not automatic.
4. Select a Built-in Scenario
Location: Rule Engine → Rule Editor
Click "Create from Scenario", use categories and search to select a scenario matching your purpose, then click Next.
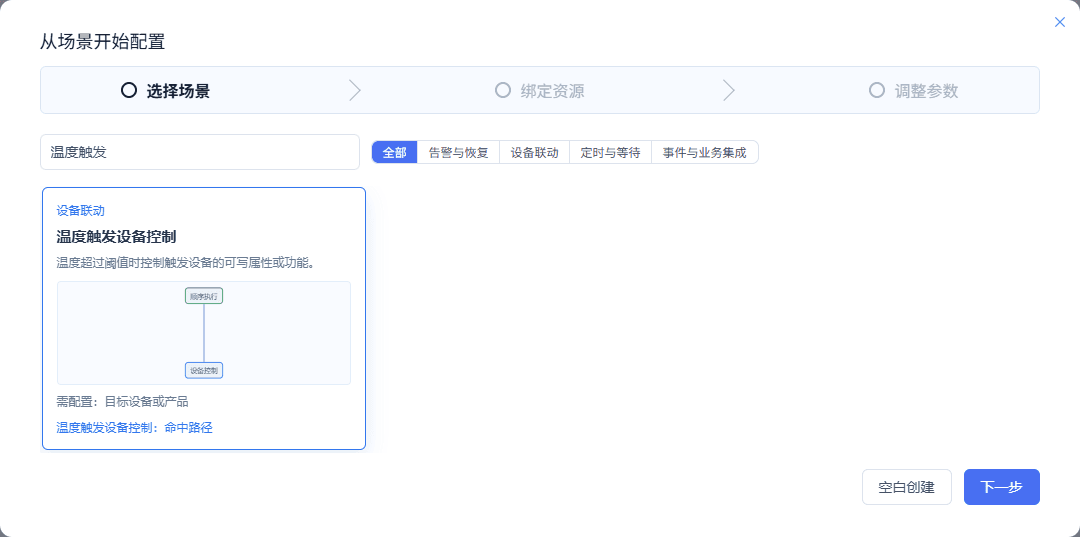
Figure: Select a built-in scenario
5. Bind This Tenant's Resources
Location: Rule Engine → Rule Editor
Select the trigger product, judgment objects, control device, and required business resources in turn; unconfigured items remain in the wizard's hints.
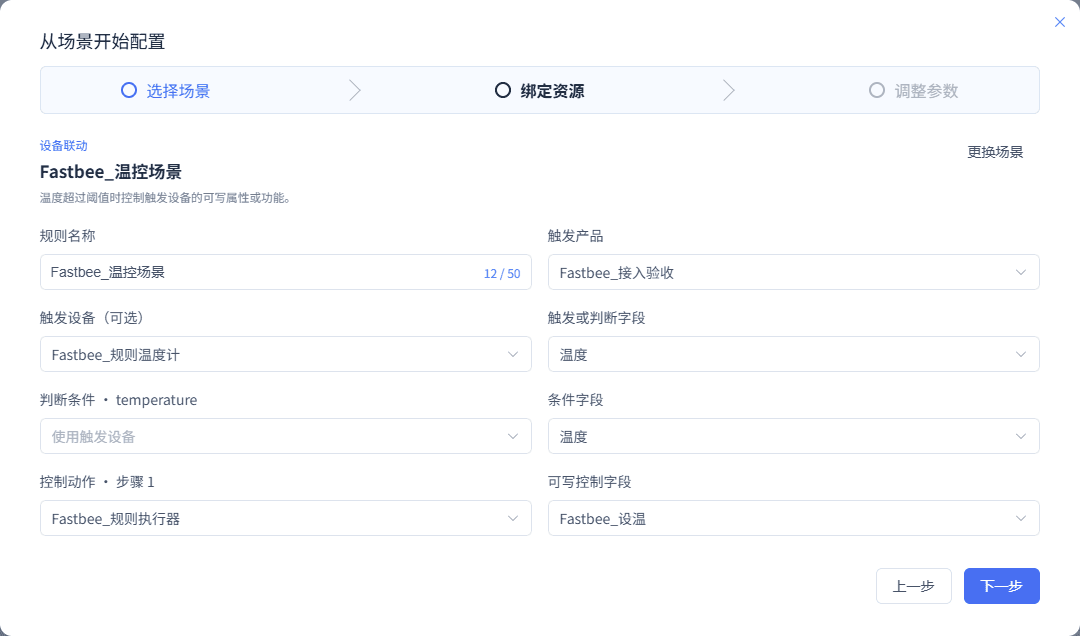
Figure: Bind this tenant's resources
6. Adjust Scenario Parameters Centrally
Location: Rule Engine → Rule Editor
After adjusting thresholds, times, or control parameters, enter the canvas and continue completing the remaining configuration.
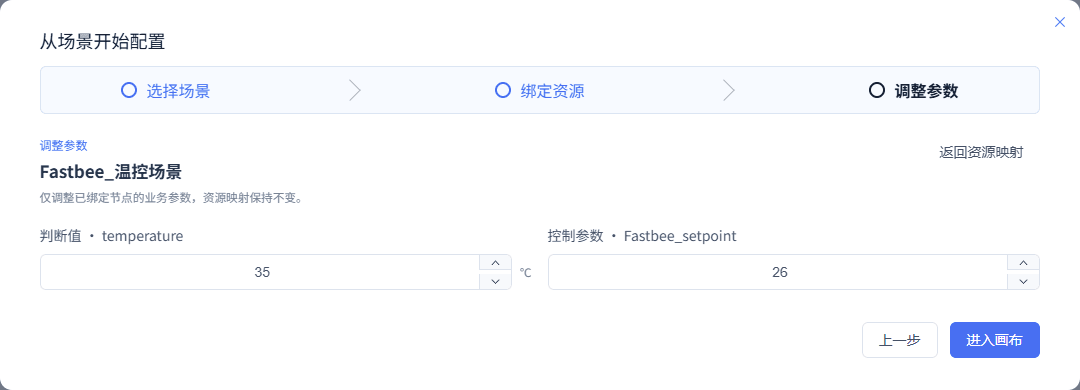
Figure: Adjust scenario parameters centrally
Quick Control Reference
| Option | Purpose and Usage Advice | Effect and Recovery |
|---|---|---|
| Bind resources | Bind trigger, judgment, and control devices plus action resources separately; when to use: check roles one by one in cross-device scenarios, control fields must be writable; prepare missing resources on the platform first. | Only modifies the to-be-created copy; after entering the canvas you still need to save and publish; on failure: re-verify the current status via this section's entry. |
Canvas, Properties Panel, and Full Form
The top of the workbench holds the rule name, draft save status, runtime status, and main operations; the left node library adds features, the middle canvas shows the trigger, conditions, and execution flow, the right side configures only the current object, and the bottom expands pending items, simulation results, and execution records on demand. The canvas and properties area scroll independently, so complex flows do not have to be expanded into one long form.
Click the trigger node to configure the trigger method and scope; click the entry condition to configure the whole condition group; click an action or delay to configure the current node. Clicking a sequential or parallel group shows only the execution mode and a summary of direct steps; click a summary to enter the corresponding child node. Click a conditional branch to configure that judgment and the entries on both sides. Click a blank area of the canvas to return to the rule overview and view the action count, workflow node count, unsaved status, and pending items.
Switch to "Full Form" to review the rule continuously as "when to trigger, conditions to satisfy, actions to execute". The full form and the canvas share the same draft; switch back after editing to see the changes — they are not two independent rules and require no import/export. The canvas suits locating and structural editing; the full form suits centralized field review.
Canvas tools and their actual effects
- Pan: hold and drag on a blank area of the canvas. Moves the viewport; does not change rule logic
- Zoom in/out: click the plus/minus buttons in the upper-right of the canvas. Current zoom range is 50% to 135%; the percentage only indicates display scale
- Fit canvas: click the fit button. Centers the flow as much as possible; larger flows can still be panned or located via the minimap
- Auto-arrange: click the auto-arrange button. Resets manual node positions and fits the display; does not change flow execution order
- Minimap: click the target area of the minimap in the lower-right. Moves the main canvas viewport to the corresponding area
- Drag nodes/groups: hold and drag a node; child nodes follow when moving a group. Only adjusts layout; to change execution order you must use move up/down within the group
- Collapse/expand group: click the collapse arrow on the right of the group title. Hides or shows the steps inside the group; hidden steps still participate in execution
- +Insert: click the plus sign at a connection position and choose a business action, branch, delay, or subgroup. Inserts at the current connection position; manual wiring to decide execution relationships is neither needed nor supported
Node editing and undo
- Left node library: first select the target group or step, then click the desired action/orchestration item. The system inserts based on the selection; after inserting, check the containing group and business summary
- Ordering: select the parent group, then click move up or move down next to the step summary. Only adjusts the order of direct child nodes within the same group; ordering in a parallel group does not imply execution sequence
- Delete node: select a node and click the delete button in the upper-right. Deleting a container also removes its internal flow; the root execution group cannot be deleted, but its steps can be changed
- Undo/redo: click the toolbar buttons; Ctrl/Cmd+Z, Ctrl/Cmd+Shift+Z, or Ctrl/Cmd+Y also work. The session keeps at most 30 rule-definition/layout snapshots; it does not include rule name, priority, or remarks, and is not server-side version rollback
- Save shortcut: Ctrl/Cmd+S. Triggers saving the draft; text undo inside an input box is still handled by the input control
- Properties panel width: drag the left edge of the properties panel on desktop. Adjustable from 340 to 480 pixels, default 380; the same browser remembers the width
- Narrower desktop: below 1200 pixels the node library collapses to icons and the properties area overlays. Click a node or the toolbar "Properties" to open it; closing it frees canvas space
- Mobile read-only: below 992 pixels a read-only preview notice is shown. You can view the flow; use desktop for editing, simulation, saving, and publishing
Also confirm the following boundaries when using this guide.
- Connections are generated automatically from the flow tree; the satisfied/not-satisfied branches and joins are for reading the diagram — dragging nodes does not create new branches.
- Changing the rule or layout shows an unsaved indicator; save before leaving the page, or explicitly choose in the discard-changes prompt. Undo history is only valid within the current editing session.
7. Switch to Full Form
Location: Rule Engine → Rule Editor
Click "Full Form" to continuously review when to trigger, conditions to satisfy, and actions to execute; edits are kept after switching back to the canvas.

Figure: Switch to full form
Quick Control Reference
| Option | Purpose and Usage Advice | Effect and Recovery |
|---|---|---|
| Flow Canvas / Full Form | Both views edit the same trigger, conditions, and execution flow; when to use: canvas for locating structure, full form for centralized configuration review. | Switching does not create a new rule and edited fields stay consistent; on failure: re-verify the current status via this section's entry. |
Triggers: Define When a Rule Starts Evaluating
Select the "Trigger" node on the canvas and choose the trigger method, scope, and fields in the right properties panel. For device-type triggers, first choose "Any Device under Product" or "Specified Device"; the former suits one rule shared by a class of same-model devices, the latter suits one key device. After selecting a product or device, the field dropdown only shows thing-model fields matching the trigger method.
Property Report starts when the selected properties are reported; Event Report starts when the selected events occur; Device Online or Offline can be limited to online, offline, or any change. State Satisfaction Change starts a rule based on the device's latest state rather than a single instantaneous report, and is commonly used for thresholds, sustained high temperature, and recovery judgment. Scheduled Check fires on a plan, and subsequent conditions should read data from "Latest State".
The defaults for a new rule are "Property Report, product scope, every time satisfied"; product, device, and trigger fields are all empty and must be selected before saving. Entering Scheduled Check fills in daily, 09:00, Asia/Shanghai by default; switching to interval defaults to 5 minutes, and switching to weekly defaults to Monday. Changing the trigger object or trigger type makes conditions that depended on trigger fields lose applicability, and the system will require reselecting the related fields; complete them one by one via the pending items before saving.
All trigger methods and options
- Property Report: a product or one specified device, one or more properties. Judge after temperature, humidity, or switch status is reported
- Event Report: a product or one specified device, one or more events. Notify on-duty staff after a device reports a fault event
- Device Online or Offline: a product or one specified device, status: online/offline/any change. Gateway offline alarms, recovery clearing
- State Satisfaction Change: a product or one specified device, property; match mode; the sustained mode also needs duration in seconds. Temperature becomes above threshold, or high temperature for 10 consecutive minutes
- Scheduled Check: daily, weekly, interval, or Cron; time/weekdays/interval; timezone. Inspect devices' latest state at 09:00 every day
Match modes of State Satisfaction Change
- Every time satisfied: the rule can be entered every time the state judgment is satisfied. Combine with cooldown to prevent repeated notifications
- Becomes satisfied: the rule is entered only when the state changes from unsatisfied to satisfied. Usually chosen for threshold-crossing alarms
- Continuously satisfied: the rule is entered only after being satisfied continuously for the set seconds. Filters instantaneous jitter; the duration must be a positive integer
Schedule options of Scheduled Check
- Daily: execution time, timezone. For fixed daily inspection or control
- Weekly: execution time, one or more weekdays, timezone. Monday to Sunday selectable
- By interval: 1 to 1440 minutes, timezone. Generates a Quartz minute-step expression (0 0/N * * * ?); it matches by the minute position within each hour and should not be understood as strictly every N minutes from the save moment
- Advanced Cron: Quartz Cron and IANA timezone. The server only accepts valid 6- or 7-field Quartz Cron; use "Preview Next Five Runs" to double-check the schedule
Advanced Cron read/write examples
- 6-field order: second minute hour day month weekday: the optional 7th field is year; an asterisk means all values for that position, and a question mark marks the unspecified one of day and weekday. After entering via "Advanced Cron", first preview the next five runs and confirm each time point fits the business
- 0 0 9 * * ?: every day at 09:00:00. Same effect as daily 09:00; dates are interpreted in the selected timezone
- 0 0 9 ? * MON-FRI: Monday to Friday at 09:00:00. For weekday inspection; it does not automatically recognize statutory workdays/holidays
- 0 0/5 * * * ?: fires at minutes 0, 5, 10, etc. of each hour. Matches by minute marks; it does not count from the save moment
- Interval input beyond minute-position capability: the UI allows entering 1 to 1440, but currently generates a minute-step Cron, and larger values may be rejected by the server. For schedules longer than one hour, prefer Advanced Cron that passes preview; do not infer strict support for arbitrary minute intervals from the UI upper limit
Also confirm the following boundaries when using this guide.
- The timezone dropdown presets China Standard Time (Asia/Shanghai) and UTC, and also allows entering other IANA timezones; the server validates whether the timezone is legal.
- When the trigger scope is "Specified Device", the page only allows selecting one device; when multiple devices of the same product need to share a rule, choose the product scope.
- Although function invocation is an underlying event type, the current V4 editor does not allow it as a trigger method; function invocation should be configured as a device action.
- A scheduled trigger does not carry a real-time device event. Scheduled control must specify the target devices or a product device list fixed at publish time; the judgment fields of scheduled inspection should select latest state.
- Conditions in state-change and scheduled triggers can only read from latest state; a nonexistent "current event" cannot be treated as a data source.
8. Configure a Continuously-Satisfied Trigger
Location: Rule Engine → Rule Editor
Select the trigger node, set State Satisfaction Change and the duration in seconds; conditions use latest state.
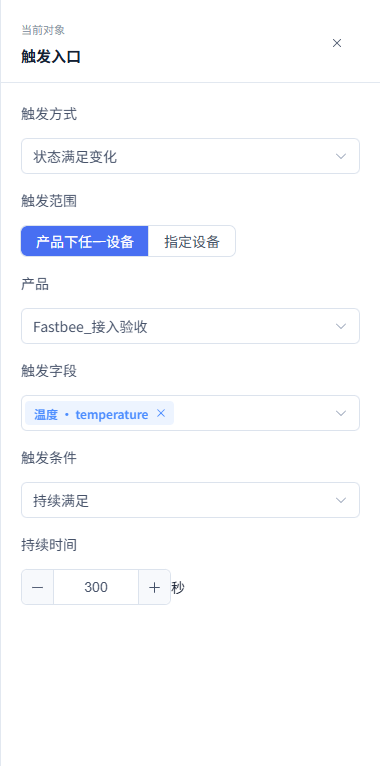
Figure: Configure a continuously-satisfied trigger
9. Configure a Scheduled Trigger
Location: Rule Engine → Rule Editor
Select the check object, execution frequency, time, and timezone, and verify the schedule with "Preview Next Five Runs".
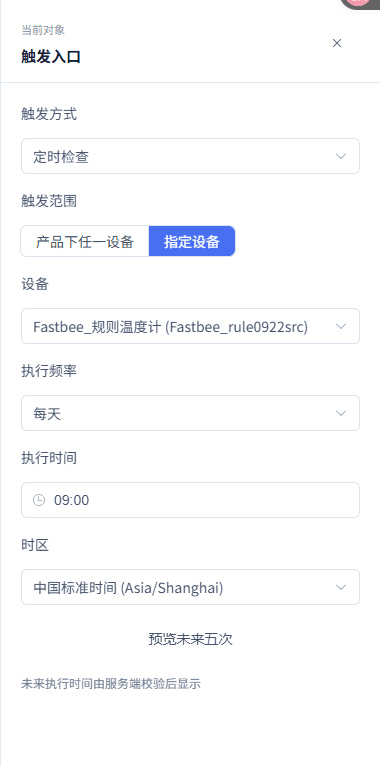
Figure: Configure a scheduled trigger
Quick Control Reference
| Option | Purpose and Usage Advice | Effect and Recovery |
|---|---|---|
| Preview Next Five Runs | Computes the next five execution times from the current schedule configuration; when to use: after filling in frequency and timezone, especially for checking Cron and cross-timezone schedules. | Only views execution times; does not actually run the rule; on failure: re-verify the current status via this section's entry. |
Conditions: Combining Events, Latest State, and Upstream Results
In the "Condition" node below the trigger node, or in a "Conditional Branch" node, first choose the condition structure, then add field judgments item by item. All Satisfied passes only when every sub-condition is true, Any Satisfied passes when any sub-condition is true, and Negate can contain only one sub-condition; a field judgment consists of source, object, field, operator, and comparison value. You can keep adding fields or condition groups to form nested logic.
Field sources are Current Event, Latest State, and Completed Upstream Output. Current Event is only available for property/event triggers; for Latest State, each field judgment can select only one object — either the trigger device or one other device — and cannot select multiple devices within one field judgment; upstream output is only available in conditional branches inside the flow, and can only select action outputs from before the current node that have completed on all possible paths.
Latest state has a validity period. The "State Validity Period" in rule settings defaults to 300 seconds; a field judgment whose state is missing or expired yields "Undeterminable" and must not be automatically treated as unsatisfied. When an entry condition is undeterminable, the rule entry is recorded as CONDITION_UNKNOWN and no instance is created; when an IF condition is undeterminable, the node is recorded as failed and neither the satisfied nor unsatisfied side executes. Confirm the cause in entry diagnosis or simulation results; do not expect a flow-instance detail to always exist.
Condition field sources
- Current Event: fields in the current property report or event report. Not available for scheduled and state-satisfaction triggers
- Latest State: readable properties of the trigger device or one device in the current tenant, plus online status. When the read time exceeds the state validity period, the result is undeterminable
- Completed Upstream Output: output fields declared by preceding actions. Sibling parallel branches cannot reference each other; nodes after a parallel group completes can reference each branch's outputs; outputs produced by only one side of a branch cannot be referenced directly after the branch
Field operators
- Numeric: greater than, greater than or equal, equal, less than, less than or equal, range. Range needs a lower and upper bound; units and enum values follow the thing-model input controls
- Non-numeric: equal, not equal, exists. Exists needs no comparison value; other operators require a comparison value
- Combined conditions: all satisfied, any satisfied, negate. All/any require at least one sub-condition; negate must have exactly one sub-condition
When a combined condition encounters undeterminable
- All satisfied: one definite unsatisfied makes the whole unsatisfied; with no unsatisfied but some undeterminable, the whole is undeterminable. Temperature satisfied with expired humidity state is not judged as all satisfied
- Any satisfied: one definite satisfied makes the whole satisfied; only when all are unsatisfied is it unsatisfied; otherwise undeterminable. When temperature is definitely satisfied, any satisfied still holds even if another condition's state is missing
- Negate: satisfied becomes unsatisfied and unsatisfied becomes satisfied; undeterminable stays undeterminable. Negation cannot make a missing state pass automatically
Also confirm the following boundaries when using this guide.
- After selecting a field, source device, or upstream output, the system clears the old comparison value to avoid applying a temperature value to another field; refill the expected value.
- Cross-device state judgment can directly select one device of the current tenant in the "Latest State" object dropdown without adding that device to the rule first; the system filters fields by the thing model of the selected device's product.
- The "when satisfied" and "when not satisfied" sides of a conditional branch are independent flows; an else branch with no business action can be deleted — do not keep an empty execution group.
10. Configure Joint Conditions Across Multiple Devices
Location: Rule Engine → Rule Editor
Switch to the full form and, under Conditions to Satisfy, select the latest-state device, field, operator, and comparison value entry by entry.
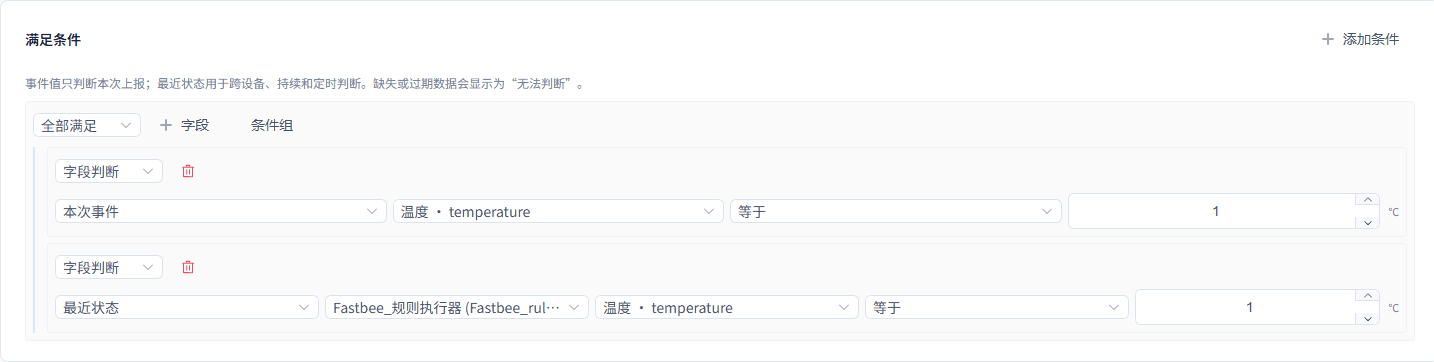
Figure: Configure joint conditions across multiple devices
Field Description
| Field / Control | Description |
|---|---|
| Condition source | Current Event reads this report; Latest State reads the device's last known value; Upstream Output reads preceding action results; missing or expired data is undeterminable; when IF is undeterminable, neither side executes. Optional · Source: event, device latest state, referenceable preceding action results · Selection: use latest state for scheduled inspection or cross-device; use completed upstream output for AI branches. Recommended: fill per the implementation plan · Example: fill per the actual environment |
Quick Control Reference
| Option | Purpose and Usage Advice | Effect and Recovery |
|---|---|---|
| Condition source | Current Event reads this report; Latest State reads the device's last known value; Upstream Output reads preceding action results; how to choose: use latest state for scheduled inspection or cross-device; use completed upstream output for AI branches; where the value comes from: event, device latest state, referenceable preceding action results; recommendation: keep the current value. | Missing or expired data is undeterminable; when IF is undeterminable, neither side executes; Impact · Scope: current rule; takes effect: requires publish; when wrong: choosing a value inconsistent with the device cycle or business frequency changes when the rule is entered; recovery: correct per this section's defaults and actual business requirements, then validate and publish. |
Flow Orchestration: Controlling Order, Concurrency, Branches, and Waiting
The flow root node and any group node can choose sequential or parallel execution. A sequential group advances item by item in list order, and execution order can be adjusted via "Move Up, Move Down" or ordering in the properties panel; a parallel group starts all child flows concurrently from the same input. Dragging positions is for canvas layout; the real execution order is determined by node structure and ordering.
A conditional branch first evaluates a condition tree, then enters the "when satisfied" and "when not satisfied" flows respectively. A delay node waits by seconds, defaults to 60 seconds when added, and allows 0 seconds. To implement "confirm after waiting", add another conditional branch after the delay and re-read fields from latest state — do not interpret delay as automatic re-checking.
When a sequential or parallel group is selected, the right side only shows the execution mode, direct step summaries, and entries for adding steps and ordering; clicking a summary locates the specific node. Groups do not recursively expand all child nodes in the properties panel, avoiding a configuration form that stretches the workbench for complex flows.
Actual semantics of flow nodes
- Sequential execution: add actions, delays, conditional branches, or subgroups, and adjust with ordering. Executes children in order; preceding action outputs can be referenced by later nodes
- Parallel execution: add multiple mutually independent child flows. Each child flow starts from the same input; sibling branches cannot reference each other, but sequential nodes after the parallel group completes can reference each branch's outputs
- Conditional branch: configure the judgment condition, the when-satisfied flow, and an optional when-not-satisfied flow. Only the matched side is entered; after a branch, only outputs stably produced by both sides can continue to be referenced
- Delay: enter a non-negative number of seconds. Continues after waiting; does not automatically re-read device state
- Action: configure one of the six business action types on the current node. Produces an action receipt and declared outputs that later nodes can reference
Also confirm the following boundaries when using this guide.
- A container node must have at least one child node; a conditional branch must have a "when satisfied" flow, while the when-not-satisfied flow can be omitted.
- A node cannot be moved into itself or its own children; the system prevents cycles.
- The total number of flow nodes is limited by server-side structure validation, currently 1000; the condition tree depth limit is 16. The page has no controls for these two items; split complex business into multiple maintainable rules.
11. Order and Select Steps in a Group Summary
Location: Rule Engine → Rule Editor
Click a sequential group and use move up or move down to adjust direct steps; click a step summary to open that step's parameters.
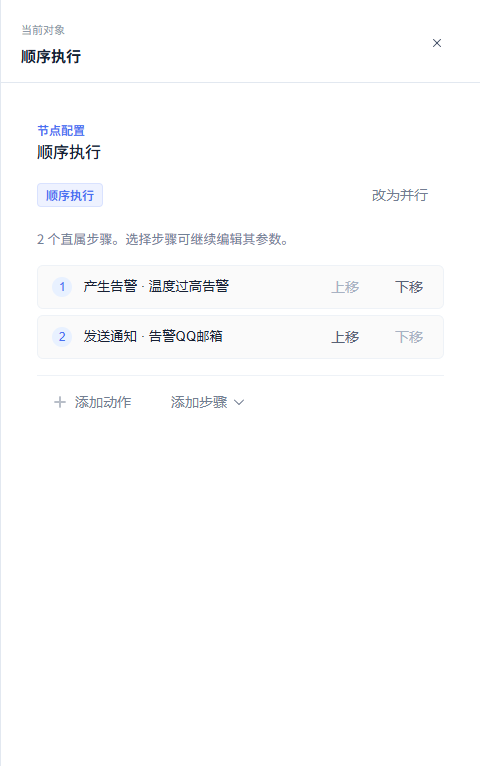
Figure: Order and select steps in a group summary
12. Set a Delay Wait
Location: Rule Engine → Rule Editor
Select the delay node and fill in the seconds; when you need to re-check after waiting, add an independent conditional branch afterward.
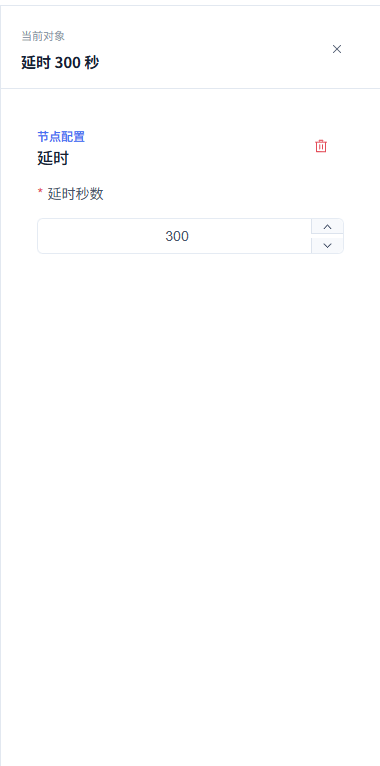
Figure: Set a delay wait
13. Set the Re-check Branch After Waiting
Location: Rule Engine → Rule Editor
Select the conditional branch and re-judge using latest state; continue actions only on the satisfied side.

Figure: Set the re-check branch after waiting
Quick Control Reference
| Option | Purpose and Usage Advice | Effect and Recovery |
|---|---|---|
| Move Up / Move Down | Changes the position and structural order of direct child nodes within the current group; when to use: when adjusting execution order; dragging canvas nodes only changes layout. | Sequential groups execute in the new order; parallel groups remain parallel — changes must be republished to affect new instances; on failure: re-verify the current status via this section's entry. |
Data References: Safely Reusing Events and Preceding Results
When "Fixed Value / Event or Upstream Field" appears next to a field, you can choose to bind data to the current parameter. Event binding reads the same kind of field in the current event; upstream binding reads outputs declared by completed actions. Binding applies to device set values, function input parameters, notification template variables, Webhook request fields, and AI analysis inputs, and can also be used in conditional branches inside the flow.
The editor does not show all action results as candidates. It computes available outputs based on the current position: a sequential flow can only see actions before itself; sibling branches of a parallel flow are invisible to each other, but nodes after the parallel group completes can reference each branch's outputs; after a conditional branch, only stable outputs produced by both branches remain. The server validates again before save and publish, so dependency order cannot be bypassed by manually editing the definition.
The report mode of an AI action provides request ID, task ID, and report; structured mode only allows referencing declared result. fields. Device actions provide the confirmation stage and result for later use; other ordinary business actions provide result fields. Fields outside the declared scope are rejected by validation.
Quick reference of reference rules
- Device property set values and function input parameters: current event, completed upstream output. Not allowed: future nodes, sibling parallel branches, undeclared outputs
- Notification variables, Webhook request fields, AI inputs: current event, completed upstream output. Not allowed: unavailable resources or source fields not in the current trigger/preceding outputs
- In-flow conditional branches: latest state, completed upstream output; current event is also available for event triggers. Not allowed: current event in scheduled/state triggers, and outputs produced by only one side of a branch
Configuration examples
- Device control value: select "Current Event · Temperature". Writes the current temperature into a writable target field
- Notification content variable: select "Upstream AI Analysis · result.severity". Shows the AI's structured severity in the notification template
- Webhook request field temperature: select "Current Event · Temperature". Builds the temperature field in the request body
Also confirm the following boundaries when using this guide.
- Binding is not a field-type converter. Choose source fields with compatible type, unit, and semantics; the thing-model input controls handle fixed-value formats and enum selection.
- When switching the target product, device, control field, notification template, or action type, old bindings are cleared or recalibrated — re-check the pending items.
- Upstream output references can show the path and sample values during simulation; the values in real runs still depend on the action's actual execution result.
14. Reference Structured Output of a Preceding Action
Location: Rule Engine → Rule Editor
In the conditional branch after the AI action, select Completed Upstream Output, then select a declared field such as result.severity.

Figure: Reference structured output of a preceding action
Field Description
| Field / Control | Description |
|---|---|
| Completed Upstream Output | Candidates are produced by actions before the current node that have completed and declared outputs; sibling parallel branches cannot reference each other; steps after a parallel join can use the group's results. Optional · Source: current workflow dependencies and action output declarations · Selection: configure preceding action outputs first, then select the corresponding field in later parameters or IF conditions. Recommended: fill per the implementation plan · Example: fill per the actual environment |
Quick Control Reference
| Option | Purpose and Usage Advice | Effect and Recovery |
|---|---|---|
| Completed Upstream Output | Candidates are produced by actions before the current node that have completed and declared outputs; how to choose: configure preceding action outputs first, then select the corresponding field in later parameters or IF conditions; where the value comes from: current workflow dependencies and action output declarations; recommendation: keep the current value. | Sibling parallel branches cannot reference each other; steps after a parallel join can use the group's results; Impact · Scope: current rule; takes effect: requires publish; when wrong: choosing a value inconsistent with the device cycle or business frequency changes when the rule is entered; recovery: correct per this section's defaults and actual business requirements, then validate and publish. |
Action: Control Device
Operation order: in a sequential or parallel group's "Add Step", add an action, select it, choose Control Device as the "Action Type"; then select the control object, target resource, and control field, and fill in the set value. A new action defaults to Control Device: scheduled triggers default to a specified device, other triggers default to the trigger device.
There are three control objects: Trigger Device, Specified Device, and Product Device List Fixed at Publish. Specified Device allows multi-select but can only keep devices of the same product; after selecting the target product or changing devices, the control fields, fixed values, and bindings are cleared and must be reselected. Product mode freezes the target list at publish time; devices added to the same product afterward are not automatically included in that runtime version.
Control fields only show writable properties and device functions — not read-only properties, events, or device status. A property has a single "Set Value" that can be a fixed value or an event/upstream field; a function appears row by row per thing-model parameter, and each input parameter independently selects a fixed value or event/upstream field. Fixed values are entered via thing-model controls in integer, enum, unit, and other formats.
Control Device fields and their dynamic appearance conditions
- Control object: Trigger Device, Specified Device, Product Device List Fixed at Publish. New actions on scheduled triggers default to Specified Device, others default to Trigger Device; the latter two show target devices or target product respectively
- Target device: appears only when the control object is Specified Device. Multiple devices of the same product can be selected
- Target product: appears only when the control object is Product Device List. Its device list is frozen at publish time
- Control field: writable properties or functions of the current target product. Required; refill parameters after switching
- Set value / function input parameters: a property shows one value; a function shows rows per declared parameter. For each, choose a fixed value or select current event / available upstream output
Also confirm the following boundaries when using this guide.
- Example: in temperature-triggered device control, select specified device "Actuator", control field "Set Temperature", fixed value 26; after running, view the delivery receipt at that action node in the execution record. DISPATCHED only means the command has been dispatched to the device runtime plane; DEVICE_ACK or DEVICE_RESULT indicates a higher-level device confirmation was received.
- A device action must have a control field configured. The current editor has no action-timeout input control; if the advanced interface definition sets a timeout, the server allows 1 to 300000 milliseconds.
15. Configure Device Control
Location: Rule Engine → Rule Editor
Select the control object, a writable property or function, then fill in the set value or map each input parameter.
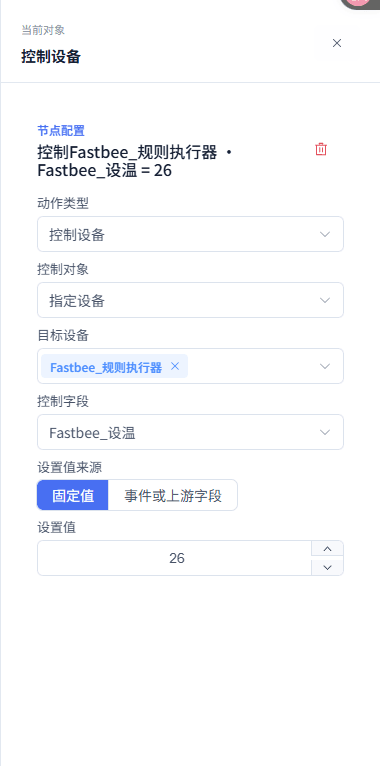
Figure: Configure device control
Field Description
| Field / Control | Description |
|---|---|
| Control object / Control field | The target device determines the list of writable properties or functions; commands are delivered at runtime; judge the completion level by receipt stage in tracing. Optional · Source: current tenant's devices and their product thing models · Selection: select the actual actuator first, then the writable field; read-only fields such as collected temperature cannot receive commands. Recommended: fill per the implementation plan · Example: fill per the actual environment |
Quick Control Reference
| Option | Purpose and Usage Advice | Effect and Recovery |
|---|---|---|
| Control object / Control field | The target device determines the list of writable properties or functions; how to choose: select the actual actuator first, then the writable field; read-only fields such as collected temperature cannot receive commands; where the value comes from: current tenant's devices and their product thing models; recommendation: keep the current value. | Commands are delivered at runtime; judge the completion level by receipt stage in tracing; Impact · Scope: current rule; takes effect: requires publish; when wrong: choosing a value inconsistent with the device cycle or business frequency changes when the rule is entered; recovery: correct per this section's defaults and actual business requirements, then validate and publish. |
Action: Raise Alarm
Operation order: after adding an action, select "Raise Alarm", select an alarm definition, then select the alarm severity and related object. The related object defaults to Trigger Device or Specified Device; the "Related Device" multi-select only appears when Specified Device is chosen.
Alarm severity can be Reminder, Minor Issue, or Critical Warning, corresponding to 1, 2, and 3 respectively. The alarm definition is selected from definitions available to the current tenant; the related object determines the device subject this alarm belongs to.
Raise Alarm fields
- Alarm definition: definitions available to the current tenant. Select the alarm category to create
- Alarm severity: Reminder, Minor Issue, Critical Warning. Appears only for Raise Alarm
- Related object: Trigger Device, Specified Device. Shows Related Device when Specified Device is selected
- Related device: multiple devices selectable. Appears only for Specified Device
Also confirm the following boundaries when using this guide.
- Example: after temperature exceeds 35, select the "High Temperature" alarm definition, Critical Warning, and Trigger Device; simulation results show a preview of the matched action, and after real runs verify the creation result in execution records and alarm records.
- Scheduled triggers have no trigger device. When raising an alarm, change "Related Object" to "Specified Device" and select the device; product attribution is determined by the selected device — the page does not provide a separate target product field.
16. Configure Raise Alarm
Location: Rule Engine → Rule Editor
Select the alarm definition, alarm severity, and related device, and confirm the alarm attribution.
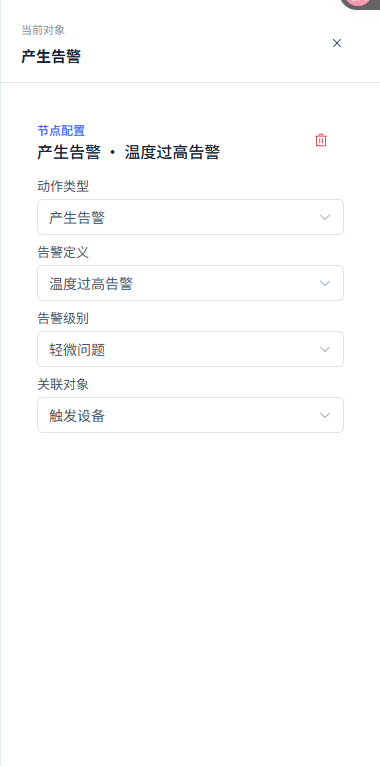
Figure: Configure raise alarm
Field Description
| Field / Control | Description |
|---|---|
| Alarm definition / Alarm severity | The alarm definition identifies the business alarm; severity can be Reminder, Minor Issue, or Critical Warning; real runs create a rule alarm belonging to the current rule and device. Optional · Source: current tenant's alarm definitions · Selection: select a configured alarm definition, choose the severity by business seriousness, and check the related device. Recommended: fill per the implementation plan · Example: fill per the actual environment |
Quick Control Reference
| Option | Purpose and Usage Advice | Effect and Recovery |
|---|---|---|
| Alarm definition / Alarm severity | The alarm definition identifies the business alarm; severity can be Reminder, Minor Issue, or Critical Warning; how to choose: select a configured alarm definition, choose the severity by business seriousness, and check the related device; where the value comes from: current tenant's alarm definitions; recommendation: keep the current value. | Real runs create a rule alarm belonging to the current rule and device; Impact · Scope: current rule; takes effect: requires publish; when wrong: choosing a value inconsistent with the device cycle or business frequency changes when the rule is entered; recovery: correct per this section's defaults and actual business requirements, then validate and publish. |
Action: Recover Alarm
Operation order: add an action in the temperature-recovery or device-online branch of the same rule, select "Recover Alarm", then select the related object. For Specified Device, select the related devices; the recover action has no alarm severity. The page still shows the alarm definition to help identify the purpose, but current runtime recovery matching does not filter by that field.
At runtime, alarms are located by the current rule, device subject, and unrecovered status — not by rule version or alarm definition. A standalone "temperature recovery clearing" rule cannot be used to recover alarms raised by another rule; unrecovered rule alarms under the same rule and same device are recovered together, at most 1000 entries.
Recover Alarm fields
- Alarm definition: definitions available to the current tenant. Selectable on the page for business identification, but not used as the current runtime recovery matching condition
- Related object: Trigger Device, Specified Device. Determines the device subject to recover under the current rule
- Related device: multiple devices selectable. Appears only for Specified Device
Also confirm the following boundaries when using this guide.
- Example: in a high-temperature rule, the IF high-temperature branch raises an alarm and the temperature-recovery branch performs recovery for the same trigger device; after real runs, confirm the recovery action in the execution record, then check that the unrecovered alarms of that rule and device are closed.
- Do not use another independent rule to attempt cross-rule clearing by the same alarm definition, and do not rely on alertLogId, which the current page does not provide. Merely adding an empty "else" branch does not execute recovery.
17. View Recover Alarm Configuration
Location: Rule Engine → Rule Editor
Select the Recover Alarm action and the related object; to close alarms already raised, the recovery action must be in the same rule that raised them. The figure only shows this action's form.
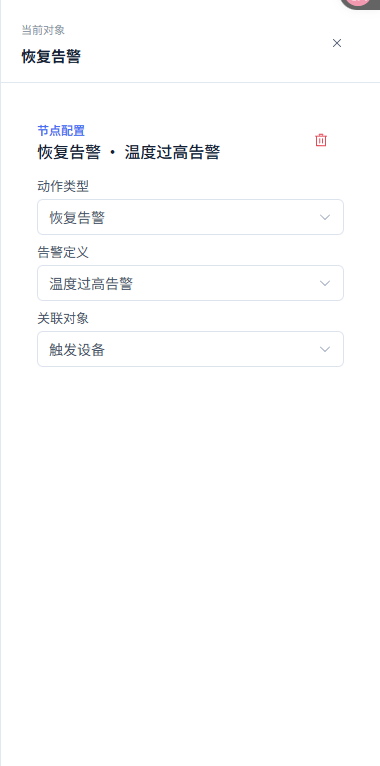
Figure: View recover alarm configuration
Field Description
| Field / Control | Description |
|---|---|
| Related object / Related device | Determines the device subject where the recovery action looks for unrecovered rule alarms; closes unrecovered rule alarms of the same rule and same device without subdividing by version or alarm definition. Optional · Source: current tenant's devices and rule-alarm attribution · Selection: place the recovery action inside the original alarm-raising rule and select the same device; an independent new rule cannot clear the original rule's alarms. Recommended: fill per the implementation plan · Example: fill per the actual environment |
Quick Control Reference
| Option | Purpose and Usage Advice | Effect and Recovery |
|---|---|---|
| Related object / Related device | Determines the device subject where the recovery action looks for unrecovered rule alarms; how to choose: place the recovery action inside the original alarm-raising rule and select the same device; an independent new rule cannot clear the original rule's alarms; where the value comes from: current tenant's devices and rule-alarm attribution; recommendation: keep the current value. | Closes unrecovered rule alarms of the same rule and same device without subdividing by version or alarm definition; Impact · Scope: current rule; takes effect: requires publish; when wrong: choosing a value inconsistent with the device cycle or business frequency changes when the rule is entered; recovery: correct per this section's defaults and actual business requirements, then validate and publish. |
Action: Send Notification
Operation order: select "Send Notification" and choose a notification template; the page automatically brings up the template's notification channel, then select recipients and fill fixed values or select event/upstream fields for the variables declared by the template. Switching the template also switches the channel and clears the selected recipients, which must be reselected.
Sender account, title, content, and attachments are not independent rule action fields. They only appear among the selected notification template's variable definitions; the page displays them with Chinese variable names, and each can be set to a fixed value or an event/upstream field. The sender account is generated before actual execution from the current tenant, the template channel, and the recipient's contact method — an account filled in on the frontend is not trusted.
Recipients are filtered by the template channel: email shows only users with a configured mailbox; SMS and voice show only users with a configured phone number; robot/HTTP-type channels may not require user recipients. At runtime it is also validated that recipients belong to the current tenant and have that channel's contact method.
Notification fields and dynamic rules
- Notification template: templates of the current tenant. Required; determines the channel and variables
- Notification channel: the template's channel, shown read-only. Cannot be selected separately in the action
- Recipients: users matching the channel's contact method, multi-select. Email/SMS/voice require 1 to 100 recipients; robot/HTTP are exceptions
- Sender account, title, content, attachments: appear dynamically when declared among template variables. Each can be fixed text or bound to current event / upstream output
Also confirm the following boundaries when using this guide.
- Example: select the "Alarm Email" template, select on-duty staff with mailboxes, bind the title to the fixed text "High Temperature Alarm" and bind the content variable to temperature; simulation shows a notification preview, and after real runs view the notification action receipt in the execution record.
- Simulation does not send notifications; a successful action receipt should also be confirmed against the channel's delivery logs — do not conclude the recipient received it just from a simulation match.
18. Configure Notification Template and Variables
Location: Rule Engine → Rule Editor
Select the template and recipients, then fill fixed values or bind fields for the dynamically shown variables such as title and content.
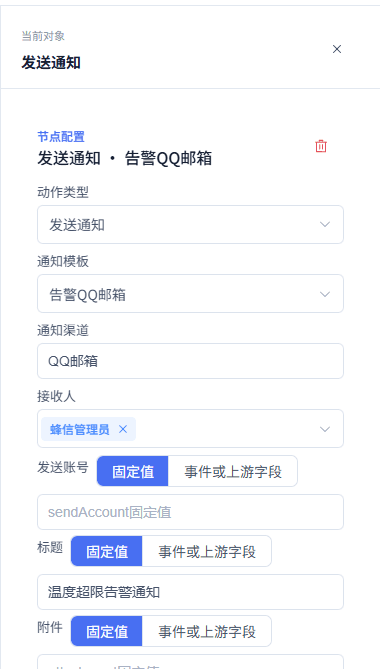
Figure: Configure notification template and variables
Field Description
| Field / Control | Description |
|---|---|
| Notification template / Recipients | The template determines the channel and dynamic variables such as title and content; recipients are filtered by the channel's contact method; real runs call the notification service; simulation only shows a content preview. Optional · Source: current tenant's notification templates, channels, and user contact methods · Selection: select users with corresponding contact methods such as mailbox or phone number, then fill the template's declared variables. Recommended: fill per the implementation plan · Example: fill per the actual environment |
Quick Control Reference
| Option | Purpose and Usage Advice | Effect and Recovery |
|---|---|---|
| Notification template / Recipients | The template determines the channel and dynamic variables such as title and content; recipients are filtered by the channel's contact method; how to choose: select users with corresponding contact methods such as mailbox or phone number, then fill the template's declared variables; where the value comes from: current tenant's notification templates, channels, and user contact methods; recommendation: keep the current value. | Real runs call the notification service; simulation only shows a content preview; Impact · Scope: current rule; takes effect: requires publish; when wrong: choosing a value inconsistent with the device cycle or business frequency changes when the rule is entered; recovery: correct per this section's defaults and actual business requirements, then validate and publish. |
Action: Invoke Webhook
Operation order: select "Webhook", choose one connector from the available connectors, then click "Add Request Field". For each field, enter the request-body key name and select a value from the current event or currently available upstream outputs; fields can be deleted or renamed.
In the Webhook main-action editor on the right of the canvas and in the full form, request fields only have an "Event or Upstream Field" selector — there is no fixed-value input. The scenario wizard's "Adjust Parameters" page may show fixed-value inputs for existing request fields. After entering the canvas, check each field's final source one by one; if a same-named field still has a mapping, do not treat the wizard-entered value as the final sent content — run a simulation first to see the action preview.
Unavailable connectors are disabled in the dropdown, and publish validation also confirms the connector belongs to the current tenant and is enabled. Simulation only shows the request body and path that would be constructed — it does not send a request to the remote end.
Webhook fields
- Webhook connector: select from the available-connector dropdown. Connector availability is validated before publish
- Request field name: entered after adding; can be renamed or deleted. Becomes a request-body key
- Request field value: select current event or completed upstream output. Becomes a request-body value; the main-action editor has no fixed-value control, while existing fields in the scenario wizard may show fixed-value inputs
Also confirm the following boundaries when using this guide.
- Example: add a temperature field bound to "Current Event · Temperature" and a deviceNo field bound to an upstream output; view the request preview in simulation, and after real execution view the connector receipt in the execution record.
- Webhook action success means the connector execution result; a simulation preview or a constructed request cannot be treated as successful business processing by the external system.
19. Configure Webhook Field Mapping
Location: Rule Engine → Rule Editor
Select an available connector and map the request fields. The environment in the figure has no connector — an administrator must complete one before publishing can finish; this figure does not represent a successful invocation.
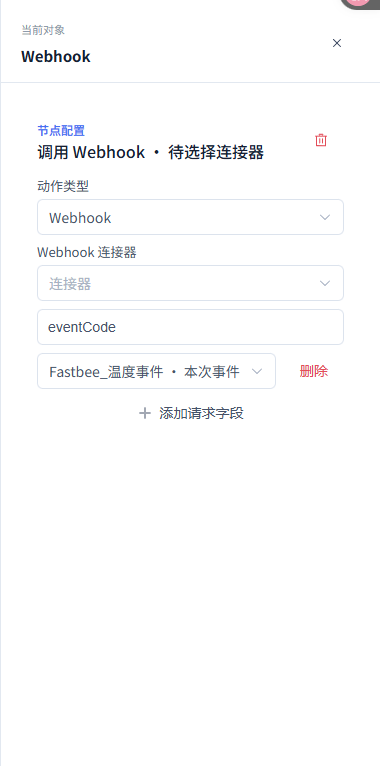
Figure: Configure Webhook field mapping
Field Description
| Field / Control | Description |
|---|---|
| Webhook connector / Request fields | The connector defines the external invocation configuration; request fields are mapped from event or upstream fields; publishing cannot complete while no connector exists; a preview does not prove the remote call succeeded. Optional · Source: current tenant's connectors and fields available to the current rule · Selection: select an available connector first; after adding a request field name, select a source for it. Recommended: fill per the implementation plan · Example: fill per the actual environment |
Quick Control Reference
| Option | Purpose and Usage Advice | Effect and Recovery |
|---|---|---|
| Webhook connector / Request fields | The connector defines the external invocation configuration; request fields are mapped from event or upstream fields; how to choose: select an available connector first; after adding a request field name, select a source for it; where the value comes from: current tenant's connectors and fields available to the current rule; recommendation: keep the current value. | Publishing cannot complete while no connector exists; a preview does not prove the remote call succeeded; Impact · Scope: current rule; takes effect: requires publish; when wrong: choosing a value inconsistent with the device cycle or business frequency changes when the rule is entered; recovery: correct per this section's defaults and actual business requirements, then validate and publish. |
Action: AI Analysis
Operation order: select "AI Analysis", choose an available AI assistant, and fill in the analysis task. When the assistant declares an input structure, the page dynamically lists each input item per its inputSchema or inputs; without a declaration, only one "Analysis Input" is provided. Each item can be a fixed value or bound to current event / completed upstream output.
After selecting an assistant, its identifier and code are recorded. The output form can be Report or Structured Result: Report is for textual conclusions; Structured Result requires adding result fields row by row, entering a field name and choosing text, number, or boolean type. Structured field names must start with an English letter, contain only letters, digits, and underscores, and be at most 64 characters; the field count is 1 to 32 and duplicates are not allowed.
To make AI results participate in later branches, first declare structured fields in the AI action, e.g. severity:string; then place the AI action in the sequential flow before the conditional branch, select "Completed Upstream Output" as the condition source, select result.severity, and compare with high. Only AI outputs completed on all reachable paths appear as candidates.
AI Analysis fields
- AI assistant: list of available assistants. The assistant identifier and code are recorded after selection; unavailable assistants are disabled
- Analysis task: always shown. Required; describes the problem to analyze
- Analysis input: dynamically generated from the assistant's input structure; a single Analysis Input when there is no structure. Each item selects a fixed value or event/upstream output
- Output form: Report, Structured Result. Report outputs text; Structured Result shows a result-fields table
- Result fields: appear only for Structured Result. Name plus type: text, number, boolean
Also confirm the following boundaries when using this guide.
- Example: select the "Device Anomaly Analysis" assistant, enter "determine alarm level" as the task, bind temperature to the input, and declare severity:string; a later IF uses result.severity = high to decide whether to notify. Simulation uses an explicit structured sample and shows the path; real runs show the AI action result and subsequent branches in the execution record.
- The AI assistant must be available and belong to the current tenant; simulation does not call the real AI. Report mode cannot be referenced as custom structured fields — only the report mode's declared requestId, taskId, and report can be used.
20. Configure AI Analysis and Output Fields
Location: Rule Engine → Rule Editor
Select the AI assistant and analysis task; when choosing Structured Result, declare output fields and types for use by later conditional branches.
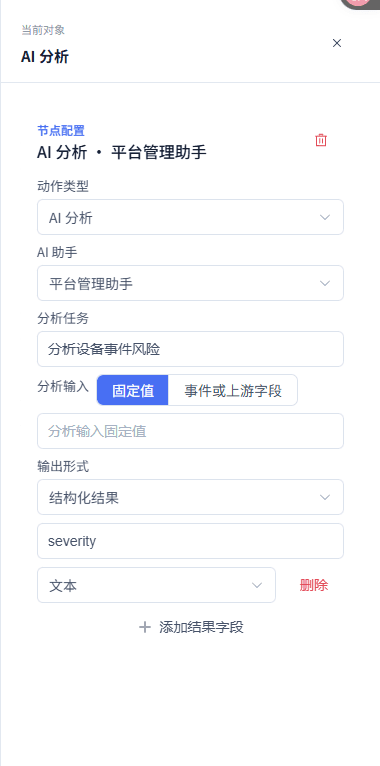
Figure: Configure AI analysis and output fields
Field Description
| Field / Control | Description |
|---|---|
| Output form / Output fields | Report is for reading; Structured Result lets later nodes judge by field; later references may only use declared structured fields; simulation uses explicit samples. Optional · Source: the AI assistant and the output structure declared by this rule · Selection: when IF branching by severity is needed, choose Structured Result and declare fields and types such as severity. Recommended: fill per the implementation plan · Example: fill per the actual environment |
Quick Control Reference
| Option | Purpose and Usage Advice | Effect and Recovery |
|---|---|---|
| Output form / Output fields | Report is for reading; Structured Result lets later nodes judge by field; how to choose: when IF branching by severity is needed, choose Structured Result and declare fields and types such as severity; where the value comes from: the AI assistant and the output structure declared by this rule; recommendation: keep the current value. | Later references may only use declared structured fields; simulation uses explicit samples; Impact · Scope: current rule; takes effect: requires publish; when wrong: choosing a value inconsistent with the device cycle or business frequency changes when the rule is entered; recovery: correct per this section's defaults and actual business requirements, then validate and publish. |
Rule Settings, Drafts, and Validation
The edit page shows the editable draft and the running published version separately. The top "Unsaved / Draft Saved / New Rule" only describes the current editing content; the runtime status on the right and the runtime version at the bottom describe the version executing online. Saving a draft neither enables the rule nor modifies the runtime version.
The overview on a blank canvas area lists pending items. Clicking a pending item locates the corresponding field in the trigger, conditions, workflow nodes, or rule settings; "Validate" collects issues returned by the server, and clicking an issue also locates it.
Rule settings fields
- Rule name: the name in the rule list and edit page, up to 128 characters. Use a name that states the trigger object and business result; saving is not possible when empty.
- Priority: the rule's business priority, from 1 to 9999; new rules default to 100, and smaller numbers enter the evaluation queue earlier. It determines the evaluation order of candidate rules and cannot change the execution order of canvas nodes within the same rule.
- Remarks: record the maintenance purpose, responsibility boundaries, or change reasons. Suitable for threshold rationale, on-duty notes, and external dependency information.
- Latest state validity period: limits how long the latest state read by conditions can be used; V4 defaults to 300 seconds for new rules. Used for cross-device, sustained, and scheduled judgments; states beyond the validity period become "Undeterminable" and are not treated as unsatisfied.
- Cooldown: repeated-entry suppression starting when the rule schedule is successfully submitted; V4 defaults to 60 seconds for new rules. Setting 0 means no cooldown. A failed schedule submission releases the reservation — do not treat "action ultimately succeeded" as the cooldown start.
- Cooldown · Scope: choose per-trigger-device cooldown or unified cooldown for the whole rule. Choose "Per Trigger Device" when devices are handled separately; choose "Whole Rule" when only one global handling is needed.
- Daily active period: limits the start and end times during which the rule may be entered each day; start and end must both be filled, in HH:mm or HH:mm:ss format. Uses the trigger's timezone, defaulting to Asia/Shanghai when unfilled; a start later than the end means crossing midnight, and equal values mean all day.
- On action failure: choose to stop subsequent actions when an action fails, or to continue and mark the instance as failed; V4 defaults to stopping subsequent actions for new rules. Choose stop for control chains that must succeed serially; notifications or records that can be handled independently may choose continue, but watch failures in tracing.
Draft operations and feedback
- Save draft: first checks local pending items, legacy-rule migration status, and the rule name, then creates or updates the draft. Follow the hints to locate missing fields; a failed save does not change the published runtime version.
- Validate: submits the current draft to the rule validation service, collects issues, and shows them at the bottom. Click an issue to locate the control, complete resources, fields, or parameters, then validate again.
- Undo / Redo: rolls back or restores editor-recorded changes within the current editing session. Only affects current edits; saves, publishes, and historical versions on other pages are not undone by this.
- Legacy rule migration: the edit page shows a convertible preview or the reasons rectification is needed. Saving is not possible when lossless conversion is impossible; complete the V4 configuration per the issues before saving.
- Mobile access: narrow screens show a read-only preview. Complete editing, saving, simulation, and publishing on desktop.
Also confirm the following boundaries when using this guide.
- Saving, passing simulation, and taking effect at runtime are three different things: saving writes the draft, simulation computes the expected path, and real events are processed only after publishing is confirmed by runtime nodes.
- When multiple people or pages modify simultaneously, the server protects updates with a version lock; after a state-conflict prompt, reopen the rule and compare the latest draft before deciding how to merge.
21. Set Rule Policies
Location: Rule Engine → Rule Editor
Open "Rule Settings" and adjust priority, state validity period, cooldown, active period, and the on-action-failure policy.
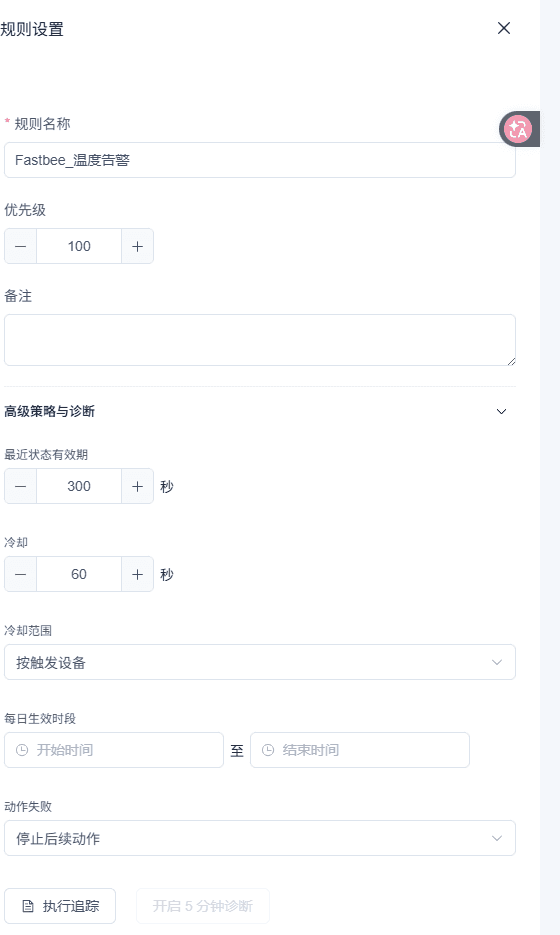
Figure: Set rule policies
Field Description
| Field / Control | Description |
|---|---|
| Latest state validity period | Limits the maximum age at which latest state can participate in judgment, in seconds, default 300; expired and not-ready states do not participate in normal numeric judgment. Optional · Source: device reporting cycle and business real-time requirements · Selection: set in combination with the device's actual reporting cycle; a value smaller than the reporting cycle may cause frequent undeterminable results. Recommended: 300 · Example: fill per the actual environment |
| Cooldown | Time in seconds to suppress repeated entry into the execution flow, default 60 for new rules; the cooldown is occupied after the schedule is successfully submitted; it does not wait for the action to ultimately succeed. Optional · Source: the repeat-handling frequency allowed by the business · Selection: set 0 to disable cooldown; for frequent alarms choose an interval per business expectation. Recommended: 60 · Example: fill per the actual environment |
Quick Control Reference
| Option | Purpose and Usage Advice | Effect and Recovery |
|---|---|---|
| Latest state validity period | Limits the maximum age at which latest state can participate in judgment, in seconds, default 300; how to choose: set in combination with the device's actual reporting cycle; a value smaller than the reporting cycle may cause frequent undeterminable results; where the value comes from: device reporting cycle and business real-time requirements; recommendation: 300. | Expired and not-ready states do not participate in normal numeric judgment; Impact · Scope: current rule's conditions and entry policies; takes effect: requires publish; when wrong: choosing a value inconsistent with the device cycle or business frequency changes when the rule is entered; recovery: correct per this section's defaults and actual business requirements, then validate and publish. |
| Cooldown | Time in seconds to suppress repeated entry into the execution flow, default 60 for new rules; how to choose: set 0 to disable cooldown; for frequent alarms choose an interval per business expectation; where the value comes from: the repeat-handling frequency allowed by the business; recommendation: 60. | The cooldown is occupied after the schedule is successfully submitted; it does not wait for the action to ultimately succeed; Impact · Scope: current rule's conditions and entry policies; takes effect: requires publish; when wrong: choosing a value inconsistent with the device cycle or business frequency changes when the rule is entered; recovery: correct per this section's defaults and actual business requirements, then validate and publish. |
Simulation Testing and Pre-publish Verification
Simulation verifies the judgment paths and action previews of the current editing draft. It can use content not yet saved, and takes a simulated event, latest states, and virtual time as input; when a scenario sample exists, it can be loaded first. Simulation does not deliver device commands, send notifications, invoke Webhooks or AI, and does not modify cooldown state.
Run results show the trigger, judgment, and orchestration path step by step and list the expected actions. Click "Locate Node" to return to the related node and check fields. A "satisfied" result in simulation is only the model's computation result — not a success receipt from an external service or device.
Simulation inputs
- Scenario sample: when a sample exists, load it from the dropdown and modify as needed. Quickly obtains the event, states, and AI structured sample defined by the scenario.
- Sample device: select the trigger device; if not selected, the trigger's default device is used. Determines the device subject of the simulated event and the available thing-model fields.
- Sample fields and sample values: select the fields reported this time and fill values per thing-model types. Verifies whether a property, event, or device-state entry can match.
- Latest state samples: multiple entries can be added: device, property, value, observation time, and "state ready". Verifies cross-device conditions, sustained conditions, and scheduled judgments; expired or not-ready states should appear as undeterminable.
- Virtual time: fill in the time you want to simulate. Verifies time-related logic such as scheduled triggers, daily active periods, delays, and state validity periods.
- AI structured output sample: fill only when the scenario or draft contains AI output. Verifies AI result branches; it is a local simulation sample and does not request the AI service.
Recommended verification order
- Configuration ready: check pending items in the canvas overview and handle them one by one. No blocking issues; fields and resources are all available.
- Validate: click "Validate" and handle all returned issues. Rule validation passes; open the full form again to check if necessary.
- Simulate hit and miss: fill samples that should satisfy and should not satisfy respectively. Paths, condition results, and action previews meet expectations; a miss should show no action preview.
- Pre-publish check: save the draft, click publish, and read the scope summary and fixed-device-list notice. The pre-check has no errors; confirm the scope and action impact before confirming publish.
- Real-run verification: after the version takes effect, use execution tracing to view real events and receipts. Treat node statuses, action receipts, and failure reasons in tracing as runtime evidence.
Also confirm the following boundaries when using this guide.
- A simulation failure usually indicates a problem with draft structure, input types, or resource constraints; read the errors and validation issues first, then locate and fix — do not treat a failed result as a real-run failure.
- Simulation inputs do not create device states, alarms, or execution records; real execution records only come from a published runtime version.
- Virtual time is used to check the period, state validity, and waiting logic after the rule receives a sample. Passing simulation does not prove the real schedule fired on time; first verify the schedule with "Preview Next Five Runs", then check real execution records at the corresponding times after the version takes effect.
22. Set Simulation Samples
Location: Rule Engine → Rule Editor
Open "Simulation Test > Configure Simulation Samples", prepare device states, observation times, state readiness, and virtual time, then run the simulation.
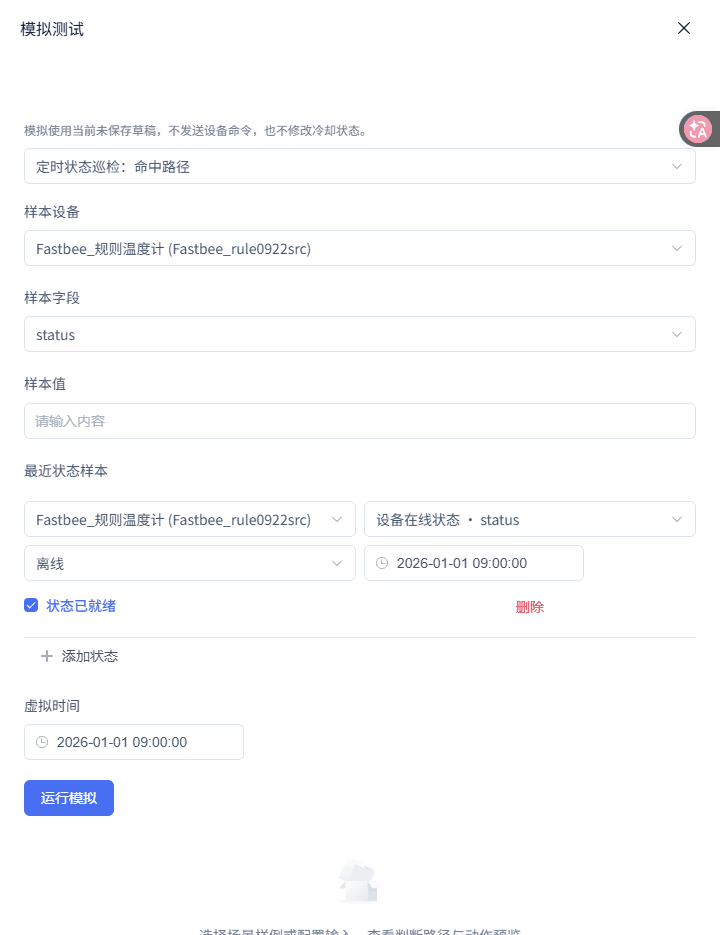
Figure: Set simulation samples
23. Read Simulation Paths and Action Previews
Location: Rule Engine → Rule Editor
Check the actual condition values, judgment results, and action previews to confirm the sample's matched path; simulation does not send out business actions.

Figure: Read simulation paths and action previews
Quick Control Reference
| Option | Purpose and Usage Advice | Effect and Recovery |
|---|---|---|
| Run Simulation | Computes paths and expected actions from the current draft and samples; when to use: enter hit, miss, and missing-state samples respectively to check different paths. | Does not write real state, modify cooldown, or send device commands or external requests; on failure: re-verify the current status via this section's entry. |
Publishing, Runtime Confirmation, and Version Management
Publishing first saves the current draft, then runs the pre-publish check. After passing, the confirmation dialog shows the scope; product batch control fixes the device list for this publish. After a successful publish, the page shows "Published, waiting for runtime node confirmation" — at this point do not treat a saved draft or candidate version as active.
The editor refreshes the rule status during confirmation and shows the number of nodes that have confirmed the candidate version; only after the status becomes "Active vN" are new matching events processed by that version. If publishing fails, the current runtime version does not change.
Publish process and version operations
- Before saving: complete pending items and save the draft. The draft is persisted but still does not run.
- Pre-publish check: click publish and wait for the pre-check; if there are errors, fix them item by item in the issues panel. The pre-check token is only for the publish following the passed check; errors do not replace the runtime version.
- Confirm · Publish: check the scope and batch device list, then confirm and submit. Creates a candidate version and waits for runtime node confirmation.
- Runtime confirmation: watch the runtime status at the top and the list status. Confirming candidate versions show progress; the active version number is shown after confirmation completes.
- Pause / Resume: pause or resume in the list. Pausing stops new entries; resuming continues with the existing published version.
- View version history: open version history from "More" in the list. You can check version numbers, checksums, publish status, and publish times.
- Restore historical version: confirm "Restore Version" in version history. Writes the historical version as an editable draft — it still must be validated, saved, and published; it is not an immediate rollback.
Raw publish-status values in version history
- pending_runtime: the candidate version is waiting for runtime node load confirmation. Wait for confirmation progress; after confirmation failure or timeout, check runtime node status and version remarks.
- published: the version has been confirmed by all expected runtime nodes and became the published version. Continue verifying with the rule's top "Active vN" and real execution tracing.
- runtime_failed: at least one runtime node failed to load the candidate rule version. Check the cause in the version remarks, fix the runtime environment, then initiate the publish again; the current runtime version remains unchanged.
Also confirm the following boundaries when using this guide.
- Publish permission differs from edit permission; a user with edit permission may still lack permission to publish, pause, resume, or terminate running instances.
- Publish confirmation polling lasts at most about one minute; if it stays confirming for a long time, have the runtime environment administrator check runtime node connections and confirmation status, then re-read the rule status.
- Restoring a historical version as a draft does not replace the first publish: a rule that was never published still needs saving, passing the pre-check, and completing runtime confirmation before a runtime version appears.
24. Read the Publish Confirmation Scope
Location: Rule Engine → Rule Editor
Click publish, and after saving and the pre-check complete, check the scope. Confirming publish creates a candidate version, which still needs runtime node confirmation.
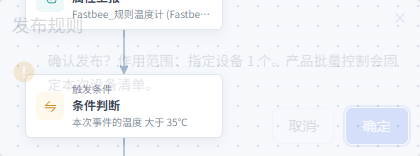
Figure: Read the publish confirmation scope
25. Confirm the Runtime Version Is Active
Location: Rule Engine → Rule Editor
Read the editor's runtime status; only "Active" means runtime confirmation is complete.

Figure: Confirm the runtime version is active
26. View Version History
Location: Rule Engine → Rule Editor
From the list's "More > Version History", view version numbers, checksums, status, and times. Restore Version only restores to a draft.
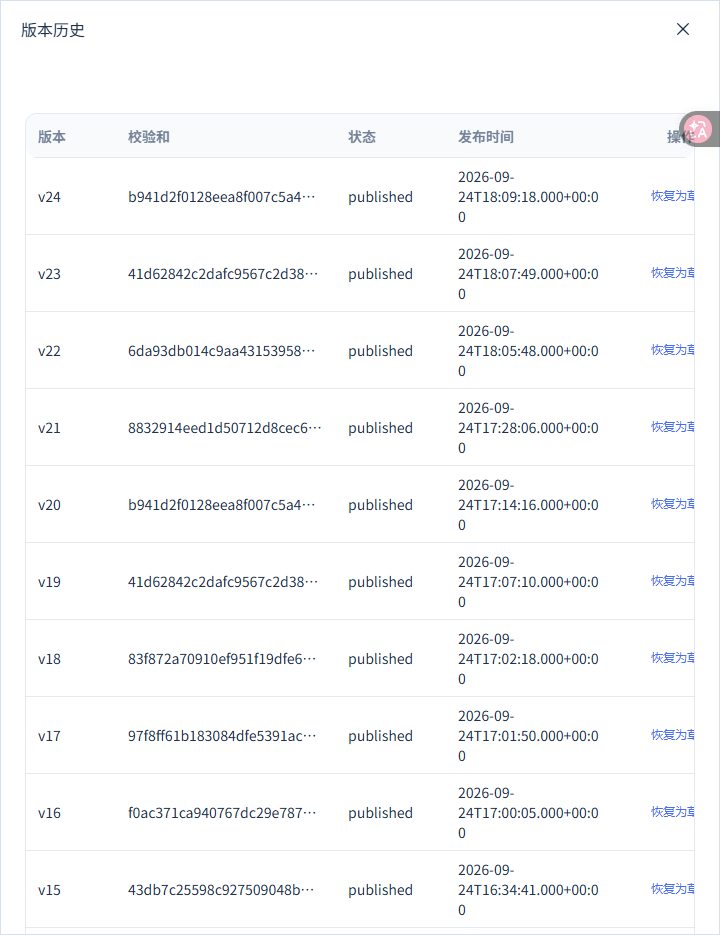
Figure: View version history
Quick Control Reference
| Option | Purpose and Usage Advice | Effect and Recovery |
|---|---|---|
| Restore Version | Restores the specified historical version as the current draft; when to use: when you need an old version's configuration as the starting point for changes — check the version number and time first. | Does not switch the runtime version immediately; the draft still needs checking and republishing; on failure: re-verify the current status via this section's entry. |
Execution Tracing, Diagnosis, and Run Termination
Execution tracing targets the published runtime version. The bottom of the edit page shows the latest execution ID, trigger object, result, and start time; after opening detailed tracing, select an execution record to view, node by node in the real flow diagram, the condition results, wait-until times, failure codes, failure reasons, input/output summaries, and action receipts.
The trace list refreshes every 1.5 seconds; the current interface always reads the rule's latest 30 records, with no filter or paging controls. After opening an instance it also subscribes to real-time steps. When the real-time connection breaks, a notice appears and reconnection is attempted, and incremental steps already received are kept. The published-version flow in tracing is for explaining historical instances — it cannot be replaced by the current draft.
Execution states and action receipts
- Execution Completed / Execution Failed: the whole instance has ended; failed status should be examined together with the failure reason and the specific node. Select the failed node in the flow diagram, then read the judgment explanation, actual value, target value, and receipt in the timeline.
- Waiting / Executing / Pending: the instance has not ended — it may be in a delay, queued, or waiting for an action receipt. Keep the trace drawer open to watch real-time updates; do not directly conclude waiting is failure.
- Canceled / Terminated: the instance was canceled or terminated by a user with publish permission. Check the termination reason and which nodes completed; rerunning requires a new real entry.
- Undeterminable: the state needed by the condition is missing, expired, or not ready. Check the latest state's device, field, observation time, and state validity period — it cannot be treated as unsatisfied.
- Dispatched: the action has been submitted to the device or service channel. Not equivalent to the device physically completing execution; continue watching for device confirmation or device execution result.
- Notification service accepted: the notification provider has received the request. Does not mean the recipient received or read it; verify per the notification channel's receipt capability.
- Service responded / Business result recorded: the Webhook, AI, or business action returned a limited summary. View the safe summary such as HTTP status and elapsed time; the page does not show external response bodies.
Diagnosis and termination operations
- Five-minute diagnosis: click "Enable 5-Minute Diagnosis" under "Rule Settings > Advanced Policies and Diagnosis". Requires test permission; records at most 1000 detail entries, the statistics area shows observation count and deadline, and details are viewed in execution tracing.
- AI explains this execution: in detailed tracing, first select an execution record, then click this button. It explains causes only from that instance's trace facts; it does not generate, save, or publish rules.
- Terminate running instance: only for unfinished instances, click "Terminate Running Instance", fill in the required reason, and confirm. Requires publish permission; nodes not yet started are canceled, and device commands already dispatched cannot be withdrawn. When a state-version conflict occurs, reload the instance before deciding.
- Real-time tracing: after selecting an execution instance, keep the trace drawer open. A broken real-time stream reconnects automatically; loaded historical steps can be viewed before the connection recovers.
Fields viewable after selecting a real flow node
- Flow diagram title: published version number, state revision, and the instance's overall status. Confirm which historical runtime version and which state snapshot this is.
- Node status: node name and status: pending, executing, waiting, completed, failed, canceled, terminated, or result unknown. Select failed or waiting nodes first, then analyze with the details and timeline below.
- Conditions and waiting: condition results, and the delay node's "wait until". When a condition is undeterminable, check the state data; a wait-until time that has not yet arrived is normal waiting.
- Failure and action receipts: failure code, failure reason, and action receipt stage. The receipt stage states where the action reached — do not treat Dispatched directly as device execution completed.
- Input/output summary: the current node's input and output fields, at most 12 items. Sensitive keys, request headers, tokens, credentials, and external response bodies are filtered; strings are also truncated.
- Timeline: phase, status, time, message/reason, plus data source, field, actual value, target value, observation time, and state version (when present). Use the timeline to confirm whether the entry, scope, condition, duration, action submission, delay, or receipt stage caused the result.
Also confirm the following boundaries when using this guide.
- Execution tracing is the basis for verifying real runs; simulation's matched paths and action previews do not create real records here.
- Action receipt strengths differ: queued, dispatched, device confirmed, device execution result, service responded, and business result recorded each represent a different stage and cannot substitute for one another.
27. Select a Real Execution Record
Location: Rule Engine → Rule Editor
Open execution tracing and select one real execution by execution ID, trigger device, result, and time.

Figure: Select a real execution record
28. View Execution Results Node by Node
Location: Rule Engine → Rule Editor
Select a flow node of the corresponding runtime version and check condition values, branches, failure reasons, and action receipts.
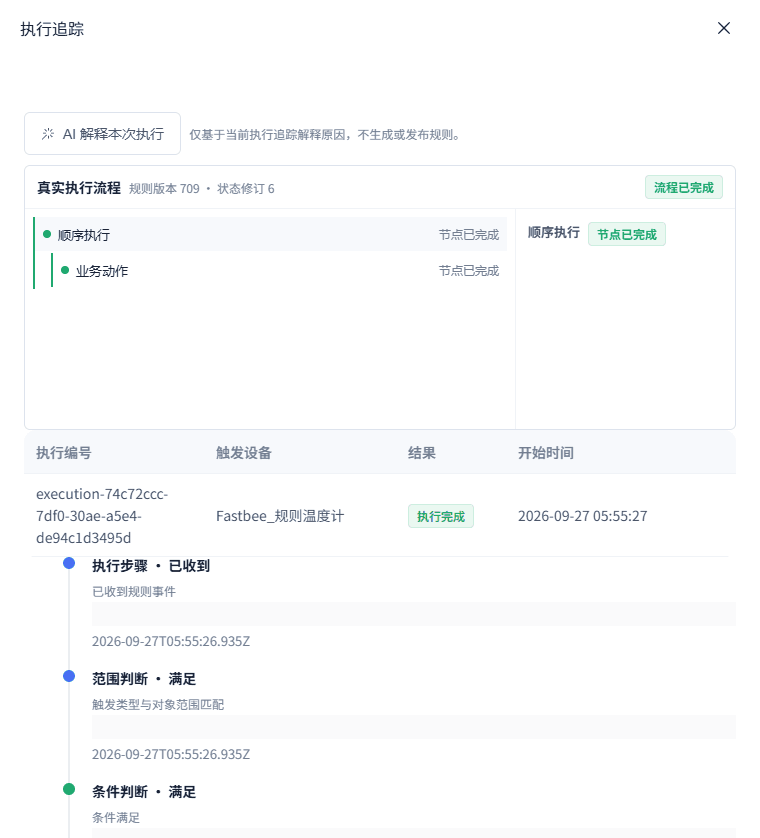
Figure: View execution results node by node
29. Distinguish Dispatched from Device Execution Completed
Location: Rule Engine → Rule Editor
Check the receipt stage of a device control action; Dispatched means submitted to the runtime channel and does not prove the physical device completed the action.
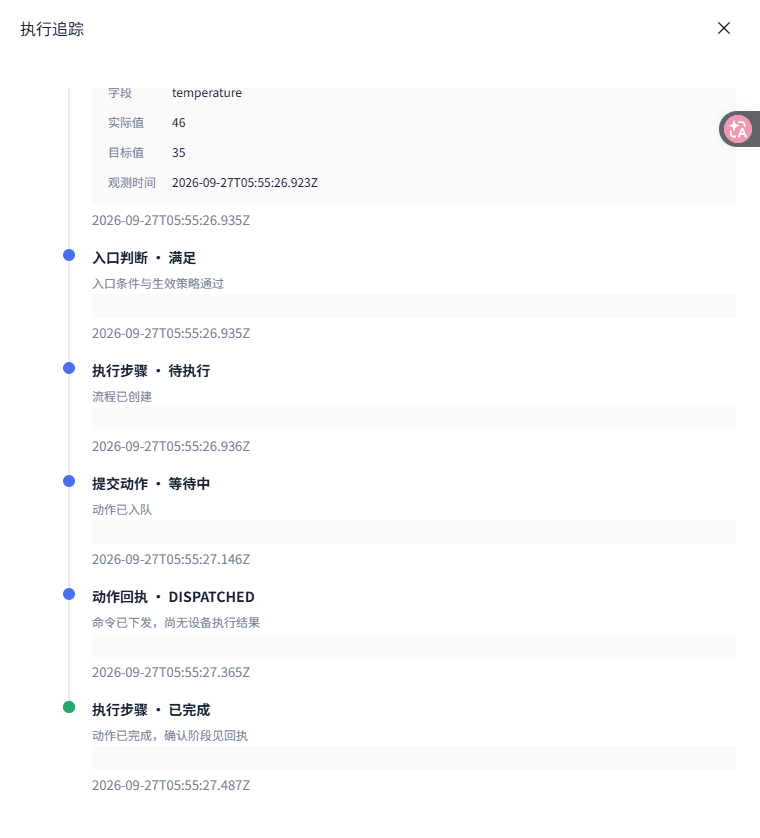
Figure: Distinguish Dispatched from device execution completed
30. Find the Time-limited Diagnosis Entry
Location: Rule Engine → Rule Editor
At the bottom of rule settings, open execution tracing or enable five-minute diagnosis; the diagnosis button is disabled for the current unsaved draft — save first.

Figure: Find the time-limited diagnosis entry
Quick Control Reference
| Option | Purpose and Usage Advice | Effect and Recovery |
|---|---|---|
| Execution ID / Node details | The execution ID distinguishes different real run instances; node details show that run's judgment values, status, and receipts; how to read: find the corresponding instance by start time, then select flow nodes to view failure or waiting reasons. | Data · Source: real executions and action receipts of the published rule; read the diagram using the flow of the instance's version; viewing does not execute actions again. |
AI Assistance, Permissions, and Runtime Boundaries
AI-generated drafts are an editing aid: select an available assistant, optionally describe the automation you want, and the system generates a draft based only on the currently selected products, devices, and thing models. A successful generation replaces the currently edited draft content with the returned definition and layout, so save first or confirm you do not need to keep existing changes. After generation you must still manually check resource bindings, validate, simulate, save, and publish — AI does not publish automatically. When AI is unavailable or information is insufficient, the dialog keeps the reason, and generation can be retried after completing assistant configuration or the prompt.
The rule engine control plane handles definition, resource selection, publishing, status, and evidence display; device protocol access, device-side execution, and the final results of external notification, Webhook, and AI services are each reported back by the corresponding runtime service. Statuses on the page such as "Dispatched" and "Service Accepted" must be understood by their receipt stage.
Correct use of AI assistance
- AI-generated rule draft: input is an automation description, an optional assistant, and the current product/device/field context; output is a definition, layout, and pending issues, replacing the current editing draft. Save drafts you want to keep first; check the generated triggers, conditions, actions, and resources, handle the issues, then validate, simulate, save, and publish.
- AI explains this execution: input is the current definition plus the selected real instance's execution, tasks, attempts, trace, and node information; output is explanation text. It is grounded in the historical-version flow and trace fixed to that instance; the explanation does not change the rule and does not trigger re-execution.
- AI unavailable: draft generation reports not deployed or no available assistant; explanation falls back to describing the collected trace facts. Retry after configuring an available assistant, or troubleshoot manually from the existing facts; do not treat unavailability as a rule runtime failure.
Permission and responsibility boundaries
- View list, details, versions, executions, and diagnosis statistics: list and query permissions. Only data the current tenant has permission for can be viewed.
- Create rule: create permission. Both scenarios and AI only produce drafts and cannot bypass publishing.
- Edit, save draft, restore historical version, AI generation: edit permission. Does not directly start the rule running.
- Simulate and enable diagnosis: test permission. Simulation has no external side effects; diagnosis is time-limited, quota-limited observation.
- Publish, pause, resume, terminate instance: publish permission. Affects runtime status; termination cannot withdraw commands already dispatched.
- Delete: delete permission. Before deleting, keep the versions and execution evidence the business needs.
Also confirm the following boundaries when using this guide.
- Rule data is isolated by tenant; when querying device states or execution instances, the server verifies current-tenant attribution.
- The current version offers restoring a historical version to a draft, not one-click immediate rollback of a running version; any runtime change still goes through publish confirmation.
- Success of external services is determined by the corresponding receipt or business result. Simulation, draft saving, publish-request success, and action dispatch are each insufficient on their own to prove physical device execution or notification delivery.
31. Open the AI Draft Generation Window
Location: Rule Engine → Rule Editor
First select the product, device, and fields, then click AI Generate, choose an available assistant, and describe the goal. After generation, check the overwritten draft; in this round we only viewed the entry and did not call external AI.
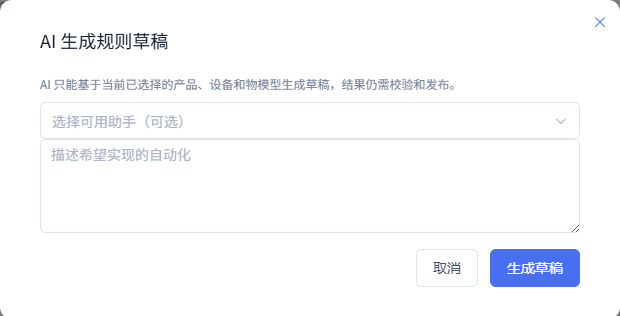
Figure: Open the AI draft generation window
Quick Control Reference
| Option | Purpose and Usage Advice | Effect and Recovery |
|---|---|---|
| Generate Draft | Generates a definition and layout from the current resource context and business description; when to use: save content you want to keep first, describe the trigger object, thresholds, and handling actions, then generate. | A successful generation replaces the current editing draft, which still needs validation, simulation, saving, and publishing; on failure: re-verify the current status via this section's entry. |
FAQ: Locating and Recovering from Problems
Troubleshoot in the order "draft validation → simulation samples → publish status → real execution trace". Each step answers a different question: validation checks whether the definition is legal, simulation checks the expected path for given inputs, publish status checks whether the version has entered the runtime plane, and execution tracing explains real events and action receipts.
Do not infer from list status alone that a device or external service has completed. First select the corresponding execution instance and check its fixed-version flow, failed nodes, timeline, and action receipts; then verify the final result in the responsible system for the device, notification, or connector.
Recover per the hints
- "Please complete the pending items first" or validation issues: canvas overview and validation-result drawer; clicking an issue locates the field. Complete resources, fields, conditions, or action parameters, then validate and save again.
- Draft save failed: rule name, pending items, legacy-rule migration hints, and current resource availability. Fix per the hints and retry saving; a failed save does not change the published version.
- Pre-publish check has errors: issues returned by the publish pre-check and the scope summary. Fix in the draft and save again; you cannot bypass the pre-check to publish directly.
- Candidate version not active for a long time or showing runtime_failed: confirmation progress at the top, publish status in version history, and version remarks. Have the runtime environment administrator check node loading/confirmation; republish after fixing — the current runtime version remains unchanged.
- Simulation shows unsatisfied or undeterminable: sample event fields and values, latest-state device/field/observation time/readiness flag, and virtual time. Refill samples with correct thing-model types; supply unexpired and ready latest states for cross-device or scheduled judgments.
- Real trace shows condition undeterminable: data source, field, observation time, state version in the timeline, and the state validity period in rule settings. Check whether the device has reported, whether the field matches, and whether the state has expired; it cannot be handled as "unsatisfied".
- Execution suppressed by cooldown or duplicate events: the not-executed reason in execution/diagnosis records, and the cooldown seconds and scope in rule settings. Confirm this is the business expectation; when more frequent execution is needed, adjust the draft cooldown and republish.
- Action dispatched but no device result seen: action receipt stage in tracing, device confirmation/execution result, and device-side records. Dispatched only means submitted; check device online status, protocol operation, and device-side receipts — wait if necessary or trigger a new event per the business process.
- Termination reports the state has changed: reload the current instance's state revision and node statuses. After confirming the instance has not ended, refill the termination reason and submit; commands already dispatched cannot be withdrawn.
- AI cannot generate or explain: missing information in the AI dialog, assistant availability, and the current product/device/thing-model context. Retry after completing resources or switching to an available assistant; even a successful AI generation must be re-validated, simulated, and published.
Also confirm the following boundaries when using this guide.
- When you need to preserve the problem scene, do not overwrite the draft first; version history and execution tracing preserve the published definition and runtime facts respectively.
- The current page has no filter, paging, or manual refresh button for execution records; after detailed tracing opens, the latest 30 records refresh automatically.
Production Operation Notice
Screenshots and examples illustrate operation locations and judgment methods, and do not represent current production status. When publishing, starting/stopping, rebinding, retrying, or deleting is involved, first confirm the target environment, scope of impact, and recovery plan, and have authorized personnel perform the operation.
FastBee (蜂信物联) · Professional Edition Web Operation Manual