


IEC103 and TCP Protection Device Access
This article reorganizes an existing operation manual into an online operation reference. Operations marked as expected or not executed in the original must still be verified against the actual environment.
Complete IEC103 TCP direct-connection ten-point reporting, two controls with independent states, manual reconnection, general interrogation, and history queries.
Before you begin: You have product, device, model, publish, control, and history permissions; the local application, single-node FMQ, and FMQX Web are available, and this device's connection parameters have been obtained
Purpose and Connection Direction
This tutorial uses an already configured demo device. For first-time access, fill in according to the configuration examples; existing resources can be verified directly, then continue from the publish and report sections.
The protection device in FMQX Web is a TCP client that actively connects to the FMQ listening port at 127.0.0.1:8888. The platform manages device identity, point mapping, publish, control, and history.
Link address 1 and common address 1 identify the link and the station; FUN160, INF1 to 10 correspond to platform point addresses 40961 to 40970 respectively. Only Protection 1 allows control.
Replace These Parameters Before Copying Templates
The code in this article uses generic template names; the screenshots retain actual historical resources. Complete the following checks before saving as a UTF-8 file or sending messages.
- The host, port, and listening direction in the connection file must be changed to the actual addresses of the current environment; 127.0.0.1 means the local machine running FMQX. When MQTT is involved, also verify the product ID, username, subscription topics, and responseRoute; passwords are only entered securely on the connection page.
- Group, session, and subscription ids are internal references of the import file; if renaming is needed, the groupId must match the corresponding group id. Verify before importing, and do not repeatedly create connections with the same name on a retained session.
- The code blocks are customer templates rewritten from existing password-free assets or original code; this version of the template has not yet been proven to import successfully. Historical screenshots, send times, and business pass scope are still subject to the records of each step; do not treat template names as the actual resource names in the old evidence.
1. Configuring the Product, Device, and Ten-Point Model
1. Creating This Article's Product
Location: IoT → Device Access Steps: Fill in the Product Name, then continue to modeling.
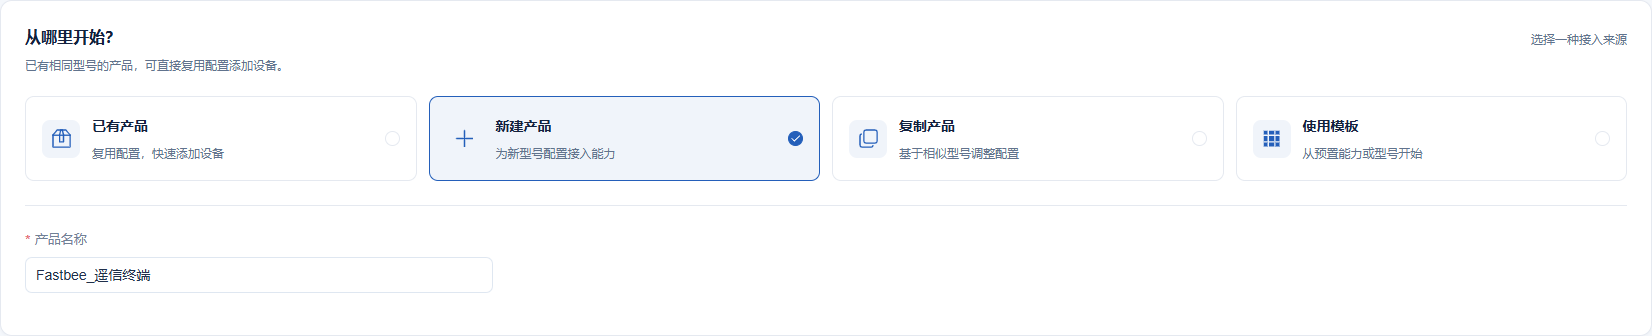
An independent product holds this device's ten boolean properties.
Screenshot Highlights
| Field / Control | Description |
|---|---|
| Product Name | Holds this device's ten boolean models. Required · Fill in: 保护装置演示 |
2. Creating Ten Properties from a Sample
Location: Device Access Wizard → JSON Sample Steps: Fill in the ten boolean fields and parse the sample.

The JSON sample is used to generate the model; the device actually communicates over native IEC103.
Screenshot Highlights
| Field / Control | Description |
|---|---|
| Modeling Sample | JSON only generates the model; IEC103 uses native FT1.2 on the wire. Required · Fill in: Fill according to the implementation plan · Example: Ten BOOLEAN fields |
| Modeling Fields | The sample initial values are odd false and even true; when sending demo events later, select the value point by point. Required · Fill in: Ten boolean fields |
3. Registering This Article's Device
Location: Device Access Wizard → Device Information Steps: Fill in the device number and name, and note the number for protocol binding.

The platform device number and the protocol-bound clientId use the same number.
Screenshot Highlights
| Field / Control | Description |
|---|---|
| Device Number | Keep identical to the protocol-bound clientId. Required · Fill in: FastBee_IEC103TCP_Tutorial_01 |
4. Completing the Initial Modeling Creation
Location: Device Access Wizard → Confirm Access Configuration Steps: Verify one device and ten fields, then complete the creation.

After creation, continue to switch the data format to native IEC103 and select TCP as the transport.
Screenshot Highlights
| Field / Control | Description |
|---|---|
| Modeling Sample | JSON only generates the model; IEC103 uses native FT1.2 on the wire. Required · Fill in: Fill according to the implementation plan · Example: Ten BOOLEAN fields |
| Device Number | Keep identical to the protocol-bound clientId. Required · Fill in: Fill according to the implementation plan · Example: FastBee_IEC103TCP_Tutorial_01 |
| Device Count | Used to complete "Completing the Initial Modeling Creation". Required · Fill in: 1 |
| Boolean Property Count | Used to complete "Completing the Initial Modeling Creation". Required · Fill in: 10 |
5. Selecting the Final Native Protocol
Location: Product Details → Basic Information Steps: Select IEC 60870-5-103 and TCP, then save.
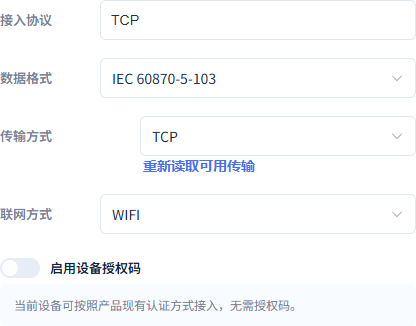
The product works with native IEC103 messages over TCP transport.
Screenshot Highlights
| Field / Control | Description |
|---|---|
| Data Format and Transport | Select native IEC103 and TCP. Required · Fill in: Fill according to the implementation plan · Example: IEC 60870-5-103 / TCP |
| Data Format | Used to complete "Selecting the Final Native Protocol". Required · Fill in: IEC 60870-5-103 |
| Transport | Used to complete "Selecting the Final Native Protocol". Required · Fill in: TCP |
6. Setting Protection 1 Permission and History
Location: Product Details → Function Definition → View Steps: Fill in the English name, turn off read-only for Protection 1 and enable history; keep the other nine points read-only with history enabled.
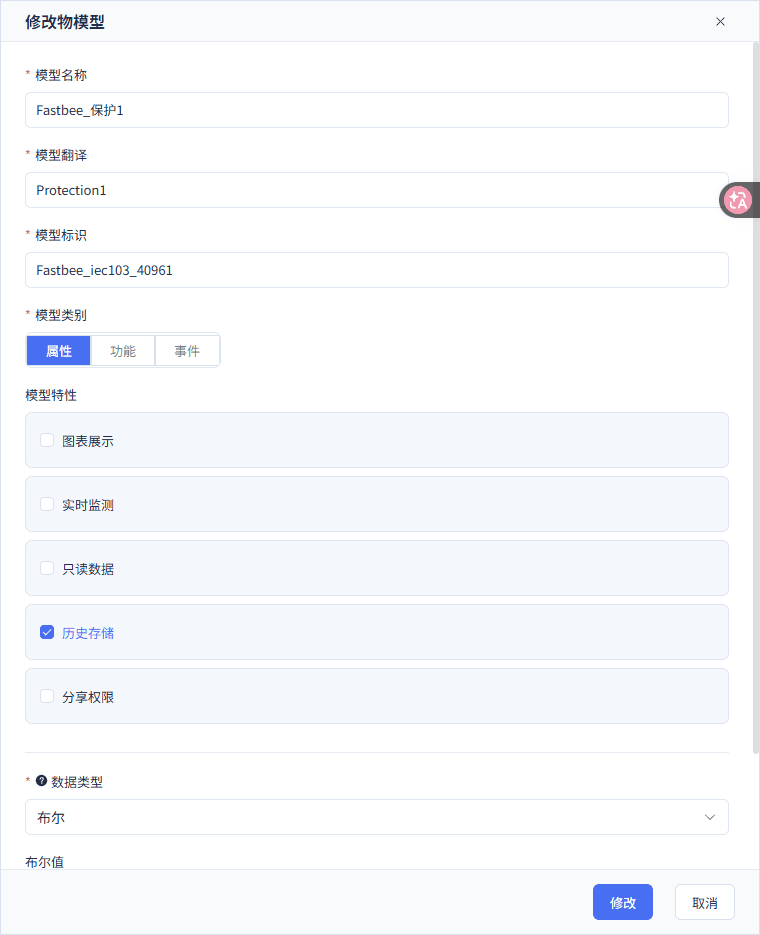
Protection 1 is controllable, and all ten points keep history; true displays as Closed and false as Open.
Screenshot Highlights
| Field / Control | Description |
|---|---|
| Permission and History | Only Protection 1 is writable; all ten points have history enabled; true is Closed, false is Open. Required · Fill in: Only Protection 1 writable; history on for all ten points |
| Model English Name | The English name is required; fill it in before saving the permission settings. Required · Fill in: Fill according to the implementation plan · Example: Protection1 |
| Protection 1 English Name | Used to complete "Setting Protection 1 Permission and History". Required · Fill in: Protection1 |
7. Binding the Device and Station Address
Location: Device Protocol Configuration → Device Binding Steps: Select this device, fill the clientId with the device number; set both the link address and the common address to 1 and enable.
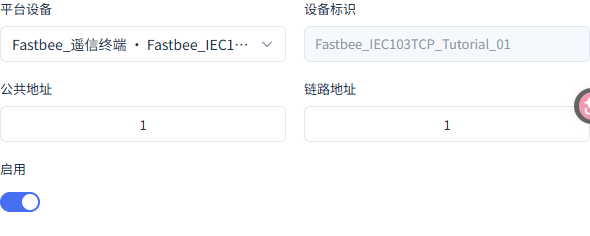
The device binding and the FMQX point table use the same link address 1 and common address 1.
Screenshot Highlights
| Field / Control | Description |
|---|---|
| Device Binding | Fill the clientId with this device's number and enable; for direct connection, do not fill gateway sub-device mapping. Required · Fill in: Fill according to the implementation plan · Example: Device number identical to clientId |
| Link Address | The FT1.2 link identifier; keep both ends consistent. Required · Fill in: 1 |
| Common Address | The station address of the protection device; keep the platform and the device consistent. Required · Fill in: 1 |
| clientId | Used to complete "Binding the Device and Station Address". Required · Fill in: FastBee_IEC103TCP_Tutorial_01 |
8. Configuring the First Point Mapping and Write Permission
Location: Device Protocol Configuration → Point Mapping → Edit Steps: Map 40961 to Protection 1, select type BOOLEAN, scale 1, offset 0, and allow write.
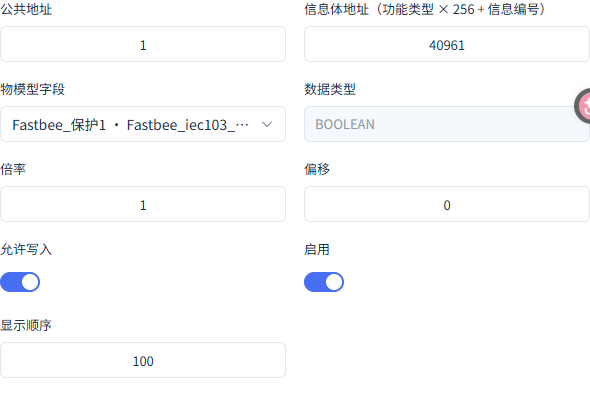
40961=160×256+1, corresponding to FUN160, INF1.
Screenshot Highlights
| Field / Control | Description |
|---|---|
| FUN and INF | FUN160, INF1 to 10 correspond to platform point addresses 40961 to 40970. Required · Fill in: Fill according to the implementation plan · Example: Platform address=FUN×256+INF |
| Point Mapping | All ten points are type BOOLEAN, scale 1, offset 0; only 40961 allows write. Required · Fill in: Fill according to the implementation plan · Example: BOOLEAN / 1 / 0 |
| Information Object Address | Used to complete "Configuring the First Point Mapping and Write Permission". Required · Fill in: 40961 |
| Type, Scale, and Offset | Used to complete "Configuring the First Point Mapping and Write Permission". Required · Fill in: BOOLEAN / 1 / 0 |
9. Verifying All Ten Points
Location: Device Protocol Configuration → Point Mapping Steps: Verify the correspondence between 40961 to 40970 and Protection 1 to 10 item by item.
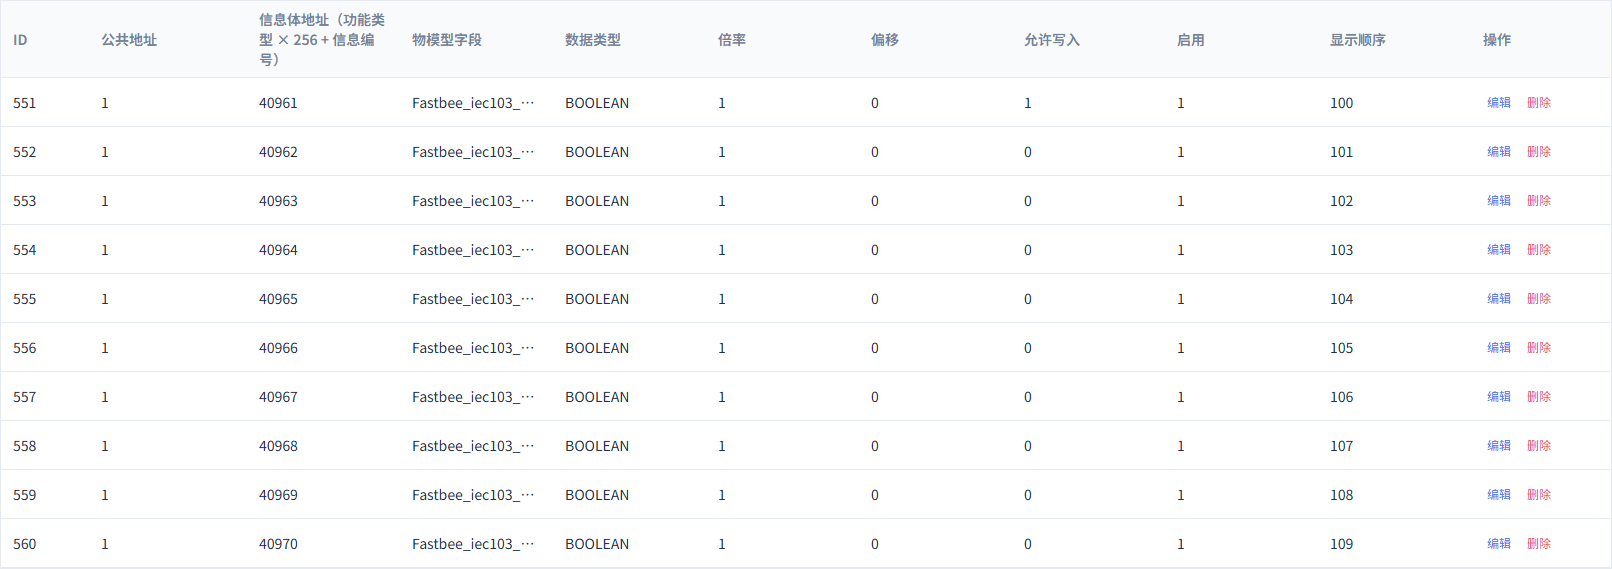
The ten addresses are not duplicated, and only 40961 allows control.
Screenshot Highlights
| Field / Control | Description |
|---|---|
| FUN and INF | FUN160, INF1 to 10 correspond to platform point addresses 40961 to 40970. Required · Fill in: 160 / 1–10 |
| Point Mapping | All ten points are type BOOLEAN, scale 1, offset 0; only 40961 allows write. Required · Fill in: Fill according to the implementation plan · Example: BOOLEAN / 1 / 0 |
| Platform Point Addresses | Used to complete "Verifying All Ten Points". Required · Fill in: 40961–40970 |
10. Saving the Protection 1 Control Template
Location: Device Protocol Configuration → Command Templates Steps: Select CONTROL, fill in common address 1 and information object address 40961, associate Protection 1, enable, and save the draft.
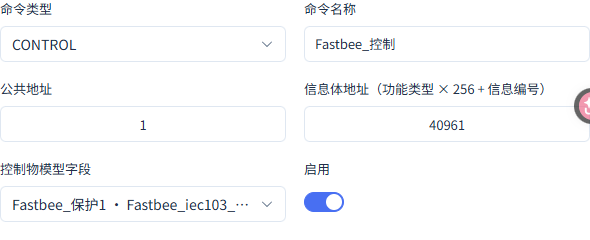
The CONTROL template corresponds to Protection 1's writable address 40961.
Screenshot Highlights
| Field / Control | Description |
|---|---|
| Control Template | CONTROL, common address 1, 40961, associated with Protection 1 and enabled. Required · Fill in: Fill according to the implementation plan · Example: CONTROL / 1 / 40961 |
| Command Type | Used to complete "Saving the Protection 1 Control Template". Required · Fill in: CONTROL |
| Station Address and Point Address | Used to complete "Saving the Protection 1 Control Template". Required · Fill in: 1 / 40961 |
2. Verifying the TCP Session and Device Point Table
The upper half of the connection parameters shows the target endpoint and INF1 to 6, and the lower half shows the remaining points; together they verify all ten points. In the disconnected state, the first-frame entry is greyed out.
11. Verifying TCP Direct-Connection Parameters and the Upper Half of the Point Table
Location: FMQX Web → Edit Point Table and Connection Steps: Open the configured session and verify the FMQ target Host, Port, access combination, link address, and common address.
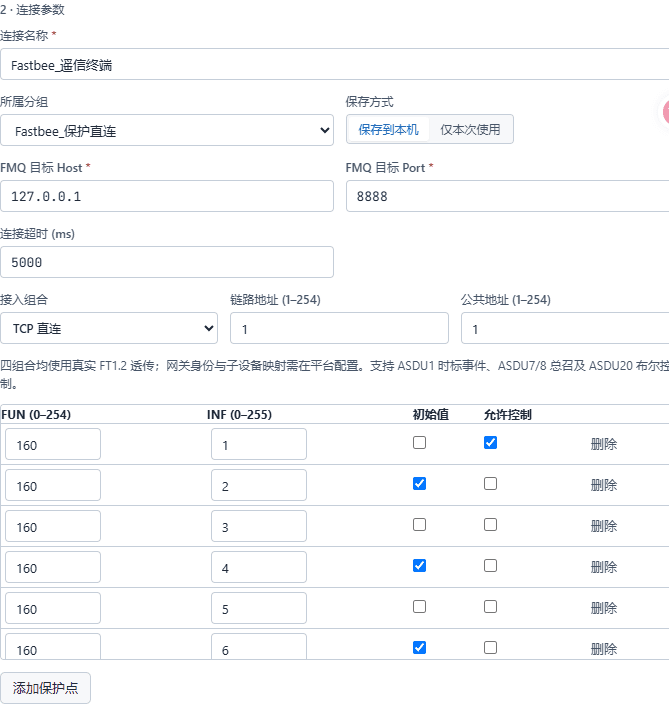
Target 127.0.0.1:8888, TCP direct connection, link address 1, common address 1; the upper half shows INF1 to 6.
Screenshot Highlights
| Field / Control | Description |
|---|---|
| FMQ Target Host | The FMQ-reachable address the device actively connects to; the local-machine demo uses the loopback address. Required · Fill in: Fill according to the implementation plan · Example: 127.0.0.1 |
| FMQ Target Port | The TCP listening port of FMQ; keep consistent with the device target. Required · Fill in: Fill according to the implementation plan · Example: 8888 |
| Access Combination | Select TCP direct connection; a gateway combination additionally requires platform gateway mapping. Required · Fill in: TCP直连 |
| Link Address | The FT1.2 link identifier; keep both ends consistent. Required · Fill in: Fill according to the implementation plan · Example: 1 |
| Common Address | The station address of the protection device; keep the platform and the device consistent. Required · Fill in: Fill according to the implementation plan · Example: 1 |
| Demo Point Table | Ten points FUN160/INF1 to 10, initially odd false and even true; only the first point allows control. Required · Fill in: Fill according to the implementation plan · Example: 160 / 1–10 |
| Target Host | Used to complete "Verifying TCP Direct-Connection Parameters and the Upper Half of the Point Table". Required · Fill in: 127.0.0.1 |
| Target Port | Used to complete "Verifying TCP Direct-Connection Parameters and the Upper Half of the Point Table". Required · Fill in: 8888 |
| Link Address and Common Address | Used to complete "Verifying TCP Direct-Connection Parameters and the Upper Half of the Point Table". Required · Fill in: 1 / 1 |
12. Completing the Remaining Demo Points
Location: FMQX Web → Edit Point Table and Connection Steps: Scroll to the lower half of the point table and verify FUN160, INF5 to 10; for first-time configuration, complete all ten points, then save the point table and connection.
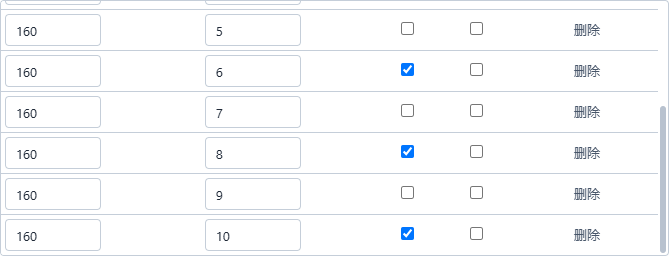
The upper and lower parts of the point table together cover INF1 to 10; only 160/1 allows control; initially odd false and even true.
Screenshot Highlights
| Field / Control | Description |
|---|---|
| Demo Point Table | Ten points FUN160/INF1 to 10, initially odd false and even true; only the first point allows control. Required · Fill in: Fill according to the implementation plan · Example: 160 / 1–10 |
| Point Table Range | Used to complete "Completing the Remaining Demo Points". Required · Fill in: FUN160 / INF1–10 |
| Initial Values | Used to complete "Completing the Remaining Demo Points". Required · Fill in: Odd false; even true |
13. Understanding the Link Status First-Frame Entry
Location: FMQX Web → IEC103 Protection Device Workspace Steps: Verify the workspace's TCP combination, link address 1, and common address 1; after connecting, Send Link Status First Frame becomes available.

The first-frame button is greyed out while disconnected; this entry declares link status and cannot replace control execution feedback.
Screenshot Highlights
| Field / Control | Description |
|---|---|
| Access Combination | Select TCP direct connection; a gateway combination additionally requires platform gateway mapping. Required · Fill in: Fill according to the implementation plan · Example: TCP直连 |
| Link Address | The FT1.2 link identifier; keep both ends consistent. Required · Fill in: Fill according to the implementation plan · Example: 1 |
| Common Address | The station address of the protection device; keep the platform and the device consistent. Required · Fill in: Fill according to the implementation plan · Example: 1 |
3. Configuring an Independent General Interrogation Template
The control template uses the single-point address 160/1; general interrogation reads the whole station, the template is associated with Protection 1, and the native request uses FUN255, INF0.
14. Locating the Saved General Interrogation Template
Location: Product Details → Device Protocol Configuration → Command Mapping Steps: Find the GENERAL_INTERROGATION template and verify the common address, associated field, and enable status.
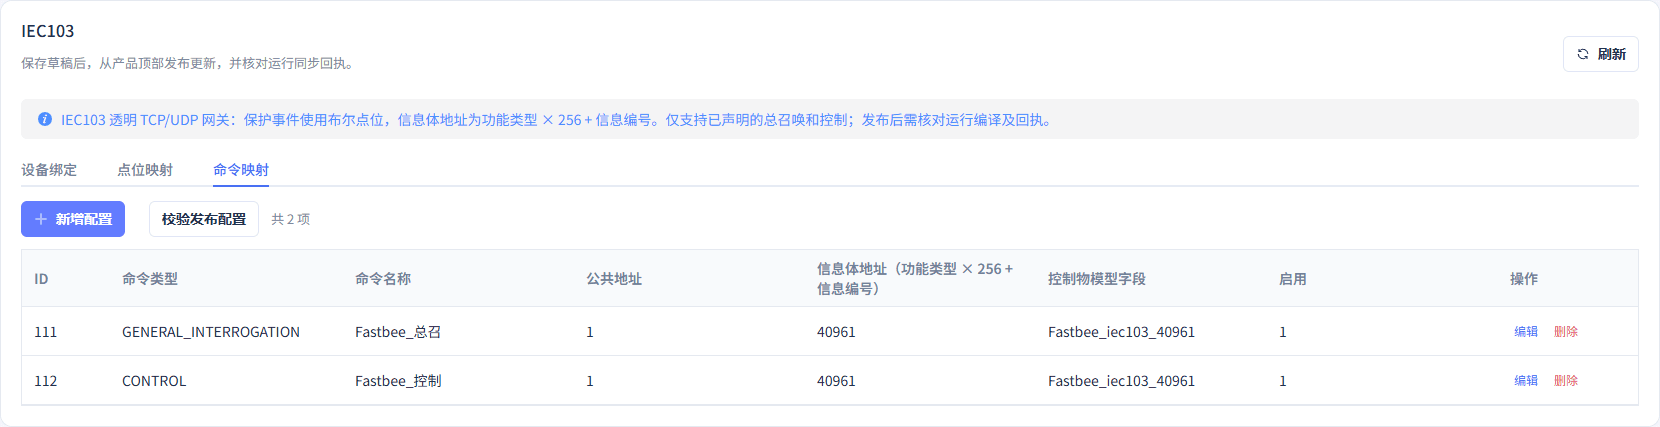
General interrogation and CONTROL are saved as separate templates.
Screenshot Highlights
| Field / Control | Description |
|---|---|
| Command Type | Used to complete "Locating the Saved General Interrogation Template". Required · Fill in: GENERAL_INTERROGATION |
15. Filling in the General Interrogation Template Parameters
Location: Command Mapping → Edit or Add Steps: Fill in the general interrogation name, common address 1, information object address 40961, and the Protection 1 associated field; enable and save the draft.
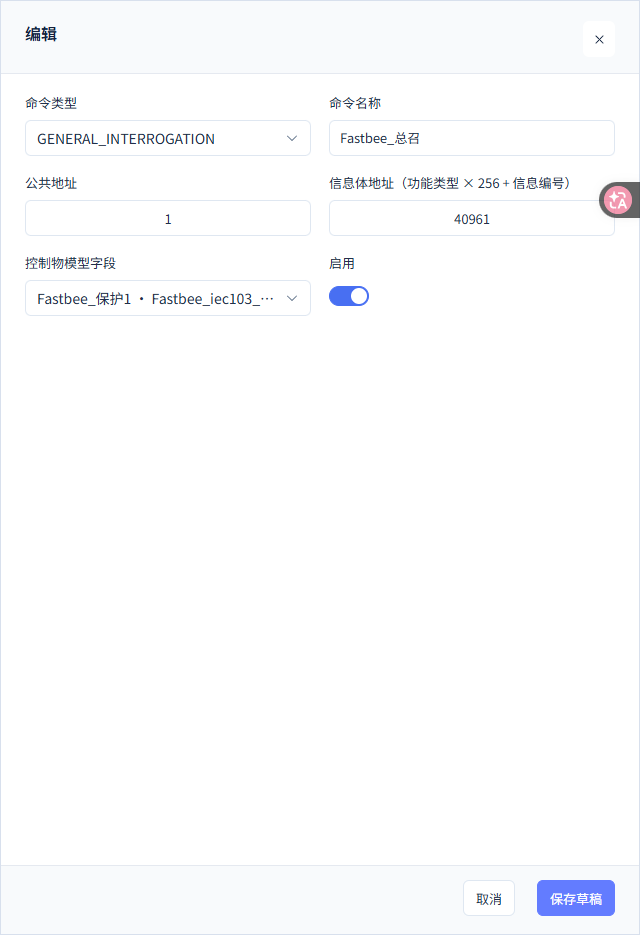
The general interrogation template binds Protection 1 as the page entry; the native whole-station request uses FUN255, INF0.
Screenshot Highlights
| Field / Control | Description |
|---|---|
| General Interrogation Name | Used to complete "Filling in the General Interrogation Template Parameters". Required · Fill in: FastBee_总召 |
| Common Address and Associated Point | Used to complete "Filling in the General Interrogation Template Parameters". Required · Fill in: 1 / 40961 |
4. Publishing and Connecting the Device
Confirm the target node has applied the configuration, then connect the same TCP session in FMQX Web.
16. Publishing the Product Configuration
Location: Product Details → Basic Information → Publish Steps: Verify the current product, then click OK in the publish confirmation box.
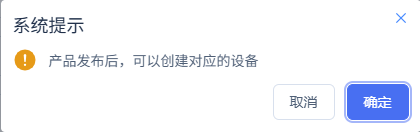
After the configuration is submitted, continue to view the application result on the target node.
17. Confirming the Configuration Has Been Applied
Location: Product Details → Sync Details Steps: Verify the target node is APPLIED, then connect the FMQX session.
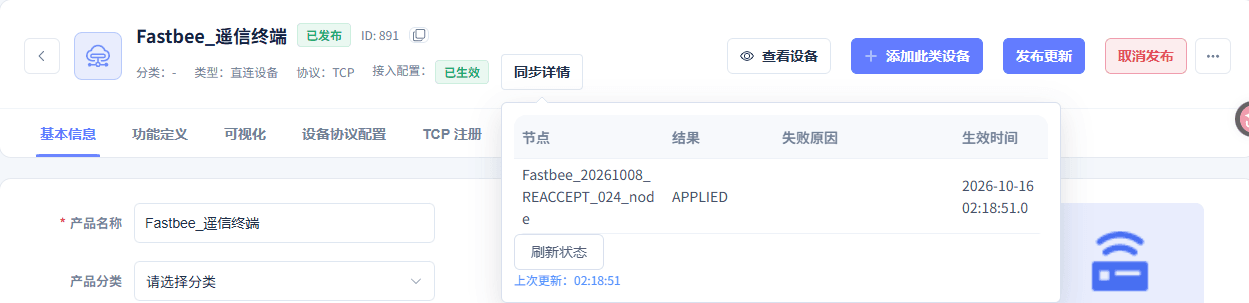
The configuration has been applied, effective at 2026-10-16 02:18:51.
5. Reporting Ten Different Addresses in Turn
The demo samples are odd true and even false, selected separately from the point table initial values. When the right evidence panel covers the button at the end of a row, collapse it first, then click to report.
18. Reporting the First Protection Point
Location: FMQX Web → Communication → Protection Point Steps: Collapse the right evidence panel, select true on row 160/1, and click Report ASDU1 Once on that row.

The actual current value of 160/1 is true; the event dropdown selects the value to send.
Screenshot Highlights
| Field / Control | Description |
|---|---|
| Event Value to Send | Selects false or true for the next event; it does not represent the current actual value. Required · Fill in: Fill according to the implementation plan · Example: Odd true; even false |
| FUN / INF | Used to complete "Reporting the First Protection Point". Required · Fill in: 160 / 1 |
| Event Value | Used to complete "Reporting the First Protection Point". Required · Fill in: true / Closed |
19. Reporting Ten Different Addresses in Turn
Location: FMQX Web → Communication → Protection Point Steps: After completing the save, send, and native-frame verification for INF1 in the previous two steps, continue sending once for each of INF2 to 10; select true for odd and false for even, waiting for the platform to update before operating the next point.

The ten samples correspond to 40961 to 40970 respectively; the final actual current value of 160/10 is false.
Screenshot Highlights
| Field / Control | Description |
|---|---|
| Event Value to Send | Selects false or true for the next event; it does not represent the current actual value. Required · Fill in: Fill according to the implementation plan · Example: Odd true; even false |
| FUN and INF | FUN160, INF1 to 10 correspond to platform point addresses 40961 to 40970. Required · Fill in: Fill according to the implementation plan · Example: Platform address=FUN×256+INF |
| FUN / INF | Used to complete "Reporting Ten Different Addresses in Turn". Required · Fill in: 160 / 1–10 |
| Ten-Point Sample Values | Used to complete "Reporting Ten Different Addresses in Turn". Required · Fill in: true, false, true, false, true, false, true, false, true, false |
6. Controlling Protection 1 and Reporting the State Independently
The control request is ASDU20, COT20; the native feedback is ASDU1, COT12. RII associates the request with the feedback, and the specific value is produced by the current command. The device's actual current value column and the to-send event dropdown are two separate fields.
20. Changing Protection 1 to Open from the Platform
Location: Device Details → Running Status → Protection 1 Steps: Verify Protection 1 is currently Closed, set the target to false, and send once.
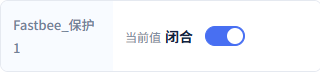
Protection 1 was Closed before control; this target is false, Open.
Screenshot Highlights
| Field / Control | Description |
|---|---|
| First Protection 1 Control | Closed before writing, target false, Open. Required · Fill in: Fill according to the implementation plan · Example: 160 / 1=false |
| Control Point | Used to complete "Changing Protection 1 to Open from the Platform". Required · Fill in: 160 / 1 (40961) |
| Target Value | Used to complete "Changing Protection 1 to Open from the Platform". Required · Fill in: false / Open |
21. Verifying the First Native Control Request
Location: FMQX Web → Communication Records → Raw Frames Steps: Open the 02:19:12.826 received frame and verify the ASDU, cause code, FUN/INF, and target value.
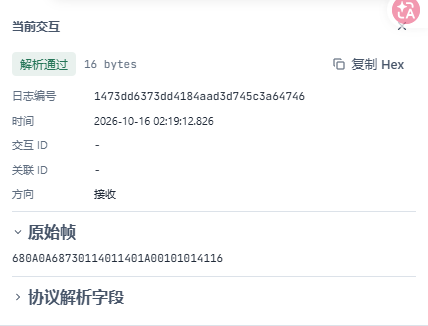
ASDU20, COT20, 160/1 target false, RII is 1.
22. Reading the Device's Actual Current Value
Location: FMQX Web → Communication → Protection Point 160/1 Steps: Read the actual current value column of 160/1.

The actual current value has changed to false; the to-send event on the right can still stay true — read the two separately.
Screenshot Highlights
| Field / Control | Description |
|---|---|
| Event Value to Send | Selects false or true for the next event; it does not represent the current actual value. Required · Fill in: Fill according to the implementation plan · Example: Odd true; even false |
23. Verifying the First Native Execution Feedback
Location: FMQX Web → Communication Records → Raw Frames Steps: View the 02:19:12.829 sent frame and associate it with the previous request by RII.
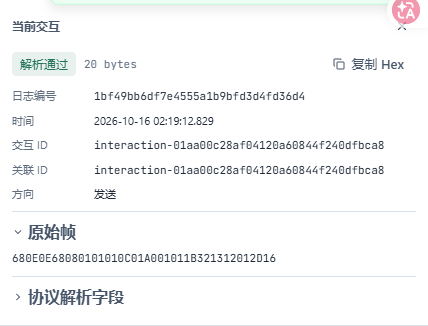
The feedback is ASDU1, COT12, 160/1=false, with the same RII 1.
24. Independently Reporting the State After the First Control
Location: FMQX Web → Protection Point 160/1 and Communication Records Steps: Collapse the evidence panel, select false on row 160/1 and report once; do not save the point table configuration, then view the new sent frame.
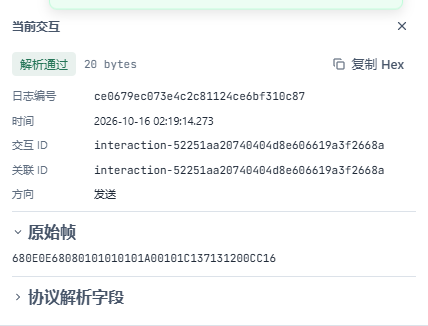
The 02:19:14.273 ASDU1, COT1 independent event is false, later than the control execution feedback.
Screenshot Highlights
| Field / Control | Description |
|---|---|
| Independent Event | Used to complete "Independently Reporting the State After the First Control". Required · Fill in: 160 / 1=false |
7. Manually Reconnecting After a Normal Disconnect
A normal reconnection reuses the published configuration. After reconnecting, a new event 160/2=true was once sent to verify post-recovery reporting; it is separate from the Protection 1 control.
25. Disconnecting the Session Normally
Location: FMQX Web → This Article's Session Steps: Click Disconnect and verify the left side of the session shows Disconnected.

The same TCP session is disconnected; the connection target is still 127.0.0.1:8888.
Screenshot Highlights
| Field / Control | Description |
|---|---|
| FMQ Target Host | The FMQ-reachable address the device actively connects to; the local-machine demo uses the loopback address. Required · Fill in: Fill according to the implementation plan · Example: 127.0.0.1 |
| FMQ Target Port | The TCP listening port of FMQ; keep consistent with the device target. Required · Fill in: Fill according to the implementation plan · Example: 8888 |
26. Manually Connecting the Original Session
Location: FMQX Web → This Article's Session Steps: Click Connect and verify the left side of the same session shows Connected.

The manual reconnection is complete; this stage reuses the published configuration.
8. Executing the Opposite-Direction Control After Recovery
The second control still targets Protection 1, with the target changed from Open to Closed; afterwards, send another event with the same value to read the independent state after the control.
27. Changing Protection 1 to Closed from the Platform After Reconnecting
Location: Device Details → Running Status → Protection 1 Steps: Verify Protection 1 is still Open, set the target to true, and send once.
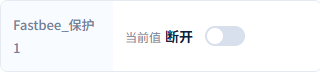
Protection 1 was Open before control; the second target is true, Closed.
Screenshot Highlights
| Field / Control | Description |
|---|---|
| Post-recovery Protection 1 Control | Open before writing, target true, Closed. Required · Fill in: Fill according to the implementation plan · Example: 160 / 1=true |
| Control Point | Used to complete "Changing Protection 1 to Closed from the Platform After Reconnecting". Required · Fill in: 160 / 1 (40961) |
| Target Value | Used to complete "Changing Protection 1 to Closed from the Platform After Reconnecting". Required · Fill in: true / Closed |
28. Verifying the New Control Request After Recovery
Location: FMQX Web → Communication Records → Raw Frames Steps: View the newly received control frame at 02:19:25.276.
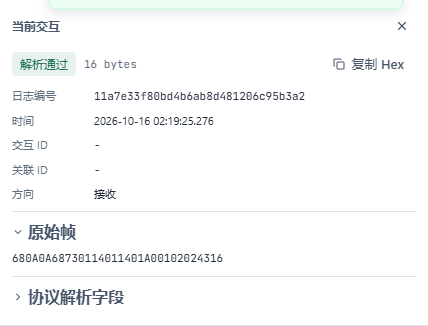
ASDU20, COT20, 160/1 target true, RII is 2.
29. Reading the Actual Current Value After Recovery
Location: FMQX Web → Communication → Protection Point 160/1 Steps: Read the actual current value column of 160/1.

The actual current value has changed to true; the to-send event dropdown can still stay false.
Screenshot Highlights
| Field / Control | Description |
|---|---|
| Event Value to Send | Selects false or true for the next event; it does not represent the current actual value. Required · Fill in: Fill according to the implementation plan · Example: Odd true; even false |
30. Verifying the Second Native Execution Feedback
Location: FMQX Web → Communication Records → Raw Frames Steps: View the 02:19:25.279 sent frame and verify the target and the matching RII.
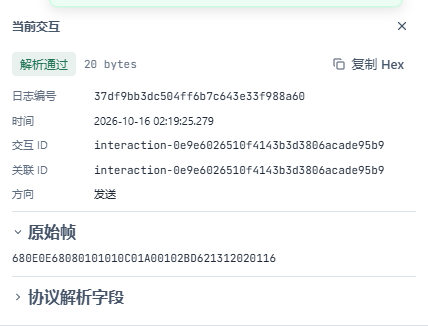
ASDU1, COT12, 160/1=true, with the same RII 2.
31. Independently Reporting the State After the Second Control
Location: FMQX Web → Protection Point 160/1 and Communication Records Steps: Collapse the evidence panel, select true on row 160/1 and report once; do not save the point table configuration, then view the new sent frame.
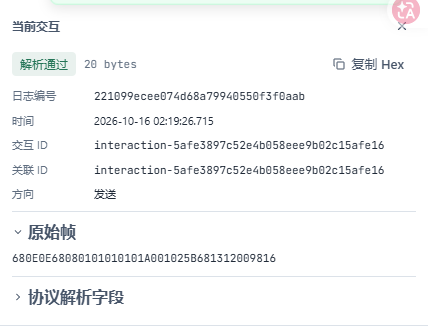
The 02:19:26.715 ASDU1, COT1 independent event is true, later than the second execution feedback.
Screenshot Highlights
| Field / Control | Description |
|---|---|
| Independent Event | Used to complete "Independently Reporting the State After the Second Control". Required · Fill in: 160 / 1=true |
9. Pausing the Single-Point Control Phase
32. Pausing the Publish to End the Single-Point Control Demo
Location: Product Details → Unpublish Steps: Read the notice that republishing may reset data, verify the product, then click OK.
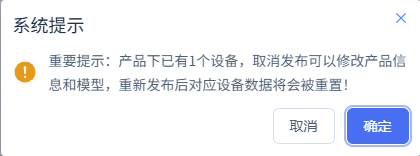
Stop the single-point control phase first, then prepare the general interrogation separately.
33. Confirming the Paused Configuration Has Been Applied
Location: Product Details → Sync Details Steps: Verify the target node after unpublish is APPLIED.
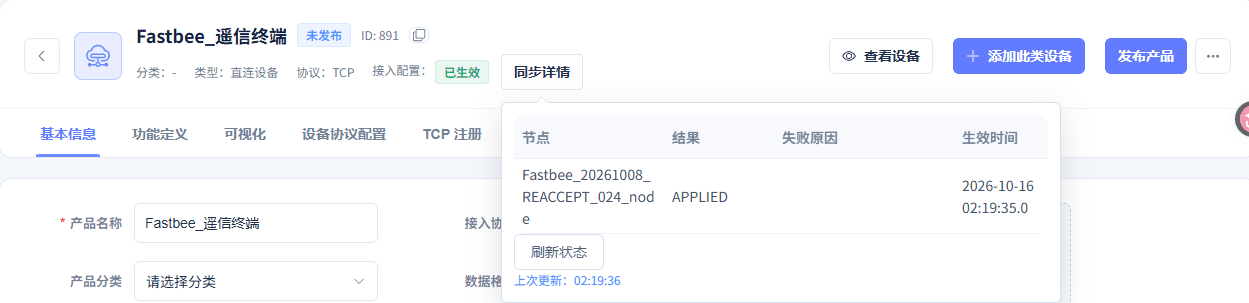
The unpublish has been applied, effective at 2026-10-16 02:19:35.
10. Initiating a Station-Wide General Interrogation After Republishing
The general interrogation phase separately restores the publish and connects; verify the ASDU7 request, the ten-point return, the ASDU8 end, and the same SIN.
34. Republishing and Connecting for the General Interrogation
Location: Product Details → Publish and Sync Details; FMQX Web → This Article's Session Steps: Restore the original product via the publish entry above, wait for APPLIED, then connect the original session.
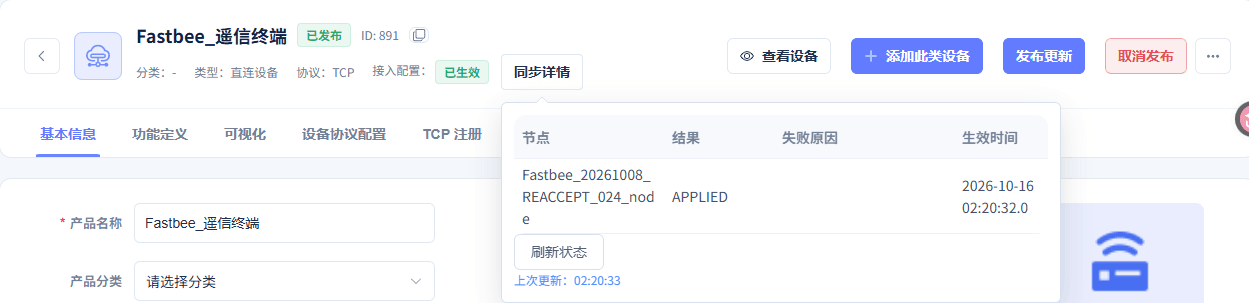
The general interrogation phase configuration has been applied, effective at 2026-10-16 02:20:32.
35. Initiating a Station-Wide General Interrogation from the Platform
Location: Device Details → Running Status → General Interrogation Steps: Select the general interrogation template for station address 1 and click Initiate General Interrogation.

The platform uses the published general interrogation template to read the station's ten-point states.
Screenshot Highlights
| Field / Control | Description |
|---|---|
| General Interrogation Template | Used to complete "Initiating a Station-Wide General Interrogation from the Platform". Required · Fill in: FastBee_总召 · Station address 1 |
36. Verifying the Native General Interrogation Request
Location: FMQX Web → Communication Records → Raw Frames Steps: View the 02:20:40.671 received frame.
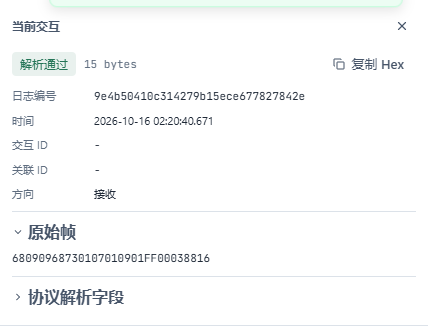
ASDU7, COT9, FUN255, INF0, SIN is 3.
37. Verifying the Native General Interrogation End
Location: FMQX Web → Communication Records → Raw Frames Steps: Verify the 02:20:40.677 end frame after the ten-point return.
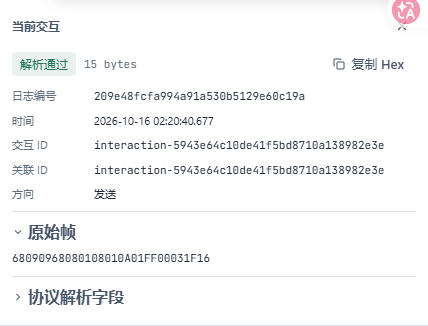
ASDU8, COT10, FUN255, INF0, with the same SIN 3, matching the request.
38. Reading the Platform General Interrogation Feedback
Location: Device Details → Running Status → General Interrogation Steps: View the platform feedback after the general interrogation operation.

The device general interrogation end has been confirmed; please verify the data collected this time.
11. Filtering, Refreshing, and Reading History
Query the ten-point samples, the Protection 1 control, and the station-wide general interrogation in three separate windows. The page merges different fields within the same second into one row: the ten samples show 9 rows, and the general interrogation ten points show 1 row. A blank column does not mean false.
39. Filling in the Ten-Point Sample Time Range
Location: Data Center → Historical Data Steps: Fill in the complete start and end date-times.
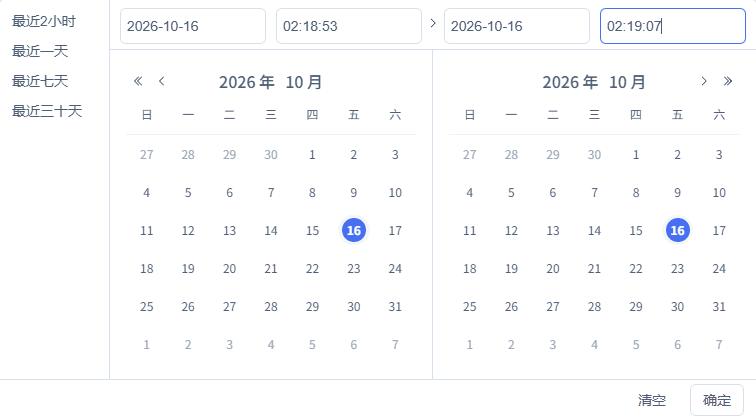
Use the specified time window to query the corresponding operation records.
Screenshot Highlights
| Field / Control | Description |
|---|---|
| Start Time | Used to complete "Filling in the Ten-Point Sample Time Range". Required · Fill in: 2026-10-16 02:18:53 |
| End Time | Used to complete "Filling in the Ten-Point Sample Time Range". Required · Fill in: 2026-10-16 02:19:07 |
40. Filtering the Ten-Point Sample Fields
Location: Data Center → Historical Data Steps: Select this device and Protection 1 to 10, verify the time conditions, then click Query.

The device, fields, and complete time range stay consistent.
Screenshot Highlights
| Field / Control | Description |
|---|---|
| Fields | Used to complete "Filtering the Ten-Point Sample Fields". Required · Fill in: Protection 1–10 |
41. Refreshing the Ten-Point Sample History
Location: Data Center → Historical Data Steps: Keep the device, fields, and time conditions, and click the refresh button at the top right of the result area.

After refresh, 9 rows are shown, totaling ten different-address samples.
42. Verifying the Ten-Point Sample History Item by Item
Location: Data Center → Historical Data → Query Results Steps: Verify the true/false of Protection 1 to 10 item by item; the 02:19:01 row reads Protection 6 and 7 at the same time.
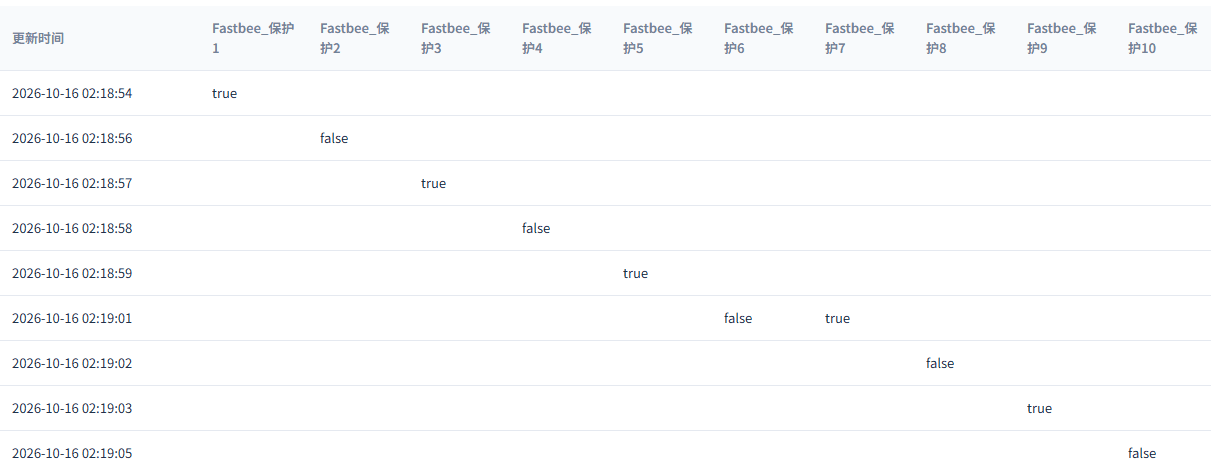
Each of the ten addresses has one sample, odd true and even false; different fields within the same second merge into one row, and a blank column means the row does not have that field.
43. Filling in the Protection 1 Control Time Range
Location: Data Center → Historical Data Steps: Fill in the complete start and end date-times.
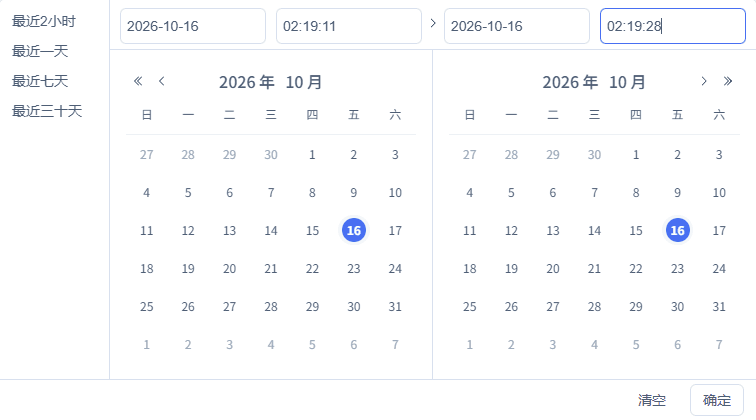
Use the specified time window to query the corresponding operation records.
Screenshot Highlights
| Field / Control | Description |
|---|---|
| Start Time | Used to complete "Filling in the Protection 1 Control Time Range". Required · Fill in: 2026-10-16 02:19:11 |
| End Time | Used to complete "Filling in the Protection 1 Control Time Range". Required · Fill in: 2026-10-16 02:19:28 |
44. Filtering the Protection 1 Control Field
Location: Data Center → Historical Data Steps: Select this device and Protection 1, verify the time conditions, then click Query.

The device, fields, and complete time range stay consistent.
Screenshot Highlights
| Field / Control | Description |
|---|---|
| Fields | Used to complete "Filtering the Protection 1 Control Field". Required · Fill in: Protection 1 |
45. Refreshing the Protection 1 Control History
Location: Data Center → Historical Data Steps: Keep the device, fields, and time conditions, and click the refresh button at the top right of the result area.

After refresh, 4 rows of Protection 1 records are shown.
46. Verifying the Protection 1 Control History Item by Item
Location: Data Center → Historical Data → Query Results Steps: Read the four rows of Protection 1 states by time, distinguishing execution feedback from independent events.

02:19:12=false, 02:19:14=false, 02:19:25=true, 02:19:26=true; each of the two execution feedbacks is followed by an independent event.
47. Filling in the Station-Wide General Interrogation Time Range
Location: Data Center → Historical Data Steps: Fill in the complete start and end date-times.
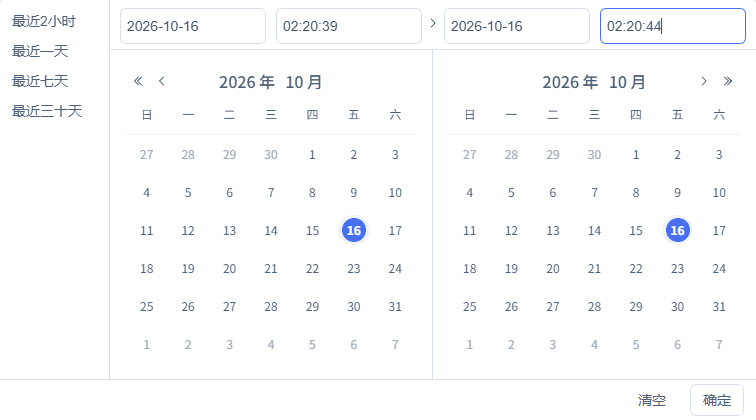
Use the specified time window to query the corresponding operation records.
Screenshot Highlights
| Field / Control | Description |
|---|---|
| Start Time | Used to complete "Filling in the Station-Wide General Interrogation Time Range". Required · Fill in: 2026-10-16 02:20:39 |
| End Time | Used to complete "Filling in the Station-Wide General Interrogation Time Range". Required · Fill in: 2026-10-16 02:20:44 |
48. Filtering the Station-Wide General Interrogation Fields
Location: Data Center → Historical Data Steps: Select this device and Protection 1 to 10, verify the time conditions, then click Query.

The device, fields, and complete time range stay consistent.
Screenshot Highlights
| Field / Control | Description |
|---|---|
| Fields | Used to complete "Filtering the Station-Wide General Interrogation Fields". Required · Fill in: Protection 1–10 |
49. Refreshing the Station-Wide General Interrogation History
Location: Data Center → Historical Data Steps: Keep the device, fields, and time conditions, and click the refresh button at the top right of the result area.

After refresh, 1 row is shown, containing the ten protection point fields.
50. Verifying the Station-Wide General Interrogation History Item by Item
Location: Data Center → Historical Data → Query Results Steps: Read the ten fields of the 02:20:40 row.

Protection 1, 2, 3, 5, 7, 9 are true; Protection 4, 6, 8, 10 are false — the ten points within the same second merge into one row.
12. Stopping Operation and Preserving Query Results
Saving the connection configuration re-initializes the demo session counters and local point values. The platform current values and the stored history are verified separately; the ten-point image retained after stopping does not mean the local point table still holds the same values.
51. Ending Send/Receive and Preserving the Session
Location: FMQX Web → This Article's Session Steps: Disconnect the session and stop scheduled sending and auto-reply; for long-term deactivation, turn off Auto Reconnect in the connection configuration and save.

The session is disconnected; turning off auto reconnect and saving rebuilds the demo session, with counters and local point values re-initialized from the saved configuration.
Screenshot Highlights
| Field / Control | Description |
|---|---|
| Auto Reconnect | Turn off and save for long-term deactivation; saving re-initializes the demo session. Required · Fill in: Fill according to the implementation plan · Example: Turn off at the end |
52. Final Unpublish and Confirmation of Application
Location: Product Details → Unpublish and Sync Details Steps: Deactivate the product via the unpublish entry above, wait for application, then verify the sync details.
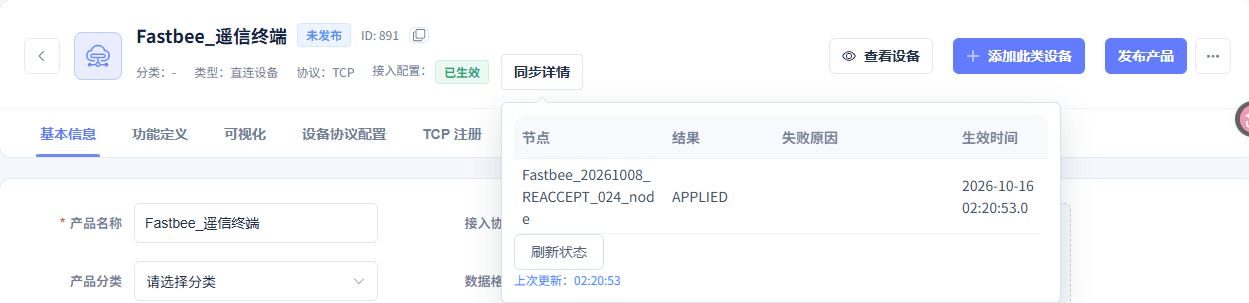
The final unpublish has been applied, effective at 2026-10-16 02:20:53.
53. Viewing the Ten-Point Current Values Retained After Stopping
Location: Device Details → Running Status → Real-time Metrics Steps: Read the ten protection points shown by the platform after stopping, item by item.
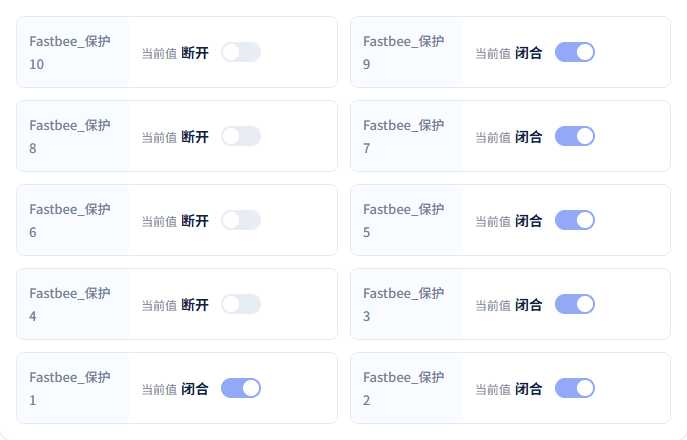
Protection 1, 2, 3, 5, 7, 9 are Closed; Protection 4, 6, 8, 10 are Open. Verify the platform retained values separately from the local point table re-initialized after saving the configuration.
Parameter Sources and Filling Reference
Product and Ten-Point Model
| Field / Control | How to Fill |
|---|---|
| Product Name | Holds this device's ten boolean models. Required · Fill in: 保护装置演示 |
| Modeling Sample | JSON only generates the model; IEC103 uses native FT1.2 on the wire. Required · Fill in: Ten BOOLEAN fields |
| Device Number | Keep identical to the protocol-bound clientId. Required · Fill in: FastBee_IEC103TCP_Tutorial_01 |
| Model English Name | The English name is required; fill it in before saving the permission settings. Required · Fill in: Protection1 |
| Permission and History | Only Protection 1 is writable; all ten points have history enabled; true is Closed, false is Open. Required · Fill in: Protection 1 writable; history on for all ten pointsPublish after changes. |
Protocol Binding, Point Mapping, and Publish
| Field / Control | How to Fill |
|---|---|
| Data Format and Transport | Select native IEC103 and TCP. Required · Fill in: IEC 60870-5-103 / TCPPublish after changes.IEC 60870-5-103 / TCP: The protection device communicates over native FT1.2; processed by link, station, and FUN/INF. |
| Device Binding | Fill the clientId with this device's number and enable; for direct connection, do not fill gateway sub-device mapping. Required · Fill in: Device number identical to clientIdPublish after changes. |
| Link Address | The FT1.2 link identifier; keep both ends consistent. Required · Fill in: 1Reconnect after changes. |
| Common Address | The station address of the protection device; keep the platform and the device consistent. Required · Fill in: 1Reconnect after changes. |
| FUN and INF | FUN160, INF1 to 10 correspond to platform point addresses 40961 to 40970. Required · Fill in: Platform address=FUN×256+INF |
| Point Mapping | All ten points are type BOOLEAN, scale 1, offset 0; only 40961 allows write. Required · Fill in: BOOLEAN / 1 / 0Publish after changes. |
| Control Template | CONTROL, common address 1, 40961, associated with Protection 1 and enabled. Required · Fill in: CONTROL / 1 / 40961Publish after changes. |
| Publish and Application | After publishing or unpublishing, view the target node's APPLIED status. |
FMQX Web TCP Protection Device
| Field / Control | How to Fill |
|---|---|
| FMQ Target Host | The FMQ-reachable address the device actively connects to; the local-machine demo uses the loopback address. Required · Fill in: 127.0.0.1Reconnect after changes. |
| FMQ Target Port | The TCP listening port of FMQ; keep consistent with the device target. Required · Fill in: 8888Reconnect after changes. |
| Access Combination | Select TCP direct connection; a gateway combination additionally requires platform gateway mapping. Required · Fill in: TCP直连Reconnect after changes.TCP直连: The device connects directly to FMQ as a TCP client; use this device's binding and link/station addresses. |
| Demo Point Table | Ten points FUN160/INF1 to 10, initially odd false and even true; only the first point allows control. Required · Fill in: 160 / 1–10 |
| Link Status First Frame | The entry is available after connecting; it declares link status and cannot replace native execution feedback. |
| Connection and Recovery | Connect after the product is applied; manually reconnect the same session after a normal disconnect. Reconnect after changes. |
| Auto Reconnect | Turn off and save for long-term deactivation; saving re-initializes the demo session. Required · Fill in: Turn off at the end关闭: Does not connect automatically after disconnect; stays deactivated and requires manual connection.开启: Retries at intervals after the connection is interrupted; keeps trying to establish the connection. |
Point Events and Raw Frames
| Field / Control | How to Fill |
|---|---|
| Actual Current Value | Read the actual current column or the platform current value; read it separately from the to-send event on the right. |
| Event Value to Send | Selects false or true for the next event; it does not represent the current actual value. Required · Fill in: Odd true; even falsefalse: An Open-state event; sends this row's Open state.true: A Closed-state event; sends this row's Closed state. |
| Report ASDU1 Once | Collapse the evidence panel, then click the button on the corresponding row to report point by point. |
| Complete Raw Frame | Verify the complete HEX by direction, time, ASDU, cause code, FUN/INF, and RII or SIN. |
| Independent Event After Control | After control, select the corresponding value and report once, without saving the point table to overwrite the execution result. |
Platform Control and General Interrogation
| Field / Control | How to Fill |
|---|---|
| First Protection 1 Control | Closed before writing, target false, Open. Required · Fill in: 160 / 1=false |
| Post-recovery Protection 1 Control | Open before writing, target true, Closed. Required · Fill in: 160 / 1=true |
| Native Execution Feedback | The ASDU20/COT20 request and the ASDU1/COT12 feedback are associated by the same RII, followed by a separate COT1 event. |
| General Interrogation Template and End | Select the general interrogation for station address 1; the ASDU7/COT9 request, the ten-point return, and the ASDU8/COT10 end are matched by the same SIN. Publish after changes. |
| Stop and Preserve | After disconnecting, stop scheduled sending and auto-reply; turn off auto reconnect and save, then deactivate the publish entry. Reconnect after changes. |
Three History Query Windows
| Field / Control | How to Fill |
|---|---|
| Device and Field Filtering | Select Protection 1 to 10 for the ten samples and the general interrogation; select only Protection 1 for the control. |
| Complete Time Range | Fill in complete date-times per operation to avoid mixing in other records. |
| History Values and Merged Rows | Different fields within the same second may merge into one row; blank means the row does not have that field. |
| Refresh Results | Keep the device, fields, and time conditions, and click refresh at the top right of the result area. |
FAQ and Recovery Methods
| Symptom | Possible Cause | Where to Check First | How to Recover |
|---|---|---|---|
| TCP session not connected | The FMQ listener, target endpoint, or publish status does not match | Verify 127.0.0.1:8888 and the publish application result | After fixing, manually connect the same session, then send a new event. |
| Protection points do not update | The device binding, link address, common address, or FUN/INF is inconsistent | Verify link 1, common 1, FUN160, and INF1 to 10 | Report only one known point first, confirm the corresponding field, then continue. |
| The to-send event differs from the actual current value | The dropdown records the next event selection, while the actual current value shows the device state | Read the actual current value column and the execution feedback with the matching RII | When reporting independently, select the current target value; do not overwrite the execution result by saving the point table. |
| Ten samples only show nine rows | Different fields within the same second are merged for display | View the Protection 6 and Protection 7 columns of the 02:19:01 row | Verify by time and field together; do not treat blank columns as false. |
| General interrogation has feedback but point values are incomplete | Only the submission or end prompt was seen | Check the ten-point return and the ten-field history result | Troubleshoot the point table after the current command ends; avoid repeatedly initiating general interrogations. |
| Counters and point values change after saving the configuration | The demo session is re-initialized from the saved connection and initial point table | View the local point table, the platform current values, and the history separately | Reconnect with the saved configuration and send new states before executing the next control. |