


Modbus TCP-over-RTU Network Passthrough Access
This article is compiled from an existing operation manual into an online operation reference. Operations marked as expected or not executed in the original text must still be verified against the actual environment.
Complete ten consecutive collections at the same address, two FC06 writes, independent FC03 read-backs, history refresh, and a normal stop and recovery.
Before you start: you have permissions for products, devices, models, publishing, control, and history; the local application, single-node FMQ, and FMQX Web are available, and this device's connection parameters have been obtained.
Before You Start
This article carries complete Modbus RTU frames over TCP, with FMQX Web as the demo slave, covering read, write, independent read-back, history query, and a normal stop and recovery.
The point table's zero-based addresses 0-9 with 201-210 each are the initial samples for the ten addresses. This round's ten consecutive samples are 411-420 in sequence at the same zero-based address 0, and 421 is read after recovery.
The platform data format in this article is Modbus TCP over RTU; the actual device session uses Modbus RTU/TCP, the online frames carry the RTU CRC, and there is no MBAP header of native Modbus TCP.
Replace These Parameters Before Copying the Templates
The code in this article uses generic template names; the screenshots keep the actual historical resources. Complete the following checks before saving anything as a UTF-8 file or sending any message.
register_0and similar are point-table template identifiers; the identifier in the platform point table, the mappings, and the FMQX Thing Model must match item by item. Addresses, station numbers, and read/write attributes follow the official on-site point table.demo-deviceis a device number template. Replace the device number in the clientId, the device number in every send/receive topic, and the clientId reported over TCP together with the platform's device number; the product number and tenant number in the MQTT identity must also be replaced with the current device connection parameters.- The host, port, and listening direction in the connection file must be changed to the actual addresses of the current environment; 127.0.0.1 means the local machine running FMQX. When MQTT is involved, also verify the product number, username, subscription topics, and responseRoute; enter passwords only on the connection page, never in the file.
- Group, session, and subscription ids are internal references of the import file; if you rename anything, the groupId must match the corresponding group id. Verify before importing, and do not create duplicate connections with the same name on retained sessions.
- The code blocks are customer templates rewritten from existing password-free assets or original code; this version of the template has not been proven to import successfully. Historical screenshots, send times, and business pass scope still follow the records of each step; do not treat template names as the actual resource names in the old evidence.
1. Initial Configuration and Reused Resources
The original sources of the first configuration or import on 2026-10-13 are retained; this round reuses the existing product, device, point table, and session, without recreating, saving models, or importing again.
Full 11-point UTF-8 collection point table CSV template csv
identifier,name,datatype,unit,registerarea,wiredatatype,byteorder,wordorder,functioncode,addressbase,startaddress,quantity,scale,offset,intervalms

register_0,采集点1,integer,,HOLDING_REGISTER,UINT16,BE,BE,3,0,0,1,1,0,5000

register_1,采集点2,integer,,HOLDING_REGISTER,UINT16,BE,BE,3,0,1,1,1,0,5000

register_2,采集点3,integer,,HOLDING_REGISTER,UINT16,BE,BE,3,0,2,1,1,0,5000

register_3,采集点4,integer,,HOLDING_REGISTER,UINT16,BE,BE,3,0,3,1,1,0,5000

register_4,采集点5,integer,,HOLDING_REGISTER,UINT16,BE,BE,3,0,4,1,1,0,5000

register_5,采集点6,integer,,HOLDING_REGISTER,UINT16,BE,BE,3,0,5,1,1,0,5000

register_6,采集点7,integer,,HOLDING_REGISTER,UINT16,BE,BE,3,0,6,1,1,0,5000

register_7,采集点8,integer,,HOLDING_REGISTER,UINT16,BE,BE,3,0,7,1,1,0,5000

register_8,采集点9,integer,,HOLDING_REGISTER,UINT16,BE,BE,3,0,8,1,1,0,5000

register_9,采集点10,integer,,HOLDING_REGISTER,UINT16,BE,BE,3,0,9,1,1,0,5000

register_100,写入设定,integer,,HOLDING_REGISTER,UINT16,BE,BE,3,0,100,1,1,0,500011 data points plus 1 header row; 0-9 are the ten collection addresses and 100 is the write address. Save as RTU-point-table.csv. Replaceable customer template names are used here; check them against the replacement list in this section before importing or sending.
1. Initial configuration: import this article's register point table
Location: IoT*→Device Access→*Collection Point Table Steps: after checking the full CSV above against the replacement list, save it as a UTF-8 file RTU-point-table.csv and import it into the platform; verify the 11 fields and the zero-based addresses. The original screenshot is a record of the initial configuration; this round reuses the saved resources.
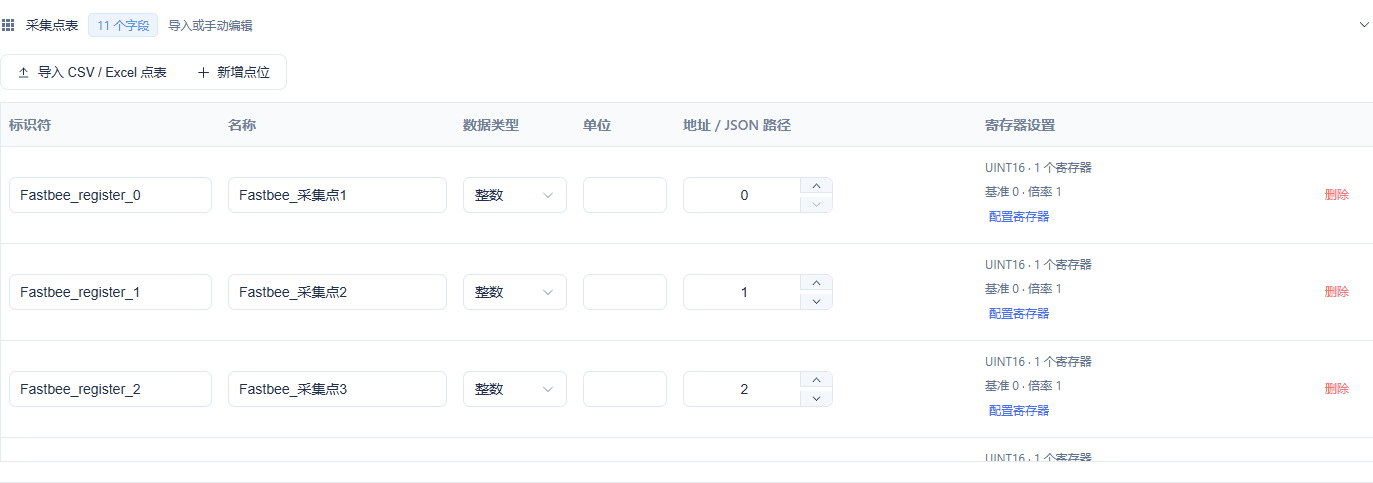
0 to 9 are collection points; 100 is the write setpoint.
Screenshot Key Points
| Field / Control | Description |
|---|---|
| Start Address and Quantity | Zero-based addresses are used; one row each for 0 to 9 and 100, quantity 1 each. Required · Enter: 0-9, 100; quantity 1 |
| Collection Point Table | Import 11 integer points; 0-9 are the ten collection addresses and 100 is the write address. This round's ten consecutive samples are all done at address 0. Required · Enter: 11 fields |
2. Initial configuration: select TCP transport and data format
Location: Product Management*→This Product→*Basic Information Steps: select TCP for Access Protocol, select Modbus TCP over RTU for data format, and save the changes. This step keeps the initial configuration record; this round reuses the saved resources.
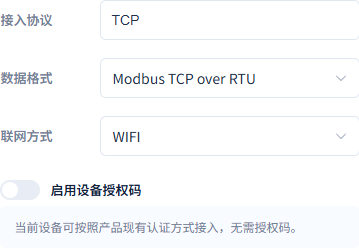
The final product in this article is TCP with Modbus TCP over RTU.
Screenshot Key Points
| Field / Control | Description |
|---|---|
| Access Protocol | In this article the device actively connects to FMQ over a persistent TCP connection. Required · Enter: TCP |
| Data Format | Select the data format verified in this article in the product's basic information. Required · Enter: Modbus TCP over RTU |
3. Initial configuration: enable display and history for collection points
Location: Product*→Function Definition→*Edit Thing Model Steps: for collection points, enable chart display, real-time monitor, read-only data, and history storage. This step keeps the initial configuration record; this round reuses the saved resources.
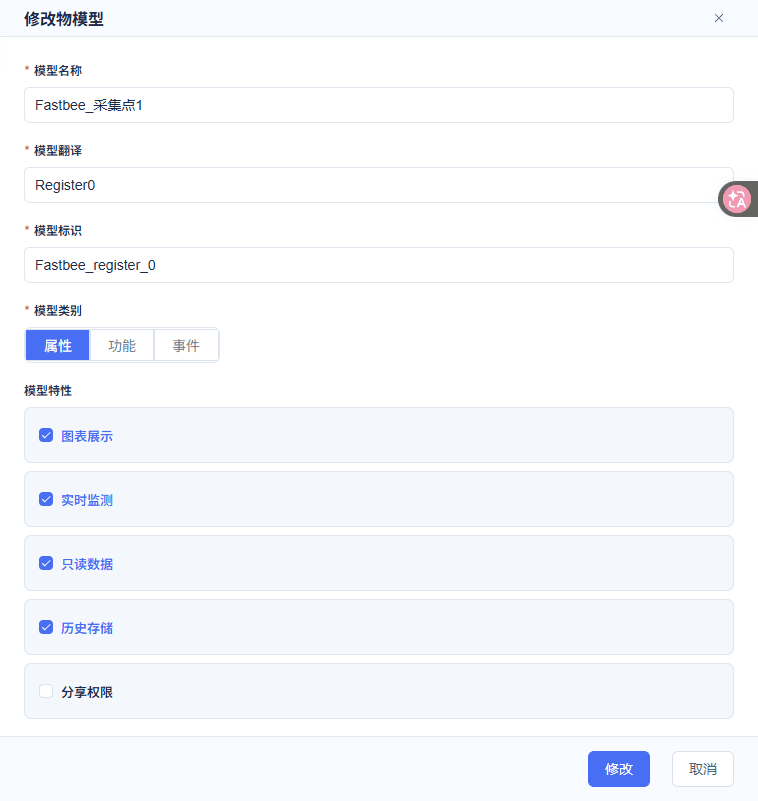
Collection points are read-only and keep history.
Screenshot Key Points
| Field / Control | Description |
|---|---|
| Read-only Data | Enabled for collection points 0 to 9; disabled for address 100 so it can be written from the platform. Required · Enter: collection points on; write setpoint off |
| History Storage | Enabled for all 11 properties; history after a write is based on the independent read. Required · Enter: On |
4. Initial configuration: allow writing the setpoint and store history
Location: Product*→Function Definition→*Edit Thing Model Steps: for the write setpoint, disable read-only data and enable history storage. This step keeps the initial configuration record; this round reuses the saved resources.
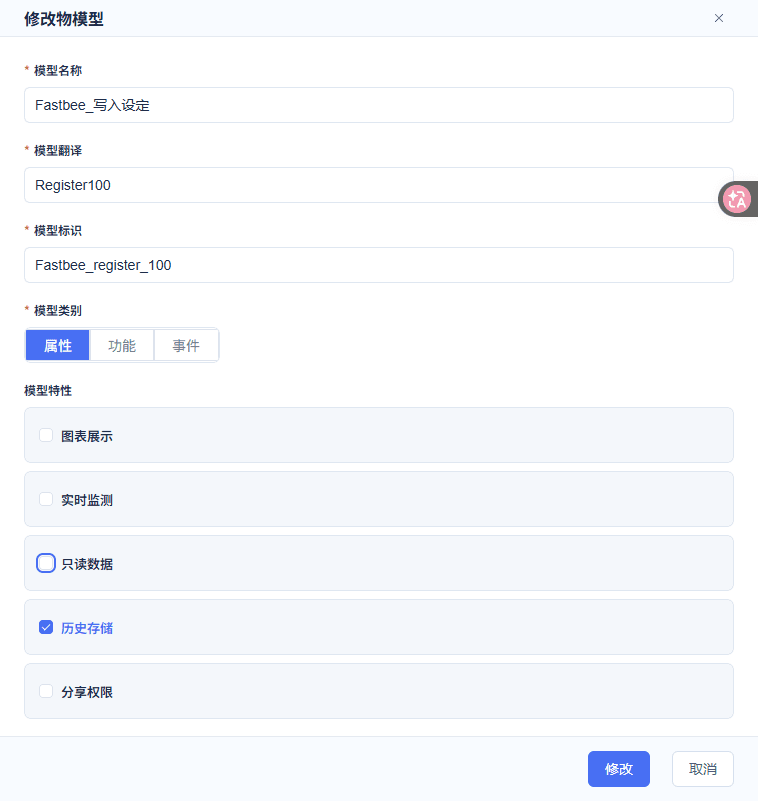
Address 100 is a writable integer property.
Screenshot Key Points
| Field / Control | Description |
|---|---|
| Read-only Data | Enabled for collection points 0 to 9; disabled for address 100 so it can be written from the platform. Required · Enter: collection points on; write setpoint off |
| History Storage | Enabled for all 11 properties; history after a write is based on the independent read. Required · Enter: On |
| Integer Range | This article uses a single 16-bit unsigned integer with no engineering unit. Required · Enter: 0-65535; step 1; unit left empty |
5. Initial configuration: bind this device and slave address
Location: Product*→Modbus Runtime Draft→*Device Binding Steps: select this device's number, fill in Unit ID 1, and enable it. This step keeps the initial configuration record; this round reuses the saved resources.

This binding sends and receives RTU frames over the established session.
Screenshot Key Points
| Field / Control | Description |
|---|---|
| Device Client ID | Select this product's encapsulated register device; it must match the FMQX registration identity. Required · Enter: this device's number |
| Unit ID | The slave address in the first byte of the RTU frame; the platform and the device must be the same. Required · Enter: 1 |
6. Initial configuration: save the independent read ranges
Location: Product*→Modbus Runtime Draft→*Polling Ranges Steps: configure 11 FC03 ranges for 0 to 9 and 100, quantity 1, interval 5000 ms. This step keeps the initial configuration record; this round reuses the saved resources.
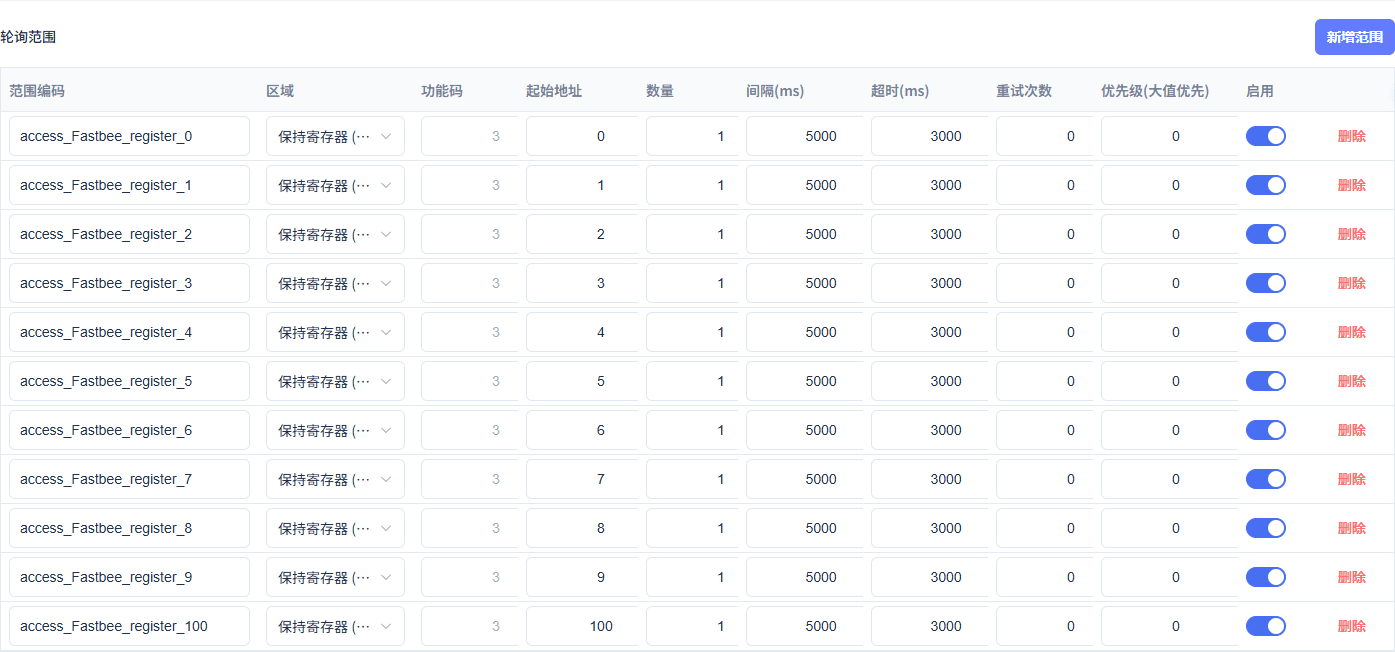
Each point is read on a normal 5-second cycle.
Screenshot Key Points
| Field / Control | Description |
|---|---|
| Start Address and Quantity | Zero-based addresses are used; one row each for 0 to 9 and 100, quantity 1 each. Required · Enter: 0-9, 100; quantity 1 |
| Read Function Code | Holding registers use FC03; an FC06 echo cannot replace an independent read. Required · Enter: 3 |
| Interval, Timeout, and Retries | Each range is read every 5 seconds; 3-second timeout, 0 retries, priority 0. Required · Enter: 5000 / 3000 ms; 0 / 0 |
7. Initial configuration: verify addresses, types, and scale
Location: Product*→Modbus Runtime Draft→*Point Mapping Steps: map each range to the corresponding Thing Model, and check UINT16, BE/BE, scale 1, and offset 0. This step keeps the initial configuration record; this round reuses the saved resources.
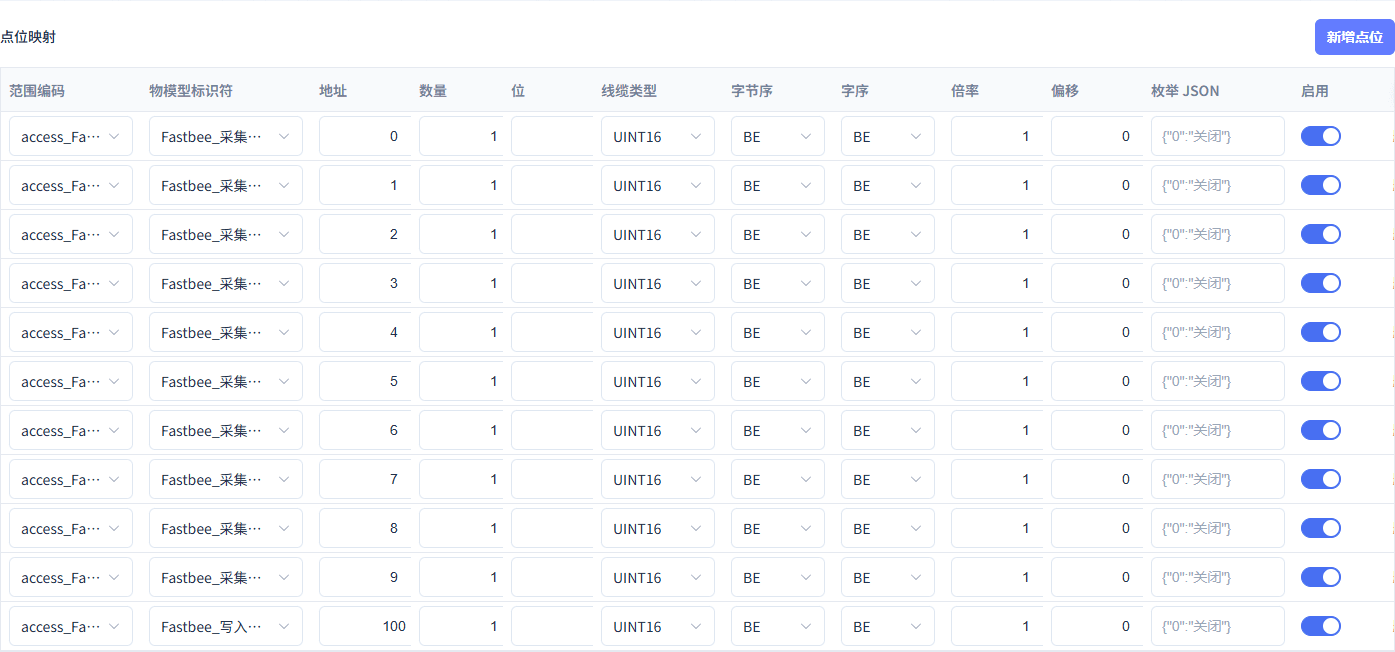
Addresses correspond to the Thing Model point by point; do not enter 40001 directly as a zero-based address.
Screenshot Key Points
| Field / Control | Description |
|---|---|
| Wire Type, Byte Order, and Word Order | This article uses single-register UINT16, high byte and high word first. Required · Enter: UINT16 / BE / BE |
| Scale and Offset | Actual value = raw value x scale + offset; this article keeps the raw value. Required · Enter: scale 1; offset 0 |
Full connection and point JSON template (no password) json
{

  "schemaVersion": 3,

  "groups": [

    {

      "id": "tutorial_demo-device",

      "name": "封装教程",

      "sortOrder": 62,

      "isSystem": false

    }

  ],

  "sessions": [

    {

      "id": "import_demo-device",

      "groupId": "tutorial_demo-device",

      "name": "封装寄存器",

      "protocol": "ModbusRTU",

      "transport": "TCP",

      "host": "127.0.0.1",

      "port": 8888,

      "unitId": 1,

      "clientId": "demo-device",

      "tcpPassiveRegistration": true,

      "autoReconnect": false,

      "modbusThingModels": [

        {

          "modelName": "采集点1",

          "identifier": "register_0",

          "type": 1,

          "dataType": "Integer",

          "isReadonly": true,

          "initialValue": 201,

          "mapping": {

            "dataArea": "HoldingRegisters",

            "address": 0,

            "length": 1,

            "wireFormat": "UInt16",

            "byteOrder": "BigEndian",

            "wordOrder": "HighWordFirst",

            "scale": 1,

            "offset": 0

          }

        },

        {

          "modelName": "采集点2",

          "identifier": "register_1",

          "type": 1,

          "dataType": "Integer",

          "isReadonly": true,

          "initialValue": 202,

          "mapping": {

            "dataArea": "HoldingRegisters",

            "address": 1,

            "length": 1,

            "wireFormat": "UInt16",

            "byteOrder": "BigEndian",

            "wordOrder": "HighWordFirst",

            "scale": 1,

            "offset": 0

          }

        },

        {

          "modelName": "采集点3",

          "identifier": "register_2",

          "type": 1,

          "dataType": "Integer",

          "isReadonly": true,

          "initialValue": 203,

          "mapping": {

            "dataArea": "HoldingRegisters",

            "address": 2,

            "length": 1,

            "wireFormat": "UInt16",

            "byteOrder": "BigEndian",

            "wordOrder": "HighWordFirst",

            "scale": 1,

            "offset": 0

          }

        },

        {

          "modelName": "采集点4",

          "identifier": "register_3",

          "type": 1,

          "dataType": "Integer",

          "isReadonly": true,

          "initialValue": 204,

          "mapping": {

            "dataArea": "HoldingRegisters",

            "address": 3,

            "length": 1,

            "wireFormat": "UInt16",

            "byteOrder": "BigEndian",

            "wordOrder": "HighWordFirst",

            "scale": 1,

            "offset": 0

          }

        },

        {

          "modelName": "采集点5",

          "identifier": "register_4",

          "type": 1,

          "dataType": "Integer",

          "isReadonly": true,

          "initialValue": 205,

          "mapping": {

            "dataArea": "HoldingRegisters",

            "address": 4,

            "length": 1,

            "wireFormat": "UInt16",

            "byteOrder": "BigEndian",

            "wordOrder": "HighWordFirst",

            "scale": 1,

            "offset": 0

          }

        },

        {

          "modelName": "采集点6",

          "identifier": "register_5",

          "type": 1,

          "dataType": "Integer",

          "isReadonly": true,

          "initialValue": 206,

          "mapping": {

            "dataArea": "HoldingRegisters",

            "address": 5,

            "length": 1,

            "wireFormat": "UInt16",

            "byteOrder": "BigEndian",

            "wordOrder": "HighWordFirst",

            "scale": 1,

            "offset": 0

          }

        },

        {

          "modelName": "采集点7",

          "identifier": "register_6",

          "type": 1,

          "dataType": "Integer",

          "isReadonly": true,

          "initialValue": 207,

          "mapping": {

            "dataArea": "HoldingRegisters",

            "address": 6,

            "length": 1,

            "wireFormat": "UInt16",

            "byteOrder": "BigEndian",

            "wordOrder": "HighWordFirst",

            "scale": 1,

            "offset": 0

          }

        },

        {

          "modelName": "采集点8",

          "identifier": "register_7",

          "type": 1,

          "dataType": "Integer",

          "isReadonly": true,

          "initialValue": 208,

          "mapping": {

            "dataArea": "HoldingRegisters",

            "address": 7,

            "length": 1,

            "wireFormat": "UInt16",

            "byteOrder": "BigEndian",

            "wordOrder": "HighWordFirst",

            "scale": 1,

            "offset": 0

          }

        },

        {

          "modelName": "采集点9",

          "identifier": "register_8",

          "type": 1,

          "dataType": "Integer",

          "isReadonly": true,

          "initialValue": 209,

          "mapping": {

            "dataArea": "HoldingRegisters",

            "address": 8,

            "length": 1,

            "wireFormat": "UInt16",

            "byteOrder": "BigEndian",

            "wordOrder": "HighWordFirst",

            "scale": 1,

            "offset": 0

          }

        },

        {

          "modelName": "采集点10",

          "identifier": "register_9",

          "type": 1,

          "dataType": "Integer",

          "isReadonly": true,

          "initialValue": 210,

          "mapping": {

            "dataArea": "HoldingRegisters",

            "address": 9,

            "length": 1,

            "wireFormat": "UInt16",

            "byteOrder": "BigEndian",

            "wordOrder": "HighWordFirst",

            "scale": 1,

            "offset": 0

          }

        },

        {

          "modelName": "写入设定",

          "identifier": "register_100",

          "type": 1,

          "dataType": "Integer",

          "isReadonly": false,

          "initialValue": 0,

          "mapping": {

            "dataArea": "HoldingRegisters",

            "address": 100,

            "length": 1,

            "wireFormat": "UInt16",

            "byteOrder": "BigEndian",

            "wordOrder": "HighWordFirst",

            "scale": 1,

            "offset": 0

          }

        }

      ]

    }

  ]

}After checking against the replacement list, save it as connection-config.json and choose Import Configuration in FMQX Web; this rewrite of the body text does not mean this template has actually been imported. Replaceable customer template names are used here; check them against the replacement list in this section before importing or sending.
8. Initial configuration: import this article's FMQX session
Location: FMQX Web*→*Configuration File Steps: after checking this section's full JSON against the replacement list, save it as a UTF-8 file connection-config.json, and in FMQX Web choose Import Configuration under More Actions. The original step screenshot keeps the original batch operation.
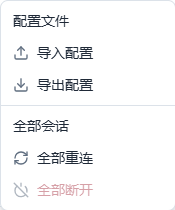
Import this article's standalone group and session.
Screenshot Key Points
| Field / Control | Description |
|---|---|
| Import Configuration | Import this article's session configuration from the FMQX Web configuration file menu. Required · Enter: connection-config.json |
2. Publish and Confirm the Running Configuration
9. Confirm publishing this article's product
Location: Product Details*→*Basic Information Steps: verify this article's product name and number, and click OK in the publish confirmation box.
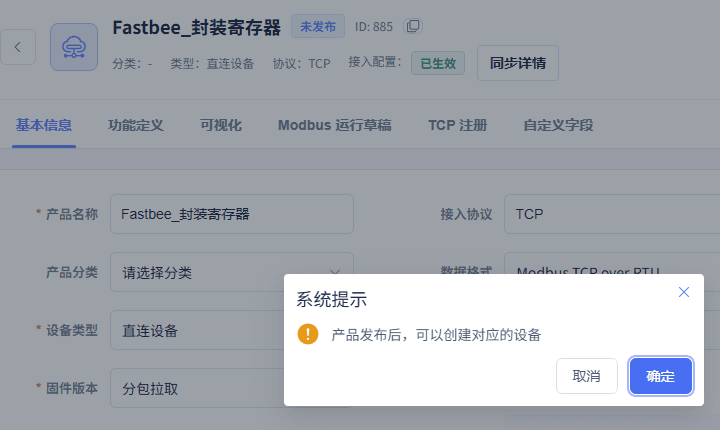
Confirm publishing the current product, keeping the product name, ID, and the full confirmation box.
10. Confirm the running configuration has been applied
Location: Product Details*→*Sync Details Steps: open the sync details and verify the application status of the current snapshot.
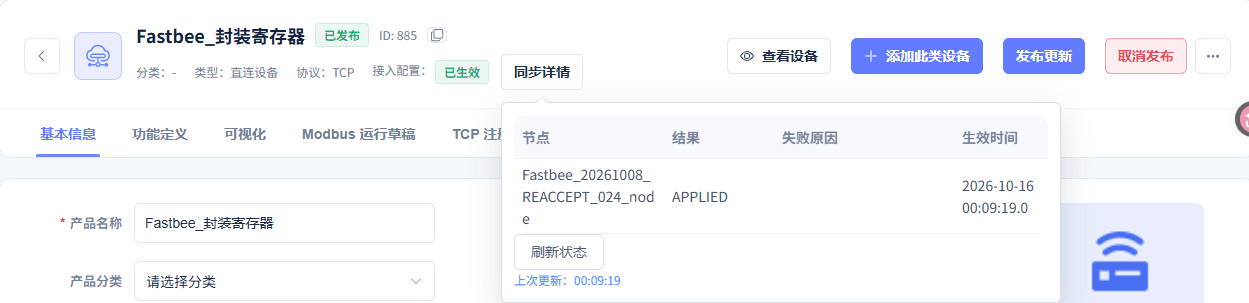
This article's node has applied the current configuration
3. Verify Parameters and Connect the Slave
11. Read-only verification of the full connection parameters
Location: FMQX Web*→This Session→*Connection Configuration Steps: read-only verification of host, port, identity, station number, and RTU parameters.
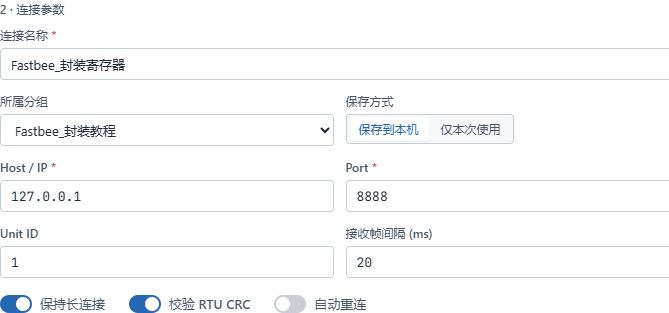
Verify this article's connection direction, target address, port, and station number
Screenshot Key Points
| Field / Control | Description |
|---|---|
| Full Connection Parameters | Read-only verification of host, port, identity, station number, RTU checksum, and reconnect settings; this supplementary capture was not saved. Required · Enter: fill in per the implementation plan · Example: fill in per the actual environment |
12. Verify the reused point table and write point
Location: FMQX Web*→This Session→*Thing Model Parameters Steps: verify zero-based addresses 0-9 and 100, and confirm that address 100 is writable.
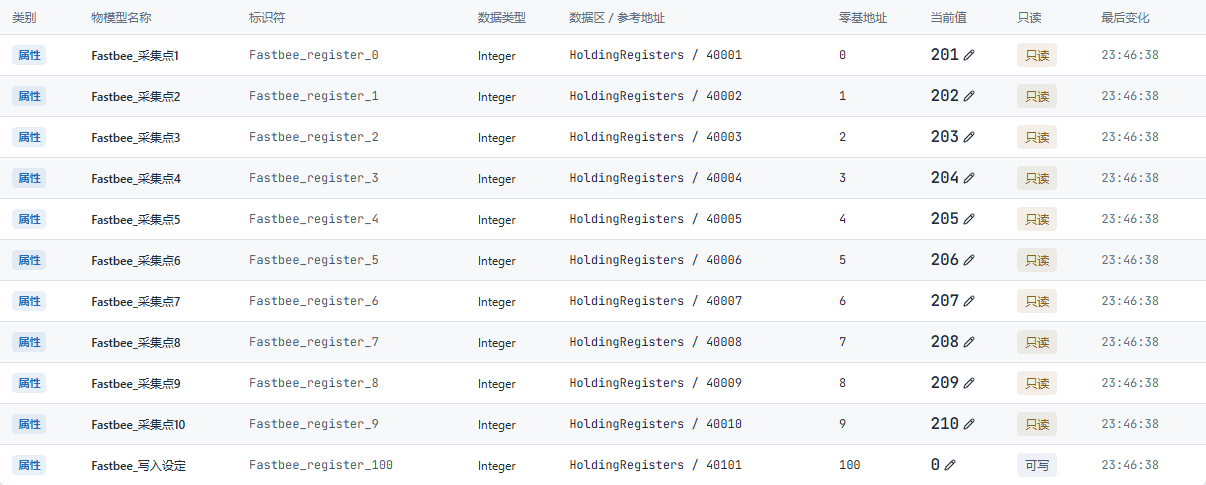
This article's 11 formal register points and initial values
13. Connect this article's slave session
Location: FMQX Web*→*This Session Steps: after verifying the session name, click Connect and wait for it to show Connected.

This article's original-identity slave session is connected.
4. Ten Consecutive Collections at the Same Address
14. Enter the first value 411 at the same address
Location: FMQX Web*→Thing Model Parameters→*Collection Point 1 Steps: enter 411 in the edit box of zero-based address 0, verify the address, and confirm.
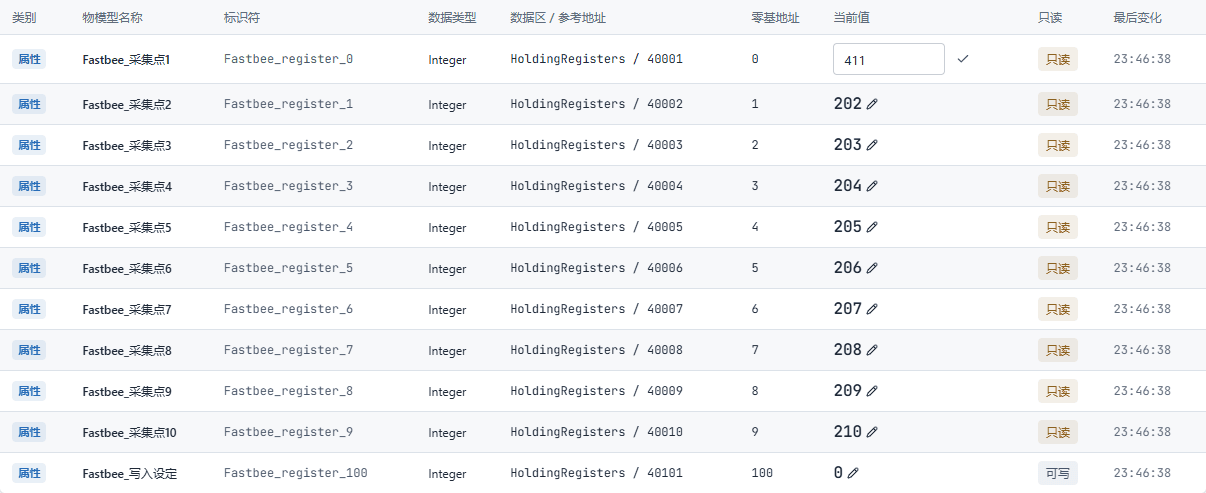
New sampled value 411 at the same address 0
Screenshot Key Points
| Field / Control | Description |
|---|---|
| Slave Register Value | Enter 411-420 in sequence at the same zero-based address 0; set 421 after recovery. Required · Enter: fill in per the implementation plan · Example: 411-420; 421 after recovery |
| Zero-based Address | Used to complete "Enter the first value 411 at the same address". Required · Enter: 0 |
| First Value | Used to complete "Enter the first value 411 at the same address". Required · Enter: 411 |
15. Collect up to 420 in sequence at the same address
Location: FMQX Web*→Thing Model Parameters→*Collection Point 1 Steps: still at address 0, set 412-420 in sequence, waiting for one actual collection after each confirmation; the figure shows the final 420 pending confirmation.
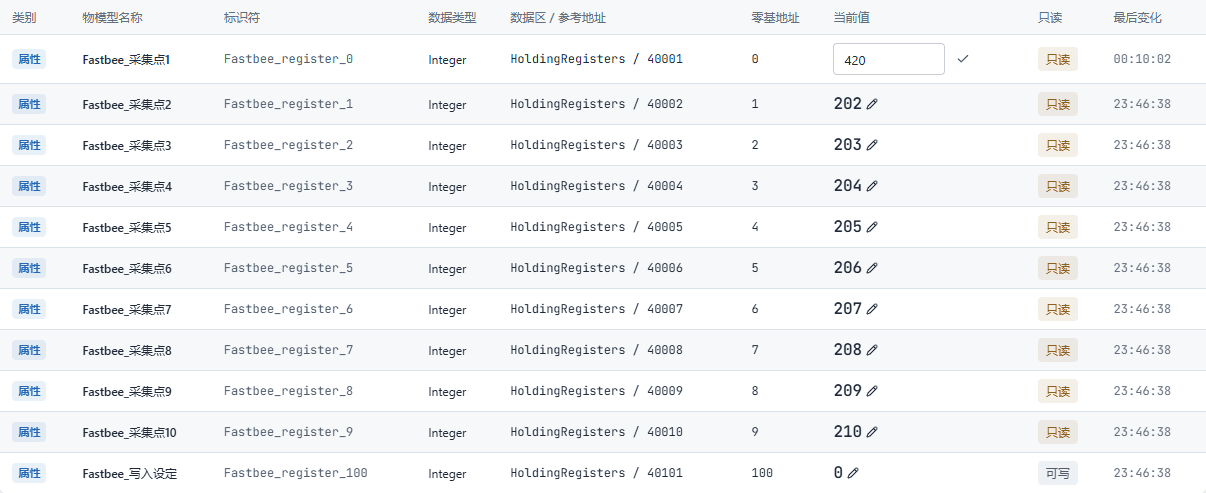
New sampled value 420 at the same address 0
Screenshot Key Points
| Field / Control | Description |
|---|---|
| Slave Register Value | Enter 411-420 in sequence at the same zero-based address 0; set 421 after recovery. Required · Enter: fill in per the implementation plan · Example: 411-420; 421 after recovery |
| Consecutive Values | Used to complete "Collect up to 420 in sequence at the same address". Required · Enter: 411-420 |
| Zero-based Address | Used to complete "Collect up to 420 in sequence at the same address". Required · Enter: 0 |
5. First Write of 45 and Independent Read-back
16. First send setpoint 45 to address 100
Location: Device Details*→Running Status→*Write Setpoint Steps: verify the current value before writing, set the pending target to 45, and click send once; the figure keeps only the pre-write baseline and the send entry — the actual target is confirmed by the raw frame in the next step.

This run's pre-write current value and send entry; the original image does not show the pending target number.
Screenshot Key Points
| Field / Control | Description |
|---|---|
| Write Address | Used to complete "First send setpoint 45 to address 100". Required · Enter: 100 |
| This Target | Used to complete "First send setpoint 45 to address 100". Required · Enter: 45 |
17. Confirm the slave received the write-45 request
Location: FMQX Web*→This Session→*Real Log Steps: view the FC06 write-single-register request received this time, and verify address 100 and value 45.
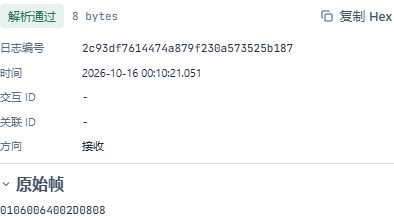
FC06 write 45: device receives the request
18. Confirm the slave echoed the write of 45
Location: FMQX Web*→This Session→*Real Log Steps: view the send echo immediately following this request, and verify the function code, address, and value.
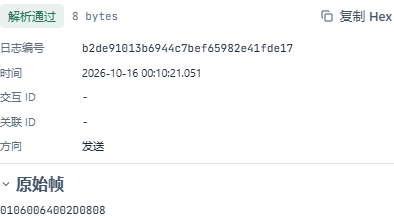
FC06 write 45: device echo
19. View the slave's current 45 at address 100
Location: FMQX Web*→This Session→*Thing Model Parameters Steps: verify that the current value of zero-based address 100 is 45.
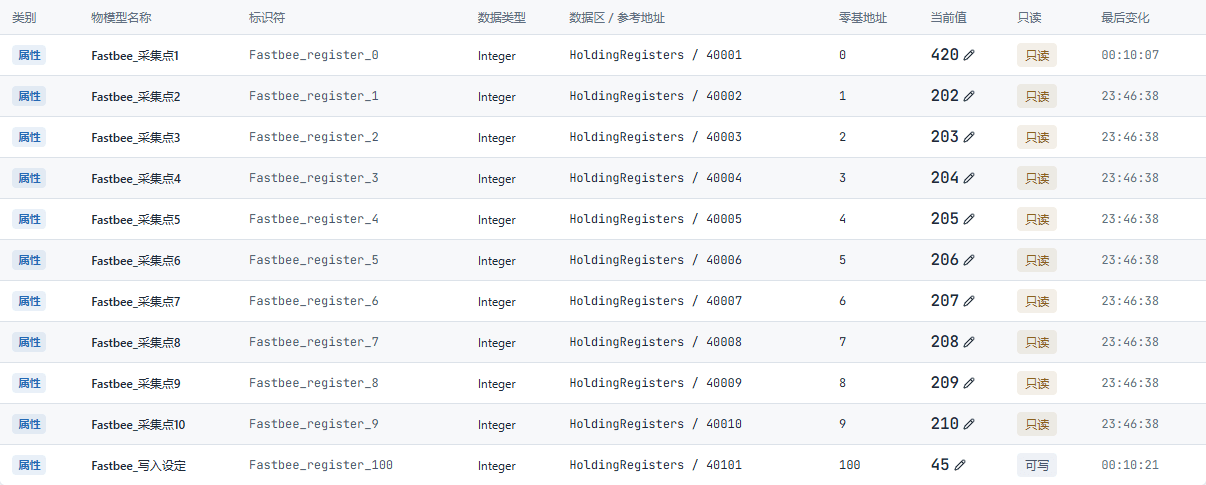
Device register 100 actual value 45
20. Verify another FC03 response of 45
Location: FMQX Web*→This Session→*Real Log Steps: view another FC03 response after the FC06, and verify that the read-back value of address 100 is 45 — do not treat the FC06 echo as a read.
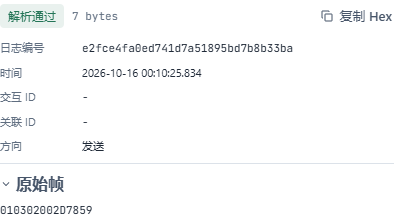
Independent FC03 read-back of setpoint 45
21. View the platform's read-back current value 45
Location: Device Details*→*Running Status Steps: refresh this article's device running status and view the write setpoint current value 45.

Platform current value 45 after the independent FC03 read-back
6. Normal Stop and Read Recovery
This round was disconnected and reconnected normally by the operator; do not call this process network-failure recovery.
22. Normally stop this article's connection
Location: FMQX Web*→*This Session Steps: click Disconnect and wait until this article's session shows Disconnected.

The slave is disconnected; configuration and history remain retained
23. Resume the same session connection
Location: FMQX Web*→*This Session Steps: continue using the original session and identity, click Connect, and verify Connected plus the retained current value 420 at address 0.
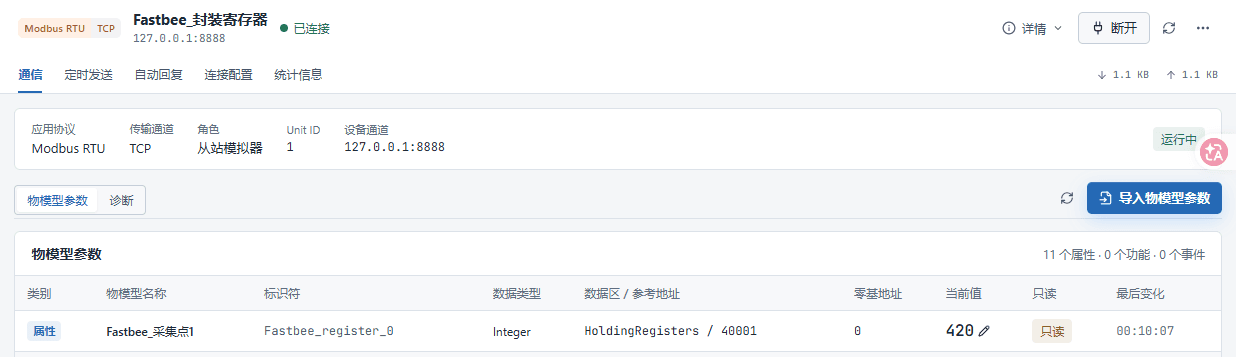
After a normal reconnection, the current session, protocol transport, traffic, address 0's current 420, and the change time are retained.
24. Verify the new read of 421 after recovery
Location: FMQX Web*→This Session→*Real Log Steps: view the new FC03 response for address 0 after the normal recovery, and verify the new value 421.
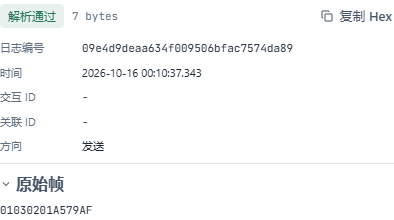
FC03 reads address 0 after recovery, returning 421
Screenshot Key Points
| Field / Control | Description |
|---|---|
| Zero-based Address | Used to complete "Verify the new read of 421 after recovery". Required · Enter: 0 |
| New Value After Recovery | Used to complete "Verify the new read of 421 after recovery". Required · Enter: 421 |
7. Write 55 After Recovery and Independent Read-back
25. Send setpoint 55 to address 100 after recovery
Location: Device Details*→Running Status→*Write Setpoint Steps: verify the current value before writing, set the pending target to 55, and click send once; the figure keeps only the pre-write baseline and the send entry — the actual target is confirmed by the raw frame in the next step.

This run's pre-write current value and send entry; the original image does not show the pending target number.
Screenshot Key Points
| Field / Control | Description |
|---|---|
| Write Address | Used to complete "Send setpoint 55 to address 100 after recovery". Required · Enter: 100 |
| This Target | Used to complete "Send setpoint 55 to address 100 after recovery". Required · Enter: 55 |
26. Confirm the slave received the write-55 request
Location: FMQX Web*→This Session→*Real Log Steps: view the FC06 write-single-register request received this time, and verify address 100 and value 55.
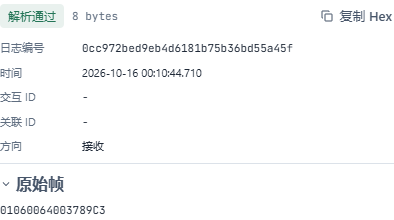
FC06 write 55: device receives the request
27. Confirm the slave echoed the write of 55
Location: FMQX Web*→This Session→*Real Log Steps: view the send echo immediately following this request, and verify the function code, address, and value.
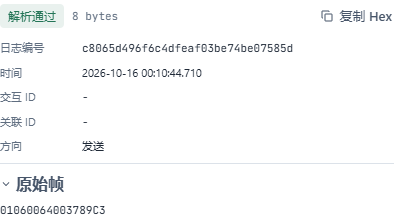
FC06 write 55: device echo
28. View the slave's current 55 at address 100
Location: FMQX Web*→This Session→*Thing Model Parameters Steps: verify that the current value of zero-based address 100 is 55.
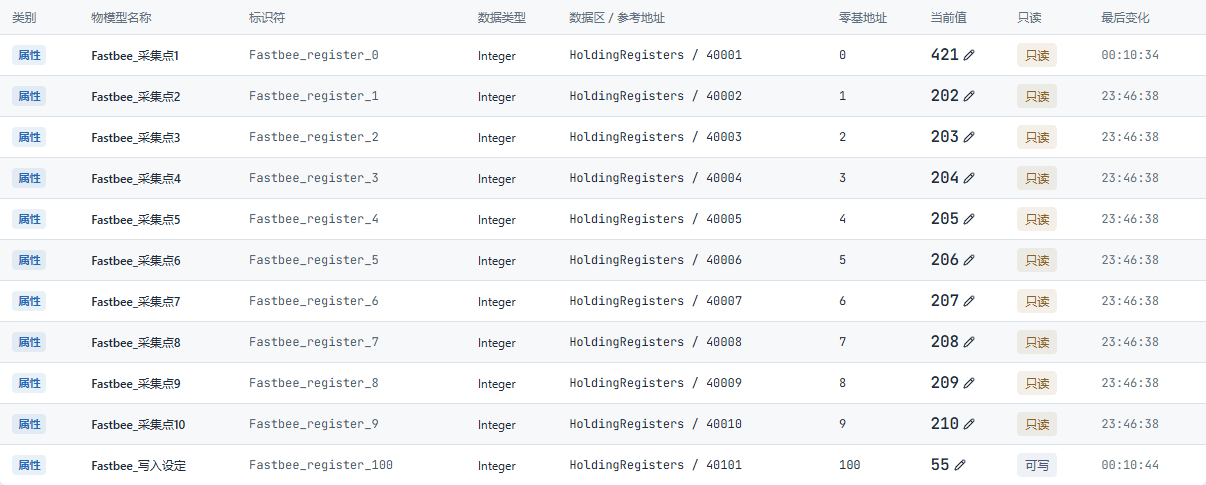
Device register 100 actual value 55
29. Verify another FC03 response of 55
Location: FMQX Web*→This Session→*Real Log Steps: view another FC03 response after the FC06, and verify that the read-back value of address 100 is 55 — do not treat the FC06 echo as a read.
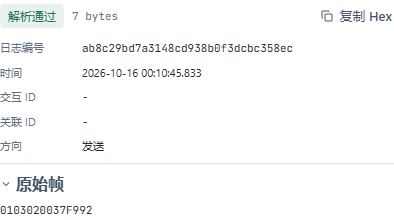
Independent FC03 read-back of setpoint 55
30. View the platform's read-back current value 55
Location: Device Details*→*Running Status Steps: refresh this article's device running status and view the write setpoint current value 55.

Platform current value 55 after the independent FC03 read-back
8. Stop Polling and Retain Resources
31. Final disconnect while keeping the current values
Location: FMQX Web*→*This Session Steps: click Disconnect, and verify Disconnected, not started, and the retained current value 421 at address 0.
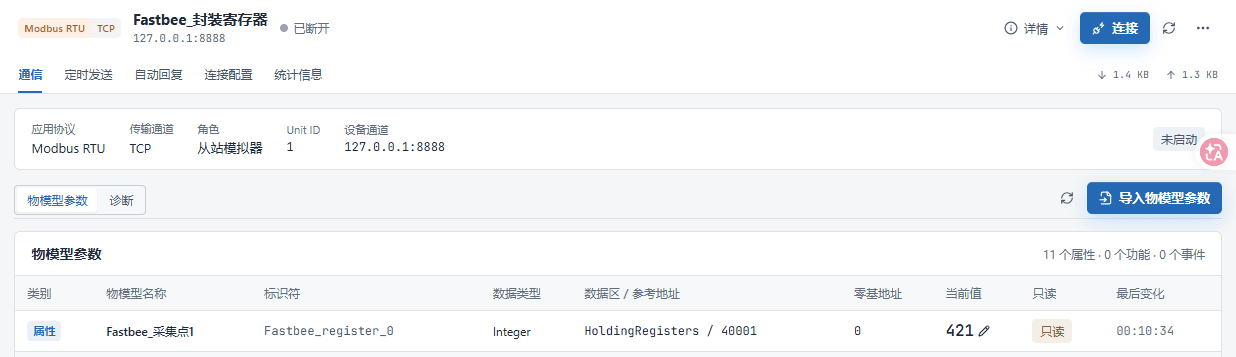
Final normal disconnect; the current session, protocol transport, traffic, address 0's current 421, and the change time are retained.
32. Confirm unpublishing stops polling
Location: Product Details*→*Unpublish Steps: click OK in the unpublish confirmation box of this article's product.
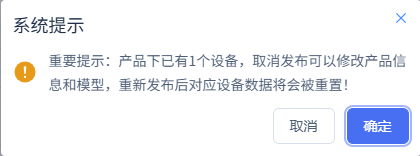
Stop this article's polling while keeping configuration and history
33. Confirm the stop configuration has been applied
Location: Product Details*→*Sync Details Steps: verify the REMOVE snapshot after unpublishing and its application result.
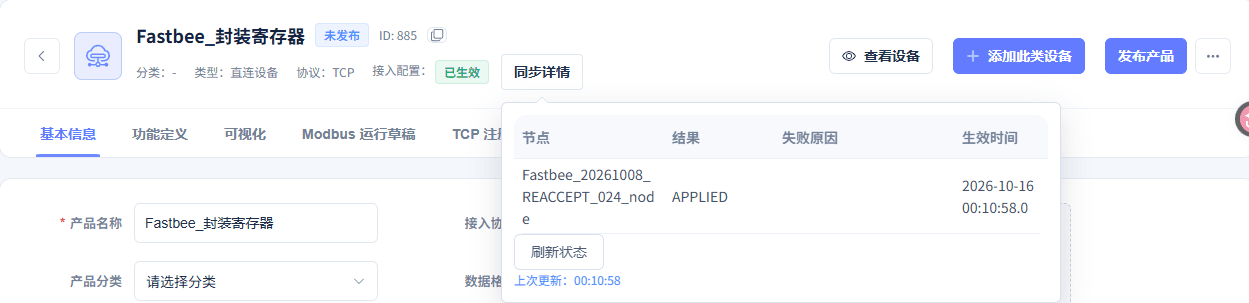
This article's node has applied the current configuration
9. Filter, Refresh, and Verify the Actual History
Write history keeps the pre-write values and duplicate values from normal polling. Verify the two post-write read-backs against this run's times and raw frames; do not equate the total number of history rows with the number of writes.
34. Fill in the full time range for Collection Point 1
Location: Data Center*→*Historical Data Steps: fill in the start and end date-times covering this run.
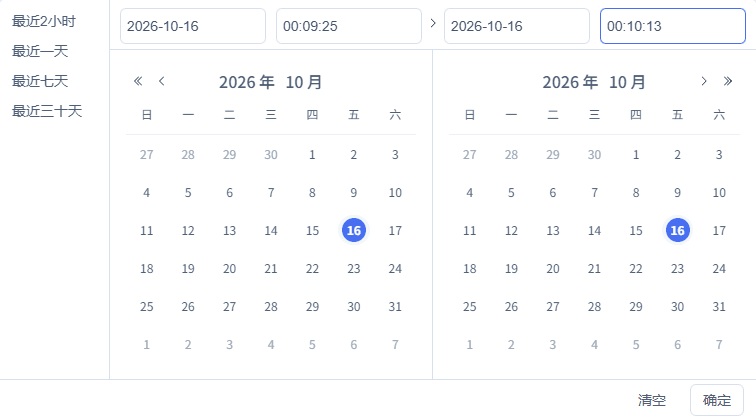
Full date and start/end times: 2026-10-16 00:09:25 to 2026-10-16 00:10:13
Screenshot Key Points
| Field / Control | Description |
|---|---|
| Full Date-time of This Round | Use the real run time range; avoid mixing in the initial configuration or other runs. Optional · Enter: fill in per the implementation plan · Example: fill in per the actual environment |
| Start Time | Used to complete "Fill in the full time range for Collection Point 1". Required · Enter: 2026-10-16 00:09:25 |
| End Time | Used to complete "Fill in the full time range for Collection Point 1". Required · Enter: 2026-10-16 00:10:13 |
35. Filter for this article's device and Collection Point 1
Location: Data Center*→*Historical Data Steps: select this article's device and the Collection Point 1 field, and verify the query target.

Query after verifying this article's device, property, and time range
Screenshot Key Points
| Field / Control | Description |
|---|---|
| Device and Field Filter | Collection Point 1 corresponds to address 0, and Write Setpoint corresponds to address 100; keep this article's device. Optional · Enter: fill in per the implementation plan · Example: fill in per the actual environment |
| Query Field | Used to complete "Filter for this article's device and Collection Point 1". Required · Enter: Collection Point 1 |
36. Refresh and query Collection Point 1 history
Location: Data Center*→*Historical Data Steps: keep this article's device, field, and time conditions, and click the refresh button in the result area to query again.

Refresh and re-query this article's history
37. Verify the actual history results of Collection Point 1
Location: Data Center*→Historical Data→*Query Results Steps: verify by time and value the ten consecutive changes 411-420 at the same zero-based address 0.
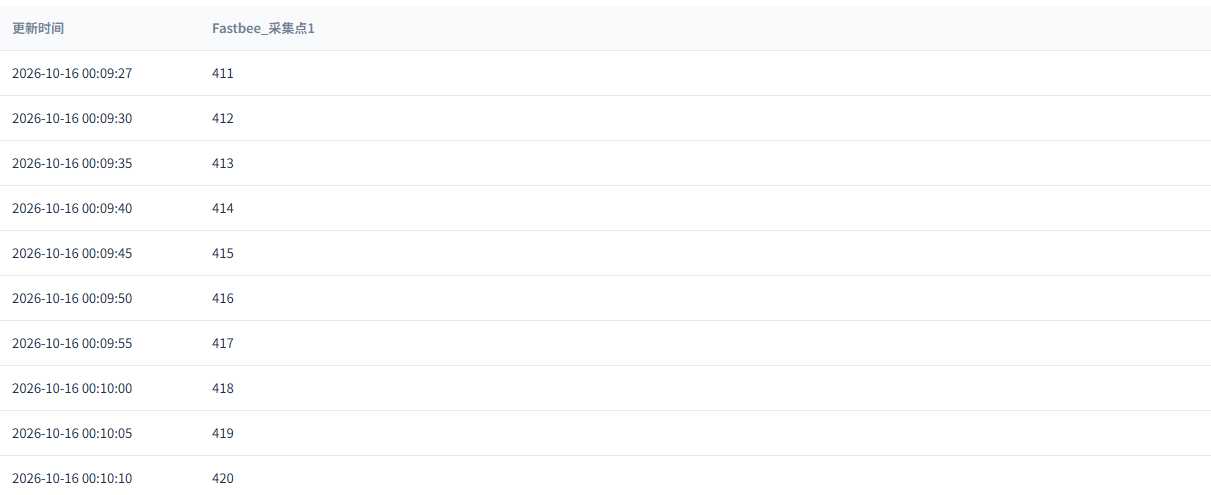
Verify this article's actual history records after refresh
38. Fill in the full time range for Write Setpoint
Location: Data Center*→*Historical Data Steps: fill in the start and end date-times covering this run.
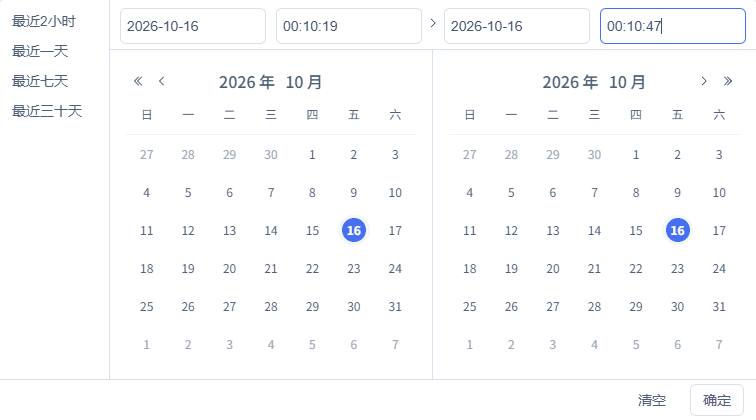
Full date and start/end times: 2026-10-16 00:10:19 to 2026-10-16 00:10:47
Screenshot Key Points
| Field / Control | Description |
|---|---|
| Full Date-time of This Round | Use the real run time range; avoid mixing in the initial configuration or other runs. Optional · Enter: fill in per the implementation plan · Example: fill in per the actual environment |
| Start Time | Used to complete "Fill in the full time range for Write Setpoint". Required · Enter: 2026-10-16 00:10:19 |
| End Time | Used to complete "Fill in the full time range for Write Setpoint". Required · Enter: 2026-10-16 00:10:47 |
39. Filter for this article's device and Write Setpoint
Location: Data Center*→*Historical Data Steps: select this article's device and the Write Setpoint field, and verify the query target.

Query after verifying this article's device, property, and time range
Screenshot Key Points
| Field / Control | Description |
|---|---|
| Device and Field Filter | Collection Point 1 corresponds to address 0, and Write Setpoint corresponds to address 100; keep this article's device. Optional · Enter: fill in per the implementation plan · Example: fill in per the actual environment |
| Query Field | Used to complete "Filter for this article's device and Write Setpoint". Required · Enter: Write Setpoint |
40. Refresh and query Write Setpoint history
Location: Data Center*→*Historical Data Steps: keep this article's device, field, and time conditions, and click the refresh button in the result area to query again.

Refresh and re-query this article's history
41. Verify the actual history results of Write Setpoint
Location: Data Center*→Historical Data→*Query Results Steps: verify by time and value the two post-write read-backs, 45 and 55, at the same zero-based address 100.
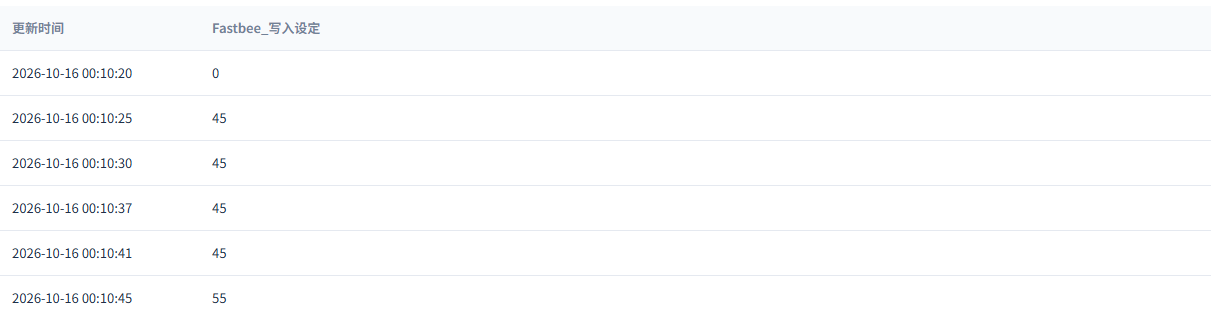
Verify this article's actual history records after refresh
Where Parameters Come From and How to Fill Them
Device Access Wizard
| Field / Control | How to Fill |
|---|---|
| Collection Point Table | Import 11 integer points; 0-9 are the ten collection addresses and 100 is for writing. This round's ten consecutive samples always use address 0. |
Protocol and Publish Effectiveness
| Field / Control | How to Fill |
|---|---|
| Access Protocol | In this article the device actively connects to FMQ over a persistent TCP connection. Required · Enter: TCPPublishing is required after changes.TCP: in this article the device actively connects to FMQ over a persistent TCP connection; in this article the device actively connects to FMQ over a persistent TCP connection. |
| Data Format | Select the data format verified in this article in the product's basic information. Required · Enter: Modbus TCP over RTUPublishing is required after changes.Modbus TCP over RTU: select the data format verified in this article in the product's basic information; select the data format verified in this article in the product's basic information. |
| Device Client ID | Select this product's encapsulated register device; it must match the FMQX registration identity. Required · Enter: this device's numberPublishing is required after changes. |
| Unit ID | The slave address in the first byte of the RTU frame; the platform and the device must be the same. Required · Enter: 1Publishing is required after changes. |
| Start Address and Quantity | Zero-based addresses are used; one row each for 0 to 9 and 100, quantity 1 each. Required · Enter: 0-9, 100; quantity 1Publishing is required after changes. |
| Read Function Code | Holding registers use FC03; an FC06 echo cannot replace an independent read. Required · Enter: 3Publishing is required after changes. |
| Interval, Timeout, and Retries | Each range is read every 5 seconds; 3-second timeout, 0 retries, priority 0. Required · Enter: 5000 / 3000 ms; 0 / 0Publishing is required after changes. |
| Wire Type, Byte Order, and Word Order | This article uses single-register UINT16, high byte and high word first. Required · Enter: UINT16 / BE / BEPublishing is required after changes. |
| Scale and Offset | Actual value = raw value x scale + offset; this article keeps the raw value. Required · Enter: scale 1; offset 0Publishing is required after changes. |
| Publish and Sync Details | Publish after saving the draft, check that the target node result is APPLIED, then connect the device. Publishing is required after changes. |
Function Definition
| Field / Control | How to Fill |
|---|---|
| Read-only Data | Enabled for collection points 0 to 9; disabled for address 100 so it can be written from the platform. Required · Enter: collection points on; write setpoint offPublishing is required after changes. |
| History Storage | Enabled for all 11 properties; history after a write is based on the independent read. Required · Enter: OnPublishing is required after changes. |
| Integer Range | This article uses a single 16-bit unsigned integer with no engineering unit. Required · Enter: 0-65535; step 1; unit left emptyPublishing is required after changes. |
FMQX Web Connection
| Field / Control | How to Fill |
|---|---|
| Import Configuration | Import this article's session configuration from the FMQX Web configuration file menu. Reconnecting is required after changes. |
| Host / IP | This article enters the FMQ listening host; in this direction the slave actively connects to the platform. Required · Enter: 127.0.0.1Reconnecting is required after changes. |
| Port | Enter the actual FMQ TCP listening port provided by the administrator. Required · Enter: 8888Reconnecting is required after changes. |
| Protocol and Role | FMQ handles master reads and commands; the FMQX Web demo slave provides registers and RTU protocol responses. Required · Enter: Modbus RTU / TCP / slave simulatorReconnecting is required after changes.Modbus RTU / TCP / slave simulator: FMQ handles master reads and commands; the FMQX Web demo slave provides registers and RTU protocol responses; FMQ handles master reads and commands; the FMQX Web demo slave provides registers and RTU protocol responses. |
| CRC and Receive Interval | Verify the RTU CRC and keep the persistent connection; auto-reconnect is off. Required · Enter: CRC on; 20 ms; persistent connectionReconnecting is required after changes. |
| Connect | After the configuration is applied, connect this article's session and confirm Connected. Reconnecting is required after changes. |
Device Reporting and Demo Replies
| Field / Control | How to Fill |
|---|---|
| Initial Registers | Addresses 0-9 start at 201-210; this round uses 411-420 consecutively at address 0 plus 421 after recovery, and address 100 is used only for the two writes. Required · Enter: original 0:201, ..., 9:210; this round 0:411-420 |
| Ten Consecutive Samples at the Same Address | 411-420 in sequence at the same zero-based address 0; the original point table's 201-210 at 0-9 are the initial values of the different addresses. Required · Enter: address 0: 411, 412, 413, 414, 415, 416, 417, 418, 419, 420 |
Device Running Status
| Field / Control | How to Fill |
|---|---|
| Target Value After Recovery | Pre-write current value 45; set the target to 55 and send once; the original pending image does not show the target number, so the real 55 is verified against the FC06 raw frame. Required · Enter: 45 before write; target 55 this time |
| Real Write and Echo | Verify the FC06 request and echo for station 1, address 100, value 55. Required · Enter: FC06 / 1 / 100 / 55 |
| Independent Read-back | After the FC06 echo, verify another FC03 read response for address 100; the expected value differs by stage — do not treat the FC06 echo as an independent read-back. Required · Enter: read 45 in the consecutive stage; read 55 in the recovery stage |
| Platform Current Value | Verify the independent FC03 read-back of address 100 per the current stage; the slider's pending value is not evidence of device execution. Required · Enter: first read-back 45; read-back 55 after recovery |
Historical Data
| Field / Control | How to Fill |
|---|---|
| Device and Field | Historical data selects only this article's encapsulated register and Write Setpoint. Required · Enter: Encapsulated Register / Write Setpoint |
| Time Range | Fill in the full date-time covering this article's current collection or post-write independent read. Required · Enter: follow this round's real history filter screenshot |
| Refresh and Re-query | Keep the same device, field, and full time range, click refresh in the result area, and verify the actual rows. |
Stop and Recovery
| Field / Control | How to Fill |
|---|---|
| Stop and Recovery | First unpublish this article's product to stop polling, then disconnect the session; to recover, publish and apply first, then connect. |
| Retained Data | At the end, stop sending, polling, and the connection; keep the product, device, model, session, and history. |
Current Run Re-verification and History Check
| Field / Control | How to Fill |
|---|---|
| Publish and Application Status | Confirm the product identity; after publishing, wait for this round's running snapshot to show APPLIED. Publishing is required after changes. |
| Full Connection Parameters | Read-only verification of host, port, identity, station number, RTU checksum, and reconnect settings; this supplementary capture was not saved. Required · Enter: fill in per the actual configurationReconnecting is required after changes. |
| Zero-based Addresses and Current Values | Address 0 is used for the consecutive 411-420 and the recovery 421; address 100 is used for the two writes. |
| Connect the Current Session | Keep this article's original-identity connection; continue real collection once connected. |
| Disconnect the Current Session | Stopped normally by the operator; scheduled sending and auto-reply both stay stopped. |
| Slave Register Value | Enter 411-420 in sequence at the same zero-based address 0; set 421 after recovery. Required · Enter: 411-420; 421 after recovery |
| Address 100 Setpoint and Send | Verify the pre-write value, set the new target, and send only once; confirm the target against the FC06 raw frame. |
| Real RTU Frames | View the received FC06, the sent echo, and the other FC03 response separately; verify direction, time, address, and value. |
| Platform Read-back Current Value | The current value should match the independent FC03 response; do not treat dispatch status as execution. |
| Unpublish to Stop Polling | Stops only this article's running polling; confirm REMOVE/APPLIED and keep business resources and history. |
| Full Date-time of This Round | Use the real run time range; avoid mixing in the initial configuration or other runs. Optional · Enter: fill in per the actual configuration |
| Device and Field Filter | Collection Point 1 corresponds to address 0, and Write Setpoint corresponds to address 100; keep this article's device. Optional · Enter: fill in per the actual configuration |
| Query and Refresh | Keep the same device, field, and full time range when re-querying. |
| Actual History Results | Verify the ten 411-420 at address 0 and the two post-write read-backs at address 100; the recovery 421 is verified separately. |
Where to Check First When Problems Occur
| Symptom | Possible Cause | Where to Check First | How to Recover |
|---|---|---|---|
| Cannot connect | Address, port, device identity, or credentials inconsistent | Verify this article's product applied status and the platform connection information | Keep it stopped, fix the connection parameters, then read a known point first. |
| Connected but readings do not match | Address base, station number, data type, or CRC configuration inconsistent | Compare against the official point table and the real FC03 requests and responses | Stop repeated writes and verify a known address first. |
| Current value not updated after a write | Only dispatched or echoed; no independent read obtained yet | Verify the FC06 request, the echo, and the subsequent independent FC03 separately | Wait for an independent poll, then refresh history; avoid continuous resending. |