


DL/T 645-1997 Meter Access over TCP
This page is an online operation reference compiled from an existing operation manual. Operations marked as expected or not executed in the source material must still be verified against the actual environment.
Complete ten-DI collection for a 1997-edition meter over TCP, two controlled writes, independent read-back, manual reconnection, and history queries.
Before you start: you have product, device, model, publish, control, and history query permissions; the local application, FMQ, and FMQX Web are available; and you have obtained the official meter number, the DI point table, and controlled authorization.
Access Goal and Connection Direction
Select TCP as the platform transport label and 1997 as the DL/T645 version. The FMQX meter channel actively connects to the FMQ listening address; the meter number and DIs follow the manufacturer's documentation.
Each of the ten DIs maps to an independent property; history is enabled for all of them, and only the first allows controlled writing. After a write, wait for the next normal read, then verify the current value and history.
1. Configure the Product, Device, and Ten-DI Mapping
1. Create the Meter Product
**Where:**Product Management, Device Management, or the corresponding operation area in FMQX Web Steps: In the device access wizard, select Create Product and enter a recognizable product name.

Select Create Product in the access wizard and enter the product name.
Screenshot Highlights
| Field / Control | Description |
|---|---|
| Create Product | Create a dedicated product for this tutorial; select the gateway device type later. Required · Value: Gateway Meter |
2. Enter the Device Identifier and Name
**Where:**Product Management, Device Management, or the corresponding operation area in FMQX Web Steps: Enter the unique device identifier that matches device registration, and enter the device name.

Enter the device identifier and name; use the same device identifier at registration.
Screenshot Highlights
| Field / Control | Description |
|---|---|
| Device Identifier | The platform device number, the real gateway clientId, and the FMQX connection identity must all match. Required · Value: the unique device number of this tutorial's gateway meter |
3. Select the 1997 TCP Meter Protocol
**Where:**Product Management, Device Management, or the corresponding operation area in FMQX Web Steps: Set the access protocol to TCP, set the data format to DL/T645 1997, and save.
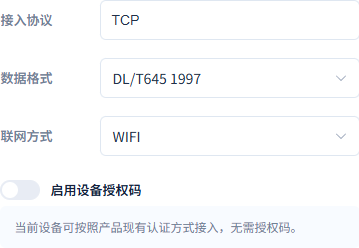
Access protocol is TCP and data format is DL/T645 1997.
Screenshot Highlights
| Field / Control | Description |
|---|---|
| Access Protocol and Data Format | TCP is the network channel; DL/T645 1997 is the meter frame version. Required · Value: TCP / DL/T645 1997 |
4. Configure the First Property and History Storage
**Where:**Product Management, Device Management, or the corresponding operation area in FMQX Web Steps: Create a property for each DI; enable History Storage for the first property FastBee_di_9010 and allow control. Save the remaining properties against their own DIs and enable history storage.
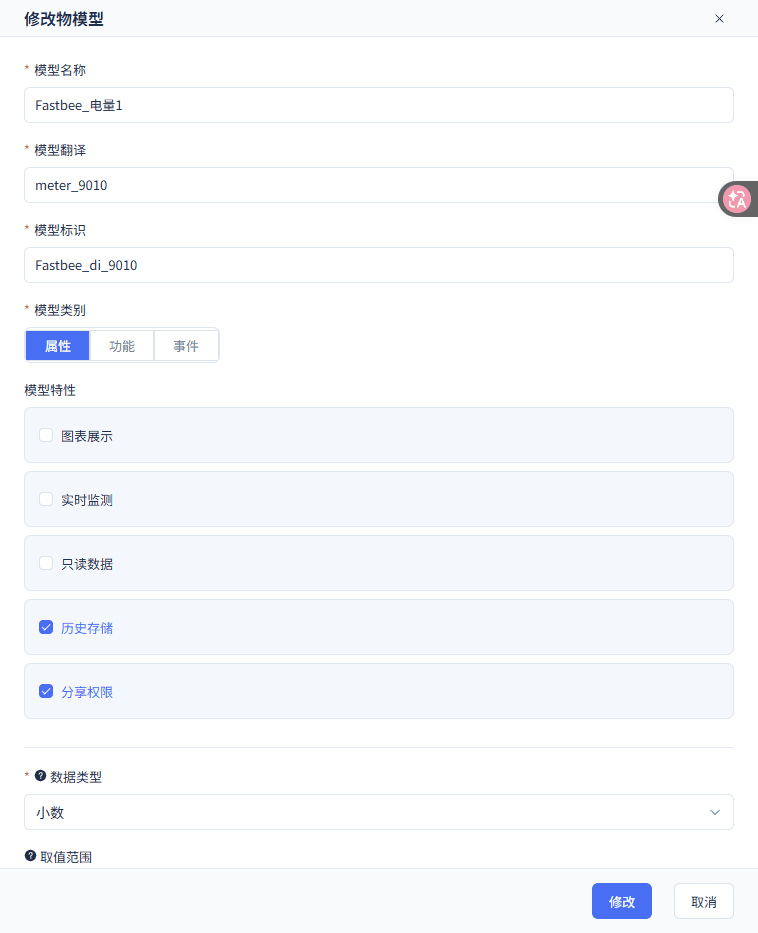
The first property FastBee_di_9010 has history storage enabled and is not set to read-only.
Screenshot Highlights
| Field / Control | Description |
|---|---|
| Feature Definition | Each DI corresponds to one decimal property; all have history enabled; only 9010 is writable. Required · Value: ten decimal properties; 9010 writable |
5. Bind the Device and Meter Number
**Where:**Product Management, Device Management, or the corresponding operation area in FMQX Web Steps: Select the platform device and the corresponding gateway device, enter the 12-digit meter number, and enable it.
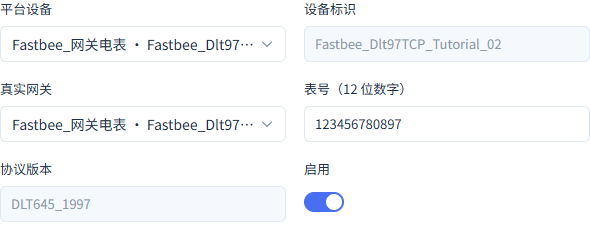
Bind the device and verify the 12-digit meter number and the 1997 protocol.
Screenshot Highlights
| Field / Control | Description |
|---|---|
| Platform Device and Real Gateway | First select a gateway device that actually exists; enter the same device identifier to carry this demonstration meter. Required · Value: select this tutorial's gateway meter |
| Meter Number | Obtained from the meter nameplate or manufacturer documentation; 12 digits, identical at both ends. Required · Value: 123456780897 |
6. Configure Polling Parameters for the First Item
**Where:**Product Management, Device Management, or the corresponding operation area in FMQX Web Steps: Create a polling item for DI9010 with interval, timeout, retries, and priority; create and enable the remaining DIs one by one according to the point table.
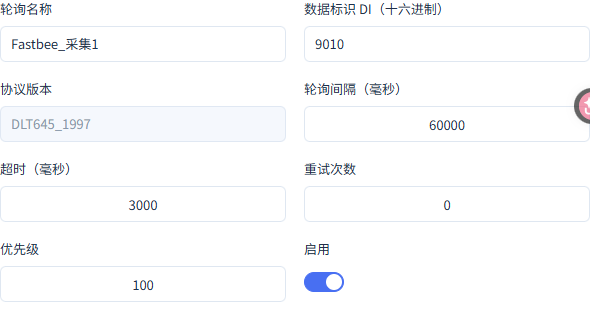
DI9010 polling: 60000 ms interval, 3000 ms timeout, 0 retries.
Screenshot Highlights
| Field / Control | Description |
|---|---|
| Data Identifier DI | The manufacturer's data item address; the 1997 edition uses 4 hexadecimal digits; it is not a Modbus register address. Required · Value: 9010 to 9019 |
| Polling Interval and Timeout | This tutorial reads once per minute, with a 3000 ms timeout and 0 retries; after a write, the wait for the next round can approach one minute. Required · Value: 60000 ms / 3000 ms / 0 retries |
7. Map the First Polling Item to Its Property
**Where:**Product Management, Device Management, or the corresponding operation area in FMQX Web Steps: Select the polling item for DI9010 and the FastBee_di_9010 property; configure BCD, value index 0, multiplier 1, and offset 0; enable Allow Write only for this item. Map the remaining DIs to their own properties.
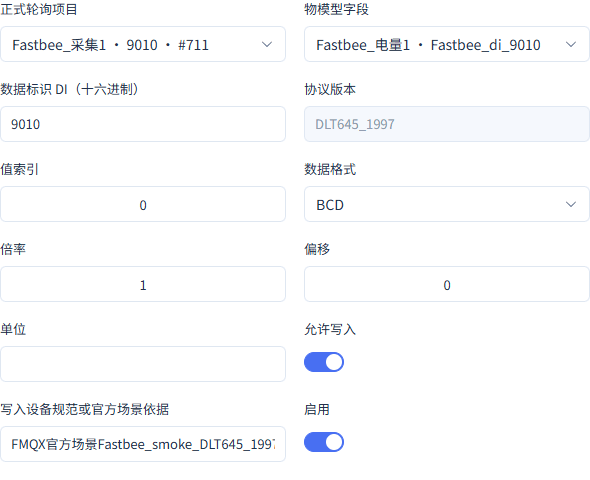
DI9010 mapped to the property of the same name, with BCD, multiplier 1, offset 0, and write allowed.
Screenshot Highlights
| Field / Control | Description |
|---|---|
| Formal Polling Item and Thing Model Field | After saving the polling item, select its real entry; each DI maps to its own field; do not enter a primary key that does not exist. Required · Value: Collection 1 / Energy 1 / DI9010 |
| Data Format, Multiplier, and Offset | BCD encodes decimal digits. The data type, multiplier, and unit follow the device specification. Required · Value: BCD / multiplier 1 / offset 0 / unit left blank |
| Allow Write and Specification Basis | Only 9010 has it enabled, with the formal scenario basis stating that this demonstration device supports writing; do not apply it to a read-only energy value on a physical meter. Required · Value: only 9010 allows writing |
8. Save the Read Command Policy
**Where:**Product Management, Device Management, or the corresponding operation area in FMQX Web Steps: Select READ_DATA, DI9010, and LOW; enable manual commands and unified downlink, then save the draft.
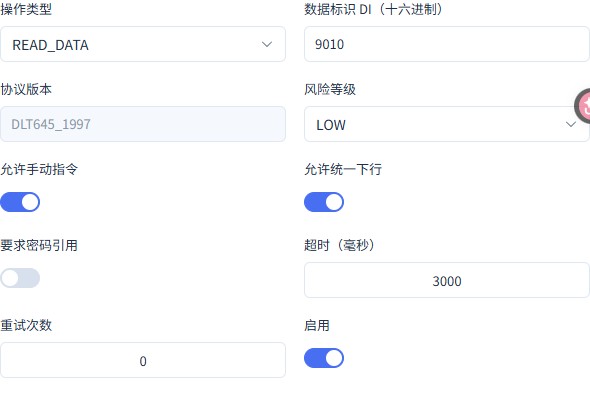
The read policy uses READ_DATA with DI9010, allowing manual commands and unified downlink.
Screenshot Highlights
| Field / Control | Description |
|---|---|
| Read Policy | Allows manual and unified downlink; low risk; does not require a password reference. Required · Value: READ_DATA / LOW / DI9010 |
9. Save the Restricted Write Policy
**Where:**Product Management, Device Management, or the corresponding operation area in FMQX Web Steps: Select WRITE_DATA, DI9010, and HIGH; enable Require Password Reference and save the draft.
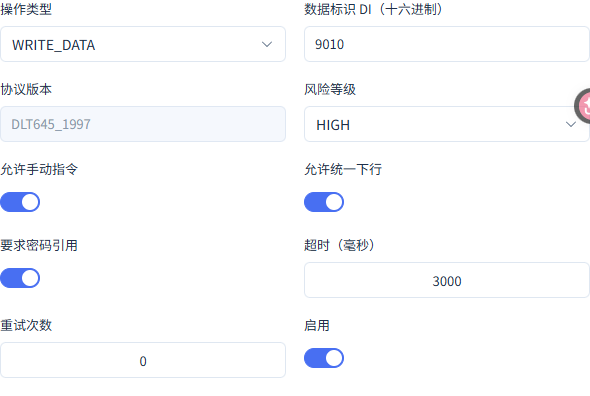
The write policy uses WRITE_DATA with DI9010 and requires a password reference.
Screenshot Highlights
| Field / Control | Description |
|---|---|
| Write Policy | High risk; requires a controlled password reference; confirm the device specification and write permission first. Required · Value: WRITE_DATA / HIGH / password reference required |
2. Verify the Meter Connection Parameters
10. Verify the Meter Version, TCP Target, and Meter Number
**Where:**Product Management, Device Management, or the corresponding operation area in FMQX Web Steps: Open the meter connection configuration and verify the protocol version, the TCP connection target, and the 12-digit meter number.
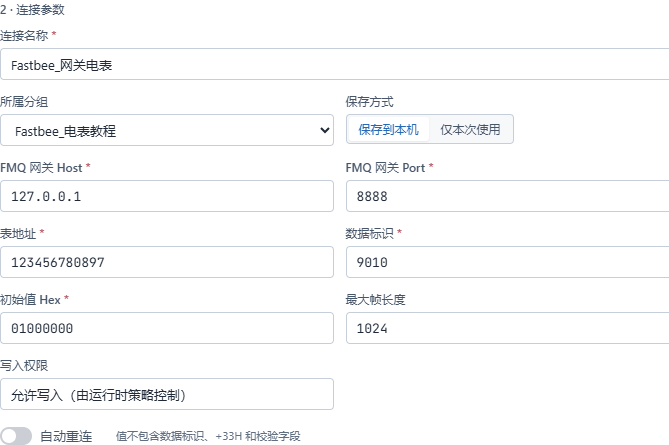
The connection target is 127.0.0.1:8888, and the meter address and DI9010 are filled in.
Screenshot Highlights
| Field / Control | Description |
|---|---|
| Current DI, Actual Value, and Controlled Write Parameters | Current DI, actual value, and controlled write parameters. Required · Value: fill in per the implementation plan · Example: 9010 / 65, 66 |
| Protocol Version | Used to complete "Verify the Meter Version, TCP Target, and Meter Number". Required · Value: 1997 |
| Platform Transport Label | Used to complete "Verify the Meter Version, TCP Target, and Meter Number". Required · Value: TCP |
3. Publish, Connect, and Configure Authorization
11. Publish the Product Configuration
**Where:**Product Management, Device Management, or the corresponding operation area in FMQX Web Steps: After verifying the product, click OK in the publish confirmation box.
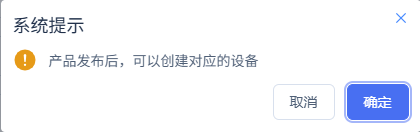
After submitting, continue to verify the apply result on the target node.
Screenshot Highlights
| Field / Control | Description |
|---|---|
| Current DI, Actual Value, and Controlled Write Parameters | Current DI, actual value, and controlled write parameters. Required · Value: fill in per the implementation plan · Example: 9010 / 65, 66 |
12. Confirm the Configuration Has Been Applied
**Where:**Product Management, Device Management, or the corresponding operation area in FMQX Web Steps: Open Sync Details, verify the target node shows APPLIED, and only then connect.
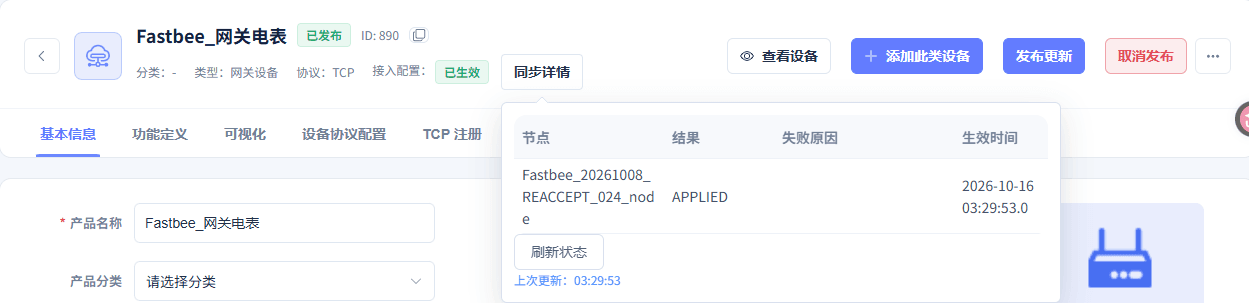
The current published configuration has been applied on the target node.
Screenshot Highlights
| Field / Control | Description |
|---|---|
| Current DI, Actual Value, and Controlled Write Parameters | Current DI, actual value, and controlled write parameters. Required · Value: fill in per the implementation plan · Example: 9010 / 65, 66 |
13. Connect and Send the Default Identity Registration
**Where:**Product Management, Device Management, or the corresponding operation area in FMQX Web Steps: In the original session, run connect and the default identity registration, then wait for normal reads.
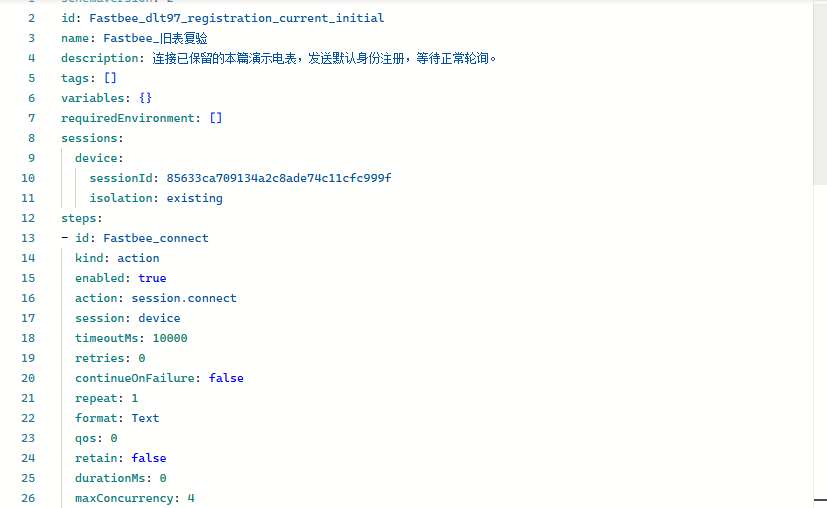
The FMQX Web scenario binds the original session and configures the connect step.
Screenshot Highlights
| Field / Control | Description |
|---|---|
| Current DI, Actual Value, and Controlled Write Parameters | Current DI, actual value, and controlled write parameters. Required · Value: fill in per the implementation plan · Example: 9010 / 65, 66 |
14. Configure Write Authorization for the Current Session
**Where:**Product Management, Device Management, or the corresponding operation area in FMQX Web Steps: Enter the controlled authorization per the manufacturer's documentation and save; verify the input fields have been cleared.

Write authorization for the current session shows as configured, and both password fields are cleared.
Screenshot Highlights
| Field / Control | Description |
|---|---|
| Current DI, Actual Value, and Controlled Write Parameters | Current DI, actual value, and controlled write parameters. Required · Value: fill in per the implementation plan · Example: 9010 / 65, 66 |
4. Read Ten Different Data Items
Normal polling may record the same DI repeatedly; verify the ten samples by distinct DI.
15. Read the First Data Item
**Where:**Product Management, Device Management, or the corresponding operation area in FMQX Web Steps: Select DI9010, verify the device's actual value, and wait for the normal polling read.
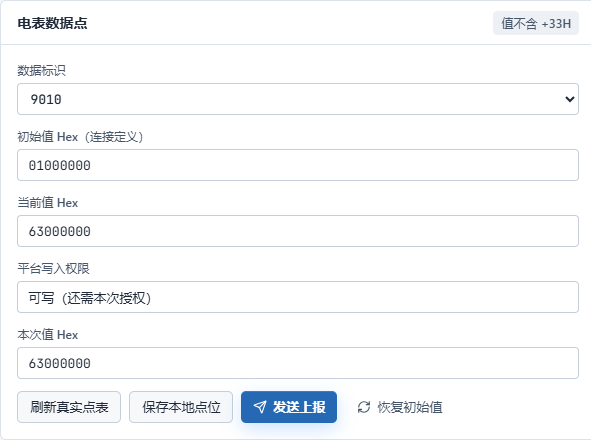
The current value Hex of DI9010 is 63000000, corresponding to BCD value 63.
Screenshot Highlights
| Field / Control | Description |
|---|---|
| Current DI, Actual Value, and Controlled Write Parameters | Current DI, actual value, and controlled write parameters. Required · Value: fill in per the implementation plan · Example: 9010 / 65, 66 |
| DI / Value | Used to complete "Read the First Data Item". Required · Value: 9010 / 63 |
16. Complete Reading the Ten Different Data Items
**Where:**Product Management, Device Management, or the corresponding operation area in FMQX Web Steps: Verify the remaining nine DIs and normal polling in turn, and finally check DI9019.
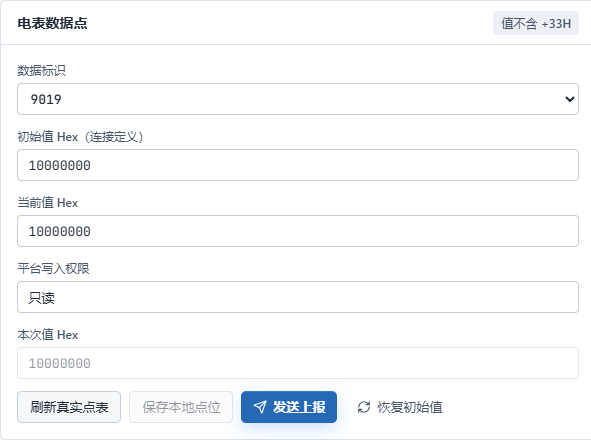
The current value Hex of the last item DI9019 is 10000000, corresponding to BCD value 10.
Screenshot Highlights
| Field / Control | Description |
|---|---|
| Current DI, Actual Value, and Controlled Write Parameters | Current DI, actual value, and controlled write parameters. Required · Value: fill in per the implementation plan · Example: 9010 / 65, 66 |
| DI Range | Used to complete "Complete Reading the Ten Different Data Items". Required · Value: 9010 to 9019 |
5. First Write and Independent Read
17. Submit the First Controlled Write from the Platform
Where: Device Details → Running Status → Meter Write Steps: In the 9010 control entry, enter the data Hex, the controlled authorization, and the reason, then confirm once.
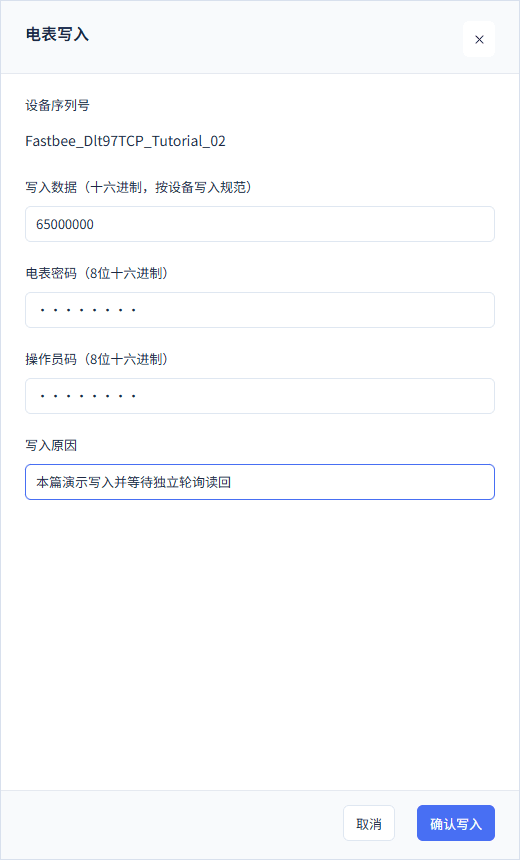
The target this time is 65, and the data Hex is 65000000.
Screenshot Highlights
| Field / Control | Description |
|---|---|
| Current DI, Actual Value, and Controlled Write Parameters | Current DI, actual value, and controlled write parameters. Required · Value: fill in per the implementation plan · Example: 9010 / 65, 66 |
| DI | Used to complete "Submit the First Controlled Write from the Platform". Required · Value: 9010 |
| Write Data Hex | Used to complete "Submit the First Controlled Write from the Platform". Required · Value: 65000000 |
18. View the Real Protocol Response
**Where:**Product Management, Device Management, or the corresponding operation area in FMQX Web Steps: View the feedback for this command and verify that a real protocol response was received.

The platform reports that a real protocol response has been received; continue to verify the device read-back and the latest report.
Screenshot Highlights
| Field / Control | Description |
|---|---|
| Current DI, Actual Value, and Controlled Write Parameters | Current DI, actual value, and controlled write parameters. Required · Value: fill in per the implementation plan · Example: 9010 / 65, 66 |
19. Verify the Native Write Response
**Where:**Product Management, Device Management, or the corresponding operation area in FMQX Web Steps: In the FMQX Web communication log, select this write response and verify the time, direction, and complete raw frame.
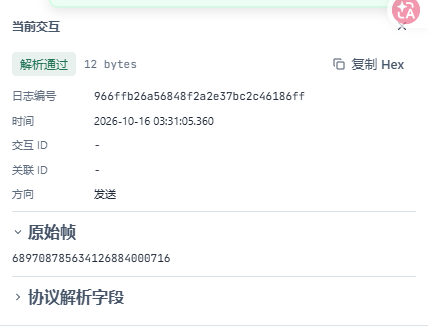
The device sent a native write-success response with control code 84.
Screenshot Highlights
| Field / Control | Description |
|---|---|
| Current DI, Actual Value, and Controlled Write Parameters | Current DI, actual value, and controlled write parameters. Required · Value: fill in per the implementation plan · Example: 9010 / 65, 66 |
20. Read the Device's Actual Point Value
**Where:**Product Management, Device Management, or the corresponding operation area in FMQX Web Steps: Refresh the device point values and verify the DI and its actual current value.
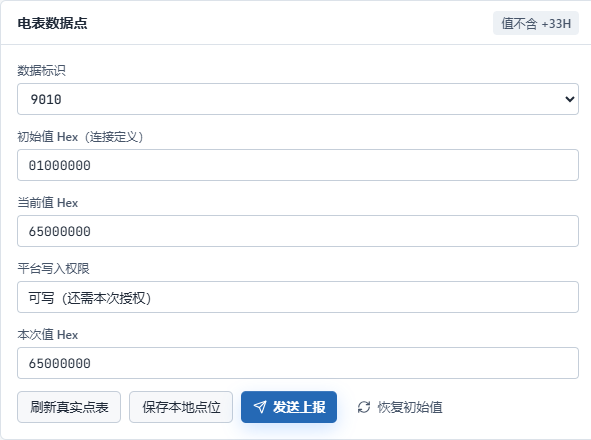
After refreshing the device point table, the current value Hex of DI9010 is 65000000.
Screenshot Highlights
| Field / Control | Description |
|---|---|
| Current DI, Actual Value, and Controlled Write Parameters | Current DI, actual value, and controlled write parameters. Required · Value: fill in per the implementation plan · Example: 9010 / 65, 66 |
21. Verify the Independent Read Request After the Write
**Where:**Product Management, Device Management, or the corresponding operation area in FMQX Web Steps: Wait for the new READ_DATA request after the write executes, and verify the DI and the actual time.
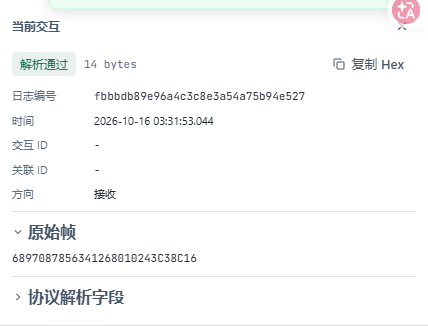
A new independent read request appears after the write executes.
Screenshot Highlights
| Field / Control | Description |
|---|---|
| Current DI, Actual Value, and Controlled Write Parameters | Current DI, actual value, and controlled write parameters. Required · Value: fill in per the implementation plan · Example: 9010 / 65, 66 |
22. Verify the Independent Read Response
**Where:**Product Management, Device Management, or the corresponding operation area in FMQX Web Steps: View the response to that read request and verify the version, meter number, DI, and value.
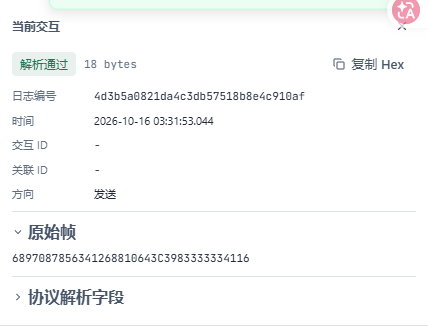
The independent read response returns the actual value 65.
Screenshot Highlights
| Field / Control | Description |
|---|---|
| Current DI, Actual Value, and Controlled Write Parameters | Current DI, actual value, and controlled write parameters. Required · Value: fill in per the implementation plan · Example: 9010 / 65, 66 |
23. Verify the Platform Current Value
**Where:**Product Management, Device Management, or the corresponding operation area in FMQX Web Steps: Wait for subsequent reads to update the platform, then read the current value of this DI.

The platform's Energy 1 current value is 65.
Screenshot Highlights
| Field / Control | Description |
|---|---|
| Current DI, Actual Value, and Controlled Write Parameters | Current DI, actual value, and controlled write parameters. Required · Value: fill in per the implementation plan · Example: 9010 / 65, 66 |
6. Manual Recovery After a Normal Disconnect
A normal disconnect and a manual registration reuse the published configuration; submit the new write after connect and registration complete.
24. Disconnect the Original Session Normally
**Where:**Product Management, Device Management, or the corresponding operation area in FMQX Web Steps: Click Disconnect and read the status of the same session.

The original session is disconnected; click the connect button to restore it manually.
Screenshot Highlights
| Field / Control | Description |
|---|---|
| Current DI, Actual Value, and Controlled Write Parameters | Current DI, actual value, and controlled write parameters. Required · Value: fill in per the implementation plan · Example: 9010 / 65, 66 |
25. Connect Manually and Re-register
**Where:**Product Management, Device Management, or the corresponding operation area in FMQX Web Steps: Connect the original session and send the default identity registration, reusing the published configuration.
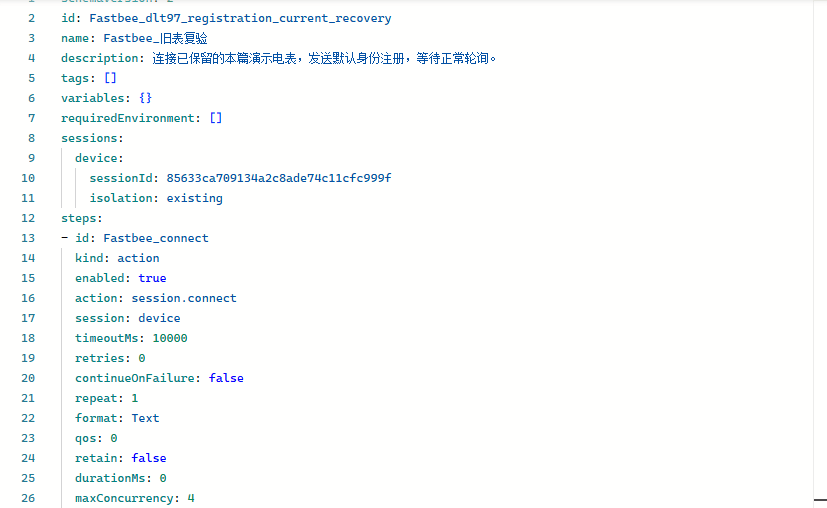
The recovery scenario binds the same meter session and configures the connect step.
Screenshot Highlights
| Field / Control | Description |
|---|---|
| Current DI, Actual Value, and Controlled Write Parameters | Current DI, actual value, and controlled write parameters. Required · Value: fill in per the implementation plan · Example: 9010 / 65, 66 |
7. First New Write and Independent Read After Recovery
26. First Controlled Write After Recovery
Where: Device Details → Running Status → Meter Write Steps: In the 9010 control entry, enter the data Hex, the controlled authorization, and the reason, then confirm once.
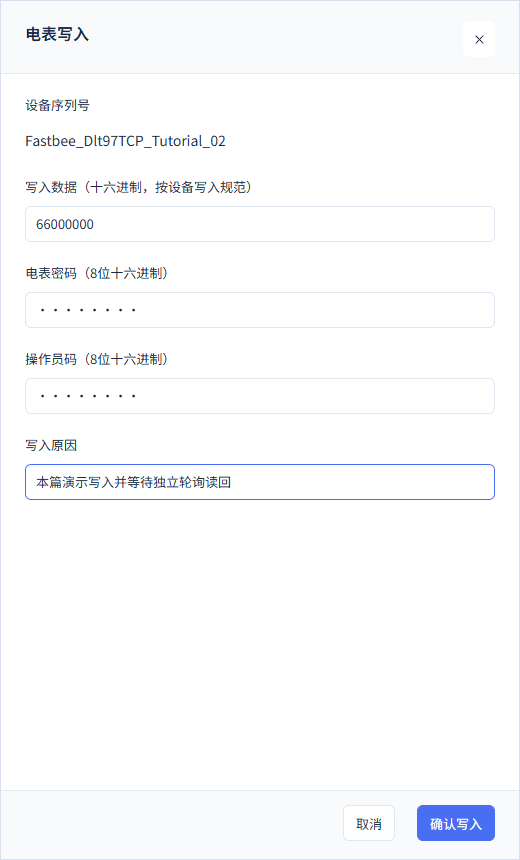
The target this time is 66, and the data Hex is 66000000.
Screenshot Highlights
| Field / Control | Description |
|---|---|
| Current DI, Actual Value, and Controlled Write Parameters | Current DI, actual value, and controlled write parameters. Required · Value: fill in per the implementation plan · Example: 9010 / 65, 66 |
| DI | Used to complete "First Controlled Write After Recovery". Required · Value: 9010 |
| Write Data Hex | Used to complete "First Controlled Write After Recovery". Required · Value: 66000000 |
27. Verify the Native Write Response
**Where:**Product Management, Device Management, or the corresponding operation area in FMQX Web Steps: In the FMQX Web communication log, select this write response and verify the time, direction, and complete raw frame.
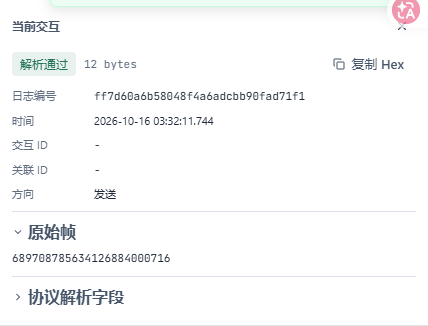
The device sent a native write-success response with control code 84.
Screenshot Highlights
| Field / Control | Description |
|---|---|
| Current DI, Actual Value, and Controlled Write Parameters | Current DI, actual value, and controlled write parameters. Required · Value: fill in per the implementation plan · Example: 9010 / 65, 66 |
28. Read the Device's Actual Point Value
**Where:**Product Management, Device Management, or the corresponding operation area in FMQX Web Steps: Refresh the device point values and verify the DI and its actual current value.
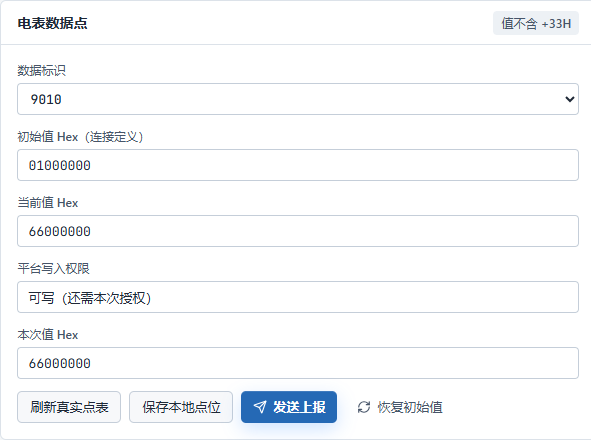
After recovery, refreshing the device point table shows DI9010 current value Hex 66000000.
Screenshot Highlights
| Field / Control | Description |
|---|---|
| Current DI, Actual Value, and Controlled Write Parameters | Current DI, actual value, and controlled write parameters. Required · Value: fill in per the implementation plan · Example: 9010 / 65, 66 |
29. Verify the Independent Read Request After the Write
**Where:**Product Management, Device Management, or the corresponding operation area in FMQX Web Steps: Wait for the new READ_DATA request after the write executes, and verify the DI and the actual time.
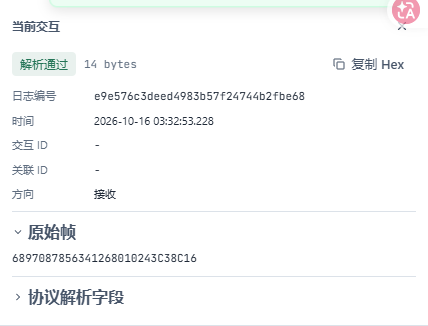
A new independent read request appears after the write executes.
Screenshot Highlights
| Field / Control | Description |
|---|---|
| Current DI, Actual Value, and Controlled Write Parameters | Current DI, actual value, and controlled write parameters. Required · Value: fill in per the implementation plan · Example: 9010 / 65, 66 |
30. Verify the Independent Read Response
**Where:**Product Management, Device Management, or the corresponding operation area in FMQX Web Steps: View the response to that read request and verify the version, meter number, DI, and value.
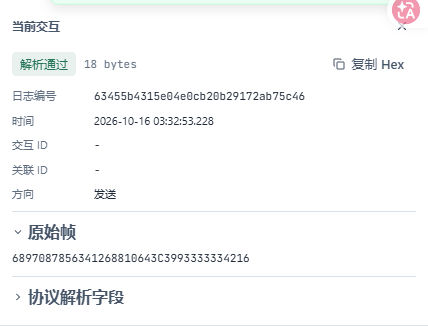
The independent read response returns the actual value 66.
Screenshot Highlights
| Field / Control | Description |
|---|---|
| Current DI, Actual Value, and Controlled Write Parameters | Current DI, actual value, and controlled write parameters. Required · Value: fill in per the implementation plan · Example: 9010 / 65, 66 |
31. Verify the Platform Current Value
**Where:**Product Management, Device Management, or the corresponding operation area in FMQX Web Steps: Wait for subsequent reads to update the platform, then read the current value of this DI.

The platform's Energy 1 current value is 66.
Screenshot Highlights
| Field / Control | Description |
|---|---|
| Current DI, Actual Value, and Controlled Write Parameters | Current DI, actual value, and controlled write parameters. Required · Value: fill in per the implementation plan · Example: 9010 / 65, 66 |
8. Query the Three History Windows Separately
32. Enter the Complete Time Range for the Ten-DI Sample
Where: Data Center → Historical Data Steps: Enter the complete start and end date-times.
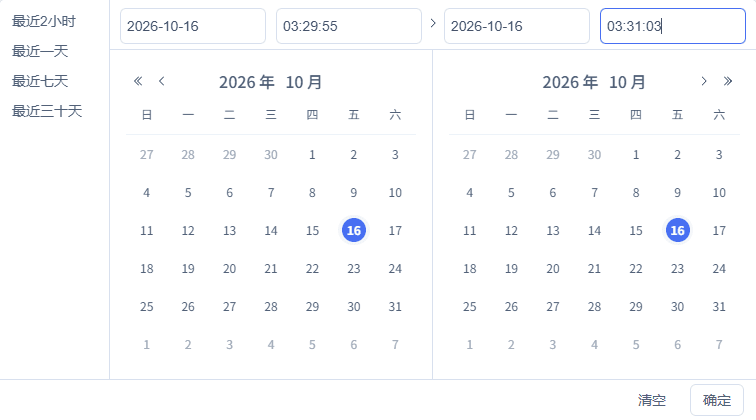
Query the corresponding records by complete date-time.
Screenshot Highlights
| Field / Control | Description |
|---|---|
| This Device, DI Fields, and Complete Date-Time | This device, DI fields, and complete date-time. Required · Value: fill in per the implementation plan · Example: use the actual time window of the corresponding operation |
| Start Time | Used to complete "Enter the Complete Time Range for the Ten-DI Sample". Required · Value: 2026-10-16 03:29:55 |
| End Time | Used to complete "Enter the Complete Time Range for the Ten-DI Sample". Required · Value: 2026-10-16 03:31:03 |
33. Filter the Ten-DI Sample Fields
Where: Data Center → Historical Data Steps: Select this device and the corresponding DI fields, verify the time, and click Query.

After selecting this device and its 10 properties, click Query.
Screenshot Highlights
| Field / Control | Description |
|---|---|
| This Device, DI Fields, and Complete Date-Time | This device, DI fields, and complete date-time. Required · Value: fill in per the implementation plan · Example: use the actual time window of the corresponding operation |
| Fields | Used to complete "Filter the Ten-DI Sample Fields". Required · Value: 9010, 9011, 9012, 9013, 9014, 9015, 9016, 9017, 9018, 9019 |
34. Refresh the Ten-DI Sample History
Where: Data Center → Historical Data Steps: Keep the same device, fields, and time, and click the refresh button at the top right of the result area.

The result area can be refreshed at the top right; there are currently 5 records.
Screenshot Highlights
| Field / Control | Description |
|---|---|
| This Device, DI Fields, and Complete Date-Time | This device, DI fields, and complete date-time. Required · Value: fill in per the implementation plan · Example: use the actual time window of the corresponding operation |
35. Verify the Ten-DI Sample Results
Where: Data Center → Historical Data Steps: Read the actual history by time and DI, distinguishing periodic repeated values from different data items.
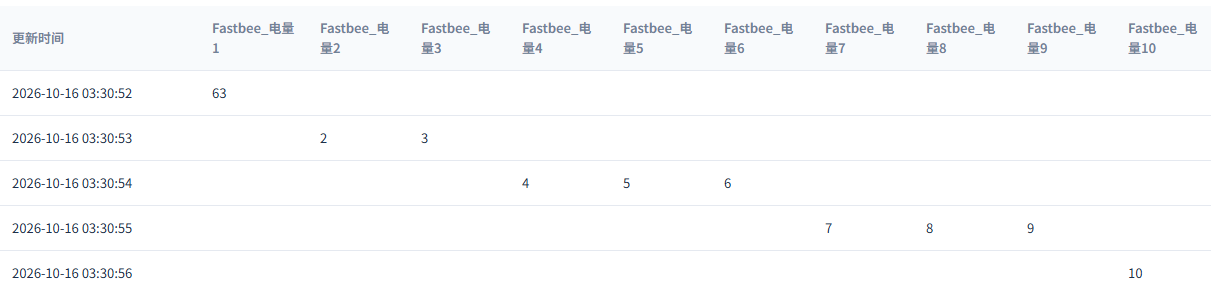
5 history rows cover the 10 energy items; the first is 63 and the rest run from 2 to 10.
Screenshot Highlights
| Field / Control | Description |
|---|---|
| This Device, DI Fields, and Complete Date-Time | This device, DI fields, and complete date-time. Required · Value: fill in per the implementation plan · Example: use the actual time window of the corresponding operation |
36. Enter the Complete Time Range for the First Write Read-Back
Where: Data Center → Historical Data Steps: Enter the complete start and end date-times.
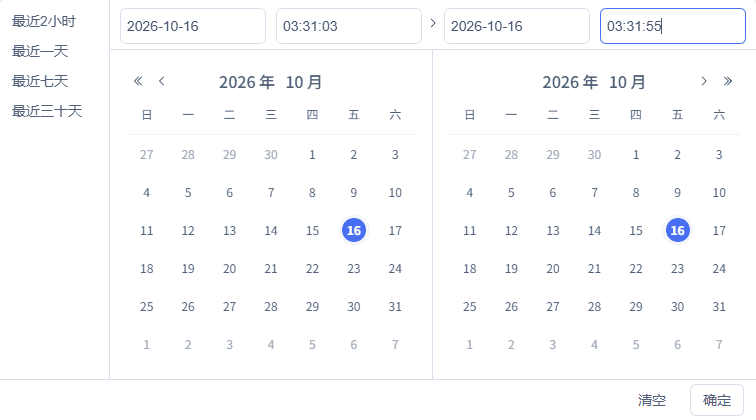
Query the corresponding records by complete date-time.
Screenshot Highlights
| Field / Control | Description |
|---|---|
| This Device, DI Fields, and Complete Date-Time | This device, DI fields, and complete date-time. Required · Value: fill in per the implementation plan · Example: use the actual time window of the corresponding operation |
| Start Time | Used to complete "Enter the Complete Time Range for the First Write Read-Back". Required · Value: 2026-10-16 03:31:03 |
| End Time | Used to complete "Enter the Complete Time Range for the First Write Read-Back". Required · Value: 2026-10-16 03:31:55 |
37. Filter the First Write Read-Back Fields
Where: Data Center → Historical Data Steps: Select this device and the corresponding DI fields, verify the time, and click Query.

The first write history filters only Energy 1, then clicks Query.
Screenshot Highlights
| Field / Control | Description |
|---|---|
| This Device, DI Fields, and Complete Date-Time | This device, DI fields, and complete date-time. Required · Value: fill in per the implementation plan · Example: use the actual time window of the corresponding operation |
| Fields | Used to complete "Filter the First Write Read-Back Fields". Required · Value: 9010 |
38. Refresh the First Write Read-Back History
Where: Data Center → Historical Data Steps: Keep the same device, fields, and time, and click the refresh button at the top right of the result area.

Refreshing the first write history shows 1 record in the result area.
Screenshot Highlights
| Field / Control | Description |
|---|---|
| This Device, DI Fields, and Complete Date-Time | This device, DI fields, and complete date-time. Required · Value: fill in per the implementation plan · Example: use the actual time window of the corresponding operation |
39. Verify the First Write Read-Back Result
Where: Data Center → Historical Data Steps: Read the actual history by time and DI, distinguishing periodic repeated values from different data items.

2026-10-16 03:31:53, the historical value of Energy 1 is 65.
Screenshot Highlights
| Field / Control | Description |
|---|---|
| This Device, DI Fields, and Complete Date-Time | This device, DI fields, and complete date-time. Required · Value: fill in per the implementation plan · Example: use the actual time window of the corresponding operation |
40. Enter the Complete Time Range for the Post-Recovery Write Read-Back
Where: Data Center → Historical Data Steps: Enter the complete start and end date-times.
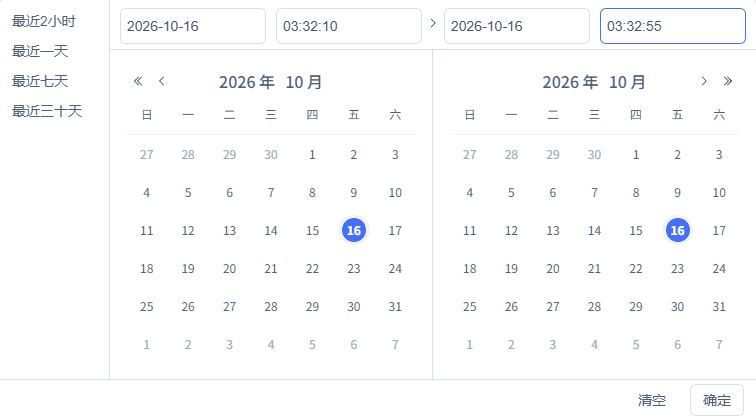
Query the corresponding records by complete date-time.
Screenshot Highlights
| Field / Control | Description |
|---|---|
| This Device, DI Fields, and Complete Date-Time | This device, DI fields, and complete date-time. Required · Value: fill in per the implementation plan · Example: use the actual time window of the corresponding operation |
| Start Time | Used to complete "Enter the Complete Time Range for the Post-Recovery Write Read-Back". Required · Value: 2026-10-16 03:32:10 |
| End Time | Used to complete "Enter the Complete Time Range for the Post-Recovery Write Read-Back". Required · Value: 2026-10-16 03:32:55 |
41. Filter the Post-Recovery Write Read-Back Fields
Where: Data Center → Historical Data Steps: Select this device and the corresponding DI fields, verify the time, and click Query.

The post-recovery write history filters Energy 1, then clicks Query.
Screenshot Highlights
| Field / Control | Description |
|---|---|
| This Device, DI Fields, and Complete Date-Time | This device, DI fields, and complete date-time. Required · Value: fill in per the implementation plan · Example: use the actual time window of the corresponding operation |
| Fields | Used to complete "Filter the Post-Recovery Write Read-Back Fields". Required · Value: 9010 |
42. Refresh the Post-Recovery Write Read-Back History
Where: Data Center → Historical Data Steps: Keep the same device, fields, and time, and click the refresh button at the top right of the result area.

Refreshing the post-recovery write history shows 1 record in the result area.
Screenshot Highlights
| Field / Control | Description |
|---|---|
| This Device, DI Fields, and Complete Date-Time | This device, DI fields, and complete date-time. Required · Value: fill in per the implementation plan · Example: use the actual time window of the corresponding operation |
43. Verify the Post-Recovery Write Read-Back Result
Where: Data Center → Historical Data Steps: Read the actual history by time and DI, distinguishing periodic repeated values from different data items.

2026-10-16 03:32:53, the historical value of Energy 1 is 66.
Screenshot Highlights
| Field / Control | Description |
|---|---|
| This Device, DI Fields, and Complete Date-Time | This device, DI fields, and complete date-time. Required · Value: fill in per the implementation plan · Example: use the actual time window of the corresponding operation |
9. Stop While Keeping Configuration and History
44. Clear the Session Write Authorization
**Where:**Product Management, Device Management, or the corresponding operation area in FMQX Web Steps: Clear the current session authorization and verify the authorization shows as not configured.

Write authorization for the current session shows as not configured, and the password fields are empty.
Screenshot Highlights
| Field / Control | Description |
|---|---|
| Current DI, Actual Value, and Controlled Write Parameters | Current DI, actual value, and controlled write parameters. Required · Value: fill in per the implementation plan · Example: 9010 / 65, 66 |
45. Stop Sending and Receiving While Keeping the Configuration
**Where:**Product Management, Device Management, or the corresponding operation area in FMQX Web Steps: Disconnect the original session and turn off auto-reconnect and any automatic items that actually exist.

The meter session status is Disconnected.
Screenshot Highlights
| Field / Control | Description |
|---|---|
| Current DI, Actual Value, and Controlled Write Parameters | Current DI, actual value, and controlled write parameters. Required · Value: fill in per the implementation plan · Example: 9010 / 65, 66 |
46. Unpublish and Confirm the Apply Result
**Where:**Product Management, Device Management, or the corresponding operation area in FMQX Web Steps: Unpublish the original product and verify APPLIED in Sync Details.
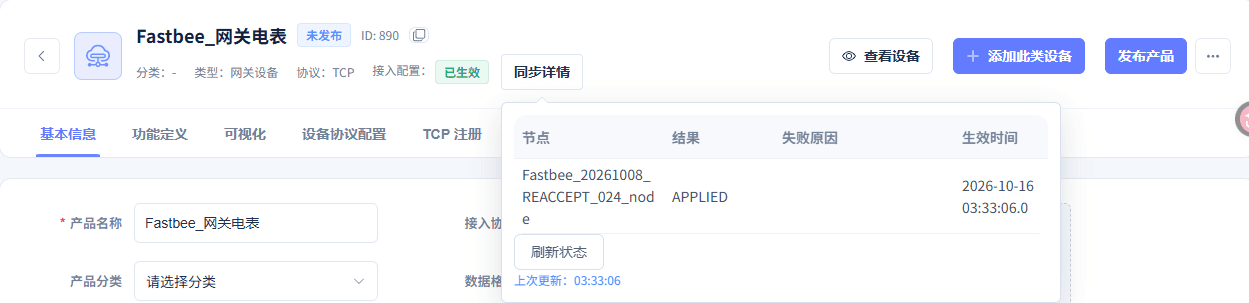
After unpublishing, the target node result is APPLIED.
Screenshot Highlights
| Field / Control | Description |
|---|---|
| Current DI, Actual Value, and Controlled Write Parameters | Current DI, actual value, and controlled write parameters. Required · Value: fill in per the implementation plan · Example: 9010 / 65, 66 |
47. View the Retained Writable Point's Current Value After Stopping
**Where:**Product Management, Device Management, or the corresponding operation area in FMQX Web Steps: Read the platform's current value for the first item and check it against the last independent read-back.

After stopping, Energy 1 still shows the latest read-back value 66.
Screenshot Highlights
| Field / Control | Description |
|---|---|
| Current DI, Actual Value, and Controlled Write Parameters | Current DI, actual value, and controlled write parameters. Required · Value: fill in per the implementation plan · Example: 9010 / 65, 66 |
Parameter Sources and Filling Reference
Device Access Wizard
| Field / Control | Filling Notes |
|---|---|
| Create Product | Create a dedicated product for this tutorial; select the gateway device type later. Required · Value: Gateway Meter |
| Device Identifier | The platform device number, the real gateway clientId, and the FMQX connection identity must all match. Required · Value: the unique device number of this tutorial's gateway meter |
Protocol and Publish Activation
| Field / Control | Filling Notes |
|---|---|
| Access Protocol and Data Format | TCP is the network channel; DL/T645 1997 is the meter frame version. Required · Value: TCP / DL/T645 1997Republish after changes. TCP / DL/T645 1997: TCP is the network channel; DL/T645 1997 is the meter frame version; TCP is the network channel; DL/T645 1997 is the meter frame version. |
| Platform Device and Real Gateway | First select a gateway device that actually exists; enter the same device identifier to carry this demonstration meter. Required · Value: select this tutorial's gateway meterRepublish after changes. Select this tutorial's gateway meter: first select a gateway device that actually exists; enter the same device identifier to carry this demonstration meter; first select a gateway device that actually exists; enter the same device identifier to carry this demonstration meter. |
| Meter Number | Obtained from the meter nameplate or manufacturer documentation; 12 digits, identical at both ends. Required · Value: 123456780897Republish after changes. |
| Data Identifier DI | The manufacturer's data item address; the 1997 edition uses 4 hexadecimal digits; it is not a Modbus register address. Required · Value: 9010 to 9019Republish after changes. |
| Polling Interval and Timeout | This tutorial reads once per minute, with a 3000 ms timeout and 0 retries; after a write, the wait for the next round can approach one minute. Required · Value: 60000 ms / 3000 ms / 0 retriesRepublish after changes. |
| Formal Polling Item and Thing Model Field | After saving the polling item, select its real entry; each DI maps to its own field; do not enter a primary key that does not exist. Required · Value: Collection 1 / Energy 1 / DI9010Republish after changes. |
| Data Format, Multiplier, and Offset | BCD encodes decimal digits. The data type, multiplier, and unit follow the device specification. Required · Value: BCD / multiplier 1 / offset 0 / unit left blankRepublish after changes. |
| Allow Write and Specification Basis | Only 9010 has it enabled, with the formal scenario basis stating that this demonstration device supports writing; do not apply it to a read-only energy value on a physical meter. Required · Value: only 9010 allows writingRepublish after changes. |
| Read Policy | Allows manual and unified downlink; low risk; does not require a password reference. Required · Value: READ_DATA / LOW / DI9010Republish after changes. |
| Write Policy | High risk; requires a controlled password reference; confirm the device specification and write permission first. Required · Value: WRITE_DATA / HIGH / password reference requiredRepublish after changes. |
| Publish and Apply | Publish after saving the draft, and verify the target node has applied it before connecting; a successful page save alone does not prove access is live. Republish after changes. |
Feature Definition
| Field / Control | Filling Notes |
|---|---|
| Feature Definition | Each DI corresponds to one decimal property; all have history enabled; only 9010 is writable. Required · Value: ten decimal properties; 9010 writableRepublish after changes. |
Current Read/Write and History Operations
| Field / Control | Filling Notes |
|---|---|
| Current DI, Actual Value, and Controlled Write Parameters | Current DI, actual value, and controlled write parameters. Required · Value: 9010 / 65, 66 |
| This Device, DI Fields, and Complete Date-Time | This device, DI fields, and complete date-time. Required · Value: use the actual time window of the corresponding operation |