

DL/T 645-2007 Meter TCP Gateway Access and Controlled Write
This page is an online operation reference compiled from an existing operation manual. Operations marked as expected or not executed in the source material must still be verified against the actual environment.
Configure the identity, collection points, and controlled demo field of a 2007 meter, and verify real-time data, history, independent read-back, and stop/recovery.
Before you start: you hold product, device, feature definition, protocol configuration, publish, and history query permissions; you know the FMQ address reachable by the gateway, the gateway identity, the meter address, and the manufacturer's formal point table; the write demonstration in this tutorial uses only FMQX and does not mean a real metering meter allows rewriting its electric energy.
Understand This Scenario First
This tutorial applies to a 2007 meter accessed over a TCP transparent gateway. The gateway actively connects to FMQ, and the platform initiates reads and controlled writes over the established connection.
The device number identifies the gateway connection; the meter address selects the meter; the data identifier selects the data inside the meter. These three come from the platform device information, the actual meter address, and the manufacturer's point table respectively.
FMQX acts as the demo meter in this tutorial. 00010000 serves as the demo setpoint and the other nine items are read-only; the write range of a real device should follow the manufacturer's specification and permissions.
Replace These Parameters Before Copying the Templates
This tutorial's code uses generic template names; the screenshots keep the actual historical resources. Complete the following checks before saving as a UTF-8 file or sending frames.
demo-deviceis the device number template. Replace the device number in clientId, the device number in every publish/subscribe topic, and the clientId of TCP reports together with the platform device number for this device; the product ID and tenant ID in the MQTT identity must also be replaced with the current device connection parameters.- The host, port, and listening direction in the connection file must be changed to the actual addresses of the current environment; 127.0.0.1 means the local machine running FMQX. When MQTT is involved, also verify the product ID, username, subscription topics, and responseRoute; enter passwords only securely on the connection page.
- The group, session, and subscription ids are internal references of the import file; if you rename them, groupId must match the corresponding group id. Verify before importing, and do not create a duplicate connection with the same name on a retained session.
- The code blocks are customer templates rewritten from existing password-free assets or original code; this version of the template has not been proven to import successfully. Historical screenshots, send times, and business pass scope still follow the records in each step; do not treat template names as the actual resource names in the old evidence.
Configure, Access, and Verify
1. Prepare an Independent Product
Where: Device Management → Device Access Steps: Select an existing 2007 meter product and enter this tutorial's name in Product Name.

The source product is selected and the new product name is filled in.
Screenshot Highlights
| Field / Control | Description |
|---|---|
| Copy Product | Specifies the source product that provides the model definition. Optional · Value: fill in per your environment · Example: select a source product of the same model |
| Product Name | Sets a distinguishable name for the copied product. Required · Value: fill in per your environment · Example: the name of this independent product |
2. Verify the Source Product
Where: Device Management → Device Access Steps: Open Preview Product and confirm the source product uses the 2007 meter protocol.

The source product's identity is visible.
3. Review the Source Model Item by Item
Where: Device Management → Device Access Steps: In the source product's Feature Definition, view the demo setpoint and Collection 1 through 9.
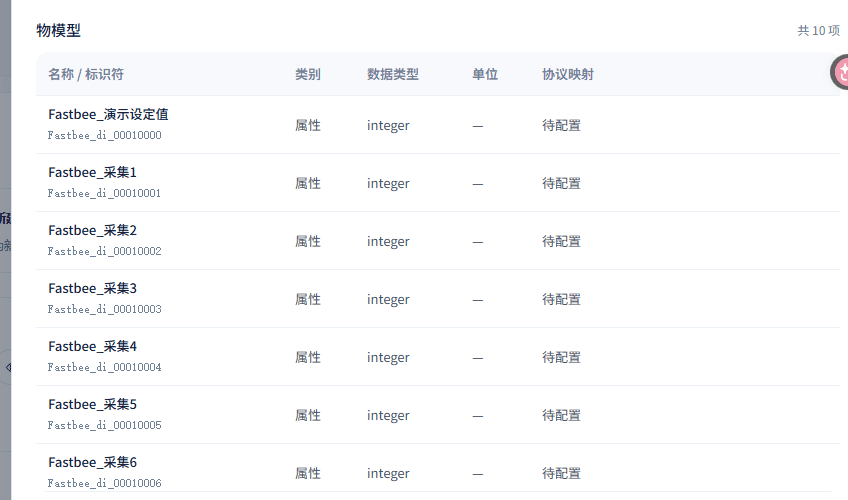
The page shows 10 items in total; part of the model is visible in this figure — scroll down for the rest.
4. Verify the Source Connection Method
Where: Device Management → Device Access Steps: View the source product's Protocol Configuration.

The source scenario is a 2007 meter over TCP gateway; the new product's protocol details are configured separately afterwards.
Screenshot Highlights
| Field / Control | Description |
|---|---|
| Protocol | Selects the meter protocol version; 2007 and 1997 differ in DI length and frame meaning. Optional · Value: DLT645_2007 |
5. Confirm the Meter Version and Connection Method
Where: Device Management → Device Access Steps: Select the 2007 meter protocol and TCP gateway, then continue preparing the product.

The new draft uses the 2007 and TCP gateway combination.
Screenshot Highlights
| Field / Control | Description |
|---|---|
| Protocol | Selects the meter protocol version; 2007 and 1997 differ in DI length and frame meaning. Optional · Value: DLT645_2007 |
6. View the Optional Information
Where: Device Management → Device Access Steps: Open Advanced Configuration and fill in the category and other information as needed.
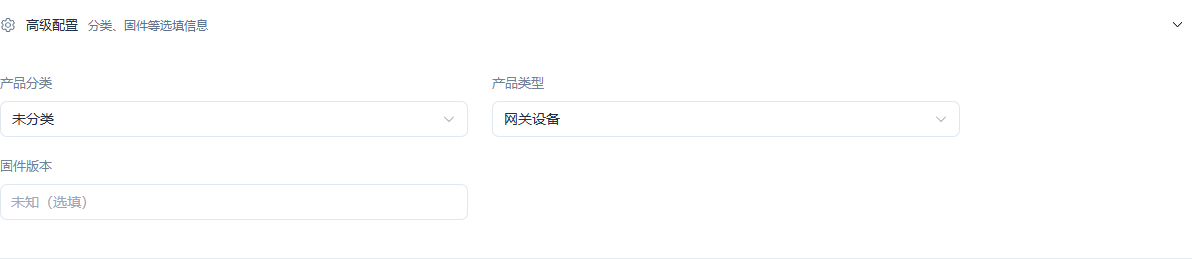
This tutorial's actual optional information is visible.
7. Verify the Product Preparation Summary
Where: Device Management → Device Access Steps: Read the Configuration Pre-check and the preparation summary, and confirm that only this tutorial's product is being prepared.
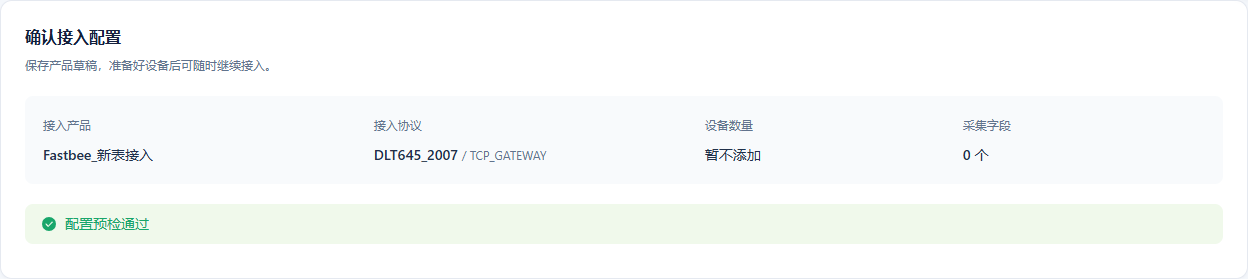
The summary passed; it is not yet published, and no runtime connection has been created.
Screenshot Highlights
| Field / Control | Description |
|---|---|
| Prepare product only, do not create a device yet | This round only saves the product draft; the device is created manually later. Optional · Value: Selected |
8. Save the Product Draft
Where: Device Management → Device Access Steps: Submit this tutorial's product preparation and verify the success feedback on the page.
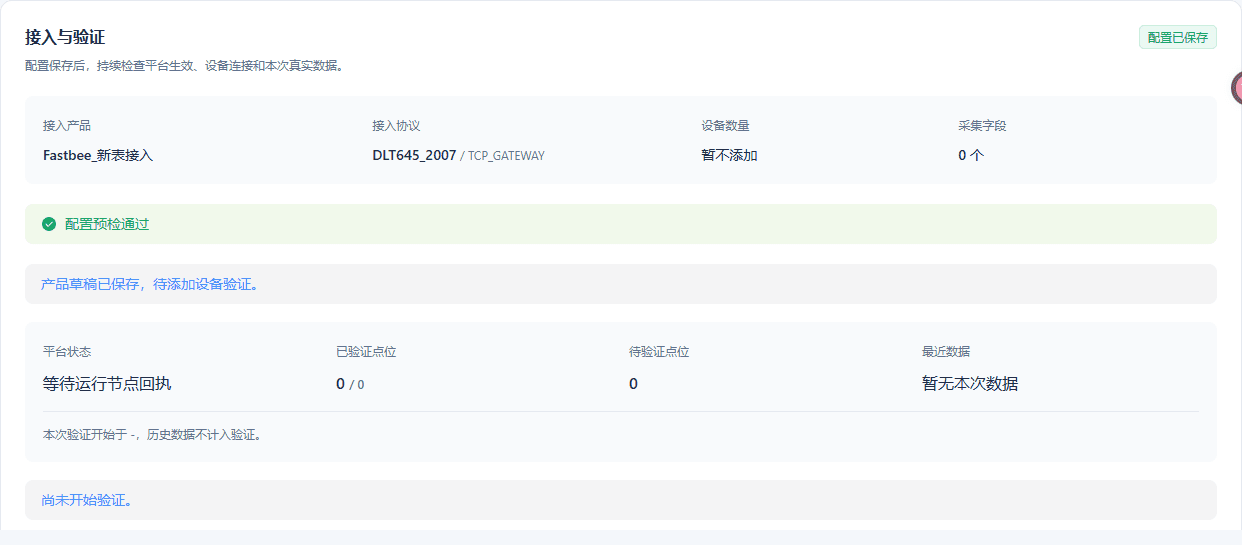
The new product draft is saved; the protocol details still need manual configuration.
Screenshot Highlights
| Field / Control | Description |
|---|---|
| Product Name | Sets a distinguishable name for the copied product. Required · Value: New Meter Access |
9. Open the New Product
Where: Product Details → Feature Definition Steps: Enter this tutorial's new product details and confirm the name and unpublished status.

The product is the current batch resource and is currently unpublished.
10. Enter Feature Definition
Where: Product Details → Feature Definition Steps: Click Feature Definition of this tutorial's product and verify the ten models.

The current tab is Feature Definition, and the ten models are visible.
11. Verify the Demo Setpoint Identifier
Where: Product Details → Feature Definition Steps: Open the demo setpoint and verify the name and identifier.
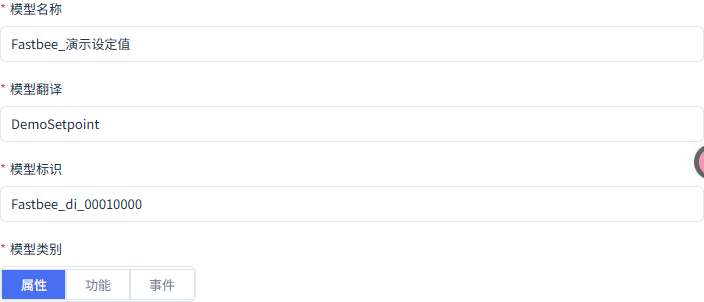
This field corresponds to data identifier 00010000.
Screenshot Highlights
| Field / Control | Description |
|---|---|
| Model Name | Sets a readable name for a collected or writable property. Required · Value: Demo Setpoint |
| Model Identifier | Maps the property one-to-one to the identifier in the point mapping. Required · Value: fill in per your environment |
12. Set the Demo Setpoint Read/Write Attributes
Where: Product Details → Feature Definition Steps: Make only the demo setpoint writable and enable history storage.
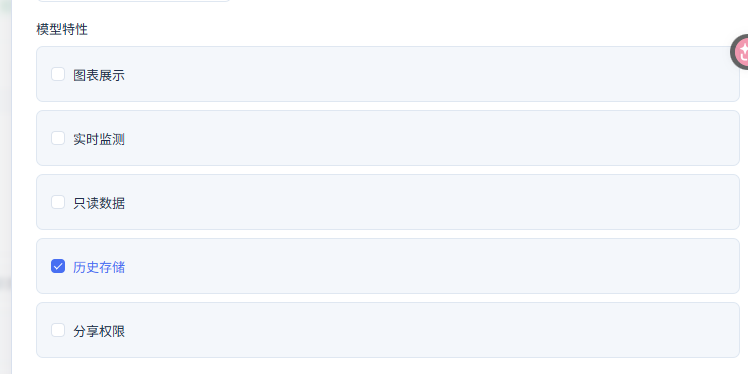
This tutorial allows writing only to the demo field; the other collection fields are read-only.
Screenshot Highlights
| Field / Control | Description |
|---|---|
| Read-Only Data | A read-only property only displays data; the demo setpoint keeps controlled writing. Optional · Value: off for the first item, on for the other nine |
| History Storage | Lets the parsed property values enter the historical data query. Optional · Value: On |
13. Verify the Integer Value Range
Where: Product Details → Feature Definition Steps: Select Integer, with minimum 0, maximum 10000, and step 1.
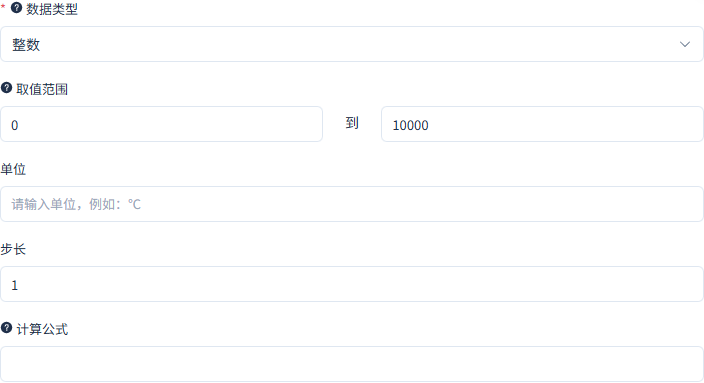
The planned writes 42 and 43 are within the legal range.
Screenshot Highlights
| Field / Control | Description |
|---|---|
| Data Type | All ten properties are parsed and displayed as integers. Optional · Value: Integer |
| Minimum | Limits the usable lower bound of the property. Required · Value: 0 |
| Maximum | Limits the usable upper bound of the property. Required · Value: 10000 |
14. Verify the Collection 1 Identifier
Where: Product Details → Feature Definition Steps: Open Collection 1 and verify the name and identifier.
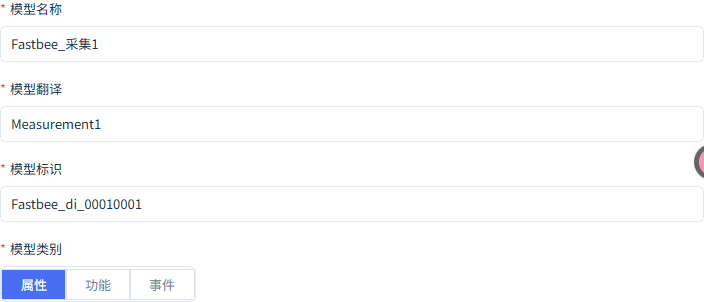
This field corresponds to data identifier 00010001.
Screenshot Highlights
| Field / Control | Description |
|---|---|
| Model Name | Sets a readable name for a collected or writable property. Required · Value: Demo Setpoint |
| Model Identifier | Maps the property one-to-one to the identifier in the point mapping. Required · Value: fill in per your environment |
15. Verify the Collection 2 Identifier
Where: Product Details → Feature Definition Steps: Open Collection 2 and verify the name and identifier.
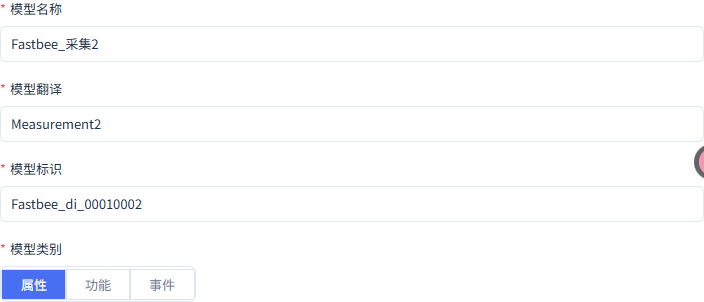
This field corresponds to data identifier 00010002.
Screenshot Highlights
| Field / Control | Description |
|---|---|
| Model Name | Sets a readable name for a collected or writable property. Required · Value: Demo Setpoint |
| Model Identifier | Maps the property one-to-one to the identifier in the point mapping. Required · Value: fill in per your environment |
16. Verify the Collection 3 Identifier
Where: Product Details → Feature Definition Steps: Open Collection 3 and verify the name and identifier.
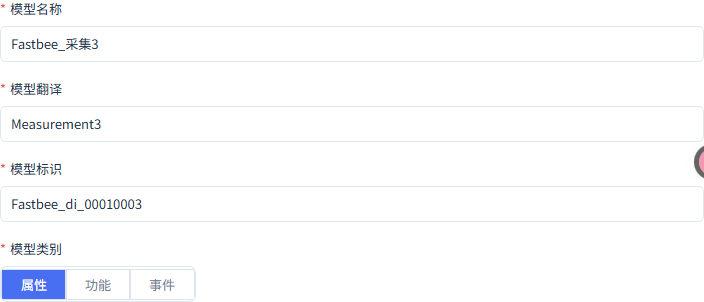
This field corresponds to data identifier 00010003.
Screenshot Highlights
| Field / Control | Description |
|---|---|
| Model Name | Sets a readable name for a collected or writable property. Required · Value: Demo Setpoint |
| Model Identifier | Maps the property one-to-one to the identifier in the point mapping. Required · Value: fill in per your environment |
17. Verify the Collection 4 Identifier
Where: Product Details → Feature Definition Steps: Open Collection 4 and verify the name and identifier.
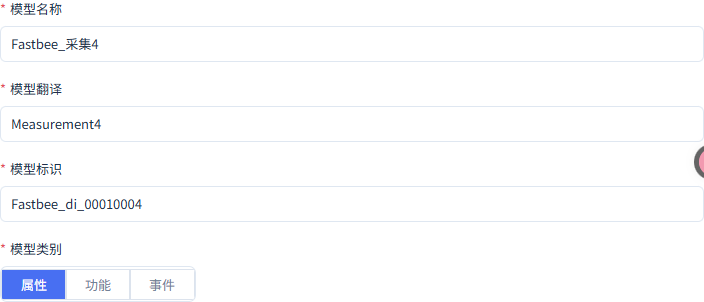
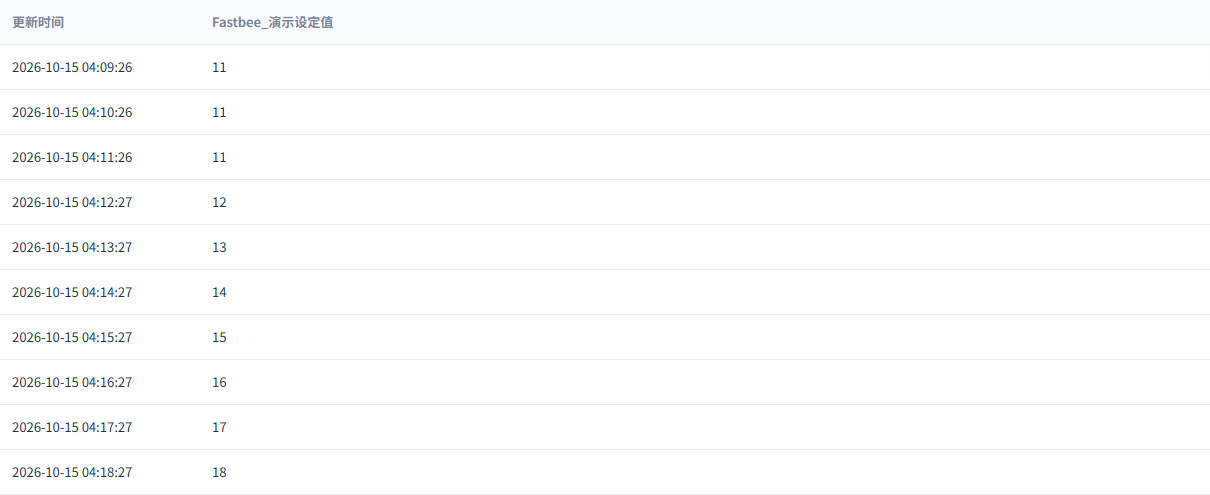
This field corresponds to data identifier 00010004.
Screenshot Highlights
| Field / Control | Description |
|---|---|
| Model Name | Sets a readable name for a collected or writable property. Required · Value: Demo Setpoint |
| Model Identifier | Maps the property one-to-one to the identifier in the point mapping. Required · Value: fill in per your environment |
18. Verify the Collection 5 Identifier
Where: Product Details → Feature Definition Steps: Open Collection 5 and verify the name and identifier.
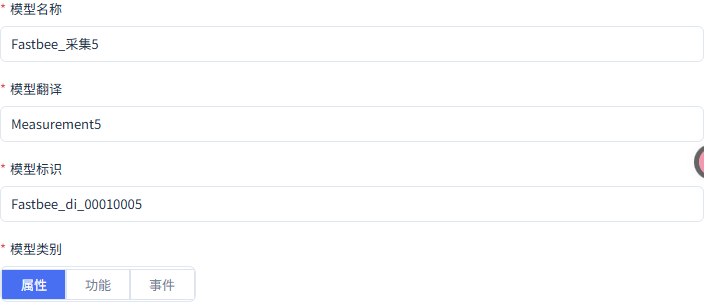
This field corresponds to data identifier 00010005.
Screenshot Highlights
| Field / Control | Description |
|---|---|
| Model Name | Sets a readable name for a collected or writable property. Required · Value: Demo Setpoint |
| Model Identifier | Maps the property one-to-one to the identifier in the point mapping. Required · Value: fill in per your environment |
19. Verify Ordinary Collection Fields Are Read-Only
Where: Product Details → Feature Definition Steps: View the read/write type and history settings of an ordinary collection field.
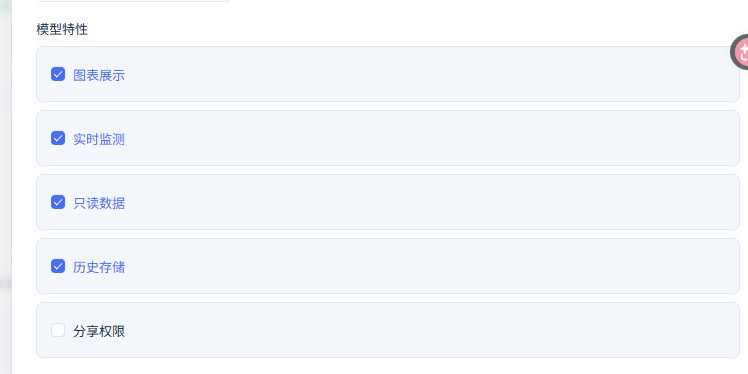
Ordinary collection fields are read-only and keep history.
Screenshot Highlights
| Field / Control | Description |
|---|---|
| Read-Only Data | A read-only property only displays data; the demo setpoint keeps controlled writing. Optional · Value: off for the first item, on for the other nine |
| History Storage | Lets the parsed property values enter the historical data query. Optional · Value: On |
20. Verify the Collection 6 Identifier
Where: Product Details → Feature Definition Steps: Open Collection 6 and verify the name and identifier.
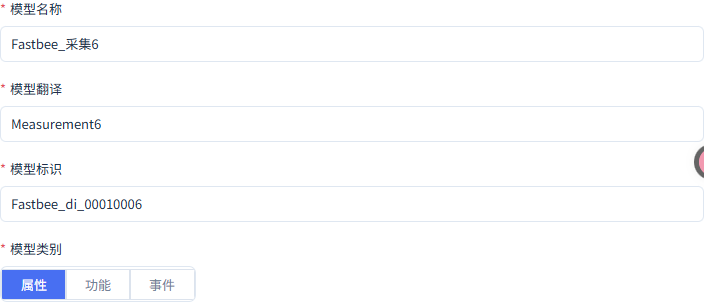
This field corresponds to data identifier 00010006.
Screenshot Highlights
| Field / Control | Description |
|---|---|
| Model Name | Sets a readable name for a collected or writable property. Required · Value: Demo Setpoint |
| Model Identifier | Maps the property one-to-one to the identifier in the point mapping. Required · Value: fill in per your environment |
21. Verify the Collection 7 Identifier
Where: Product Details → Feature Definition Steps: Open Collection 7 and verify the name and identifier.
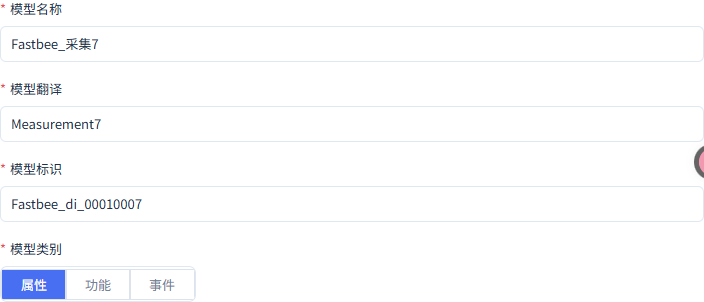
This field corresponds to data identifier 00010007.
Screenshot Highlights
| Field / Control | Description |
|---|---|
| Model Name | Sets a readable name for a collected or writable property. Required · Value: Demo Setpoint |
| Model Identifier | Maps the property one-to-one to the identifier in the point mapping. Required · Value: fill in per your environment |
22. Verify the Collection 8 Identifier
Where: Product Details → Feature Definition Steps: Open Collection 8 and verify the name and identifier.
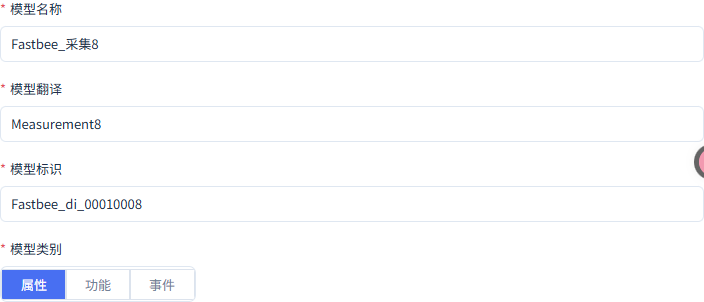
This field corresponds to data identifier 00010008.
Screenshot Highlights
| Field / Control | Description |
|---|---|
| Model Name | Sets a readable name for a collected or writable property. Required · Value: Demo Setpoint |
| Model Identifier | Maps the property one-to-one to the identifier in the point mapping. Required · Value: fill in per your environment |
23. Verify the Collection 9 Identifier
Where: Product Details → Feature Definition Steps: Open Collection 9 and verify the name and identifier.
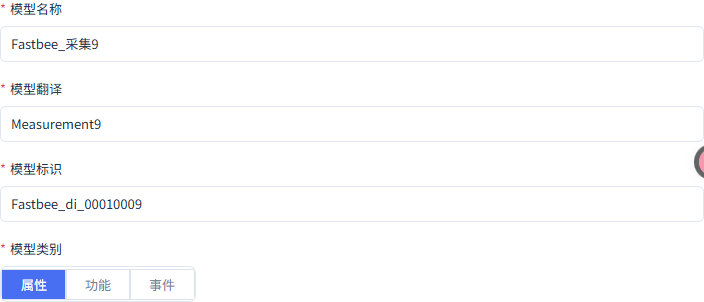
This field corresponds to data identifier 00010009.
Screenshot Highlights
| Field / Control | Description |
|---|---|
| Model Name | Sets a readable name for a collected or writable property. Required · Value: Demo Setpoint |
| Model Identifier | Maps the property one-to-one to the identifier in the point mapping. Required · Value: fill in per your environment |
24. Enter Add Device Manually
Where: Device List → Access Device → Add Manually Steps: In the device list, hover over Access Device and select Add Manually.
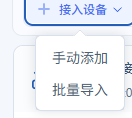
After expanding the menu, the "Add Manually" entry is visible; enter it and fill in the device information.
Screenshot Highlights
| Field / Control | Description |
|---|---|
| Device Name | Sets a readable name for the logical meter. Required · Value: Access New Meter |
25. Enter the New Device Identity
Where: Device List → Add Manually Steps: Enter the device name and this tutorial's device number.
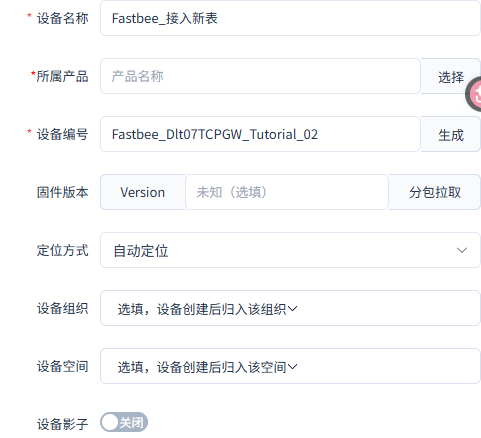
The device number is this tutorial's independent identity.
Screenshot Highlights
| Field / Control | Description |
|---|---|
| Device Name | Sets a readable name for the logical meter. Required · Value: fill in per your environment |
| Device Number | Serves as the platform identity, the gateway identity, and the default registration number. Required · Value: fill in per your environment |
26. Select the New Product
Where: Device List → Add Manually Steps: In Product, select this tutorial's new product.

The current batch resource is selected.
Screenshot Highlights
| Field / Control | Description |
|---|---|
| Product | Associates the new device with the product just prepared. Optional · Value: fill in per the integration materials · Example: fill in per your environment |
27. Verify the Device-Product Correspondence
Where: Device List → Add Manually Steps: Confirm that the product in the device window is this tutorial's object.
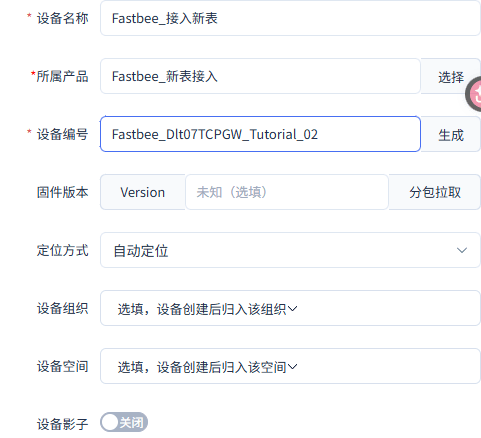
The device will be associated with this tutorial's product.
Screenshot Highlights
| Field / Control | Description |
|---|---|
| Product | Associates the new device with the product just prepared. Optional · Value: fill in per the integration materials · Example: fill in per your environment |
28. Verify the Device Has Been Saved
Where: Device List Steps: After submitting the new device, view this tutorial's device card in the list.
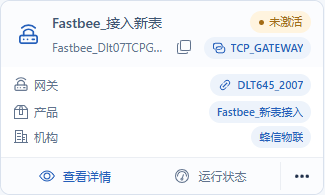
Device 1258 exists and is currently not activated; this is not a conclusion that it is online.
Screenshot Highlights
| Field / Control | Description |
|---|---|
| Device Name | Sets a readable name for the logical meter. Required · Value: Access New Meter |
29. Fill In the Meter Binding
Where: Product Details → Protocol Configuration → Device Binding Steps: Fill in this tutorial's device and gateway identity, and set the meter address to 123456782008.
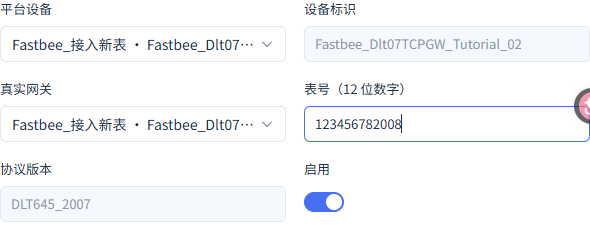
Everything filled in points to this tutorial's meter.
Screenshot Highlights
| Field / Control | Description |
|---|---|
| Meter Number (12 digits) | Matches the meter address in the DL/T 645 frame. Required · Value: 123456782008 |
30. Save the Meter Binding
Where: Product Details → Protocol Configuration → Device Binding Steps: Save the binding and verify the current record.

Binding 76 is saved and enabled.
31. Configure Polling for Data Identifier 00010000
Where: Product Details → Protocol Configuration → Polling Items Steps: Add a polling item for this data identifier; period 60000 ms, timeout 3000 ms, 0 retries.
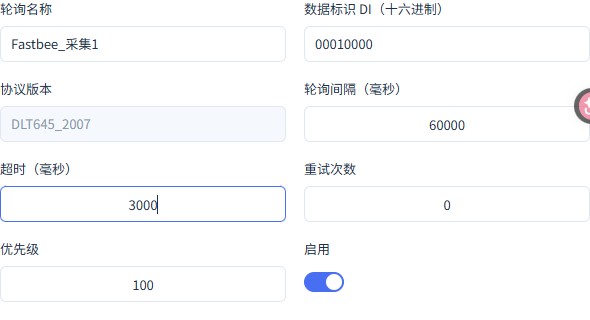
The data identifier and period of this row are filled in correctly.
Screenshot Highlights
| Field / Control | Description |
|---|---|
| Data Identifier DI (hexadecimal) | Specifies the eight-hexadecimal-digit data identifier of the 2007 protocol. Required · Value: 00010000 |
| Polling Interval (ms) | Controls the normal read interval; 60000 ms is 60 seconds. Required · Value: 60000 |
| Timeout (ms) | Limits how long a single read waits for a response. Required · Value: 3000 |
32. Save the 00010000 Polling
Where: Product Details → Protocol Configuration → Polling Items Steps: Save the current polling item and verify the record.

The current item is saved and enabled.
33. Configure Polling for Data Identifier 00010001
Where: Product Details → Protocol Configuration → Polling Items Steps: Add a polling item for this data identifier; period 60000 ms, timeout 3000 ms, 0 retries.
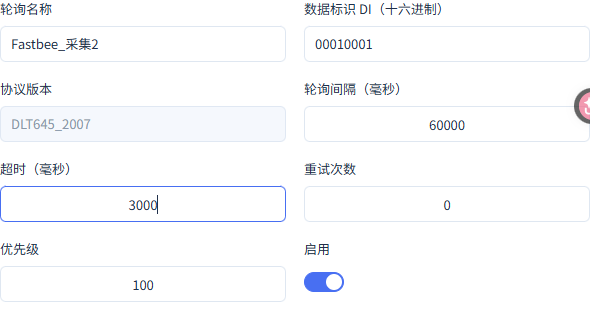
The data identifier and period of this row are filled in correctly.
Screenshot Highlights
| Field / Control | Description |
|---|---|
| Data Identifier DI (hexadecimal) | Specifies the eight-hexadecimal-digit data identifier of the 2007 protocol. Required · Value: 00010001 |
| Polling Interval (ms) | Controls the normal read interval; 60000 ms is 60 seconds. Required · Value: 60000 |
| Timeout (ms) | Limits how long a single read waits for a response. Required · Value: 3000 |
34. Save the 00010001 Polling
Where: Product Details → Protocol Configuration → Polling Items Steps: Save the current polling item and verify the record.

The current item is saved and enabled.
35. Configure Polling for Data Identifier 00010002
Where: Product Details → Protocol Configuration → Polling Items Steps: Add a polling item for this data identifier; period 60000 ms, timeout 3000 ms, 0 retries.
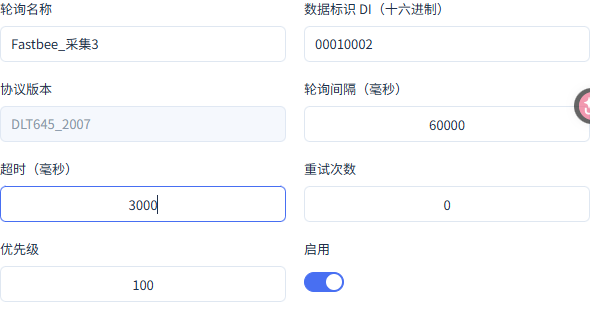
The data identifier and period of this row are filled in correctly.
Screenshot Highlights
| Field / Control | Description |
|---|---|
| Data Identifier DI (hexadecimal) | Specifies the eight-hexadecimal-digit data identifier of the 2007 protocol. Required · Value: 00010002 |
| Polling Interval (ms) | Controls the normal read interval; 60000 ms is 60 seconds. Required · Value: 60000 |
| Timeout (ms) | Limits how long a single read waits for a response. Required · Value: 3000 |
36. Save the 00010002 Polling
Where: Product Details → Protocol Configuration → Polling Items Steps: Save the current polling item and verify the record.

The current item is saved and enabled.
37. Configure Polling for Data Identifier 00010003
Where: Product Details → Protocol Configuration → Polling Items Steps: Add a polling item for this data identifier; period 60000 ms, timeout 3000 ms, 0 retries.
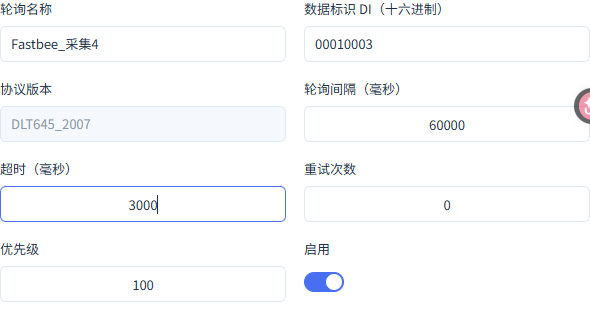
The data identifier and period of this row are filled in correctly.
Screenshot Highlights
| Field / Control | Description |
|---|---|
| Data Identifier DI (hexadecimal) | Specifies the eight-hexadecimal-digit data identifier of the 2007 protocol. Required · Value: 00010003 |
| Polling Interval (ms) | Controls the normal read interval; 60000 ms is 60 seconds. Required · Value: 60000 |
| Timeout (ms) | Limits how long a single read waits for a response. Required · Value: 3000 |
38. Save the 00010003 Polling
Where: Product Details → Protocol Configuration → Polling Items Steps: Save the current polling item and verify the record.
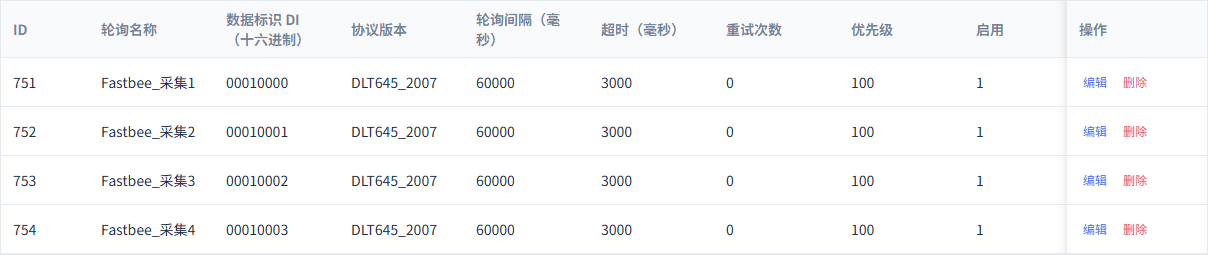
The current item is saved and enabled.
39. Configure Polling for Data Identifier 00010004
Where: Product Details → Protocol Configuration → Polling Items Steps: Add a polling item for this data identifier; period 60000 ms, timeout 3000 ms, 0 retries.
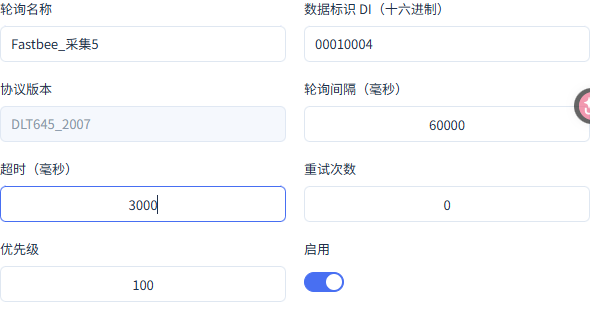
The data identifier and period of this row are filled in correctly.
Screenshot Highlights
| Field / Control | Description |
|---|---|
| Data Identifier DI (hexadecimal) | Specifies the eight-hexadecimal-digit data identifier of the 2007 protocol. Required · Value: 00010004 |
| Polling Interval (ms) | Controls the normal read interval; 60000 ms is 60 seconds. Required · Value: 60000 |
| Timeout (ms) | Limits how long a single read waits for a response. Required · Value: 3000 |
40. Save the 00010004 Polling
Where: Product Details → Protocol Configuration → Polling Items Steps: Save the current polling item and verify the record.
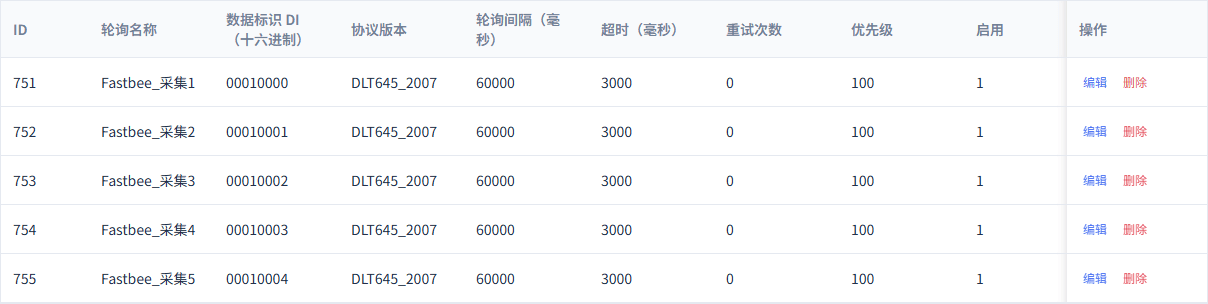
The current item is saved and enabled.
41. Configure Polling for Data Identifier 00010005
Where: Product Details → Protocol Configuration → Polling Items Steps: Add a polling item for this data identifier; period 60000 ms, timeout 3000 ms, 0 retries.
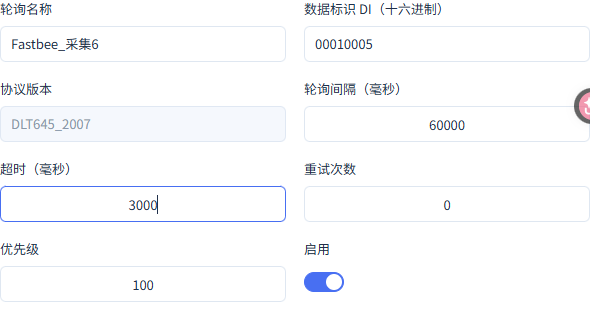
The data identifier and period of this row are filled in correctly.
Screenshot Highlights
| Field / Control | Description |
|---|---|
| Data Identifier DI (hexadecimal) | Specifies the eight-hexadecimal-digit data identifier of the 2007 protocol. Required · Value: 00010005 |
| Polling Interval (ms) | Controls the normal read interval; 60000 ms is 60 seconds. Required · Value: 60000 |
| Timeout (ms) | Limits how long a single read waits for a response. Required · Value: 3000 |
42. Save the 00010005 Polling
Where: Product Details → Protocol Configuration → Polling Items Steps: Save the current polling item and verify the record.
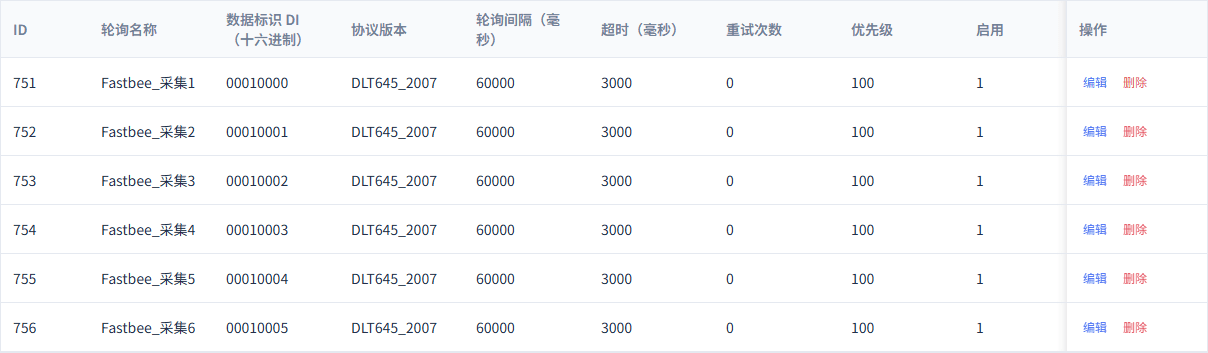
The current item is saved and enabled.
43. Configure Polling for Data Identifier 00010006
Where: Product Details → Protocol Configuration → Polling Items Steps: Add a polling item for this data identifier; period 60000 ms, timeout 3000 ms, 0 retries.
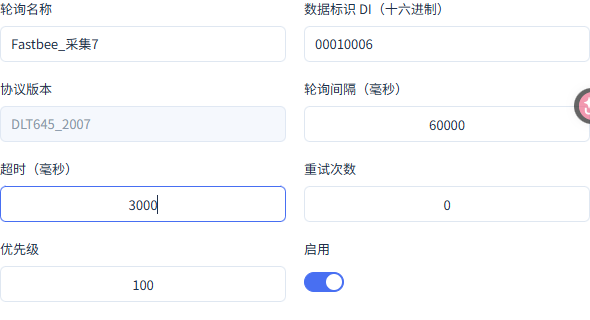
The data identifier and period of this row are filled in correctly.
Screenshot Highlights
| Field / Control | Description |
|---|---|
| Data Identifier DI (hexadecimal) | Specifies the eight-hexadecimal-digit data identifier of the 2007 protocol. Required · Value: 00010006 |
| Polling Interval (ms) | Controls the normal read interval; 60000 ms is 60 seconds. Required · Value: 60000 |
| Timeout (ms) | Limits how long a single read waits for a response. Required · Value: 3000 |
44. Save the 00010006 Polling
Where: Product Details → Protocol Configuration → Polling Items Steps: Save the current polling item and verify the record.
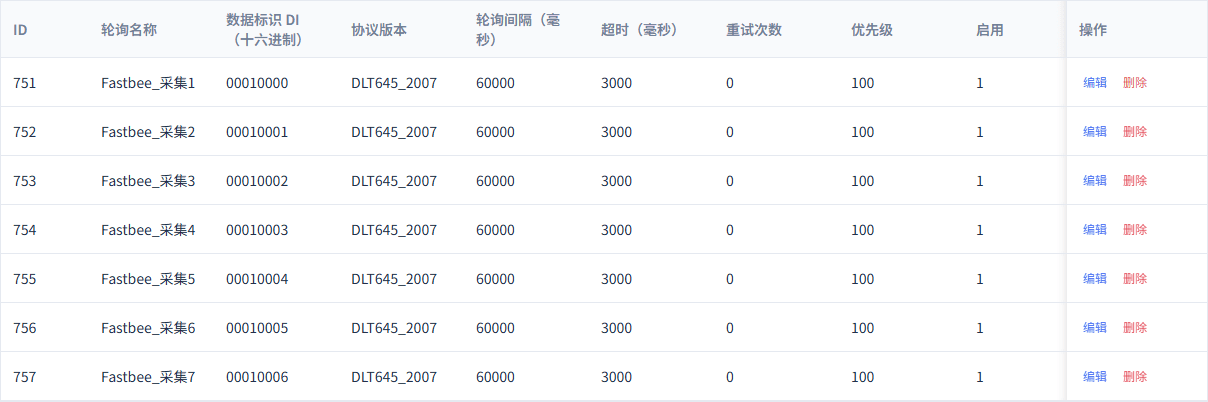
The current item is saved and enabled.
45. Configure Polling for Data Identifier 00010007
Where: Product Details → Protocol Configuration → Polling Items Steps: Add a polling item for this data identifier; period 60000 ms, timeout 3000 ms, 0 retries.
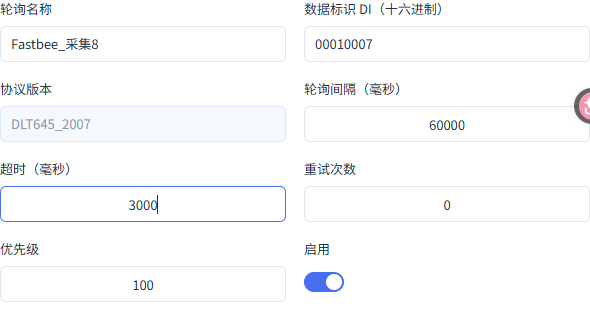
The data identifier and period of this row are filled in correctly.
Screenshot Highlights
| Field / Control | Description |
|---|---|
| Data Identifier DI (hexadecimal) | Specifies the eight-hexadecimal-digit data identifier of the 2007 protocol. Required · Value: 00010007 |
| Polling Interval (ms) | Controls the normal read interval; 60000 ms is 60 seconds. Required · Value: 60000 |
| Timeout (ms) | Limits how long a single read waits for a response. Required · Value: 3000 |
46. Save the 00010007 Polling
Where: Product Details → Protocol Configuration → Polling Items Steps: Save the current polling item and verify the record.
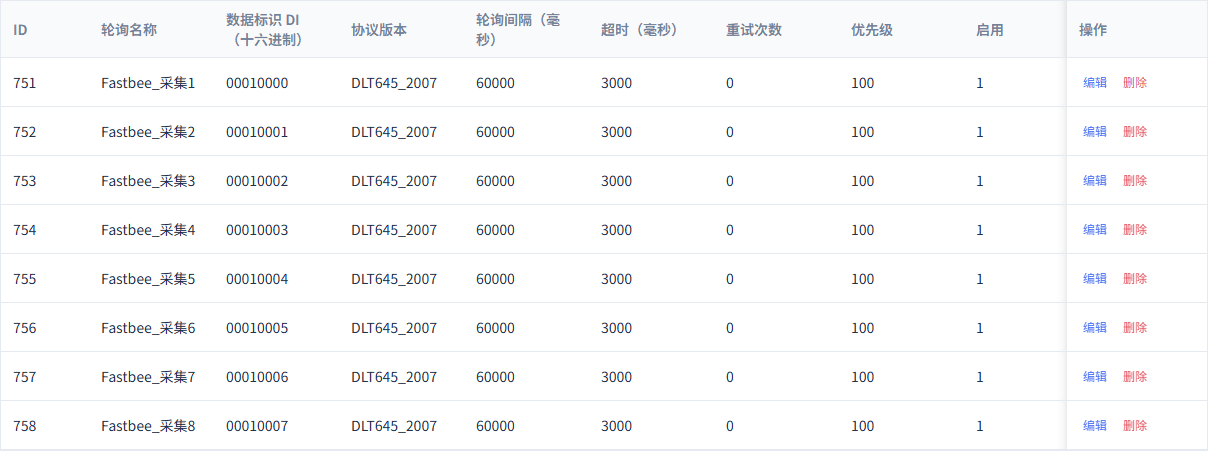
The current item is saved and enabled.
47. Configure Polling for Data Identifier 00010008
Where: Product Details → Protocol Configuration → Polling Items Steps: Add a polling item for this data identifier; period 60000 ms, timeout 3000 ms, 0 retries.
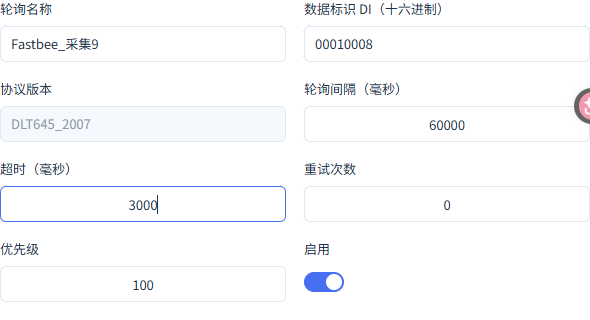
The data identifier and period of this row are filled in correctly.
Screenshot Highlights
| Field / Control | Description |
|---|---|
| Data Identifier DI (hexadecimal) | Specifies the eight-hexadecimal-digit data identifier of the 2007 protocol. Required · Value: 00010008 |
| Polling Interval (ms) | Controls the normal read interval; 60000 ms is 60 seconds. Required · Value: 60000 |
| Timeout (ms) | Limits how long a single read waits for a response. Required · Value: 3000 |
48. Save the 00010008 Polling
Where: Product Details → Protocol Configuration → Polling Items Steps: Save the current polling item and verify the record.
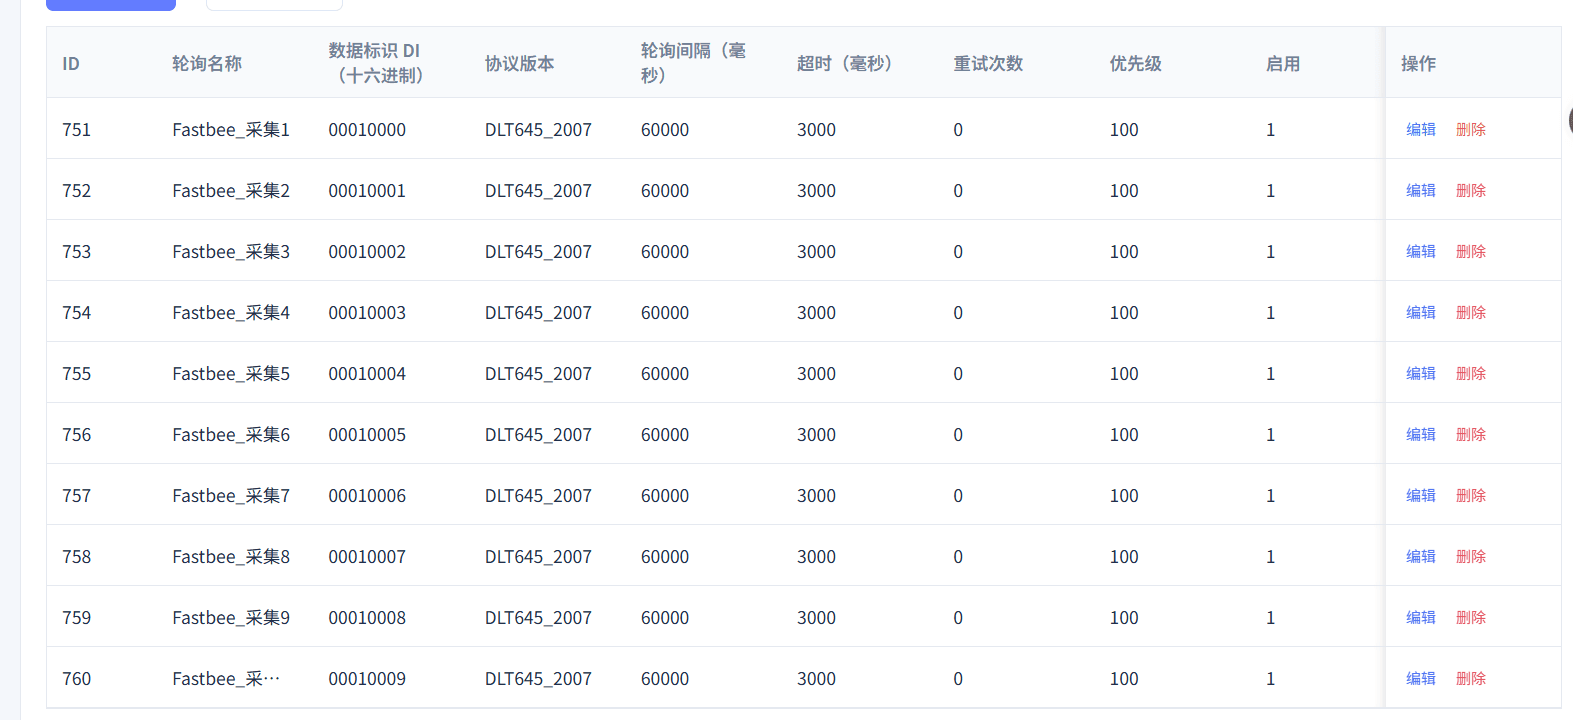
The current item is saved and enabled.
49. Configure Polling for Data Identifier 00010009
Where: Product Details → Protocol Configuration → Polling Items Steps: Add a polling item for this data identifier; period 60000 ms, timeout 3000 ms, 0 retries.
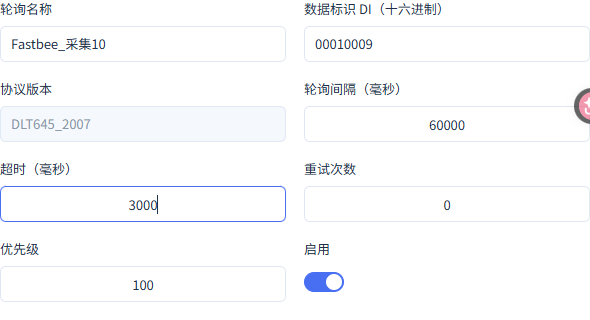
The data identifier and period of this row are filled in correctly.
Screenshot Highlights
| Field / Control | Description |
|---|---|
| Data Identifier DI (hexadecimal) | Specifies the eight-hexadecimal-digit data identifier of the 2007 protocol. Required · Value: 00010009 |
| Polling Interval (ms) | Controls the normal read interval; 60000 ms is 60 seconds. Required · Value: 60000 |
| Timeout (ms) | Limits how long a single read waits for a response. Required · Value: 3000 |
50. Save the 00010009 Polling
Where: Product Details → Protocol Configuration → Polling Items Steps: Save the current polling item and verify the record.
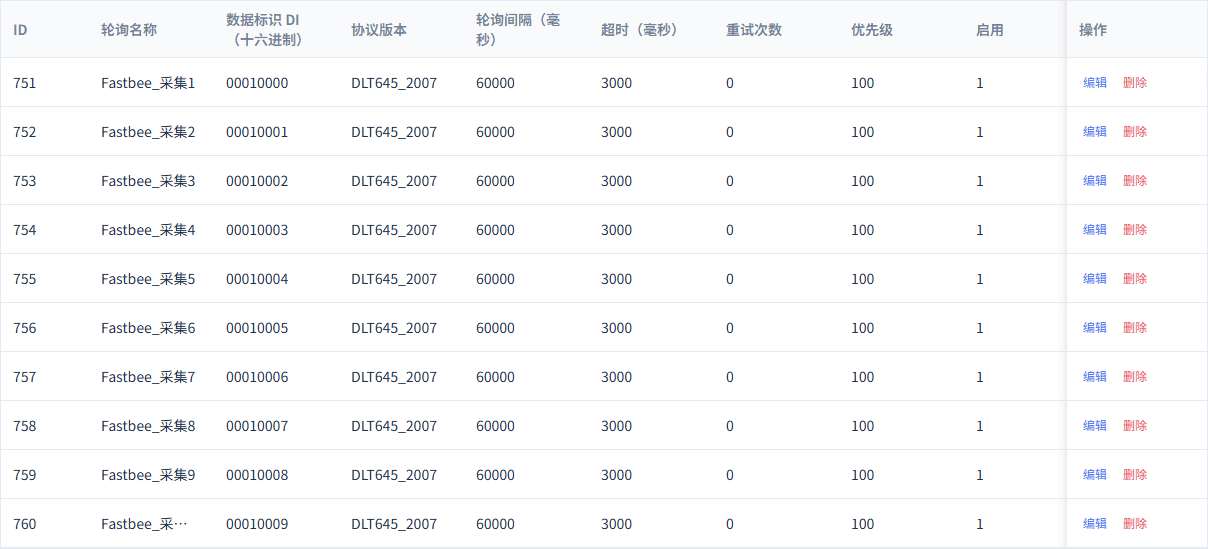
The current item is saved and enabled.
51. Map Data Identifier 00010000
Where: Product Details → Protocol Configuration → Point Mapping Steps: Associate the model and the polling item with the same data identifier; select BCD, value index 0, multiplier 1, offset 0.
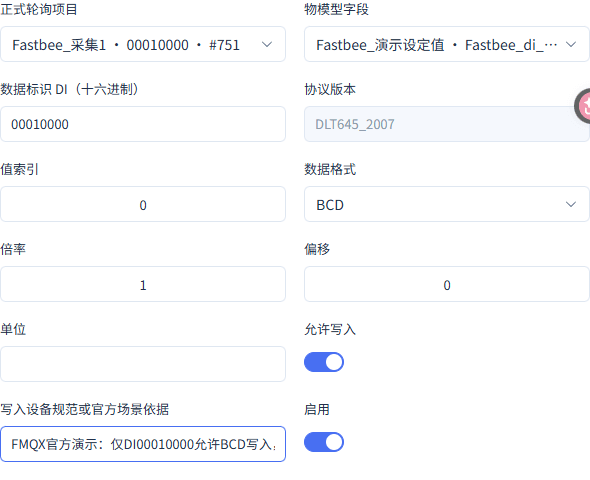
Protocol data will be mapped to the corresponding model; only the first item is writable.
Screenshot Highlights
| Field / Control | Description |
|---|---|
| Data Identifier DI (hexadecimal) | Must exactly match the DI of the selected polling item. Required · Value: 00010000 |
| Data Format | Decodes the value per the device definition; this example uses BCD, the decimal-digit encoding. Optional · Value: BCD |
| Multiplier | Converts the decoded value by the agreed ratio. Required · Value: 1 |
52. Save the 00010000 Mapping
Where: Product Details → Protocol Configuration → Point Mapping Steps: Save the current mapping and verify the model, data identifier, and polling item.

The current mapping is saved and enabled.
53. Map Data Identifier 00010001
Where: Product Details → Protocol Configuration → Point Mapping Steps: Associate the model and the polling item with the same data identifier; select BCD, value index 0, multiplier 1, offset 0.
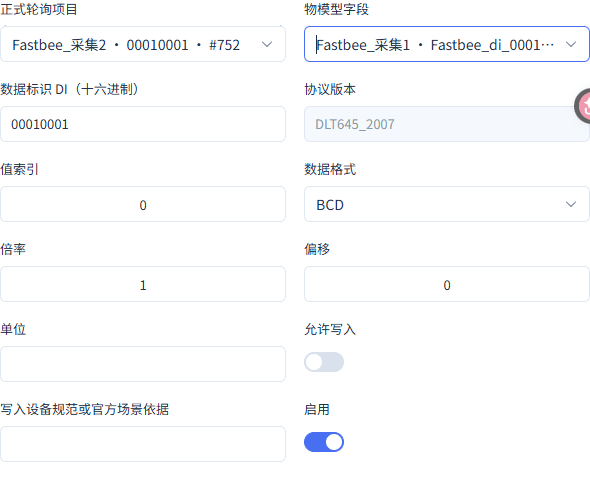
Protocol data will be mapped to the corresponding model; only the first item is writable.
Screenshot Highlights
| Field / Control | Description |
|---|---|
| Data Identifier DI (hexadecimal) | Must exactly match the DI of the selected polling item. Required · Value: 00010001 |
| Data Format | Decodes the value per the device definition; this example uses BCD, the decimal-digit encoding. Optional · Value: BCD |
| Multiplier | Converts the decoded value by the agreed ratio. Required · Value: 1 |
54. Save the 00010001 Mapping
Where: Product Details → Protocol Configuration → Point Mapping Steps: Save the current mapping and verify the model, data identifier, and polling item.

The current mapping is saved and enabled.
55. Map Data Identifier 00010002
Where: Product Details → Protocol Configuration → Point Mapping Steps: Associate the model and the polling item with the same data identifier; select BCD, value index 0, multiplier 1, offset 0.
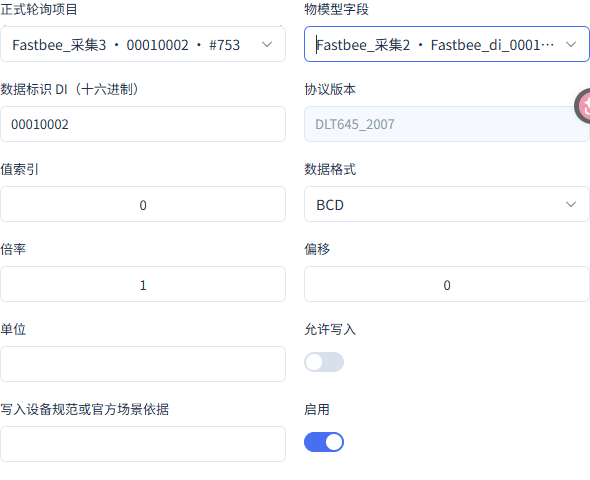
Protocol data will be mapped to the corresponding model; only the first item is writable.
Screenshot Highlights
| Field / Control | Description |
|---|---|
| Data Identifier DI (hexadecimal) | Must exactly match the DI of the selected polling item. Required · Value: 00010002 |
| Data Format | Decodes the value per the device definition; this example uses BCD, the decimal-digit encoding. Optional · Value: BCD |
| Multiplier | Converts the decoded value by the agreed ratio. Required · Value: 1 |
56. Save the 00010002 Mapping
Where: Product Details → Protocol Configuration → Point Mapping Steps: Save the current mapping and verify the model, data identifier, and polling item.

The current mapping is saved and enabled.
57. Map Data Identifier 00010003
Where: Product Details → Protocol Configuration → Point Mapping Steps: Associate the model and the polling item with the same data identifier; select BCD, value index 0, multiplier 1, offset 0.
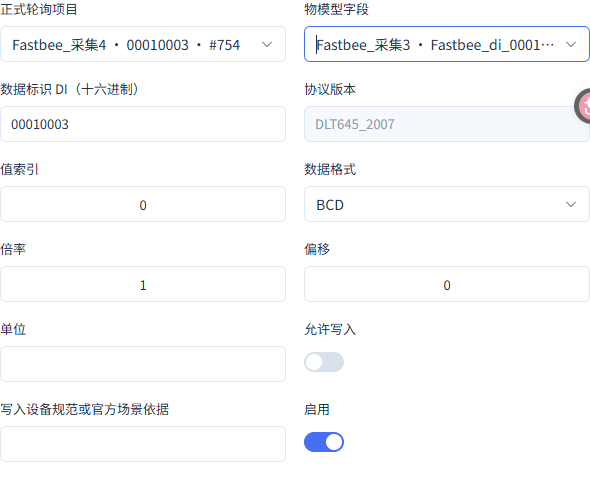
Protocol data will be mapped to the corresponding model; only the first item is writable.
Screenshot Highlights
| Field / Control | Description |
|---|---|
| Data Identifier DI (hexadecimal) | Must exactly match the DI of the selected polling item. Required · Value: 00010003 |
| Data Format | Decodes the value per the device definition; this example uses BCD, the decimal-digit encoding. Optional · Value: BCD |
| Multiplier | Converts the decoded value by the agreed ratio. Required · Value: 1 |
58. Save the 00010003 Mapping
Where: Product Details → Protocol Configuration → Point Mapping Steps: Save the current mapping and verify the model, data identifier, and polling item.
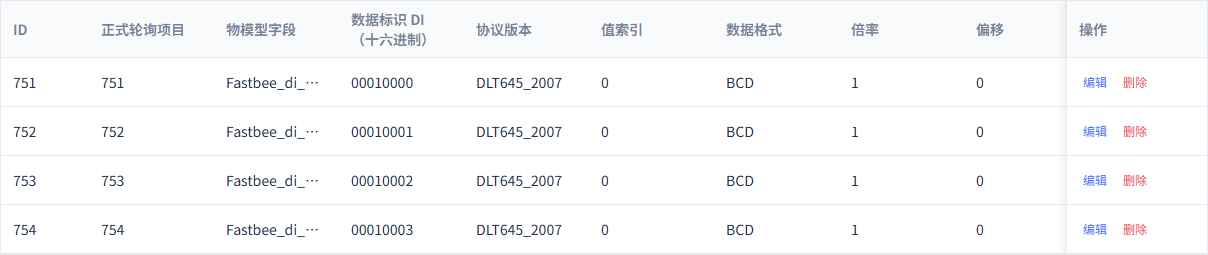
The current mapping is saved and enabled.
59. Map Data Identifier 00010004
Where: Product Details → Protocol Configuration → Point Mapping Steps: Associate the model and the polling item with the same data identifier; select BCD, value index 0, multiplier 1, offset 0.
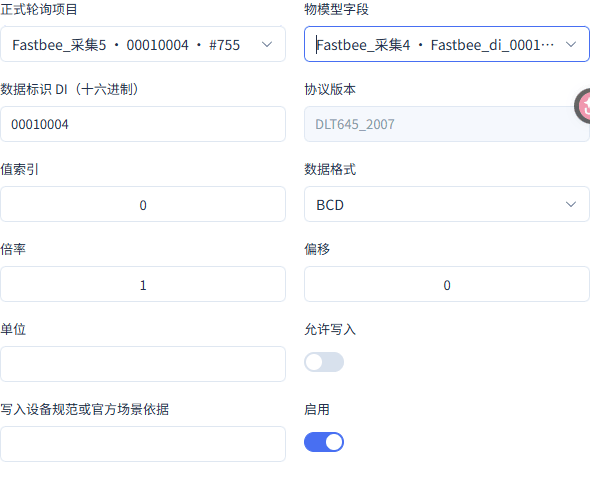
Protocol data will be mapped to the corresponding model; only the first item is writable.
Screenshot Highlights
| Field / Control | Description |
|---|---|
| Data Identifier DI (hexadecimal) | Must exactly match the DI of the selected polling item. Required · Value: 00010004 |
| Data Format | Decodes the value per the device definition; this example uses BCD, the decimal-digit encoding. Optional · Value: BCD |
| Multiplier | Converts the decoded value by the agreed ratio. Required · Value: 1 |
60. Save the 00010004 Mapping
Where: Product Details → Protocol Configuration → Point Mapping Steps: Save the current mapping and verify the model, data identifier, and polling item.
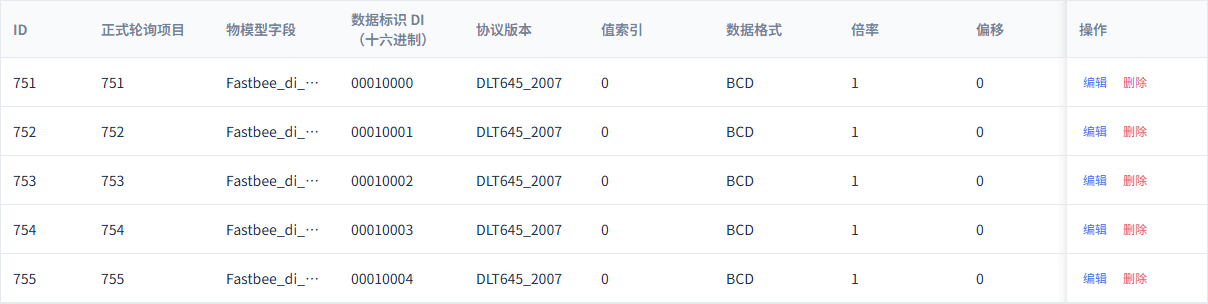
The current mapping is saved and enabled.
61. Map Data Identifier 00010005
Where: Product Details → Protocol Configuration → Point Mapping Steps: Associate the model and the polling item with the same data identifier; select BCD, value index 0, multiplier 1, offset 0.
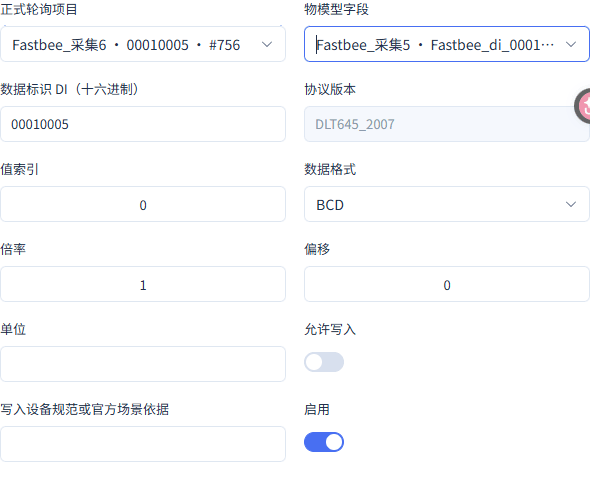
Protocol data will be mapped to the corresponding model; only the first item is writable.
Screenshot Highlights
| Field / Control | Description |
|---|---|
| Data Identifier DI (hexadecimal) | Must exactly match the DI of the selected polling item. Required · Value: 00010005 |
| Data Format | Decodes the value per the device definition; this example uses BCD, the decimal-digit encoding. Optional · Value: BCD |
| Multiplier | Converts the decoded value by the agreed ratio. Required · Value: 1 |
62. Save the 00010005 Mapping
Where: Product Details → Protocol Configuration → Point Mapping Steps: Save the current mapping and verify the model, data identifier, and polling item.
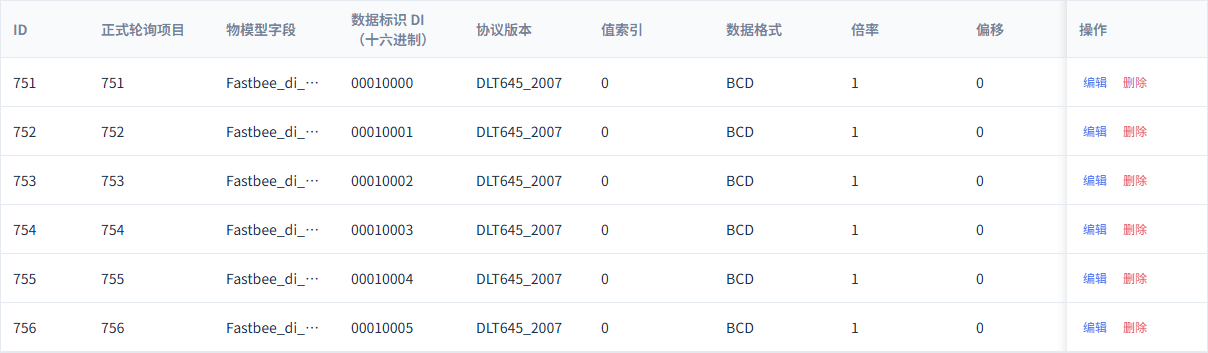
The current mapping is saved and enabled.
63. Map Data Identifier 00010006
Where: Product Details → Protocol Configuration → Point Mapping Steps: Associate the model and the polling item with the same data identifier; select BCD, value index 0, multiplier 1, offset 0.
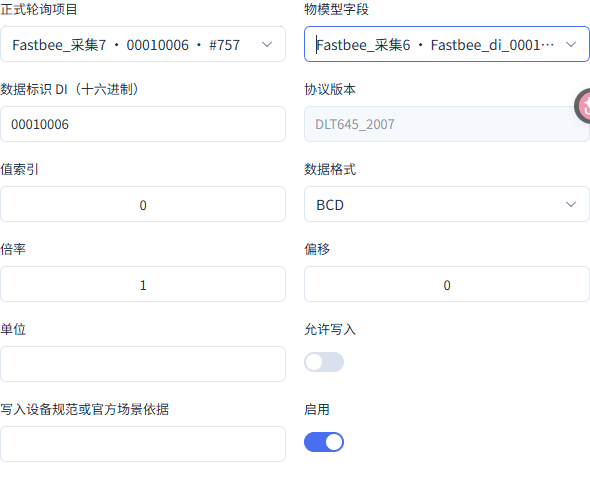
Protocol data will be mapped to the corresponding model; only the first item is writable.
Screenshot Highlights
| Field / Control | Description |
|---|---|
| Data Identifier DI (hexadecimal) | Must exactly match the DI of the selected polling item. Required · Value: 00010006 |
| Data Format | Decodes the value per the device definition; this example uses BCD, the decimal-digit encoding. Optional · Value: BCD |
| Multiplier | Converts the decoded value by the agreed ratio. Required · Value: 1 |
64. Save the 00010006 Mapping
Where: Product Details → Protocol Configuration → Point Mapping Steps: Save the current mapping and verify the model, data identifier, and polling item.
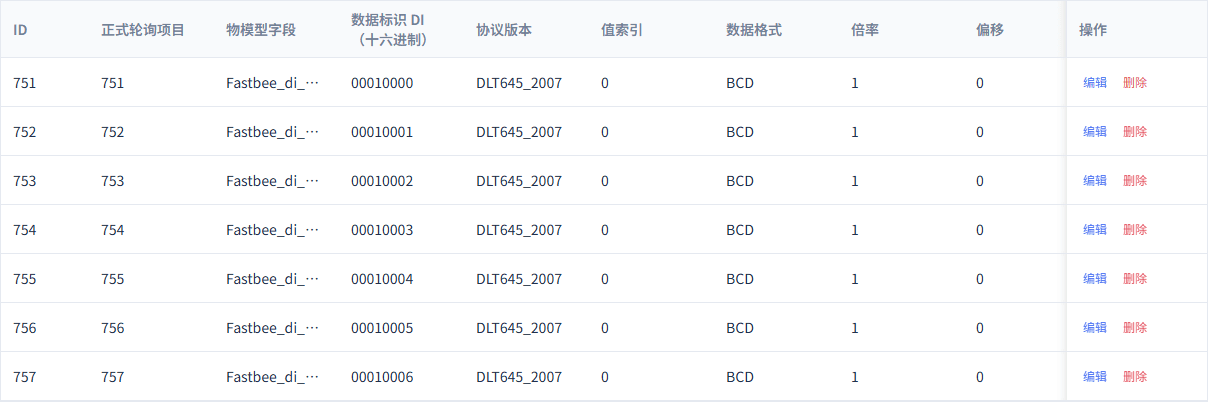
The current mapping is saved and enabled.
65. Map Data Identifier 00010007
Where: Product Details → Protocol Configuration → Point Mapping Steps: Associate the model and the polling item with the same data identifier; select BCD, value index 0, multiplier 1, offset 0.
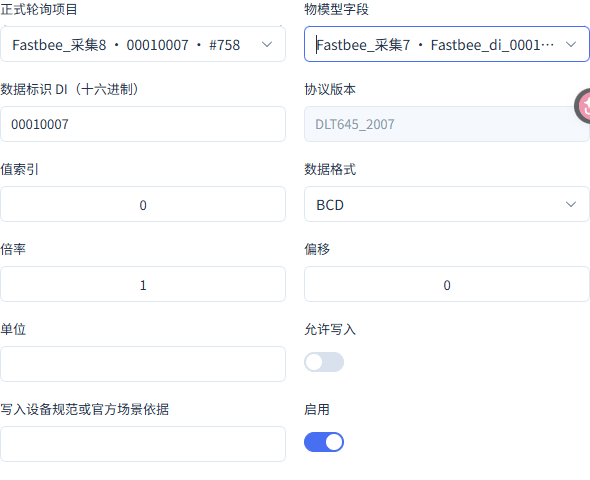
Protocol data will be mapped to the corresponding model; only the first item is writable.
Screenshot Highlights
| Field / Control | Description |
|---|---|
| Data Identifier DI (hexadecimal) | Must exactly match the DI of the selected polling item. Required · Value: 00010007 |
| Data Format | Decodes the value per the device definition; this example uses BCD, the decimal-digit encoding. Optional · Value: BCD |
| Multiplier | Converts the decoded value by the agreed ratio. Required · Value: 1 |
66. Save the 00010007 Mapping
Where: Product Details → Protocol Configuration → Point Mapping Steps: Save the current mapping and verify the model, data identifier, and polling item.
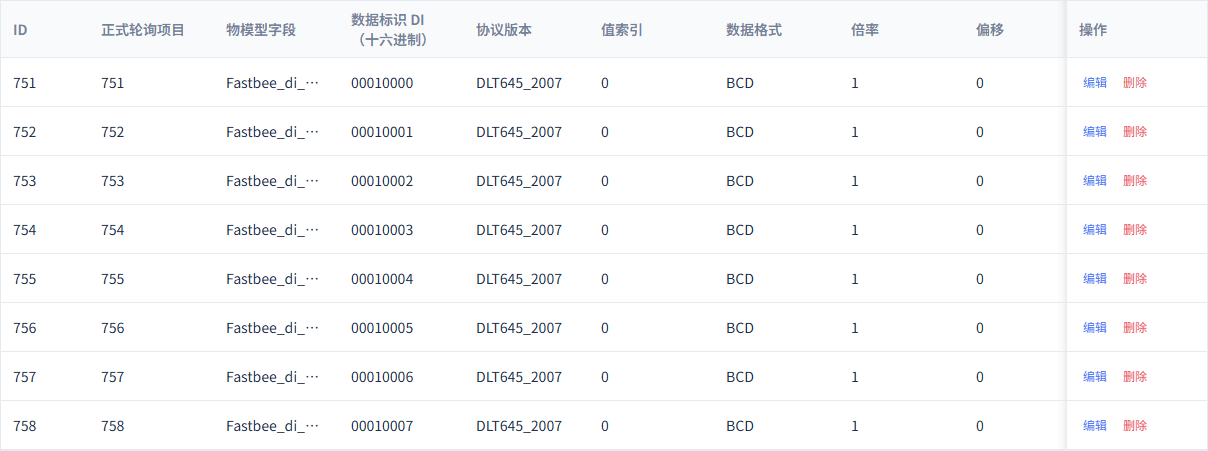
The current mapping is saved and enabled.
67. Map Data Identifier 00010008
Where: Product Details → Protocol Configuration → Point Mapping Steps: Associate the model and the polling item with the same data identifier; select BCD, value index 0, multiplier 1, offset 0.
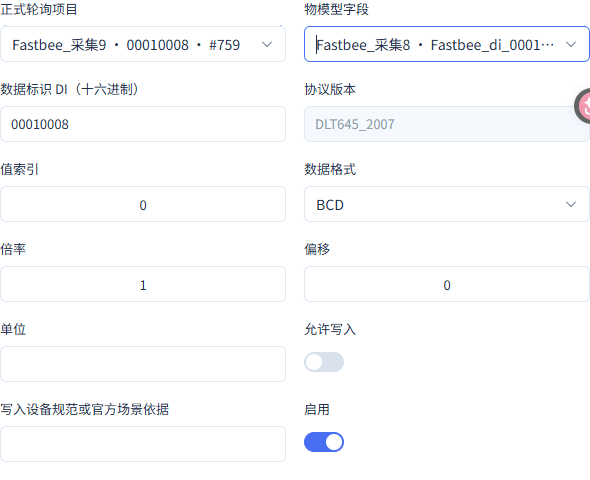
Protocol data will be mapped to the corresponding model; only the first item is writable.
Screenshot Highlights
| Field / Control | Description |
|---|---|
| Data Identifier DI (hexadecimal) | Must exactly match the DI of the selected polling item. Required · Value: 00010008 |
| Data Format | Decodes the value per the device definition; this example uses BCD, the decimal-digit encoding. Optional · Value: BCD |
| Multiplier | Converts the decoded value by the agreed ratio. Required · Value: 1 |
68. Save the 00010008 Mapping
Where: Product Details → Protocol Configuration → Point Mapping Steps: Save the current mapping and verify the model, data identifier, and polling item.
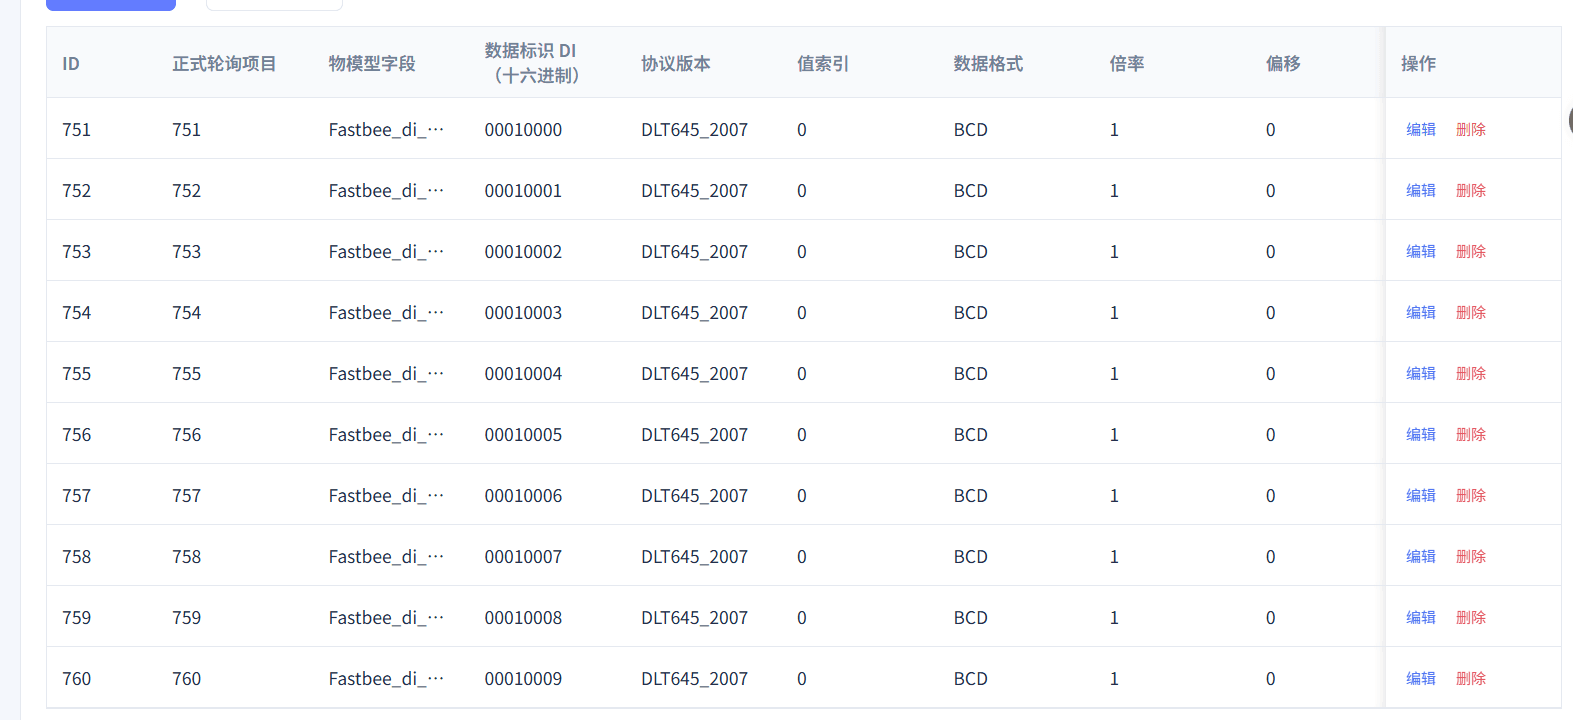
The current mapping is saved and enabled; long identifiers can be viewed on hover and checked against data identifier 00010008.
69. Map Data Identifier 00010009
Where: Product Details → Protocol Configuration → Point Mapping Steps: Associate the model and the polling item with the same data identifier; select BCD, value index 0, multiplier 1, offset 0.
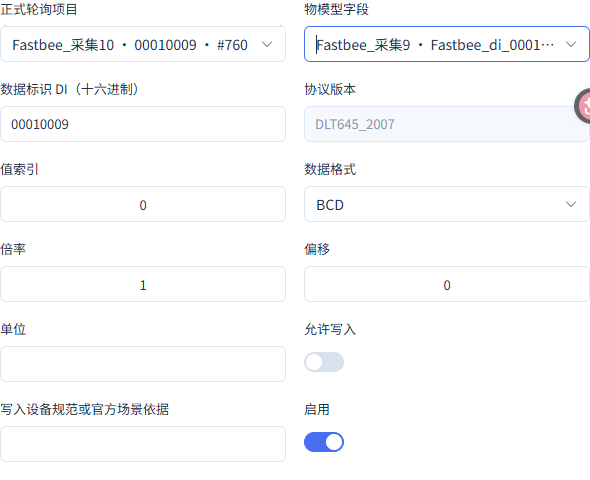
Protocol data will be mapped to the corresponding model; only the first item is writable.
Screenshot Highlights
| Field / Control | Description |
|---|---|
| Data Identifier DI (hexadecimal) | Must exactly match the DI of the selected polling item. Required · Value: 00010009 |
| Data Format | Decodes the value per the device definition; this example uses BCD, the decimal-digit encoding. Optional · Value: BCD |
| Multiplier | Converts the decoded value by the agreed ratio. Required · Value: 1 |
70. Save the 00010009 Mapping
Where: Product Details → Protocol Configuration → Point Mapping Steps: Save the current mapping and verify the model, data identifier, and polling item.
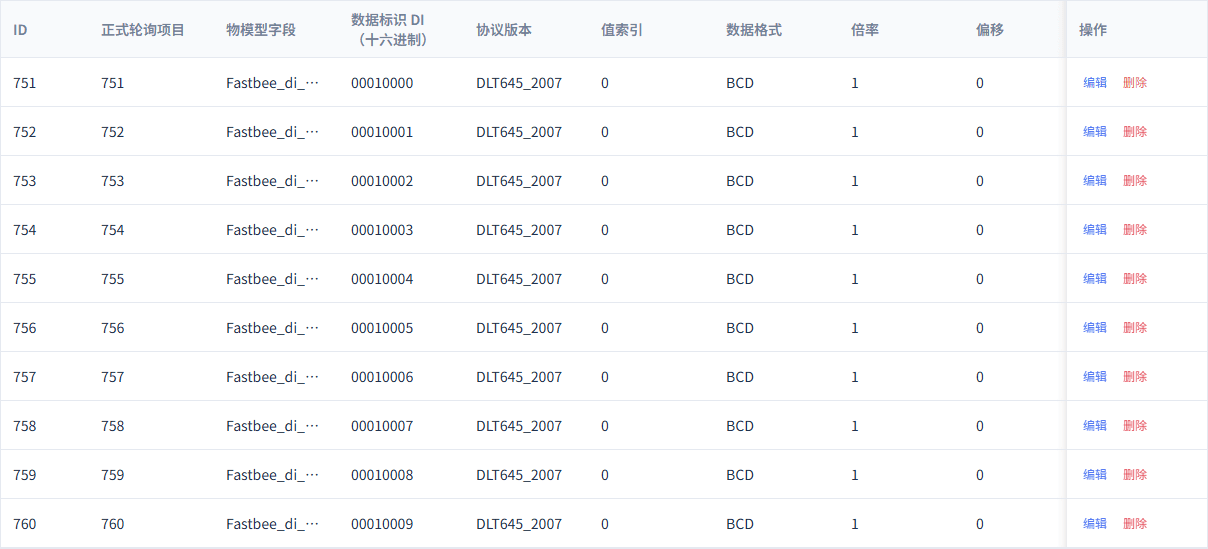
The current mapping is saved and enabled.
71. Configure the Read Policy
Where: Product Details → Protocol Configuration → Command Policy Steps: Add a READ_DATA policy for 00010000.
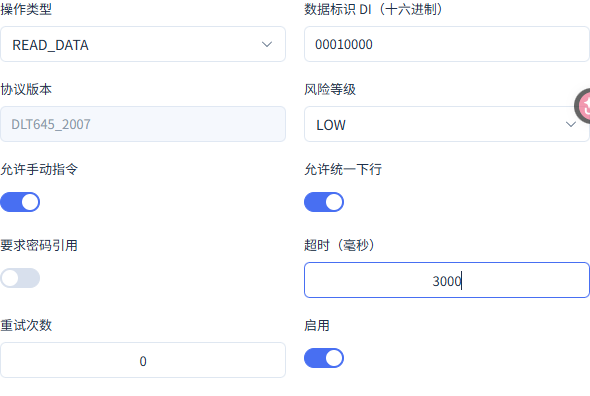
The read policy covers only this tutorial's demo field.
Screenshot Highlights
| Field / Control | Description |
|---|---|
| Operation Type | Distinguishes read and write operations; a read policy cannot replace a write policy. Optional · Value: READ_DATA · Example: read data |
| Data Identifier DI (hexadecimal) | Restricts the policy to the mapped demo DI. Required · Value: 00010000 |
72. Save the Read Policy
Where: Product Details → Protocol Configuration → Command Policy Steps: Save and verify the read policy record.

Read policy 790 is saved.
73. Configure the Controlled Write Policy
Where: Product Details → Protocol Configuration → Command Policy Steps: Add WRITE_DATA for 00010000 and set the write security requirements per this tutorial's demonstration.
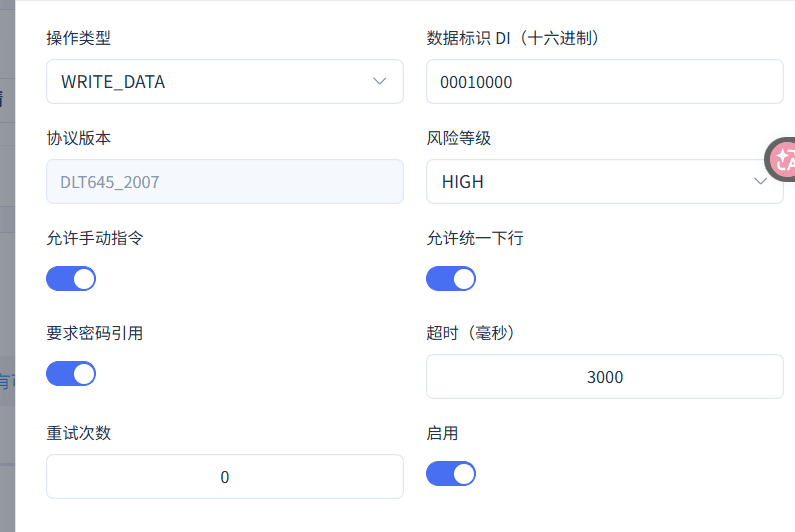
The saved WRITE_DATA policy was reopened to verify the security requirements; this was a read-only supplementary screenshot and was cancelled afterwards — no changes were saved.
Screenshot Highlights
| Field / Control | Description |
|---|---|
| Operation Type | Distinguishes read and write operations; a read policy cannot replace a write policy. Optional · Value: WRITE_DATA · Example: write data |
| Require Password Reference | Writes must use controlled authorization and cannot bypass it by turning off the switch. Optional · Value: fill in per your environment |
74. Save the Write Policy
Where: Product Details → Protocol Configuration → Command Policy Steps: Save and verify the current write policy.

Write policy 791 is saved; no command has been sent yet.
75. Verify the Product Configuration Validation
Where: Product Details → Protocol Configuration → Command Policy Steps: Click Validate in Protocol Configuration.

The page draft validation passed; runtime adoption and business traffic still need verification.
76. Select the FMQX Meter Protocol
Where: FMQX Web → This Tutorial's Connection Steps: In FMQX Web, select DL/T 645-2007.
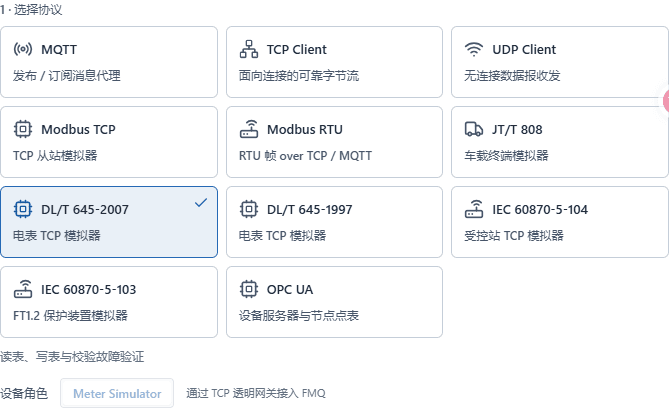
Use the 2007 meter device demo capability.
Screenshot Highlights
| Field / Control | Description |
|---|---|
| Application Protocol | Selects the DL/T 645-2007 simulation capability. Optional · Value: DL/T 645-2007 |
**Complete connection and point JSON template (no password)**json
{

  "schemaVersion": 3,

  "groups": [

    {

      "id": "DLT07_TCPGW_Tutorial_02_group",

      "name": "新表接入"

    }

  ],

  "sessions": [

    {

      "id": "DLT07_TCPGW_Tutorial_02",

      "groupId": "DLT07_TCPGW_Tutorial_02_group",

      "name": "接入新表",

      "protocol": "DLT645_2007",

      "transport": "TCP",

      "host": "127.0.0.1",

      "port": 8888,

      "clientId": "demo-device",

      "autoReconnect": false,

      "dlt645MeterAddress": "123456782008",

      "dlt645IncludePreamble": false,

      "dlt645MaxFrameBytes": 1024,

      "dlt645Points": [

        {

          "dataIdentifier": "00010000",

          "valueHex": "11000000",

          "writable": true

        },

        {

          "dataIdentifier": "00010001",

          "valueHex": "12000000",

          "writable": false

        },

        {

          "dataIdentifier": "00010002",

          "valueHex": "13000000",

          "writable": false

        },

        {

          "dataIdentifier": "00010003",

          "valueHex": "14000000",

          "writable": false

        },

        {

          "dataIdentifier": "00010004",

          "valueHex": "15000000",

          "writable": false

        },

        {

          "dataIdentifier": "00010005",

          "valueHex": "16000000",

          "writable": false

        },

        {

          "dataIdentifier": "00010006",

          "valueHex": "17000000",

          "writable": false

        },

        {

          "dataIdentifier": "00010007",

          "valueHex": "18000000",

          "writable": false

        },

        {

          "dataIdentifier": "00010008",

          "valueHex": "19000000",

          "writable": false

        },

        {

          "dataIdentifier": "00010009",

          "valueHex": "20000000",

          "writable": false

        }

      ]

    }

  ]

}After verifying against the replacement checklist, save it as a UTF-8 file named 连接配置.json (connection configuration) and choose Import Configuration in FMQX Web; this rewrite of the body text does not mean the template has actually been imported. Replaceable customer template names are used here; verify against this section's replacement checklist before importing or sending.
77. Import This Tutorial's Connection Configuration
Where: FMQX Web → This Tutorial's Connection Steps: After verifying this section's complete JSON against the replacement checklist, save it as a UTF-8 file named 连接配置.json (connection configuration), then in FMQX Web choose Import Configuration under More Actions. The original step's screenshot keeps the original batch operation.
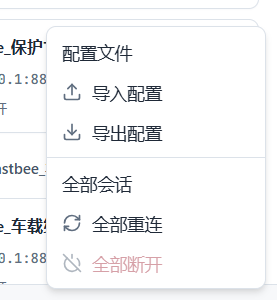
The current connection's configuration and the "Import Configuration" item in the batch operations menu are visible; this time the menu was only opened without re-importing.
78. Verify the Imported New Connection
Where: FMQX Web → This Tutorial's Connection Steps: View this tutorial's group and the new connection.
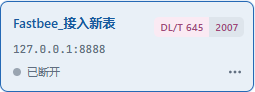
The connection is saved but not connected.
Screenshot Highlights
| Field / Control | Description |
|---|---|
| Connection Name | Used to find the current meter connection. Required · Value: fill in per the integration materials · Example: fill in per your environment |
79. Verify the Meter Connection Overview
Where: FMQX Web → This Tutorial's Connection Steps: In this tutorial's connection overview, verify the application protocol, transport channel, meter address, point count, and remote address.

Meter address 123456782008, point count 10, remote address 127.0.0.1:8888; this figure does not show the client number.
Screenshot Highlights
| Field / Control | Description |
|---|---|
| Application Protocol | Selects the DL/T 645-2007 simulation capability. Optional · Value: DL/T 645-2007 |
| Transport Channel | The TCP transparent gateway sends and receives meter messages as native frames. Optional · Value: TCP transparent gateway |
| Meter Address | Must match the 12-digit meter number in the device binding. Required · Value: fill in per the integration materials · Example: 123456782008 |
| Host | Enter this round's local FMQ listening address; do not copy it from another environment. Required · Value: fill in per the integration materials · Example: 127.0.0.1 |
| Port | Enter this round's TCP listening port. Required · Value: fill in per the integration materials · Example: 8888 |
80. Verify the Gateway Registration Identity
Where: FMQX Web → This Tutorial's Connection Steps: In the connection parameters, verify the TCP gateway client number; it must exactly match the platform device number.

The client number is this tutorial's device number; it is not the meter address.
Screenshot Highlights
| Field / Control | Description |
|---|---|
| Client Number | Matches the platform device and the real gateway identity; in this example it came in through the complete configuration import. Required · Value: fill in per the integration materials · Example: fill in per your environment |
81. View the Saved Connection Parameters
Where: FMQX Web → This Tutorial's Connection Steps: Open the connection parameters to verify the address, port, and meter address; this viewing was cancelled afterwards.
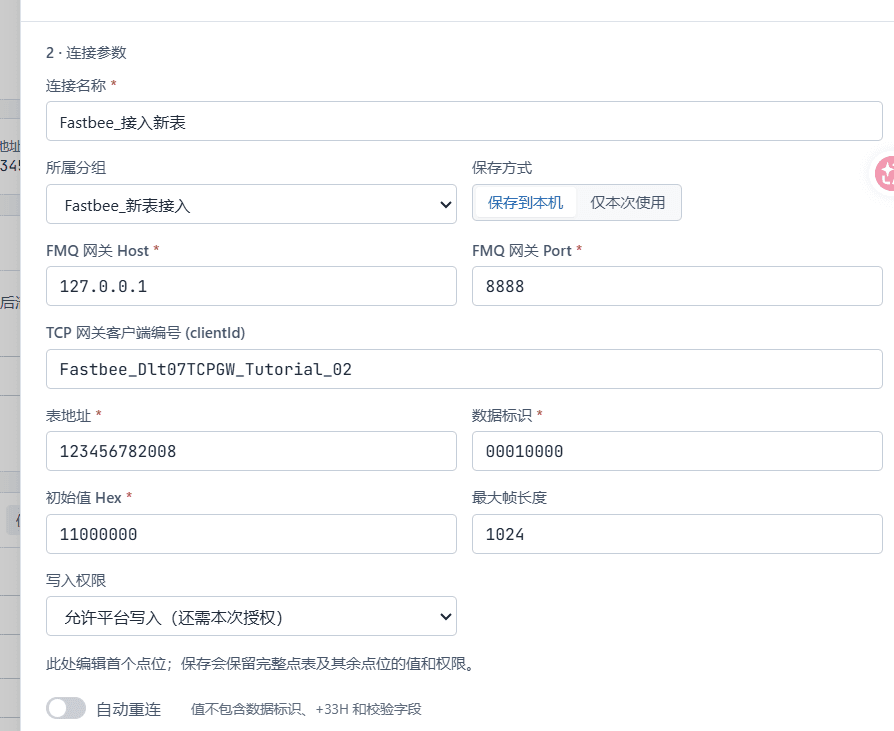
The saved configuration was reopened to verify the gateway address, port, client number, and meter number; no changes were saved this time.
Screenshot Highlights
| Field / Control | Description |
|---|---|
| Host | Enter this round's local FMQ listening address; do not copy it from another environment. Required · Value: fill in per the integration materials · Example: 127.0.0.1 |
| Port | Enter this round's TCP listening port. Required · Value: fill in per the integration materials · Example: 8888 |
| Meter Address | Must match the 12-digit meter number in the device binding. Required · Value: fill in per the integration materials · Example: 123456782008 |
82. Verify the Protocol and Ten-Point Identity
Where: FMQX Web → This Tutorial's Connection → Communication Steps: Open Communication and verify the meter version, meter address, and point count.

The complete protocol identity card was reviewed again: meter version, gateway number, meter address 123456782008, ten points, and remote address; no connection or data resend was performed this time.
83. Save This Tutorial's Independent Registration Scenario
Where: FMQX Web → Automation Testing Steps: Save this tutorial's default identity registration scenario and verify the new name in the case list.

The new scenario is associated only with this tutorial's session and has not been run yet.
84. Enter Publish
Where: Product Details → Publish and Runtime Sync Steps: Select the Publish entry in this tutorial's product.

The publish window points to this tutorial's product.
85. Confirm Publishing This Tutorial's Product
Where: Product Details → Publish and Runtime Sync Steps: Verify the current product and click OK in the system prompt to complete the publish.
The publish confirmation window's buttons are clear; this tutorial's actual publish is then adopted by a single node.
86. Verify the Runtime Adoption Result
Where: Product Details → Publish and Runtime Sync Steps: View this round's runtime sync receipt.

FMQ finished compiling and adopted the new version, and the platform received the matching success receipt.
87. Verify the Default Registration Action
Where: FMQX Web → Automation Testing Steps: In the automation testing scenario, verify the registration.default.send action and the current meter session.

The default registration action reads the current connection's client number and automatically generates the identity registration frame.
88. Execute This Tutorial's Registration
Where: FMQX Web → Automation Testing Steps: Run this tutorial's registration scenario once.

The real connection and registration have occurred; verify them with the communication frames next.
89. Verify the Actual Registration Sent
Where: FMQX Web → This Tutorial's Connection → Communication Steps: In this tutorial's communication records, view the registration raw frame and device identity.
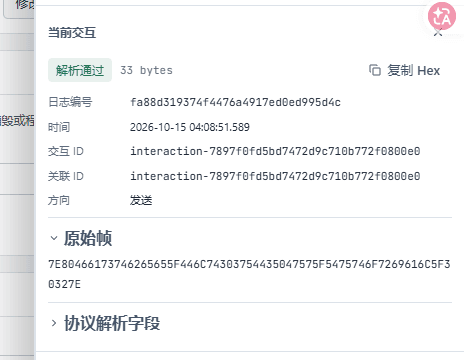
The registration comes from this tutorial's device at this round's time, not an old frame or a run report.
90. Verify the Real Polling Requests
Where: FMQX Web → This Tutorial's Connection → Communication Steps: View the meter read requests this tutorial received.
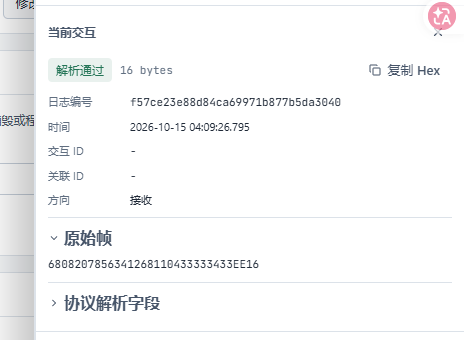
The requested meter address and data identifier match.
91. Verify the Ten Responses One by One
Where: FMQX Web → This Tutorial's Connection → Communication Steps: In Real-Time Evidence, verify the meter address, data identifier, and response against each read record; view all ten points the same way.
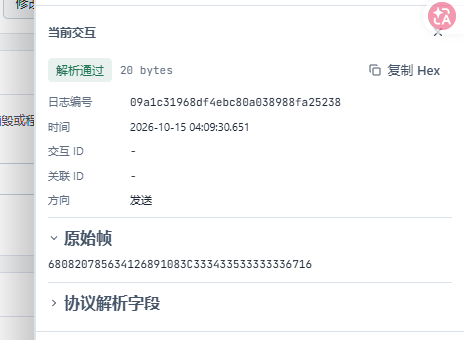
The figure shows one real response example for 00010009; the complete per-point evidence for all ten is kept — one image is not claimed to be ten frames.
92. Observe Continuous Collection
Where: FMQX Web → This Tutorial's Connection → Communication Steps: Following the 60-second polling period, change the demo setpoint from 11 to 20 in turn, waiting for a new read each time; verify the continuous collection result in Run History.
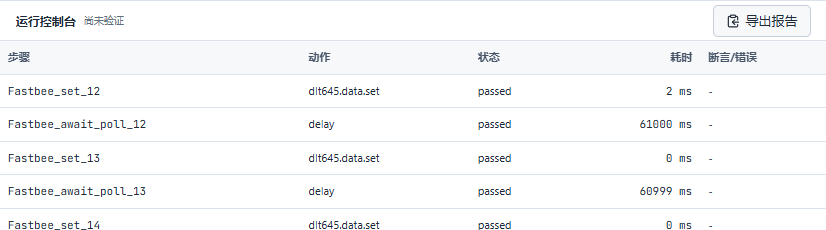
The real run console shows the set-value and wait steps passed; the initial value 11 has three rounds, then 12 through 20 have one round each.
93. Verify the Ten Real-Time Values
Where: Device Details → Running Status Steps: Enter Running Status of this tutorial's device and view the ten properties in turn; the demo setpoint should be 20.

The figure shows demo setpoint 20; verify the other nine points one by one on the same page.
94. Open the Controlled Write
Where: Device Details → Running Status → Demo Setpoint Steps: In the device details' Running Status, click the send icon to the right of the demo setpoint to open Meter Write.
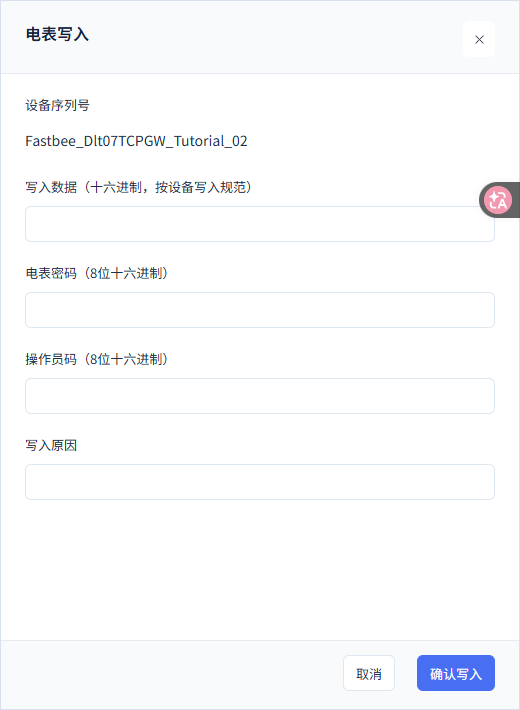
The native write window has not been filled in or sent yet.
95. Configure the Write Authorization for This Device Round
Where: FMQX Web → Communication → Current Session Steps: On the FMQX Communication page, under Current Session Write Authorization, enter the authorized write password and operator code, then click Configure This Authorization.

Once the authorization is configured, the inputs are cleared automatically and stay only in the current session memory; the tutorial does not provide real credentials.
96. Fill In the Write of 42
Where: Device Details → Running Status → Demo Setpoint Steps: In Write Data, enter 42000000, plus the authorized meter password, operator code, and write reason.
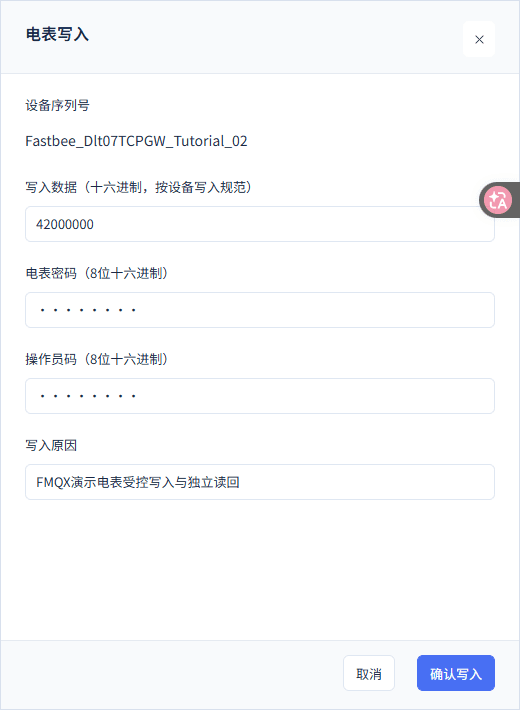
This tutorial's FMQX demo field represents 42 as little-endian BCD bytes; the password is shown with native masking.
Screenshot Highlights
| Field / Control | Description |
|---|---|
| Write Data (hexadecimal) | Enter the complete data bytes to write this time, in this tutorial's BCD encoding. Required · Value: 42000000 / 43000000 |
| Meter Password (8 hexadecimal digits) | Provided by the authorization owner; use the password field and do not record it in plain text. Required · Value: fill in per your environment |
| Operator Code (8 hexadecimal digits) | Enter the current operator code per the authorization materials. Required · Value: fill in per the integration materials · Example: not provided in the manual |
| Write Data | Used to complete "Fill In the Write of 42". Required · Value: 42000000 · Example: only this tutorial's FMQX demo point; real values follow the manufacturer's specification |
97. Send the Write of 42
Where: Device Details → Running Status → Demo Setpoint Steps: Verify the target and Confirm Write once.

The platform generated this command's number; actual device receipt still needs verification.
98. Verify 42 Was Actually Received and Executed
Where: FMQX Web → Communication → Current Session Steps: On the FMQX Communication page, in Current Session Write Execution Record, verify this request, the pre-write value, the post-write value, and the execution count.

After the device received the request, the value changed from 20000000 to 42000000, with one cumulative execution; the raw write frame contains authorization bytes and is not shown in the tutorial.
99. Verify the Write Response for 42
Where: FMQX Web → Communication → Current Session Steps: In Real-Time Evidence, locate the corresponding write response and verify the time, meter address, and parsing result.
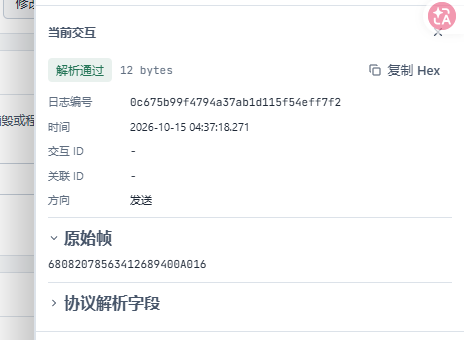
This is the secure write response actually sent by the device; do not conclude execution from the platform's "sent" status alone.
100. Wait for the Next Independent Read
Where: FMQX Web → Communication → Current Session Steps: Wait for the configured 60-second polling and view the new read request after the write response in Real-Time Evidence.
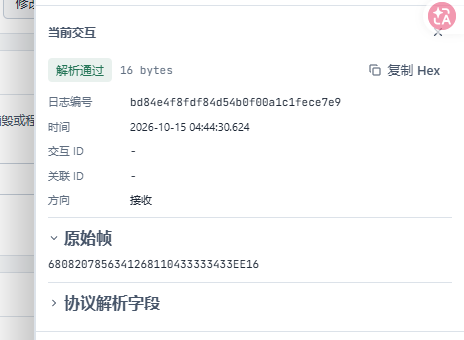
This tutorial's read-back is triggered by automatic polling; no separate manual read command was submitted.
Screenshot Highlights
| Field / Control | Description |
|---|---|
| Automatic Read Period | Used to complete "Wait for the Next Independent Read". Required · Value: 60 seconds · Example: wait for the next independent read-back; do not resubmit the write command |
101. Verify the Independent Read of 42
Where: FMQX Web → Communication → Current Session Steps: View the device response corresponding to the new read request and confirm the read-back value is 42000000.
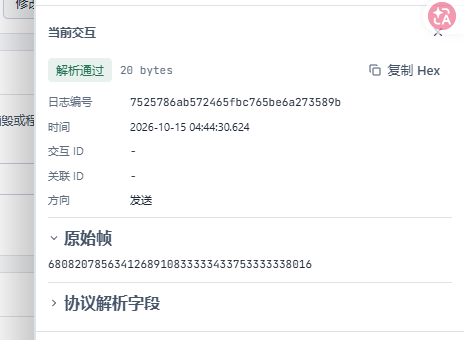
The figure shows a real independent read response after writing 42, not the write response.
102. Verify the Platform's Real-Time 42
Where: Device Details → Running Status → Demo Setpoint Steps: Read this tutorial's device current value.

The platform shows 42.
103. Disconnect and Confirm the Connection Status
Where: FMQX Web → Communication → Current Session Steps: Click Disconnect on the current connection, turn off Auto Reconnect, and confirm the status becomes Disconnected.

The figure shows the real connection status after stopping; the first disconnect happened after reading back 42, and the independent run record is kept.
Screenshot Highlights
| Field / Control | Description |
|---|---|
| Auto Reconnect | Turned off at the end to avoid reconnecting after exit. Optional · Value: Off |
104. Restore Registration and Verify the Result
Where: FMQX Web → Automation Testing → Run History Steps: In Automation Testing, Run this tutorial's registration scenario once again, then view that run's result in Run History.
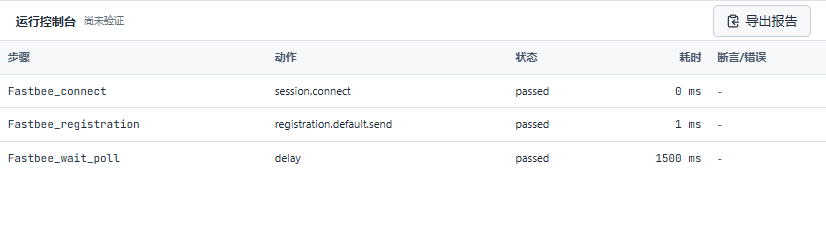
On recovery, connect, default registration, and wait all passed; this figure only opens the completed recovery result and did not run it again.
105. Verify Reading 42 After Recovery
Where: FMQX Web → Communication → Current Session Steps: View the new read and device response received after re-registration, and confirm the original value 42 is still retained.
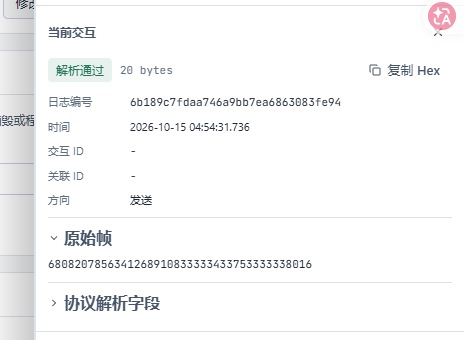
The independent read at 04:54:31 after recovery still returns 42000000; 43 was written only afterwards.
106. Fill In the Post-Recovery Write of 43
Where: Device Details → Running Status → Demo Setpoint Steps: Reopen the write window, enter 43000000 in Write Data, and fill in this round's authorized parameters.
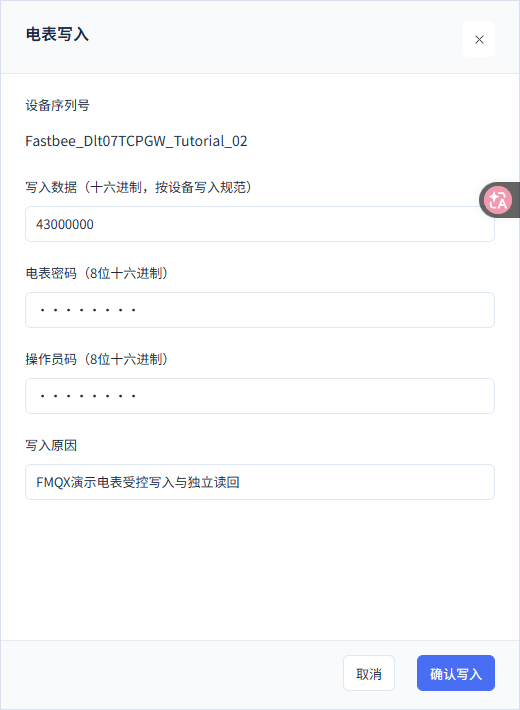
The complete native form shows 43; after the supplementary screenshot it was cancelled, and the write was not sent again.
Screenshot Highlights
| Field / Control | Description |
|---|---|
| Write Data (hexadecimal) | Enter the complete data bytes to write this time, in this tutorial's BCD encoding. Required · Value: 42000000 / 43000000 |
| Meter Password (8 hexadecimal digits) | Provided by the authorization owner; use the password field and do not record it in plain text. Required · Value: fill in per your environment |
| Operator Code (8 hexadecimal digits) | Enter the current operator code per the authorization materials. Required · Value: fill in per the integration materials · Example: not provided in the manual |
| Write Data | Used to complete "Fill In the Post-Recovery Write of 43". Required · Value: 43000000 · Example: only this tutorial's FMQX demo point; real values follow the manufacturer's specification |
107. Send 43 and View the Platform Feedback
Where: Device Details → Command Log Steps: After verifying the target, click Confirm Write once, then enter the current device's Command Log and view the device response by this round's time.

04:55:10 shows the device response was received. The 200 here is the response status code, not the written value; whether 43 was executed still requires verifying the subsequent device records and independent read.
108. Verify 43 Was Actually Received and Executed
Where: FMQX Web → Communication → Current Session Steps: In Current Session Write Execution Record, verify the new request and the change from 42 to 43; the cumulative execution count should be 2.

42000000 before the write and 43000000 after; the two platform commands were each actually executed once.
109. Verify the Write Response for 43
Where: FMQX Web → Communication → Current Session Steps: Locate the write response corresponding to the new request and check it against this execution record.
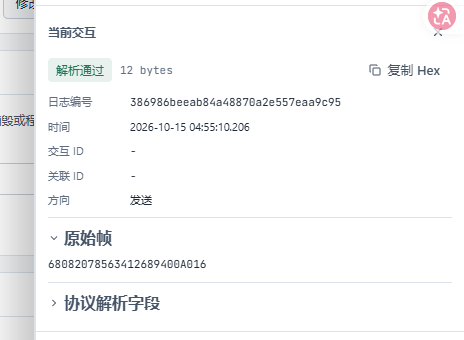
The new write response comes from this tutorial's device at 04:55:10; the old record of writing 42 is not reused.
110. Wait for the Independent Read Again
Where: FMQX Web → Communication → Current Session Steps: Keep waiting for the next 60-second polling round and view the new read request after the write-43 response.
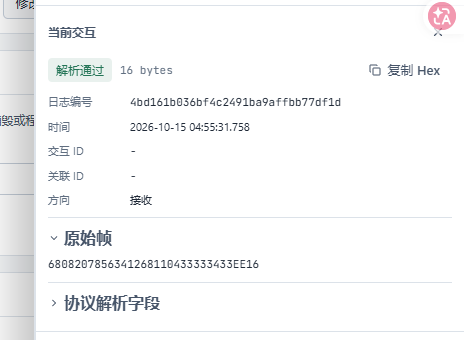
The post-write read-back uses the published automatic read configuration; no additional manual READ was submitted.
Screenshot Highlights
| Field / Control | Description |
|---|---|
| Automatic Read Period | Used to complete "Wait for the Independent Read Again". Required · Value: 60 seconds · Example: wait for the next independent read-back; do not resubmit the write command |
111. Verify the Independent Read of 43
Where: FMQX Web → Communication → Current Session Steps: Verify the response frame of the new read.
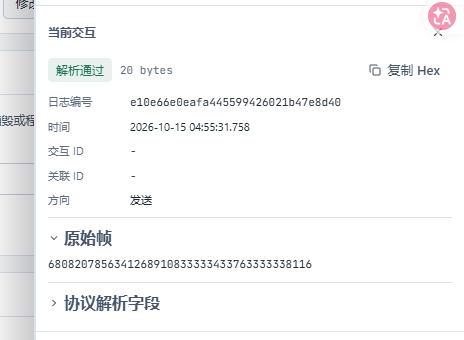
It returns 43000000, parsed as 43.
112. Verify the Platform's Real-Time 43
Where: Device Details → Running Status → Demo Setpoint Steps: Read this tutorial's device current value.

The platform shows 43.
113. Enter the History Query
Where: Data Center → Historical Data Steps: Open the Historical Data page.

The history query entry is visible.
Screenshot Highlights
| Field / Control | Description |
|---|---|
| Device | Queries only this tutorial's formal meter. Optional · Value: fill in per the integration materials · Example: fill in per your environment |
114. Select the Device and the Ten Fields
Where: Data Center → Historical Data Steps: Select this tutorial's device, expand Advanced Filter, and tick the ten fields one by one in the field dropdown.

The new screenshot is a read-only verification of the device and the ten fields (the first item plus 9 items); Query has not been clicked yet, and the old samples and the post-write read-back window are still accepted per the original records.
Screenshot Highlights
| Field / Control | Description |
|---|---|
| Device | Queries only this tutorial's formal meter. Optional · Value: fill in per the integration materials · Example: fill in per your environment |
| Fields | The ten-sample query selects all ten properties; the write-change query selects only the demo setpoint. Optional · Value: demo setpoint and Collection 1–9 |
115. Query This Tutorial's Sample Window
Where: Data Center → Historical Data Steps: Enter the start and end times of this sampling round in the time popup, click OK, then click Query.

This tutorial's real sample window is 2026-10-15 04:08:50 to 04:21:05; the example dates are not fixed recommended values.
Screenshot Highlights
| Field / Control | Description |
|---|---|
| Time Range | Restricts the history to the original sample or write window; do not look at only the latest record. Required · Value: fill in per the integration materials · Example: choose per the actual business time |
| Sampling Start Time | Used to complete "Query This Tutorial's Sample Window". Required · Value: 2026-10-15 04:08:50 · Example: fill in per your environment |
| Sampling End Time | Used to complete "Query This Tutorial's Sample Window". Required · Value: 2026-10-15 04:21:05 · Example: fill in per your environment |
116. Verify the Sample History
Where: Data Center → Historical Data Steps: Verify the history of the ten fields, then view the demo setpoint's twelve rounds separately.
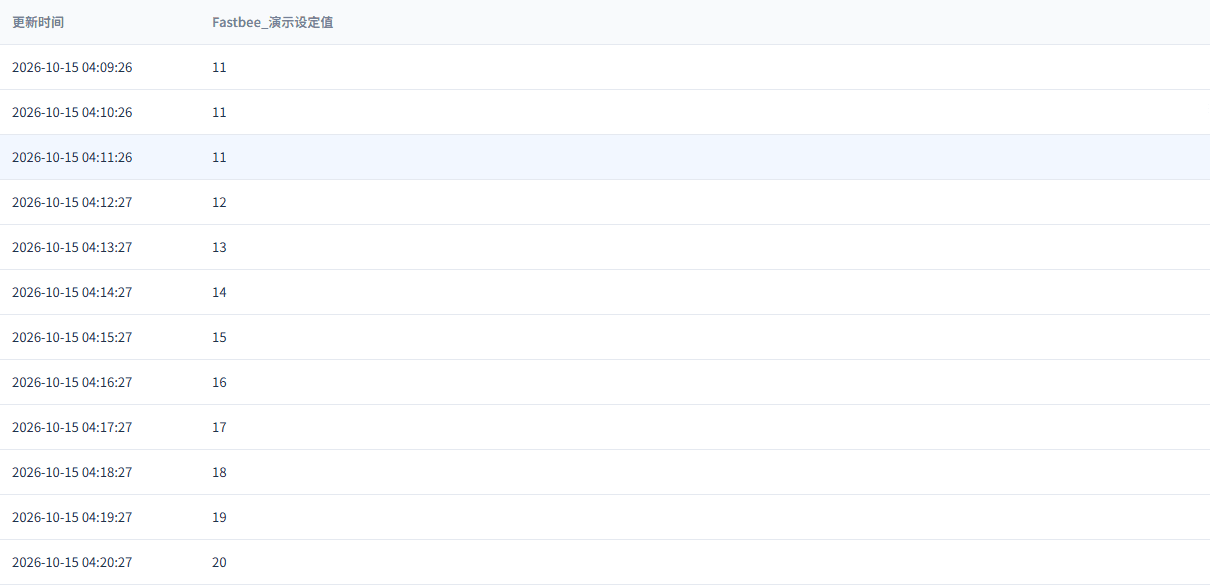
The first point reads 11, 11, 11, then 12 through 20; multiple fields may be grouped by second, so the row count does not equal the raw collection count.
117. Query the Write-Change Window
Where: Data Center → Historical Data Steps: Select the demo setpoint, enter this round's recovery and write times, click OK in the time popup, then Query.

This tutorial's window is 2026-10-15 04:53:40 to 04:57:05, used to verify the post-recovery 42 and the post-write 43.
Screenshot Highlights
| Field / Control | Description |
|---|---|
| Fields | The ten-sample query selects all ten properties; the write-change query selects only the demo setpoint. Optional · Value: demo setpoint and Collection 1–9 |
| Time Range | Restricts the history to the original sample or write window; do not look at only the latest record. Required · Value: fill in per the integration materials · Example: choose per the actual business time |
| Write Observation Start Time | Used to complete "Query the Write-Change Window". Required · Value: 2026-10-15 04:53:40 · Example: fill in per your environment |
| Write Observation End Time | Used to complete "Query the Write-Change Window". Required · Value: 2026-10-15 04:57:05 · Example: fill in per your environment |
118. Verify the 42 and 43 History
Where: Data Center → Historical Data Steps: Verify the values and times in the write-change window, and confirm that the recovery read of 42 and the post-write read of 43 both exist.

The real history is, in order: 42 at 04:54:31, 43 at 04:55:31, and another 43 in the next round; a write response must not be treated as collection history.
119. Query Again After Refresh
Where: Data Center → Historical Data Steps: Refresh the entire page, re-select this tutorial's device, fields, and sample window, then click Query again.

It is not just the old table being kept; re-querying after refresh still returns the twelve rounds of data.
120. Verify the History After Refresh
Where: Data Center → Historical Data Steps: View the refreshed table and total count, and page through to verify all records.
The figure shows the first page of ten records after refresh; the total is twelve, and the remaining two can be viewed by paging.
121. Stop This Tutorial's Device Traffic
Where: This Tutorial's Product and FMQX Connection Steps: Disconnect this tutorial's connection, turn off Auto Reconnect, and confirm in Scheduled Sending that the current status is Not Enabled.

The device is disconnected, scheduled sending is not enabled, and auto-reconnect and auto-reply are off.
Screenshot Highlights
| Field / Control | Description |
|---|---|
| Auto Reconnect | Turned off at the end to avoid reconnecting after exit. Optional · Value: Off |
122. Clear the Temporary Write Authorization
Where: This Tutorial's Product and FMQX Connection Steps: On the Communication page, click Clear Authorization, then read the masked status to confirm Not Configured.

Only this session's authorization is cleared; the historical write execution count is unchanged and no points are deleted.
123. Unpublish and Stop Polling
Where: This Tutorial's Product and FMQX Connection Steps: Return to this tutorial's product, click Unpublish and confirm, then refresh and verify it shows Unpublished.

This tutorial's withdrawal has been adopted by the runtime node, and polling has stopped. Unpublishing clears the real-time value cache; Sync Details no longer shows the publish node receipt.
124. Verify the Retained Device and History
Where: This Tutorial's Product and FMQX Connection Steps: Verify the device number and points are still there, and query the history by the time windows above; when re-accepting, publish, register, and read again.

The product, device, ten points, and 488 history records are retained. The FMQX device value is 43; after deactivation the platform's real-time cache is empty, so do not expect it to still show 43 at this point.
Where the Parameters Come From
Device Access Wizard
| Field / Control | Filling Notes |
|---|---|
| Access Source | Chooses the starting point: reusing existing configuration or preparing a new product. Optional · Value: Copy ProductExisting Product: uses a product that already exists to add a device; uses a product that already exists to add a device. Create Product: prepares access from an empty product; prepares access from an empty product. Copy Product: copies the model definition from an existing product, with the device identity filled in separately; copies the model definition from an existing product, with the device identity filled in separately. Use Template: prepares a product from a maintained template; prepares a product from a maintained template. |
| Copy Product | Specifies the source product that provides the model definition. Optional · Value: fill in per your environmentIn Product Management, select a maintained 2007 meter product of the same model. Current batch resource: specifies the source product that provides the model definition; specifies the source product that provides the model definition. |
| Product Name | Sets a distinguishable name for the copied product. Required · Value: New Meter AccessFilled in by the person performing this access with a recognizable product name. |
| Preview Product | Opens the source product details to verify the model, instead of looking only at the summary numbers. |
| Protocol | Selects the meter protocol version; 2007 and 1997 differ in DI length and frame meaning. Optional · Value: DLT645_2007DLT645_2007: selects the meter protocol version; 2007 and 1997 differ in DI length and frame meaning; selects the meter protocol version; 2007 and 1997 differ in DI length and frame meaning. |
| Prepare product only, do not create a device yet | This round only saves the product draft; the device is created manually later. Optional · Value: Selected |
| Next | Enters the next stage and verifies this round's prepared content. |
| Previous | Returns to the previous stage to fix unsubmitted content. |
| Configuration Pre-check | Shows whether the current draft meets the submission conditions. |
| Save Product Draft | Submits the product draft; this does not yet mean the runtime plane has taken effect. |
| Configuration Saved | Shows the draft save feedback; the collection field summary should still be verified in Feature Definition. |
Advanced parameters (1 item)
| Field / Control | Filling Notes |
|---|---|
| Advanced Configuration | Expands the optional product information such as category and firmware. |
Feature Definition
| Field / Control | Filling Notes |
|---|---|
| Feature Definition | Opens the current product's property, function, and event definitions. |
| Property Count | Confirms the real total number of properties after copying. |
| Model Name | Sets a readable name for a collected or writable property. Required · Value: Demo SetpointRepublish after changes. |
| Model Translation | Fills in the model's English name for cross-language display. Required · Value: DemoSetpointRepublish after changes. |
| Model Identifier | Maps the property one-to-one to the identifier in the point mapping. Required · Value: fill in per your environmentFrom the current product's feature definition. Republish after changes. |
| Model Category | This example uses a property to carry the read-back value. Optional · Value: PropertyRepublish after changes. Property: a state value the device can report or be read from; a state value the device can report or be read from. Function: a function the platform requests from the device; a function the platform requests from the device. Event: an event the device notifies to the platform; an event the device notifies to the platform. |
| Chart Display | Controls whether the property is shown as a chart field. Optional · Value: on for read-only collection properties, off for the demo setpointRepublish after changes. |
| Real-Time Monitoring | Controls whether the property enters the real-time monitoring display. Optional · Value: on for read-only collection properties, off for the demo setpointRepublish after changes. |
| Read-Only Data | A read-only property only displays data; the demo setpoint keeps controlled writing. Optional · Value: off for the first item, on for the other nineRepublish after changes. |
| History Storage | Lets the parsed property values enter the historical data query. Optional · Value: OnRepublish after changes. |
| Data Type | All ten properties are parsed and displayed as integers. Optional · Value: IntegerRepublish after changes. Integer: all ten properties are parsed and displayed as integers; all ten properties are parsed and displayed as integers. |
| Minimum | Limits the usable lower bound of the property. Required · Value: 0Republish after changes. |
| Maximum | Limits the usable upper bound of the property. Required · Value: 10000Republish after changes. |
| Step | Defines the increment when adjusting an integer property. Required · Value: 1Republish after changes. |
| Unit | Marks the unit per the device specification; this demo value carries no electric-energy unit. Optional · Value: blankRepublish after changes. |
| View | Opens the model form of the corresponding name to verify the definition. Republish after changes. |
| Modify | Saves corrections in the model form to the product draft. Republish after changes. |
| Cancel | Closes the model window and discards unsaved changes. |
Advanced parameters (2 items)
| Field / Control | Filling Notes |
|---|---|
| Sharing Permission | Controls attribute access in sharing scenarios; this tutorial does not open shared writing. Optional · Value: OffRepublish after changes. |
| Delete | Deleting the current model would affect the mapping; this tutorial does not delete. Republish after changes. |
Add Device
| Field / Control | Filling Notes |
|---|---|
| Add Manually | Opens the device creation form. |
| Device Name | Sets a readable name for the logical meter. Required · Value: Access New MeterFilled in by the person performing this access. |
| Product | Associates the new device with the product just prepared. Optional · Value: fill in per your environmentFrom this tutorial's newly saved product. Current batch resource: associates the new device with the product just prepared; associates the new device with the product just prepared. |
| Select | Locates the target product in the product list. |
| Confirm Selection | Brings the selected product back to the device form. |
| Device Number | Serves as the platform identity, the gateway identity, and the default registration number. Required · Value: fill in per your environmentFrom the platform device information; ensure uniqueness when entering manually. |
| Device Shadow | Controls offline target-state sync; this tutorial verifies the real read-back directly. Optional · Value: Off |
| OK | Submits the device and checks the saved name and number. |
| Close | Closes the unsubmitted device form. |
Advanced parameters (5 items)
| Field / Control | Filling Notes |
|---|---|
| Generate | Generates a number automatically; this tutorial enters it manually to match the device client. |
| Firmware Version | Records the device firmware version; this tutorial keeps it unknown. Optional · Value: Unknown |
| Positioning Method | Controls how the device location is maintained. Optional · Value: Automatic positioningAutomatic positioning: controls how the device location is maintained; controls how the device location is maintained. |
| Device Organization | Assigned to the selected organization after creation; not selected in this tutorial. Optional · Value: Not selectedNot selected: assigned to the selected organization after creation; not selected in this tutorial; assigned to the selected organization after creation; not selected in this tutorial. |
| Device Space | Assigned to the selected space after creation; not selected in this tutorial. Optional · Value: Not selectedNot selected: assigned to the selected space after creation; not selected in this tutorial; assigned to the selected space after creation; not selected in this tutorial. |
DLT645 2007 Device Binding
| Field / Control | Filling Notes |
|---|---|
| Device Binding | Associates the platform logical meter with the real gateway and meter number. |
| Add Configuration | Opens a new device binding draft. Republish after changes. |
| Platform Device | Selects the logical meter just created manually. Optional · Value: fill in per your environmentFrom the devices already created in the current tenant. Republish after changes. Current batch resource: selects the logical meter just created manually; selects the logical meter just created manually. |
| Device Identifier | Shows the selected device's registration identity. |
| Real Gateway | Selects the gateway identity that carries this meter's communication. Optional · Value: fill in per your environmentFrom the registered gateway this meter actually uses. Republish after changes. Current batch resource: selects the gateway identity that carries this meter's communication; selects the gateway identity that carries this meter's communication. |
| Meter Number (12 digits) | Matches the meter address in the DL/T 645 frame. Required · Value: 123456782008The real meter address comes from the meter nameplate, the manufacturer's configuration tool, or the integration materials. Republish after changes. |
| Protocol Version | Ensures the binding belongs to the 2007 edition. |
| Enable | Includes this binding in the runtime configuration after publishing. Optional · Value: OnRepublish after changes. |
| Save Draft | Saves the binding record and checks the device and meter number in the list. Republish after changes. |
| Binding List | Shows the saved bindings. |
Polling Items
| Field / Control | Filling Notes |
|---|---|
| Polling Items | Configures which meter DIs the platform reads actively. |
| Add Configuration | Opens a polling item draft. Republish after changes. |
| Polling Name | Helps find the same polling item later in the point mapping. Required · Value: fill in per your environmentRepublish after changes. |
| Data Identifier DI (hexadecimal) | Specifies the eight-hexadecimal-digit data identifier of the 2007 protocol. Required · Value: 00010000From the manufacturer's formal point table for this model; this tutorial uses the FMQX demo point table. Republish after changes. |
| Protocol Version | The polling item belongs to the current 2007 edition. |
| Polling Interval (ms) | Controls the normal read interval; 60000 ms is 60 seconds. Required · Value: 60000Republish after changes. |
| Timeout (ms) | Limits how long a single read waits for a response. Required · Value: 3000Republish after changes. |
| Retries | Controls extra retries after a read fails; zero in this example. Required · Value: 0Republish after changes. |
| Priority | Provides a priority value for polling scheduling. Required · Value: 100Republish after changes. |
| Enable | Determines whether this read is scheduled after publishing. Optional · Value: OnRepublish after changes. |
| Save Draft | Saves the current polling item and verifies the returned real item number. Republish after changes. |
| Polling List | Shows the saved items' DIs, intervals, timeouts, and enabled status. |
Point Mapping
| Field / Control | Filling Notes |
|---|---|
| Point Mapping | Maps DI values from normal reads to product properties. |
| Add Configuration | Opens a mapping draft. Republish after changes. |
| Formal Polling Item | References a previously saved real polling item; typing only a DI cannot replace the association. Optional · Value: select this device's saved 00010000 polling · Example: for the first item, select Collection 1, 00010000, number 751Republish after changes. Collection 1 · 00010000 · #751 (historical example of this tutorial): references a previously saved real polling item; typing only a DI cannot replace the association; references a previously saved real polling item; typing only a DI cannot replace the association. |
| Thing Model Field | Selects the unique property that receives this DI's parsed result. Optional · Value: fill in per your environmentRepublish after changes. Current batch resource: selects the unique property that receives this DI's parsed result; selects the unique property that receives this DI's parsed result. |
| Data Identifier DI (hexadecimal) | Must exactly match the DI of the selected polling item. Required · Value: 00010000Republish after changes. |
| Protocol Version | The mapping belongs to the same version as the binding and polling. |
| Value Index | Selects which value to take from the returned data item; zero means the first. Required · Value: 0Republish after changes. |
| Data Format | Decodes the value per the device definition; this example uses BCD, the decimal-digit encoding. Optional · Value: BCDRepublish after changes. BCD: decodes the value per the device definition; this example uses BCD, the decimal-digit encoding; decodes the value per the device definition; this example uses BCD, the decimal-digit encoding. |
| Multiplier | Converts the decoded value by the agreed ratio. Required · Value: 1Republish after changes. |
| Offset | The offset to add after conversion. Required · Value: 0Republish after changes. |
| Unit | Marks the unit for the mapped value; this demo keeps it blank. Optional · Value: blankRepublish after changes. |
| Allow Write | Only the DI corresponding to the demo setpoint allows controlled writes; the other nine are off. Optional · Value: on for the first item onlyRepublish after changes. |
| Write Device Specification or Official Scenario Basis | States the writable basis explicitly; the demo write capability must not be used to rewrite real electric energy. Required · Value: FMQX official demo: only DI00010000 allows BCD writes; this does not mean real electric energy can be rewritten at will.Republish after changes. |
| Enable | Adds this mapping to the parsing after publishing. Optional · Value: OnRepublish after changes. |
| Save Draft | Saves the mapping and checks the real point table and polling number. Republish after changes. |
| Point Table List | Shows the correspondence between point table, polling items, and DIs. |
Command Policy
| Field / Control | Filling Notes |
|---|---|
| Command Policy | Restricts which meter operations the platform is allowed to issue. |
| Add Configuration | Opens a command policy draft. Republish after changes. |
| Operation Type | Distinguishes read and write operations; a read policy cannot replace a write policy. Optional · Value: READ_DATA / WRITE_DATARepublish after changes. READ_DATA: reads the current DI value; reads the current DI value. WRITE_DATA: writes a DI value per the device specification and authorization; writes a DI value per the device specification and authorization. |
| Data Identifier DI (hexadecimal) | Restricts the policy to the mapped demo DI. Required · Value: 00010000Republish after changes. |
| Protocol Version | The policy uses the current 2007 edition. |
| Risk Level | Reads are managed as low risk and writes as high risk. Optional · Value: LOW for reads, HIGH for writesRepublish after changes. LOW: the read risk level in this example; the read risk level in this example. HIGH: the controlled write risk level in this example; the controlled write risk level in this example. |
| Allow Manual Commands | Allows authorized users to actively initiate operations permitted by the policy. Optional · Value: OnRepublish after changes. |
| Allow Unified Downlink | Allows the unified downlink entry to use this policy. Optional · Value: OnRepublish after changes. |
| Require Password Reference | Writes must use controlled authorization and cannot bypass it by turning off the switch. Optional · Value: fill in per your environmentRepublish after changes. |
| Timeout (ms) | Limits how long a command waits for the device protocol response. Required · Value: 3000Republish after changes. |
| Retries | Limits extra retries to avoid repeating the demo write. Required · Value: 0Republish after changes. |
| Enable | Enables this policy after publishing. Optional · Value: OnRepublish after changes. |
| Save Draft | Saves the command policy and checks the operation type and DI. Republish after changes. |
| Policy List | Verifies this tutorial's permitted read and write policies separately. |
| Policy Validation Prompt | The page refuses to save when write authorization is required but not enabled. |
Product Publish and Runtime Receipt
| Field / Control | Filling Notes |
|---|---|
| Transport Mode | Carries 2007 meter frames over a TCP transparent gateway. Optional · Value: TCP_GATEWAYRepublish after changes. TCP_GATEWAY: carries 2007 meter frames over a TCP transparent gateway; carries 2007 meter frames over a TCP transparent gateway. |
| Data Format | Parses the current meter with DL/T645 2007. Optional · Value: DL/T645 2007Republish after changes. DL/T645 2007: parses the current meter with DL/T645 2007; parses the current meter with DL/T645 2007. |
| Network Type | Records the product's network type; the page shows WIFI in this example. Optional · Value: WIFIWIFI: records the product's network type; the page shows WIFI in this example; records the product's network type; the page shows WIFI in this example. |
| Enable Device Authorization Code | This example reuses the platform's existing identity authentication and does not enable a separate device authorization code. Optional · Value: Off |
| Save | Saves the basic protocol selection, then verifies the independent modification feedback. |
| Modification Succeeded | Only proves the basic product fields were saved. |
| Validate Publish Configuration | Checks the consistency of binding, polling, mapping, and command policies before publishing. |
| Draft Validation Passed | The draft can enter publishing; whether the runtime takes effect still requires the receipt. |
| Publish | Creates a runtime configuration publish task for this product. |
| OK | Confirms the product publish. |
| Operation Succeeded | The page's feedback after submitting; alone it does not prove the runtime has applied it. |
| Runtime Sync Receipt | Verifies this task, operation, target node, and APPLIED result. The latest task after product publish and its node adoption receipt. |
| Refresh | Re-reads this configuration and receipt status. |
FMQX Web Connection
| Field / Control | Filling Notes |
|---|---|
| Configuration File | Opens the import menu of the connection configuration. |
| Import Configuration | Imports the complete connection configuration containing the default registration identity and the ten points. |
| Configuration File Selection | Selects this tutorial's verified connection configuration JSON. Required · Value: fill in per your environmentExport the connection configuration file from FMQX's prepared connections. |
| Connection Name | Used to find the current meter connection. Required · Value: fill in per your environmentProvided by the current environment or the device owner; this tutorial has been actually verified, but the specific device parameters must still be obtained from the corresponding owner. |
| Application Protocol | Selects the DL/T 645-2007 simulation capability. Optional · Value: DL/T 645-2007DL/T 645-2007: selects the DL/T 645-2007 simulation capability; selects the DL/T 645-2007 simulation capability. |
| Transport Channel | The TCP transparent gateway sends and receives meter messages as native frames. Optional · Value: TCP transparent gatewayTCP transparent gateway: the TCP transparent gateway sends and receives meter messages as native frames; the TCP transparent gateway sends and receives meter messages as native frames. |
| Host | Enter this round's local FMQ listening address; do not copy it from another environment. Required · Value: 127.0.0.1Obtain the gateway-reachable TCP listening address from the current FMQ service administrator. Reconnect after changes. |
| Port | Enter this round's TCP listening port. Required · Value: 8888From the current FMQ TCP listening configuration. Reconnect after changes. |
| Client Number | Matches the platform device and the real gateway identity; in this example it came in through the complete configuration import. Required · Value: fill in per your environmentCopy the device number from the platform device information. |
| Meter Address | Must match the 12-digit meter number in the device binding. Required · Value: 123456782008Taken from the meter address in this tutorial's device binding. |
| Point Configuration | Shows the ten DIs, encodings, and initial values 11–20. |
| Connect | Establishes the TCP session; then the default registration, and wait for normal reads. |
| Connection Status | Shows whether the original session is connected or disconnected. |
| Details | Expands the protocol, meter number, point count, and actual remote address. |
| Communication | Views raw requests, responses, and masked parsed fields. |
| Connection Configuration | Verifies the original connection settings. |
| Scheduled Sending | Checks whether there is any independent scheduled sending; it should be stopped at the end. |
| Auto Reply | Verifies the meter's automatic response capability for normal requests. |
| Statistics | Views the actual send/receive counts; this tutorial does not use cumulative bytes as a substitute for business verification. |
| Disconnect | Disconnects this tutorial's original session; restore or finish after observing. |
| Auto Reconnect | Turned off at the end to avoid reconnecting after exit. Optional · Value: Off |
| Timer Status | No more packets may be sent at the end. |
| Write Password Hex | Provided by the device authorization owner; stays only in this session's memory. Required · Value: fill in per your environmentProvided by the current environment or the device owner; this tutorial has been actually verified, but the specific device parameters must still be obtained from the corresponding owner. |
| Operator Code Hex | Provided by the device authorization owner; the input is cleared after submission. Required · Value: fill in per the authorization materials; do not record in plain textProvided by the current environment or the device owner; this tutorial has been actually verified, but the specific device parameters must still be obtained from the corresponding owner. |
| Configure This Authorization | Temporarily stores the write authorization in the original session memory. |
| Read Masked Status | Verifies the authorization is configured without echoing the controlled content. |
| Current Session Write Authorization | Shows configured or not configured. |
| Clear Authorization | Clears this round's temporary authorization. |
Meter Registration Scenario
| Field / Control | Filling Notes |
|---|---|
| Scenario List | Selects this example's original meter registration scenario; do not run scenarios of other protocols. Optional · Value: fill in per your environmentCurrent batch resource: selects this example's original meter registration scenario; do not run scenarios of other protocols; selects this example's original meter registration scenario; do not run scenarios of other protocols. |
| Flow | Views the three sequential actions: connect, default registration, short wait. |
| YAML | Views the scenario source configuration; controlled authorization must not be written into it. |
| Save Version | Saves the current scenario order and the original session reference. |
| Validate | Checks the scenario structure; passing validation has not yet sent the registration. |
| Run | Connects the current session, sends the default registration packet, and waits briefly, in order. |
| Action Order | This example uses the platform's UTF-8 device number default registration; it cannot serve as a tutorial for custom raw 7E hexadecimal. |
Meter Communication Records
| Field / Control | Filling Notes |
|---|---|
| Communication Cards | Distinguishes received read requests from sent meter responses, paired by time and DI. |
| Message Time | Used to match the original reads, writes, and responses; it does not represent database write latency. |
| Communication Endpoint | The original card shows this example's TCP listening target. |
| Protocol Version | The original frames are parsed as 2007; they cannot be interpreted with the 1997 two-byte DI. |
| Meter Address | Identifies that the response belongs to this tutorial's meter number. |
| Data Identifier | Corresponds the communication DI to the polling item and Thing Model. |
| Response Value | The first point's ten distinguishable samples are 11 to 20; the new reads after writing are 42 and 43 respectively — a write response cannot replace a read-back. |
| Masked Received Fields | Write requests keep only safely parsed fields; the raw controlled authorization frame is not shown. |
| Actual Execution Count | Verified from device-side state changes that only two executions occurred. |
| Native Write Response | A native acknowledgment only means the protocol accepted the response; execution also requires an independent read. |
| Independent Read | After a write, the next automatic read's request and response independently verify the current value; this tutorial did not submit a manual read. |
Device Control and Meter Write
| Field / Control | Filling Notes |
|---|---|
| Device Control | Enters the writable property operations of this meter. |
| Meter Write | Opens the controlled write drawer of the demo setpoint. |
| Device Serial Number | Confirms the target device number before sending. |
| Write Data (hexadecimal) | Enter the complete data bytes to write this time, in this tutorial's BCD encoding. Required · Value: 42000000 / 43000000 |
| Meter Password (8 hexadecimal digits) | Provided by the authorization owner; use the password field and do not record it in plain text. Required · Value: fill in per your environmentProvided by the current environment or the device owner; this tutorial has been actually verified, but the specific device parameters must still be obtained from the corresponding owner. |
| Operator Code (8 hexadecimal digits) | Enter the current operator code per the authorization materials. Required · Value: not provided in the manualProvided by the current environment or the device owner; this tutorial has been actually verified, but the specific device parameters must still be obtained from the corresponding owner. |
| Write Reason | Records the purpose of this controlled demo write for review. Required · Value: demo setpoint write-then-read-back |
| Confirm Write | Each target value in this tutorial is confirmed only once, then the response and actual read-back are observed. |
| Cancel | Cancels the write that has not been sent yet. |
| Protocol Response Prompt | After a real protocol response is received, device execution and the independent read still need verification. |
| Current Value | Shows the latest normal read value; the slider's pending value cannot substitute for it. |
Historical Data
| Field / Control | Filling Notes |
|---|---|
| Device | Queries only this tutorial's formal meter. Optional · Value: fill in per your environmentProvided by the current environment or the device owner; this tutorial has been actually verified, but the specific device parameters must still be obtained from the corresponding owner. Current batch resource: queries only this tutorial's formal meter; queries only this tutorial's formal meter. |
| Fields | The ten-sample query selects all ten properties; the write-change query selects only the demo setpoint. Optional · Value: demo setpoint and Collection 1–9Demo setpoint and Collection 1–9: the ten-sample query selects all ten properties; the write-change query selects only the demo setpoint; the ten-sample query selects all ten properties; the write-change query selects only the demo setpoint. |
| Time Range | Restricts the history to the original sample or write window; do not look at only the latest record. Required · Value: choose per the actual business timeFrom the actual times of this round's collection and writes. |
| Query | Re-reads the persisted data by the current device, fields, and time. |
| Reset | Clears the filter; this tutorial's meter must then be re-selected. |
| History Table | Verifies each field's original samples and the post-write values and times. |
| Refresh Page | Reloads the page and re-applies the original conditions to verify the saved data can still be queried. |
Advanced parameters (1 item)
| Field / Control | Filling Notes |
|---|---|
| Advanced Filter | Verifies the current additional filter conditions to avoid missing original samples. |
Stop and Retain
| Field / Control | Filling Notes |
|---|---|
| Unpublish | Stops the current product's runtime configuration while keeping the business configuration and history. |
| Unpublish Prompt | Unpublishing withdraws this tutorial's polling and clears the current value cache; history and the device are retained. |
| OK | Confirms this withdrawal, then continue verifying the REMOVE receipt. |
| Retention List | Retains the product, device, ten models, configuration, original session, scenario, and history. |
| Current Value After Stopping | Distinguishes the device's retained value from the platform real-time cache after deactivation. |
Device Command Log
| Field / Control | Filling Notes |
|---|---|
| Command Log | Enters the current device's stored command response list. Current device logs, system dictionary, and this round's actual operation times. |
| Log Type | Filters by system dictionary category; in this example the response shows as property retrieval — do not treat the category name as proof the write executed. Optional · Value: fill in per the actual configurationCurrent device logs, system dictionary, and this round's actual operation times. Service Delivery: views the service delivery category; views the service delivery category. Property Retrieval: views the property and protocol response category; views the property and protocol response category. OTA Upgrade: views the upgrade category; views the upgrade category. |
| Identifier | Filters by a known log identifier; leave blank when unsure. Optional · Value: fill in per the actual configurationCurrent device logs, system dictionary, and this round's actual operation times. |
| Start Date and End Date | Queries by the date of this operation; it does not change the device collection times. Optional · Value: the date of this writeCurrent device logs, system dictionary, and this round's actual operation times. |
| Query | Applies the current filter conditions to a new query. Current device logs, system dictionary, and this round's actual operation times. |
| Export Log | Exports the logs under the current query conditions; export permission is required; not executed in this tutorial. Current device logs, system dictionary, and this round's actual operation times. |
| Reset | Clears the filter conditions and queries again. Current device logs, system dictionary, and this round's actual operation times. |
| Record Checkbox | Selects log records; it does not send device commands. Optional · Value: fill in per the actual configurationCurrent device logs, system dictionary, and this round's actual operation times. |
| Log Time | The time of the stored response; use it to check against this write's time. Current device logs, system dictionary, and this round's actual operation times. |
| Log Name and Identifier | Describes the record kind; this tutorial's is the response of a device property write. Current device logs, system dictionary, and this round's actual operation times. |
| Log Category | Shows the system dictionary category; the category alone does not prove a device action. Current device logs, system dictionary, and this round's actual operation times. |
| Set Value | This response record shows 200, the response status code; for writing 43, see the device execution record and the subsequent read-back. Current device logs, system dictionary, and this round's actual operation times. |
| Device | Verifies the log belongs to the current demo device; do not reuse other devices' records. Current device logs, system dictionary, and this round's actual operation times. |
| Result | A received device response only proves the response was received; continue verifying actual execution and the independent read-back. Current device logs, system dictionary, and this round's actual operation times. |
| Delete | Removes the selected log audit records; this tutorial keeps the logs and does not delete. Current device logs, system dictionary, and this round's actual operation times. |
| Total Record Count | Shows the number of matches for the current query; this tutorial's two writes correspond to two responses. Current device logs, system dictionary, and this round's actual operation times. |
| Page Size | Selects how many records each page shows; it does not change the logs themselves. Optional · Value: 10 per pageCurrent device logs, system dictionary, and this round's actual operation times. 10: shows 10 records per page; shows 10 records per page. 20: shows 20 records per page; shows 20 records per page. 30: shows 30 records per page; shows 30 records per page. 50: shows 50 records per page; shows 50 records per page. |
| Previous and Next Page | Switches between existing record pages; the first/last page buttons are unavailable. Current device logs, system dictionary, and this round's actual operation times. |
| Page Number | Views the records of the selected page. Current device logs, system dictionary, and this round's actual operation times. |
FAQ
| Symptom | Possible Cause | Check First | How to Recover |
|---|---|---|---|
| Protocol details are empty after copying | Copying the model and configuring the meter protocol details are not the same task. | Check the binding, polling, mapping, and command policies separately. | Configure item by item per this tutorial, then validate and publish. |
| Connected successfully but no data | The device identity, meter address, or read configuration was not adopted by the runtime node. | Verify this tutorial's runtime receipt and the real registration and read frames. | Fix the configuration and republish; connection status alone cannot prove success. |
| Write shows success but the value did not change | The delivery status cannot replace device execution; there may also be only a write response without a new read-back. | Verify the device's actual receipt, execution count, response, and the new read response. | Re-verify against the fields and authorization the manufacturer allows, and keep the failure records. |
| Query results unchanged after modifying the time | The date input was not confirmed, so the old query time is still used. | Open the date popup and verify the start and end times. | Extend the end time first, then adjust the start time; click OK before querying. |
| Real-time values are empty after unpublishing | Deactivating the product clears the real-time value cache; history and device values are retained. | Check whether the product is unpublished, then query history with the original time window. | Publish, connect, and register again; real-time values recover after the independent read. |
| The write response arrived, but the page value changed only later | In this scenario, the real-time value is updated by the next automatic read. | Verify the device write execution record, then wait for the configured 60-second read period. | Check the subsequent read first, and avoid clicking write repeatedly, which would cause duplicate executions. |
Retained Data and Re-acceptance
This tutorial is verified against the FMQX demo meter. The first point is collected from 11 to 20 in turn, then 42 is written, the connection is disconnected and re-registered, 42 is read back, and then 43 is written. After each write, wait for the next automatic read; the device response, actual execution, and read-back are three different checkpoints.
At the end, only the connection, scheduled sending, auto-reconnect, auto-reply, temporary write authorization, and product polling are stopped. The product, device, ten points, and history are retained; unpublishing clears the current value cache, so the empty value at that point must not be mistaken for lost history.
To review this round's history again, select the demo setpoint and query 2026-10-15 04:08:50 to 04:21:05; for post-write changes, query 04:53:40 to 04:57:05. The first window has twelve rounds of records, and the post-write window shows 42, 43, 43 in order. When viewing the ten fields, the table may merge rows by time.
To run real-time acceptance again, first republish the product, open this tutorial's FMQX connection, execute the identity registration, and wait for the next read; the device's retained value 43 should reappear on the platform. Write permission has been cleared; if re-testing writes is truly needed, obtain the current device authorization and configure it again first.
A real manufacturer meter's meter address, data identifiers, BCD width, decimal places, and write permissions must come from that model's documentation; the demo setpoint is not a promise that a real metering meter allows rewriting its electric energy.