

DL/T 645-1997 Meter TCP Gateway Access and Controlled Write
This page is an online operation reference compiled from an existing operation manual. Operations marked as expected or not executed in the source material must still be verified against the actual environment.
Starting from copying a product, complete ten-point collection, controlled writes, independent read-back, history queries, and a safe stop for one FMQX demo meter.
Before you start: you already have a copyable 1997-edition TCP gateway product; this tutorial reuses its model and verifies each item; you have obtained access to the current platform, the FMQ gateway, and FMQX Web, plus the materials for this independent device; you hold product, device, model, protocol draft, publish, history query, and demo write permissions; writes target only the writable first point of the FMQX demo; a real device requires separate explicit manufacturer specifications and on-site authorization.
Understand This Access Flow Before You Start
This tutorial completes 1997-edition TCP gateway access with one FMQX demo meter: copy the product, verify the model, add the device, configure the protocol, publish, register, collect, write under control, query history, and stop safely.
Prepare a reusable product with the same protocol, the manufacturer's point table, and the connection address provided by the current environment first. The names and parameters in the screenshots are the actual values of this demonstration; fill in the device number, addresses, grouping, and authorization fields according to your own on-site materials.
This tutorial shows the actual journey of a local single node with the FMQX demo meter; it has not yet undergone a real novice read-through or version-specific acceptance.
Relationship Between Configuration, Collection, and Writing
This is a functional relationship diagram for understanding the responsibilities of each component, not a screenshot of the running platform.
Replace These Parameters Before Copying the Templates
This tutorial's code uses generic template names; the screenshots keep the actual historical resources. Complete the following checks before saving as a UTF-8 file or sending frames.
- In the YAML,
deviceis the session alias of this flow;demo-session-idmust be replaced with the real ID of this tutorial's target session via session binding, while thesessionof the action nodes staysdevice. - Paste the full definition first, validate it, and save the version; saving only proves the configuration was saved — verify the run and device results separately per the steps.
demo-deviceis the device number template. Replace the device number in clientId, the device number in every publish/subscribe topic, and the clientId of TCP reports together with the platform device number for this device; the product ID and tenant ID in the MQTT identity must also be replaced with the current device connection parameters.- The host, port, and listening direction in the connection file must be changed to the actual addresses of the current environment; 127.0.0.1 means the local machine running FMQX. When MQTT is involved, also verify the product ID, username, subscription topics, and responseRoute; enter passwords only securely on the connection page.
- The group, session, and subscription ids are internal references of the import file; if you rename them, groupId must match the corresponding group id. Verify before importing, and do not create a duplicate connection with the same name on a retained session.
- The code blocks are customer templates rewritten from existing password-free assets or original code; this version of the template has not been proven to import successfully. Historical screenshots, send times, and business pass scope still follow the records in each step; do not treat template names as the actual resource names in the old evidence.
Copy the Product and Prepare an Independent Draft
This tutorial starts by copying a retained product. Preview the existing protocol and feature definition first, then save the independent product; this tutorial is not written as a field-by-field creation from scratch.
1. Select Copy Product
Where: Device Management → Device Access Steps: On the Device Access page, select Copy Product.

The Copy Product card is selected.
2. Specify the Source Product and the New Name
Where: Device Management → Device Access Steps: Select the source product and enter the new product name for this round.

Both the source product and the new name are filled in.
3. Verify the Source Product
Where: Device Management → Device Access Steps: Open Preview Product and verify the product name.

The preview shows the source product selected this time.
4. Verify the Source Product Protocol
Where: Device Management → Device Access Steps: Check the source product's protocol and device type.

It is the 1997 edition, TCP gateway, and gateway device.
5. View the Existing Collection Properties
Where: Device Management → Device Access Steps: In the upper half of the feature definition, verify the existing properties.
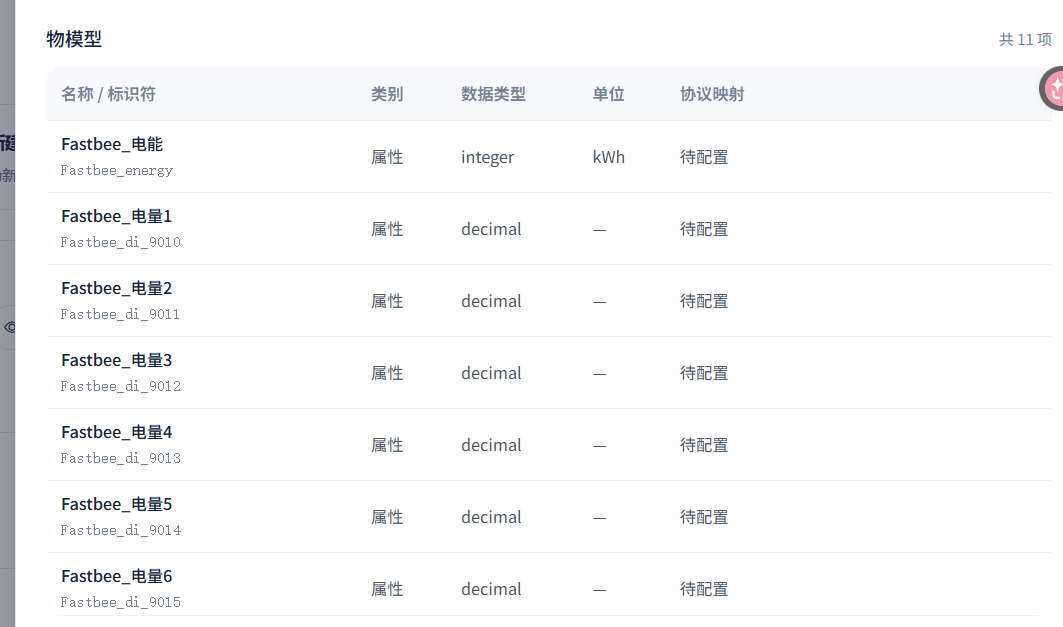
The energy properties this tutorial needs to reuse are visible.
6. Verify the Remaining Collection Properties
Where: Device Management → Device Access Steps: Scroll the preview and verify Energy 4 through 10.
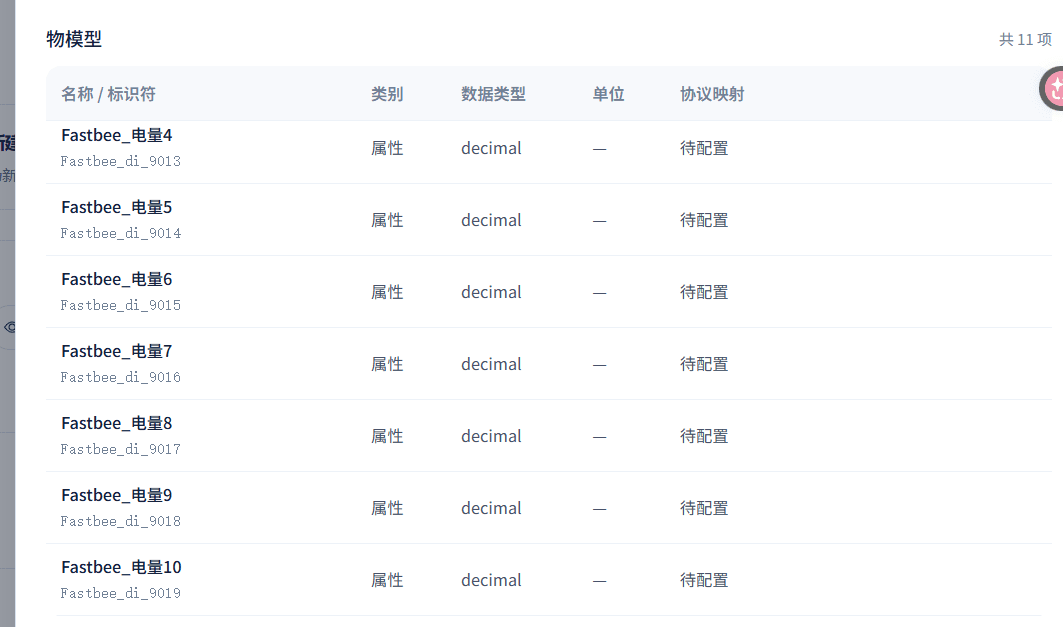
All ten collection properties can be found.
7. Confirm the 1997 Edition and TCP Gateway
Where: Device Management → Device Access Steps: Return to the wizard and verify the protocol and transport mode.

The protocol is the 1997 edition and the transport mode is TCP gateway.
8. Prepare the Product First
Where: Device Management → Device Access Steps: Select Prepare product only, do not create a device yet.

This round only prepares the product draft.
9. Verify the Optional Product Information
Where: Device Management → Device Access Steps: Expand Advanced Configuration and verify the category and device type against the figure.
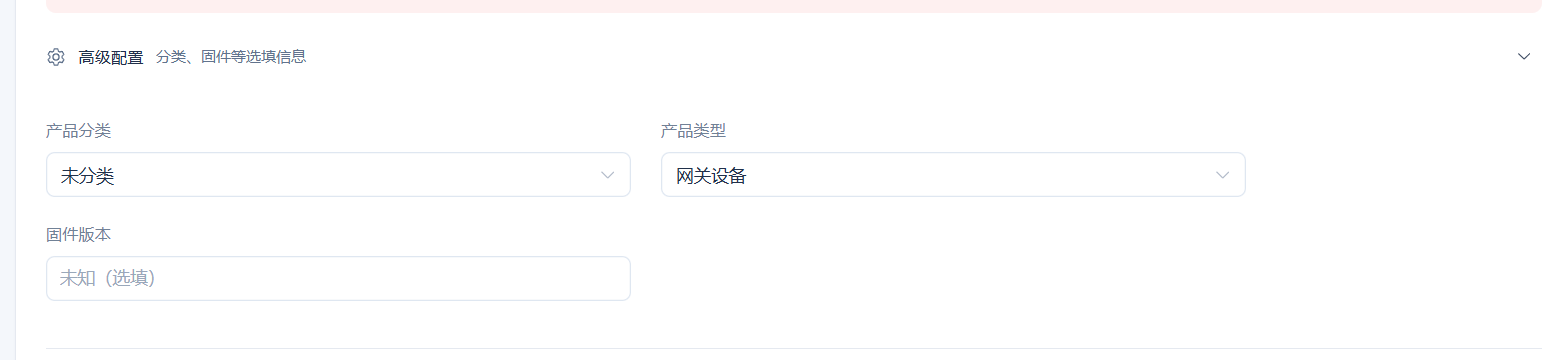
This tutorial uses a gateway device; firmware is not filled in.
10. Verify the Wizard Summary
Where: Device Management → Device Access Steps: Go to the confirmation page and review Configuration Pre-check.
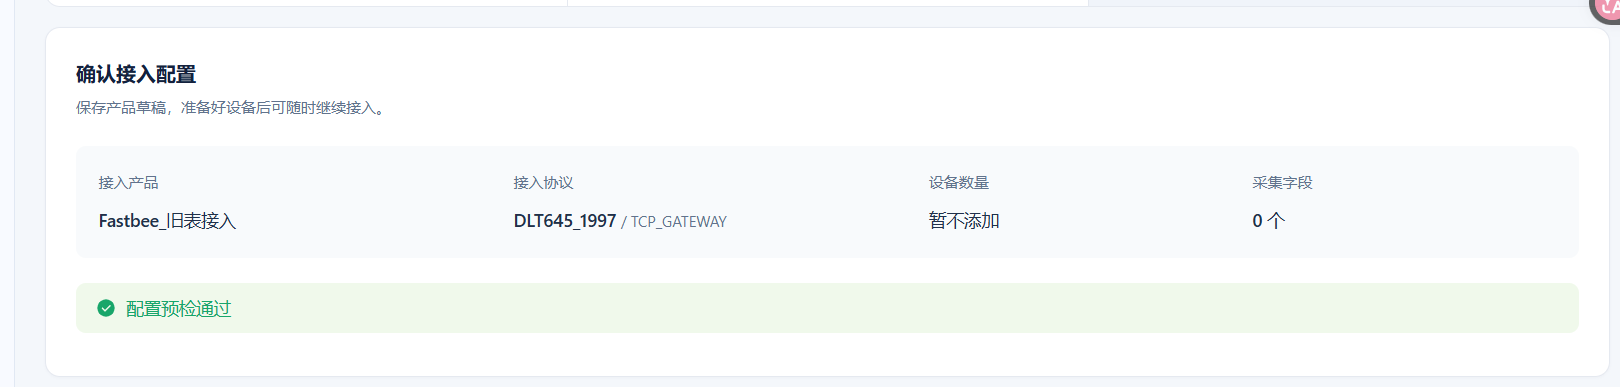
The configuration pre-check passed; no device is added yet.
11. Save the Product Draft
Where: Device Management → Device Access Steps: Click Save Product Draft.

Submit this tutorial's independent product draft.
12. Confirm the Product Has Been Saved
Where: Device Management → Device Access Steps: Review the preparation result after saving.

The page shows the product draft has been saved.
13. Open the New Product
Where: Device Management → Device Access Steps: Open the newly saved product and verify its name.

The new product is unpublished, and its access configuration is pending activation.
Device Management → Device Access
| Field / Control | Filling Notes |
|---|---|
| Access Source | Determines the starting point of this access. Optional · Value: Copy ProductCopy Product: determines the starting point of this access; this tutorial copies the retained old-meter product. |
| Copy Product | Selects the source product that provides the feature definition. Required · Value: fill in per your environmentSelect an existing product with the same protocol from Product Management. Current batch resource: selects the source product that provides the feature definition; preview the protocol, gateway type, and ten collection properties first. |
| Product Name | Names the independent product copied this time. Required · Value: fill in per your environmentNamed by the person performing this access, according to its purpose. |
| Preview Product | Views the source product's identity and feature definition. |
| Protocol | Defines the meter frame format and data identifier length. Required · Value: DLT645_1997From the meter nameplate and manufacturer protocol documentation. DLT645_1997: defines the meter frame format and data identifier length; the 1997 edition is used consistently throughout and must not be mixed with the 2007 edition. |
| Transport Mode | Accesses the meter over a connection actively established by the gateway. Required · Value: TCP_GATEWAYFrom the actual gateway access method. TCP_GATEWAY: accesses the meter over a connection actively established by the gateway; this tutorial selects TCP gateway, and the gateway device type must match. |
| Prepare product only, do not create a device yet | Save the product draft first and add the device separately later. Optional · Value: SelectedOn: enables this option; save the product draft first and add the device separately later. Off: disables this option; the behavior is not enabled. |
| Next | Enters the next stage and verifies the summary. |
| Previous | Returns to the previous step to fix unsubmitted configuration. |
| Configuration Pre-check | Shows whether the product draft meets the submission conditions. |
| Save Product Draft | Creates this tutorial's independent product draft. |
| Product Draft Saved | Shows the product preparation result. |
Advanced parameters (4 items)
| Field / Control | Filling Notes |
|---|---|
| Advanced Configuration | Expands the product category, type, firmware, and other information. |
| Product Category | Classifies the product for business purposes. Required · Value: UncategorizedFrom the current platform's category dictionary. Uncategorized: classifies the product for business purposes; this tutorial keeps it uncategorized, and other projects choose per their management practice. |
| Device Type | Determines the role of devices under the product. Required · Value: Gateway DeviceFrom the actual gateway role. Gateway Device: determines the role of devices under the product; this tutorial uses the same device to represent the transparent gateway. |
| Firmware Version | Records the device firmware information. Required · Value: left blankFrom the manufacturer's firmware documentation. |
Verify the Ten Collection Properties
The model identifier is the fixed key for the later point mapping. The first point is used for the FMQX demo write; clearing read-only also turns off the chart and real-time monitoring; all ten fields keep history storage.
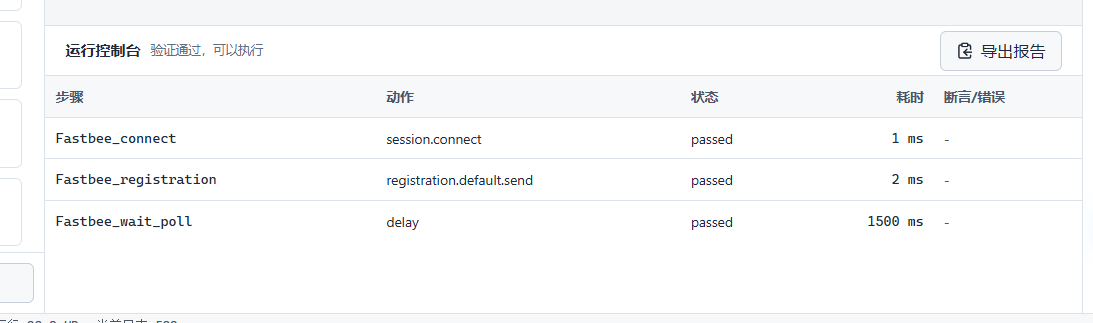
14. Verify the First Point's Name and Identifier
Where: Product Details → Feature Definition Steps: In Feature Definition, open Energy 1 and verify the name, translation, and model identifier.
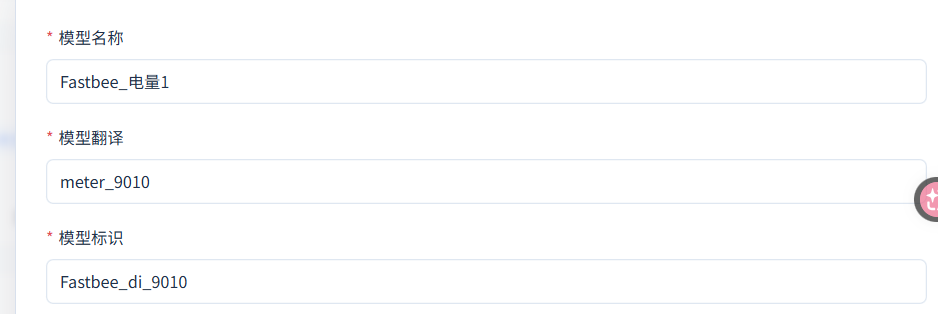
The first point corresponds to this tutorial's demo point table.
15. Prepare the Writable Demo First Point
Where: Product Details → Feature Definition Steps: Clear read-only on the first point, verify that the chart and Real-Time Monitoring are turned off together, and keep History Storage.
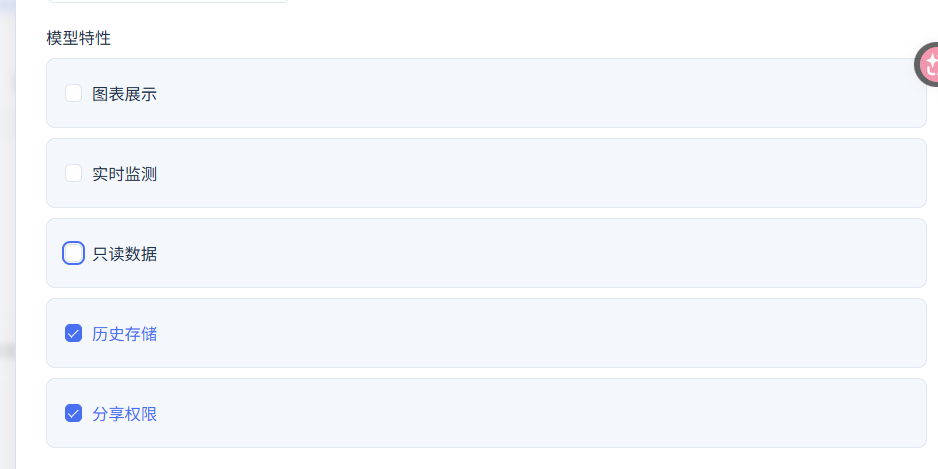
The first point can enter controlled writing and still keeps history.
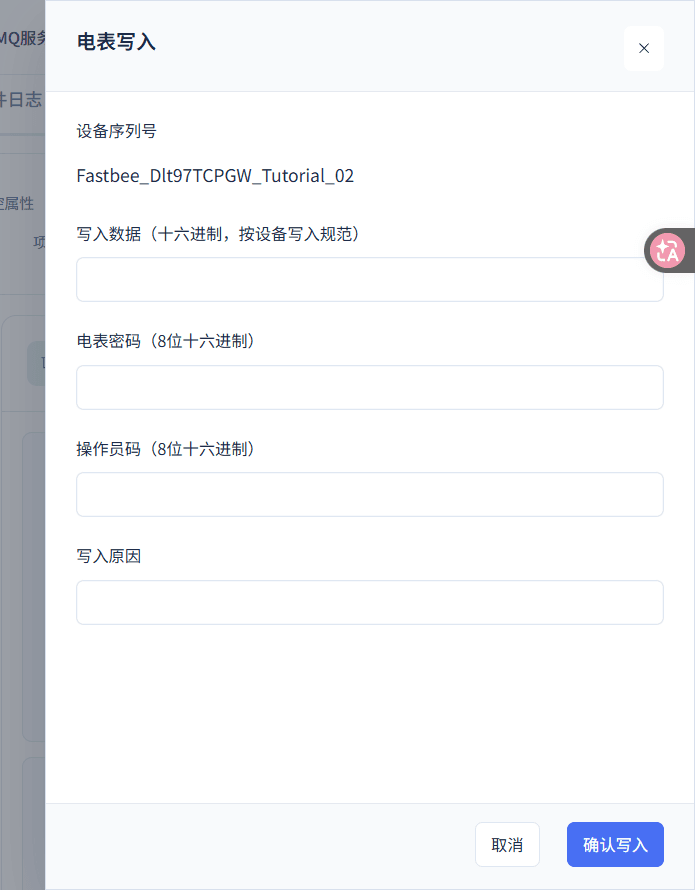
16. Verify the First Point's Numeric Range
Where: Product Details → Feature Definition Steps: Verify the Decimal type, range, step, and unit.
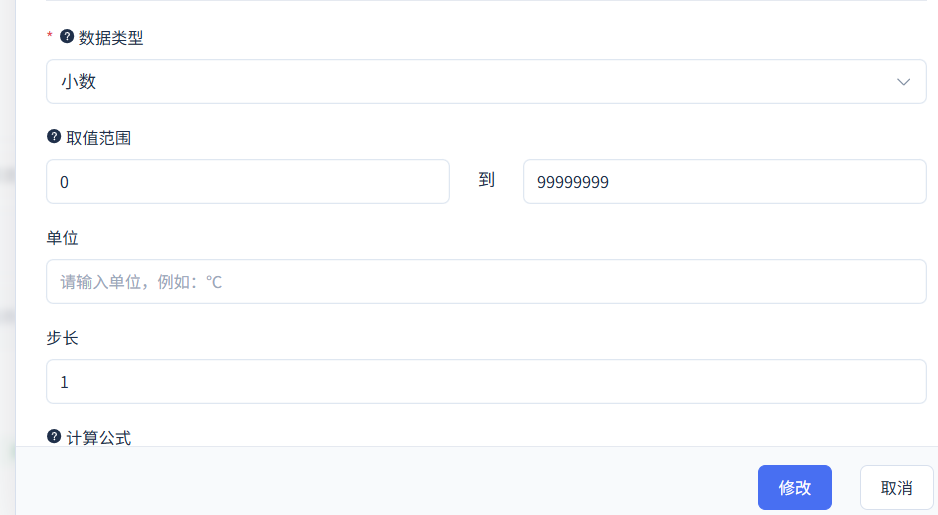
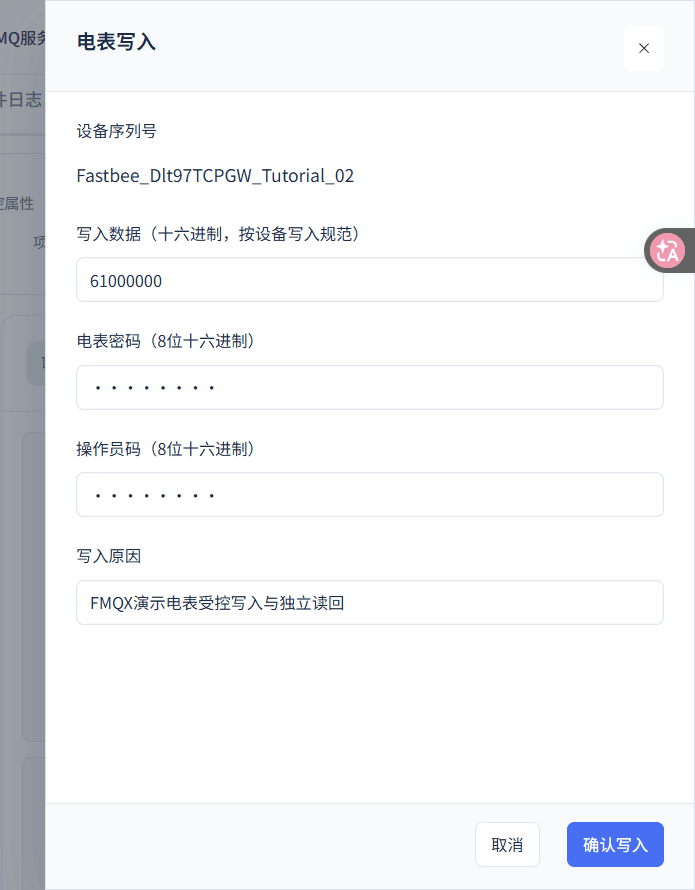
Decimal, range 0 to 99999999, step 1, unit empty.
17. Save the First Point's Property
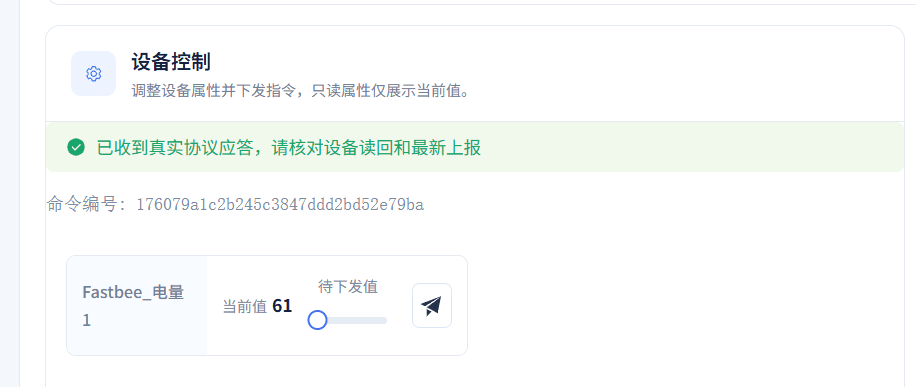
Where: Product Details → Feature Definition Steps: Click Modify.

Submit the current modification of the first point's property.
18. Return to the First Point's Property List
Where: Product Details → Feature Definition Steps: View the Energy 1 property row returned after saving.
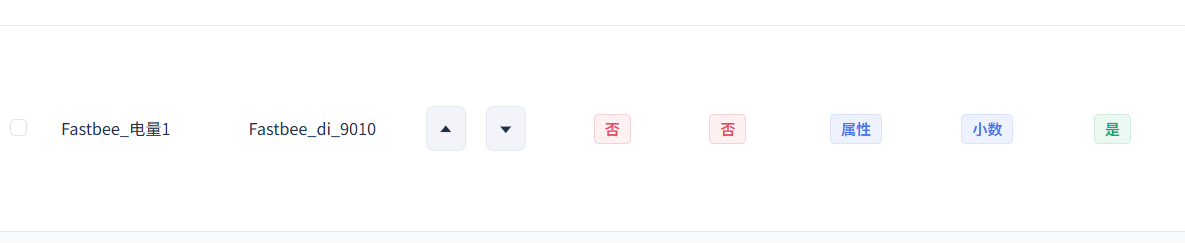
It is still Energy 1 in this tutorial's product.
19. Verify the Second Point's Property
Where: Product Details → Feature Definition Steps: Open Energy 2 and verify the name, translation, and identifier.
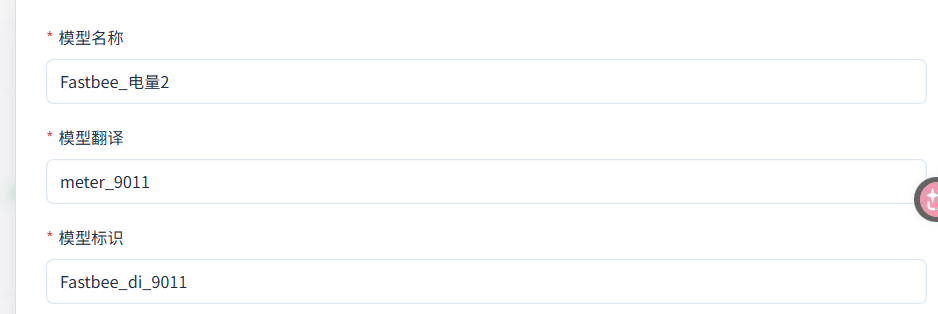
Energy 2 corresponds to the second data identifier.
20. Keep the Remaining Points Read-Only
Where: Product Details → Feature Definition Steps: Verify the second point keeps read-only, chart, Real-Time Monitoring, and History Storage.
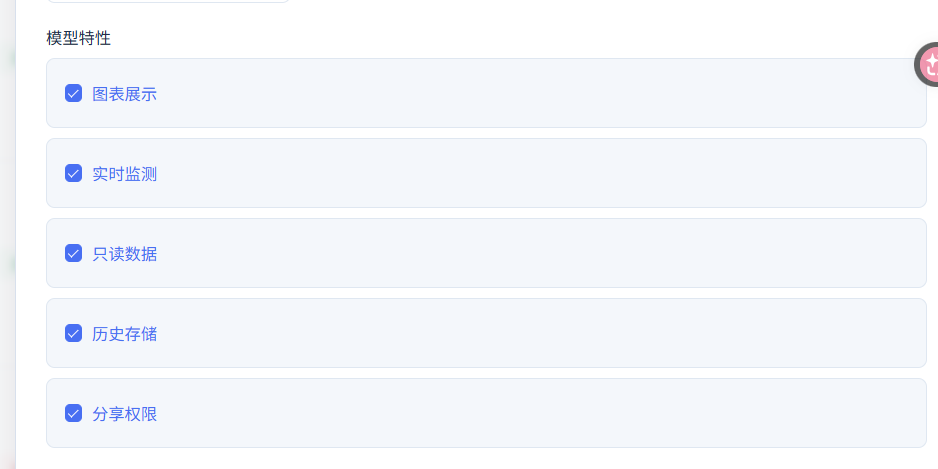
This point is used in read-only collection mode.
21. Verify the Energy 3 Property
Where: Product Details → Feature Definition Steps: Open Energy 3 and verify this tutorial's name, translation, and model identifier.
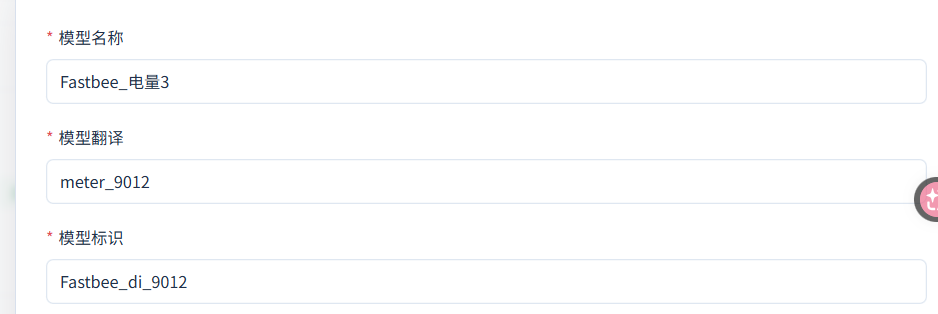
Energy 3 corresponds to data identifier 9012.
22. Verify the Energy 4 Property
Where: Product Details → Feature Definition Steps: Open Energy 4 and verify this tutorial's name, translation, and model identifier.
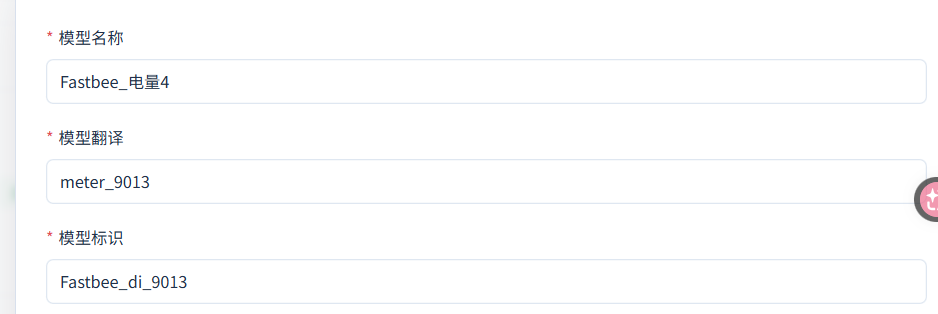
Energy 4 corresponds to data identifier 9013.
23. Verify the Energy 5 Property
Where: Product Details → Feature Definition Steps: Open Energy 5 and verify this tutorial's name, translation, and model identifier.
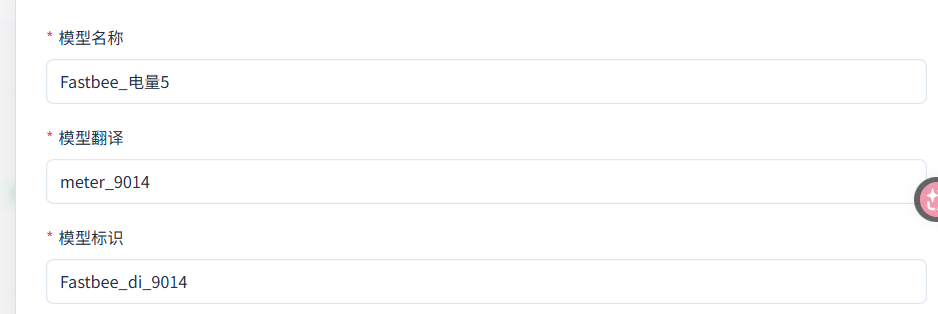
Energy 5 corresponds to data identifier 9014.
24. Verify the Energy 6 Property
Where: Product Details → Feature Definition Steps: Open Energy 6 and verify this tutorial's name, translation, and model identifier.
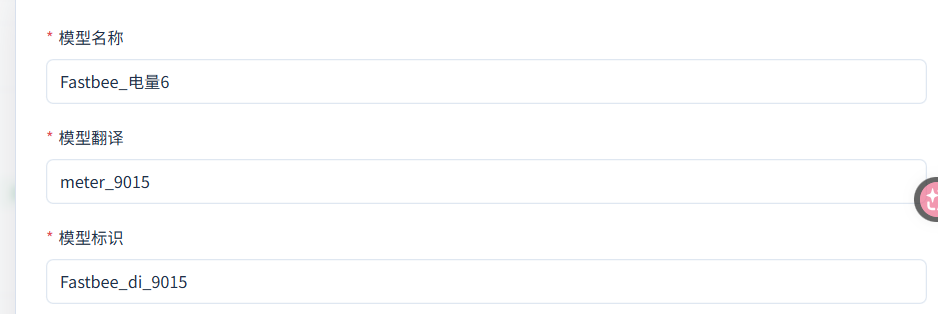
Energy 6 corresponds to data identifier 9015.
25. Verify the Energy 7 Property
Where: Product Details → Feature Definition Steps: Open Energy 7 and verify this tutorial's name, translation, and model identifier.
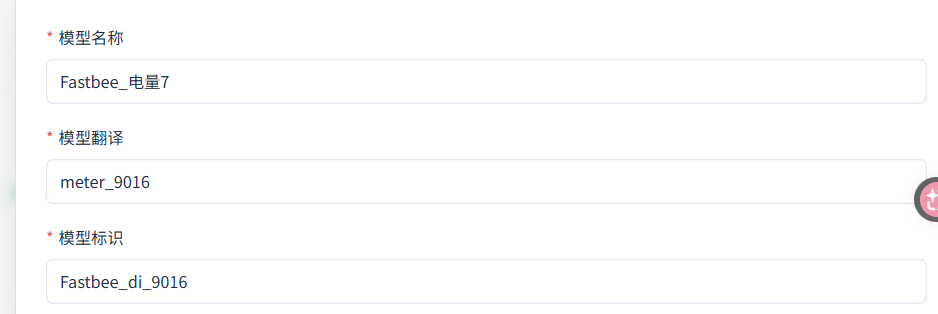
Energy 7 corresponds to data identifier 9016.
26. Verify the Energy 8 Property
Where: Product Details → Feature Definition Steps: Open Energy 8 and verify this tutorial's name, translation, and model identifier.
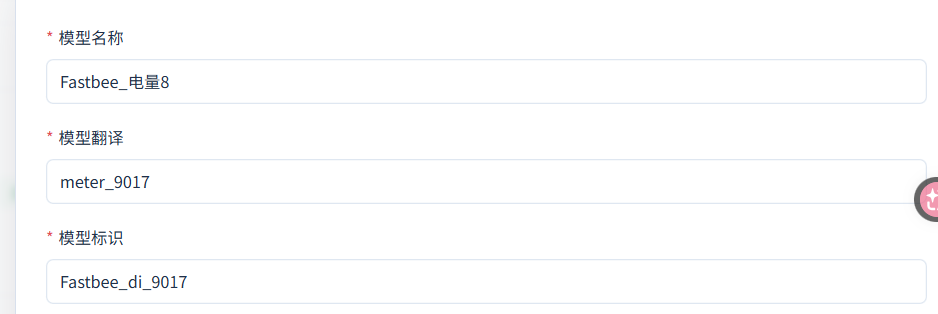
Energy 8 corresponds to data identifier 9017.
27. Verify the Energy 9 Property
Where: Product Details → Feature Definition Steps: Open Energy 9 and verify this tutorial's name, translation, and model identifier.
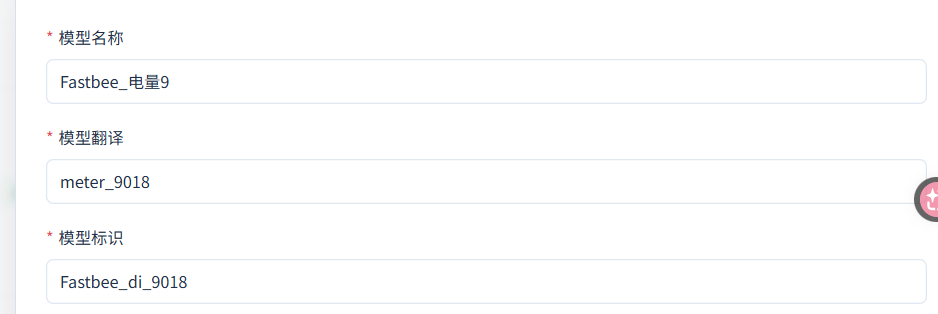
Energy 9 corresponds to data identifier 9018.
28. Verify the Energy 10 Property
Where: Product Details → Feature Definition Steps: Open Energy 10 and verify this tutorial's name, translation, and model identifier.
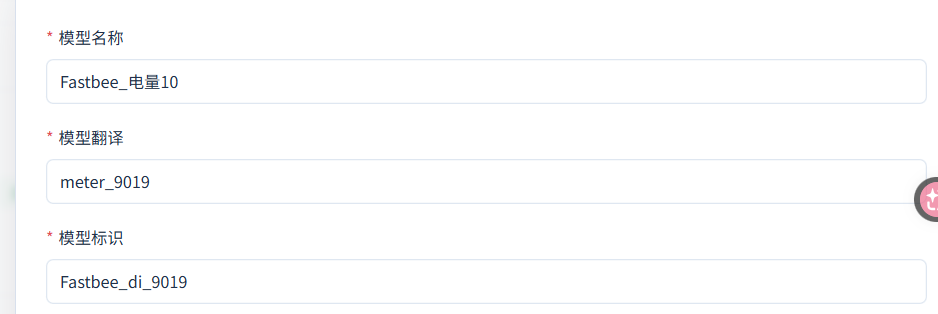
Energy 10 corresponds to data identifier 9019.
Product Details → Feature Definition
| Field / Control | Filling Notes |
|---|---|
| Feature Definition | Views and adjusts the copied model. |
| Model Name | Provides a readable name for each collected value. Required · Value: fill in per your environmentFrom the manufacturer's point table and this demonstration's naming. Republish after changes. |
| Model Identifier | The fixed key for point mapping and data display. Required · Value: fill in per your environmentFrom the current product's feature definition. Republish after changes. |
| Model Category | Distinguishes properties, functions, and events. Optional · Value: PropertyRepublish after changes. Property: distinguishes properties, functions, and events; all ten points in this tutorial are properties. |
| Chart Display | Controls chart display; enabling it requires read-only. Optional · Value: off for the first point, on for the other nineRepublish after changes. On: enables this option; controls chart display; enabling it requires read-only. Off: disables this option; the behavior is not enabled. |
| Real-Time Monitoring | Controls read-only monitoring display, linked with read-only. Optional · Value: off for the first point, on for the other nineRepublish after changes. On: enables this option; controls read-only monitoring display, linked with read-only. Off: disables this option; the behavior is not enabled. |
| Read-Only Data | Restricts whether the property can be written from the device control entry. Optional · Value: off for the first point, on for the other nineFrom the range of operations the real device allows. Republish after changes. On: enables this option; restricts whether the property can be written from the device control entry. Off: disables this option; the behavior is not enabled. |
| History Storage | Allows the property to keep historical records. Optional · Value: OnRepublish after changes. On: enables this option; allows the property to keep historical records. Off: disables this option; the behavior is not enabled. |
| Data Type | Determines which numeric type the model uses to receive data. Required · Value: DecimalFrom the manufacturer's point table and the decoding result. Republish after changes. Decimal: determines which numeric type the model uses to receive data; this tutorial uses Decimal, which must be compatible with the mapping format. |
| Minimum | Constrains the lower bound of usable values for the model. Required · Value: 0From the manufacturer's field range. Republish after changes. |
| Maximum | Constrains the upper bound of usable values for the model. Required · Value: 99999999From the manufacturer's field width and range. Republish after changes. |
| Step | Defines the increment per adjustment of the control. Required · Value: 1Republish after changes. |
| Unit | Adds a dimension to the property. Required · Value: left blankFrom the manufacturer's point table. Republish after changes. |
| Modify | Saves the current property modification. Republish after changes. |
| Cancel | Discards the current unsubmitted modification. |
| Property List | Shows the models currently saved in the product. From the current product query result. |
Advanced parameters (3 items)
| Field / Control | Filling Notes |
|---|---|
| Model Translation | Saves the translation configuration of the current model. Required · Value: meter_9010 to meter_9019Follows the actual configuration of the model copied in this tutorial. Republish after changes. |
| Sharing Permission | Controls sharing-related flags and does not determine the collection chain. Optional · Value: was selected in the formFrom the platform's sharing permission requirements. Republish after changes. On: enables this option; controls sharing-related flags and does not determine the collection chain. Off: disables this option; the behavior is not enabled. |
| Calculation Formula | Used for calculation conversion at the model layer. Required · Value: the screenshot only shows the labelFrom business calculation needs and the current model configuration. Republish after changes. |
Add This Tutorial's Gateway Device
The device number is used for connection registration, and the meter number identifies the meter in the connection. After selecting the product, re-verify the device number, then save the device.
29. Manually Add This Tutorial's Device
Where: Device Management → Access Device → Add Manually Steps: In the Access Device menu, click Add Manually.
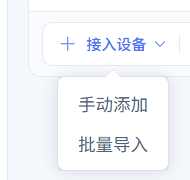
The new device form opens.
30. Select This Tutorial's New Product
Where: Device Management → Access Device → Add Manually Steps: On the Product Select page, select the newly saved product.

This tutorial's new product is selected.
31. Confirm the Product
Where: Device Management → Access Device → Add Manually Steps: Click Confirm Selected Product.

Return to the device form with this tutorial's product carried over.
32. Complete the Device Name and Number
Where: Device Management → Access Device → Add Manually Steps: Enter this tutorial's device name and device number, and verify the product.
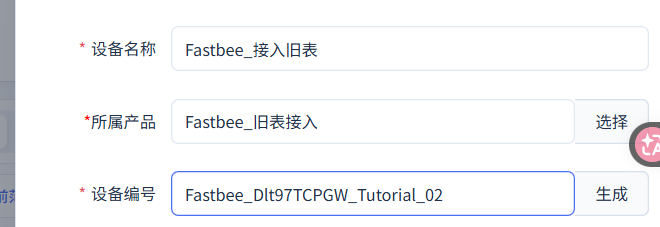
Name, product, and number are all complete.
33. Save the New Device
Where: Device Management → Access Device → Add Manually Steps: Click OK.

Submit this tutorial's new device.
34. Confirm the Device Has Been Created
Where: Device Management → Access Device → Add Manually Steps: View the device card and verify the name, protocol, and product.
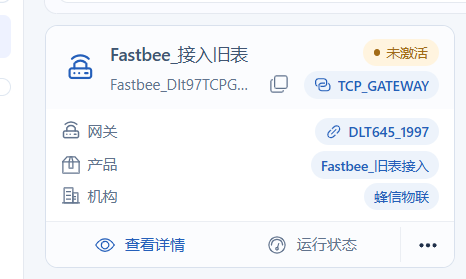
This tutorial's device exists but is not yet activated.
Device Management → Access Device → Add Manually
| Field / Control | Filling Notes |
|---|---|
| Add Manually | Opens the new device form. |
| Device Name | Distinguishes this device with a short name. Required · Value: fill in per your environmentNamed by the person performing the access, according to its purpose. |
| Product | Associates the device with this tutorial's new product. Required · Value: fill in per your environmentFrom the platform product list. Current batch resource: associates the device with this tutorial's new product; select the newly copied product, then re-verify the device number. |
| Select | Opens the product selection page. |
| Confirm Selected Product | Brings the selected product back to the device form. |
| Device Number | The platform uses this number to identify the gateway connection. Required · Value: copy from this tutorial's device materialsFrom the device number in the platform device details. |
| OK | Saves this tutorial's new device. |
| Close | Exits the unsubmitted device form. |
| Device Status | Shows the current device registration and connection status. From the device query result. |
Advanced parameters (6 items)
| Field / Control | Filling Notes |
|---|---|
| Generate | Generates a new device number. Generated by the platform. |
| Firmware Version | Records the device firmware version. Required · Value: the actual value was not fully verified; fill in per the current device materialsFrom the manufacturer's device materials. |
| Positioning Method | Controls the source of the device location. Required · Value: the actual value was not fully verified; fill in per the current device materialsFrom the device installation method. Actual options pending verification: this selection control is visible in the source code, but the actual options were not fully observed; choose per the current tenant and device materials; this tutorial does not provide an environment value to copy. |
| Device Organization | Determines the business ownership of the device. Required · Value: the actual value was not fully verified; fill in per the current device materialsFrom this tenant's organization configuration. Actual options pending verification: this selection control is visible in the source code, but the actual options were not fully observed; choose per the current tenant and device materials; this tutorial does not provide an environment value to copy. |
| Device Space | Associates the space the device belongs to. Required · Value: the actual value was not fully verified; fill in per the current device materialsFrom this tenant's space configuration. Actual options pending verification: this selection control is visible in the source code, but the actual options were not fully observed; choose per the current tenant and device materials; this tutorial does not provide an environment value to copy. |
| Device Shadow | Controls shadow behavior while offline. Optional · Value: the actual value was not fully verified; fill in per the current device materialsOn: enables this option; controls shadow behavior while offline. Off: disables this option; the behavior is not enabled. |
Bind the Device, Gateway, and Meter Number
This tutorial carries this demo meter on the same platform gateway device. In a real project, select the gateway according to the actual topology, and do not treat the meter address as the device number.
35. Enter the Meter Protocol Configuration
Where: Product Details → Protocol Configuration → Device Binding Steps: Open Protocol Configuration in this tutorial's product.

The device binding, polling, mapping, and policy entries are visible.
36. Fill In the Gateway and Meter Number Binding
Where: Product Details → Protocol Configuration → Device Binding Steps: Select this tutorial's device and real gateway, enter the meter number, verify the protocol, and enable it.
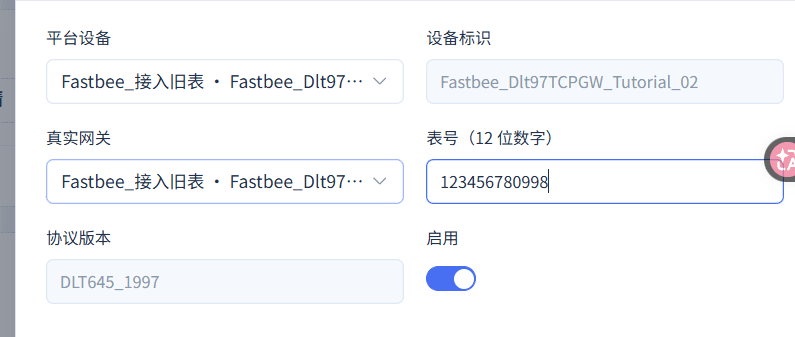
The device, gateway, and meter number match this tutorial's meter.
37. Save the Binding Draft
Where: Product Details → Protocol Configuration → Device Binding Steps: Click Save Draft.

Submit the current binding.
38. Verify the Binding List
Where: Product Details → Protocol Configuration → Device Binding Steps: Verify the saved device, gateway, meter number, and enabled status.

The list shows the correct binding for this tutorial's device.
Product Details → Protocol Configuration → Device Binding
| Field / Control | Filling Notes |
|---|---|
| Device Binding | Selects the device binding list. |
| Add Configuration | Opens the binding draft form. Republish after changes. |
| Platform Device | Determines the platform device that owns the data. Required · Value: fill in per your environmentSelect from the current product's device list. Republish after changes. Current batch resource: determines the platform device that owns the data; select this tutorial's newly created device. |
| Device Identifier | Automatically carried over from the selected device. Auto-filled from the platform device record. |
| Real Gateway | Specifies the gateway that carries this meter's connection. Required · Value: fill in per your environmentFrom the platform gateway device list. Republish after changes. Current batch resource: specifies the gateway that carries this meter's connection; this tutorial uses the same gateway device and does not select other test connections. |
| Meter Number (12 digits) | Determines the meter to access in the gateway connection. Required · Value: 123456780998From the meter address setting or manufacturer documentation. Republish after changes. |
| Protocol Version | Inherits the current product's meter protocol. From the current product protocol. |
| Enable | Allows this binding to be included when publishing. Optional · Value: OnRepublish after changes. On: enables this option; allows this binding to be included when publishing. Off: disables this option; the behavior is not enabled. |
| Save Draft | Saves the current binding; not yet published. Republish after changes. |
| Binding List | Shows the binding save result. From the current product binding query. |
Configure the Ten Polling Items
Each data identifier gets its own polling item. This tutorial explicitly sets a 10-second interval, 3-second timeout, and zero retries; the defaults of the platform's new-item form are different.
39. Fill In the First Point's Polling
Where: Product Details → Protocol Configuration → Polling Items Steps: Add a polling item and fill in the first point's parameters as shown.
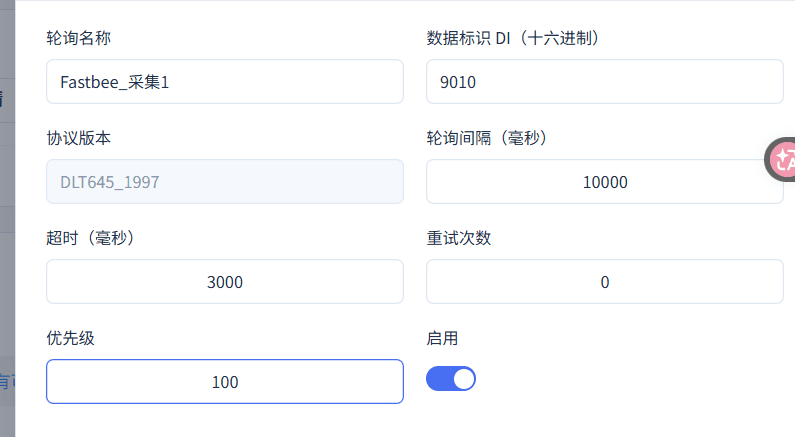
The first point reads every 10 seconds, with a 3-second timeout and 0 retries.
40. Save the First Point's Polling
Where: Product Details → Protocol Configuration → Polling Items Steps: Click Save Draft.

The first point's polling is written to the current product.
41. Verify the First Point's Polling Record
Where: Product Details → Protocol Configuration → Polling Items Steps: In the list, verify the first point's data identifier and collection parameters.

The list shows this tutorial's actual polling record.
42. Save the Energy 2 Polling
Where: Product Details → Protocol Configuration → Polling Items Steps: After verifying the current field parameters in the figure, click Save Draft.
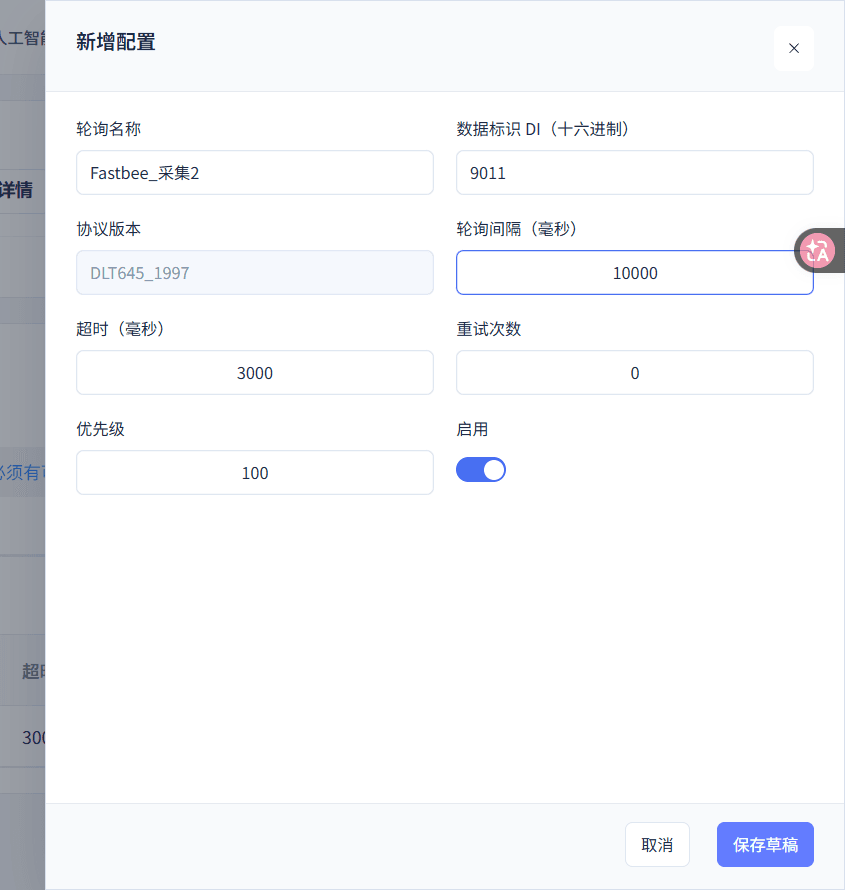
Energy 2 corresponds to 9011; the other collection parameters match the first point.
43. Save the Energy 3 Polling
Where: Product Details → Protocol Configuration → Polling Items Steps: After verifying the current field parameters in the figure, click Save Draft.
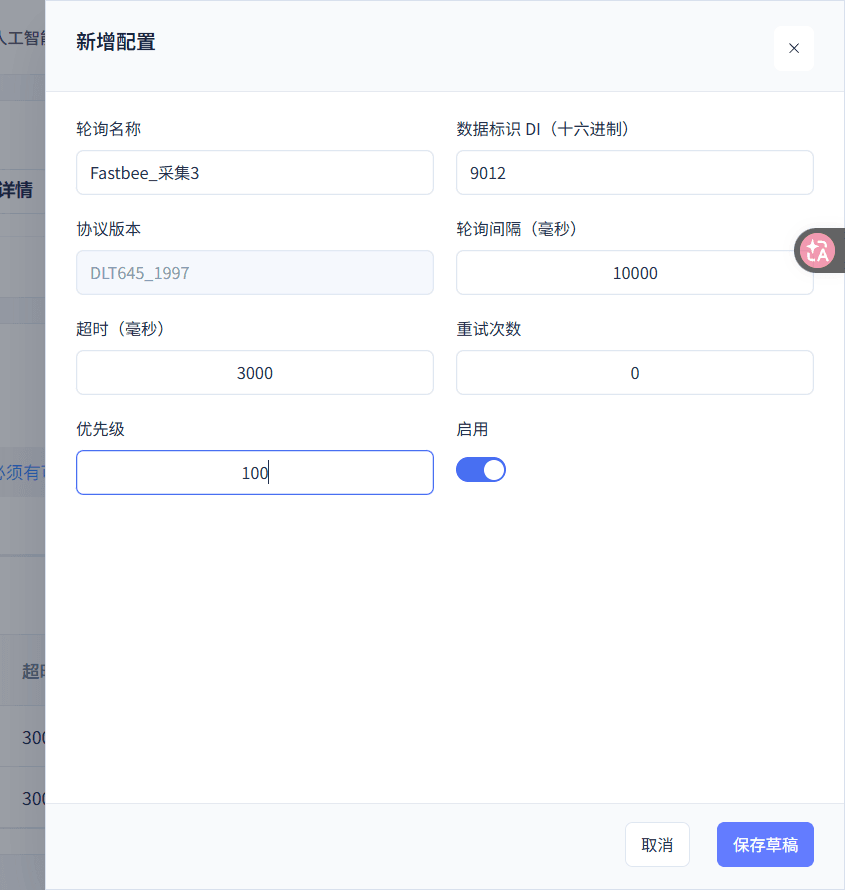
Energy 3 corresponds to 9012; the other collection parameters match the first point.
44. Save the Energy 4 Polling
Where: Product Details → Protocol Configuration → Polling Items Steps: After verifying the current field parameters in the figure, click Save Draft.
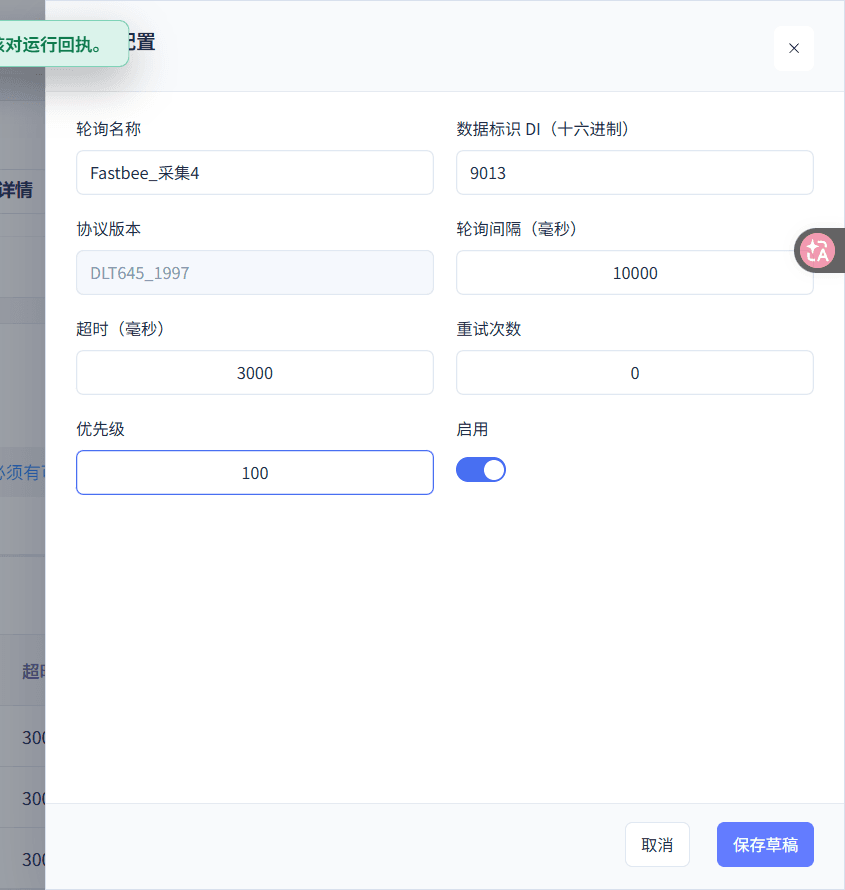
Energy 4 corresponds to 9013; the other collection parameters match the first point.
45. Save the Energy 5 Polling
Where: Product Details → Protocol Configuration → Polling Items Steps: After verifying the current field parameters in the figure, click Save Draft.
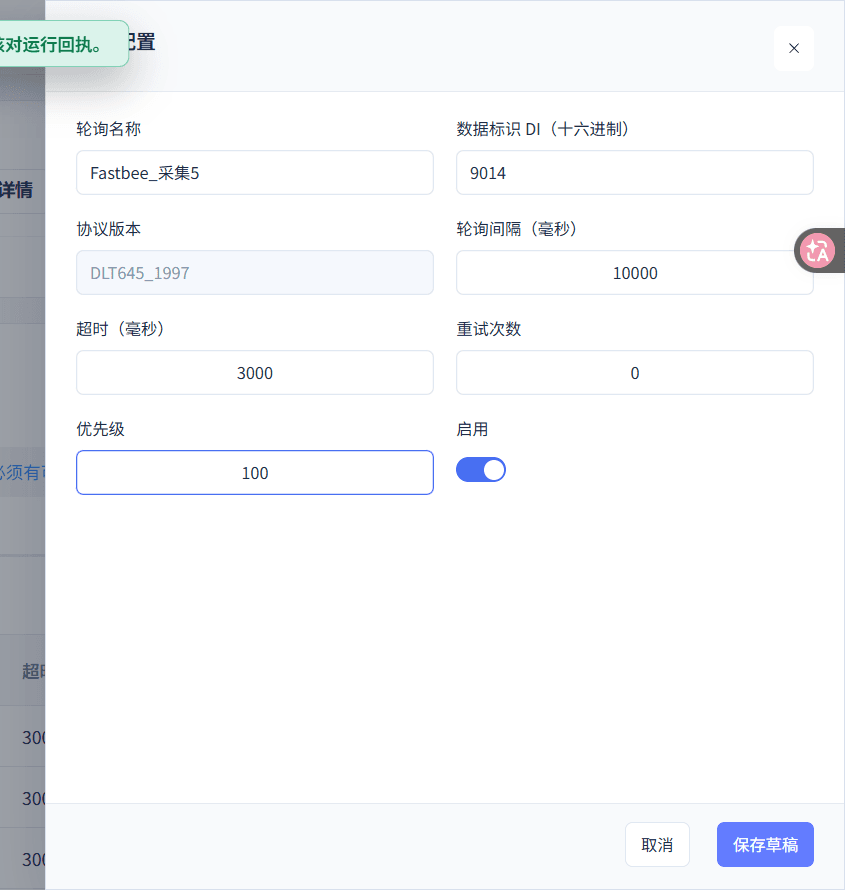
Energy 5 corresponds to 9014; the other collection parameters match the first point.
46. Save the Energy 6 Polling
Where: Product Details → Protocol Configuration → Polling Items Steps: After verifying the current field parameters in the figure, click Save Draft.
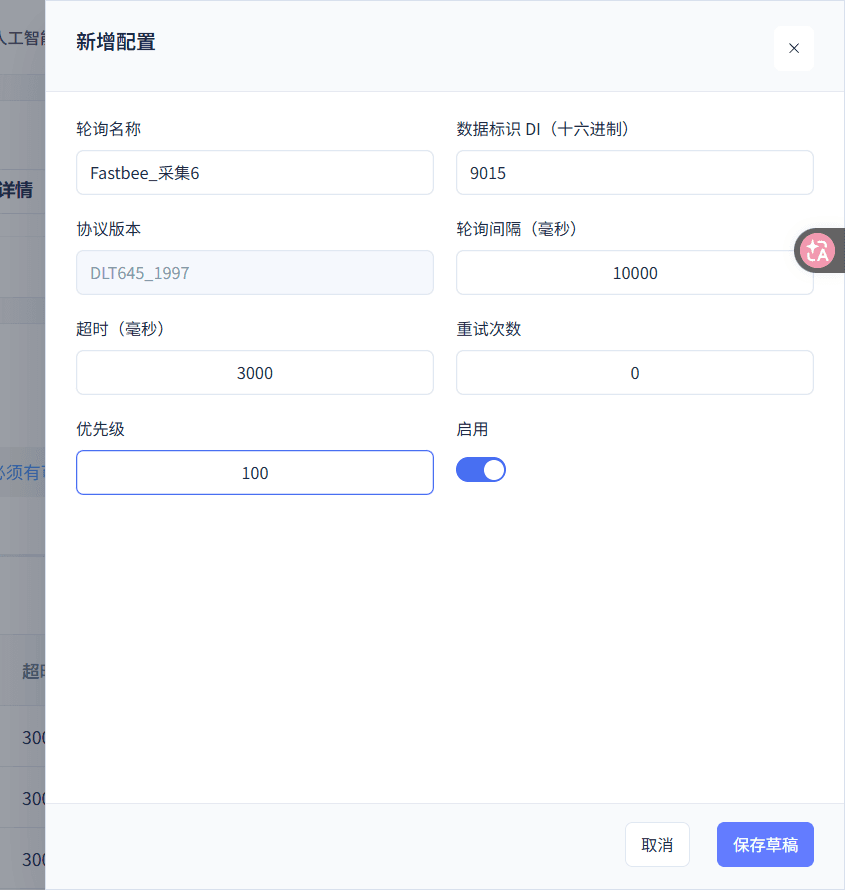
Energy 6 corresponds to 9015; the other collection parameters match the first point.
47. Save the Energy 7 Polling
Where: Product Details → Protocol Configuration → Polling Items Steps: After verifying the current field parameters in the figure, click Save Draft.
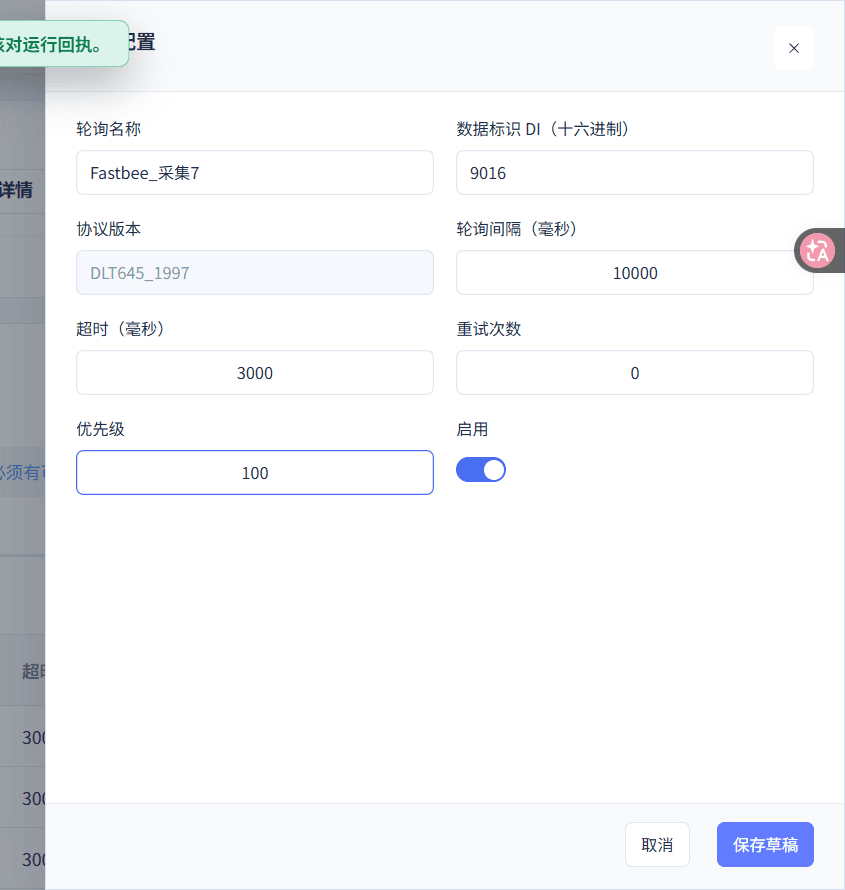
Energy 7 corresponds to 9016; the other collection parameters match the first point.
48. Save the Energy 8 Polling
Where: Product Details → Protocol Configuration → Polling Items Steps: After verifying the current field parameters in the figure, click Save Draft.
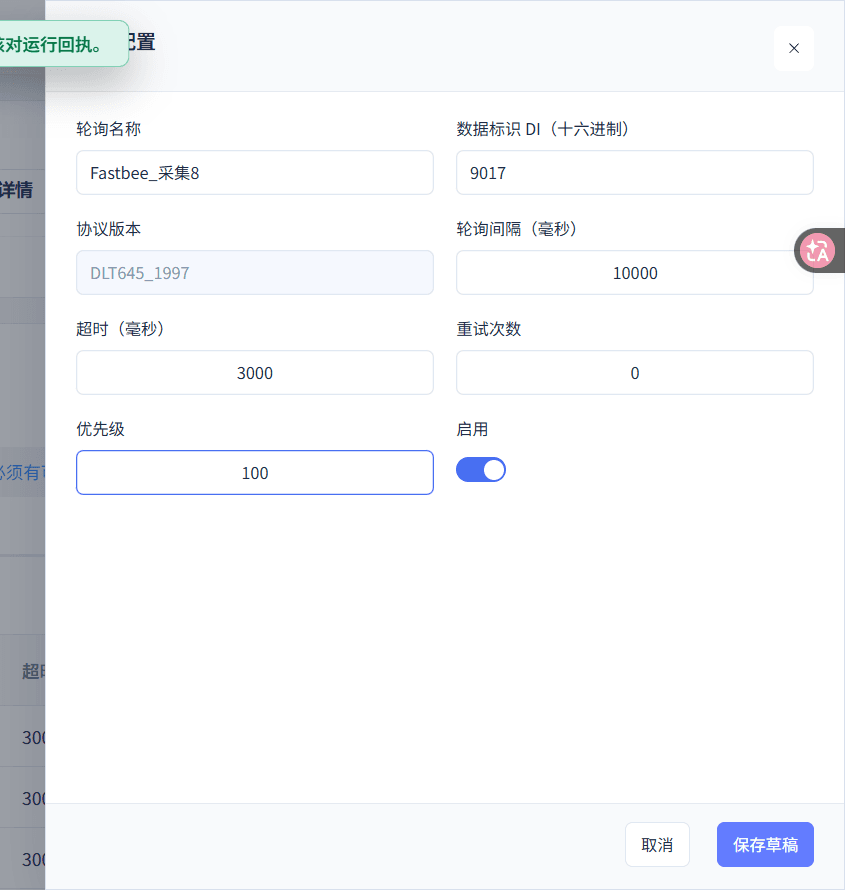
Energy 8 corresponds to 9017; the other collection parameters match the first point.
49. Save the Energy 9 Polling
Where: Product Details → Protocol Configuration → Polling Items Steps: After verifying the current field parameters in the figure, click Save Draft.
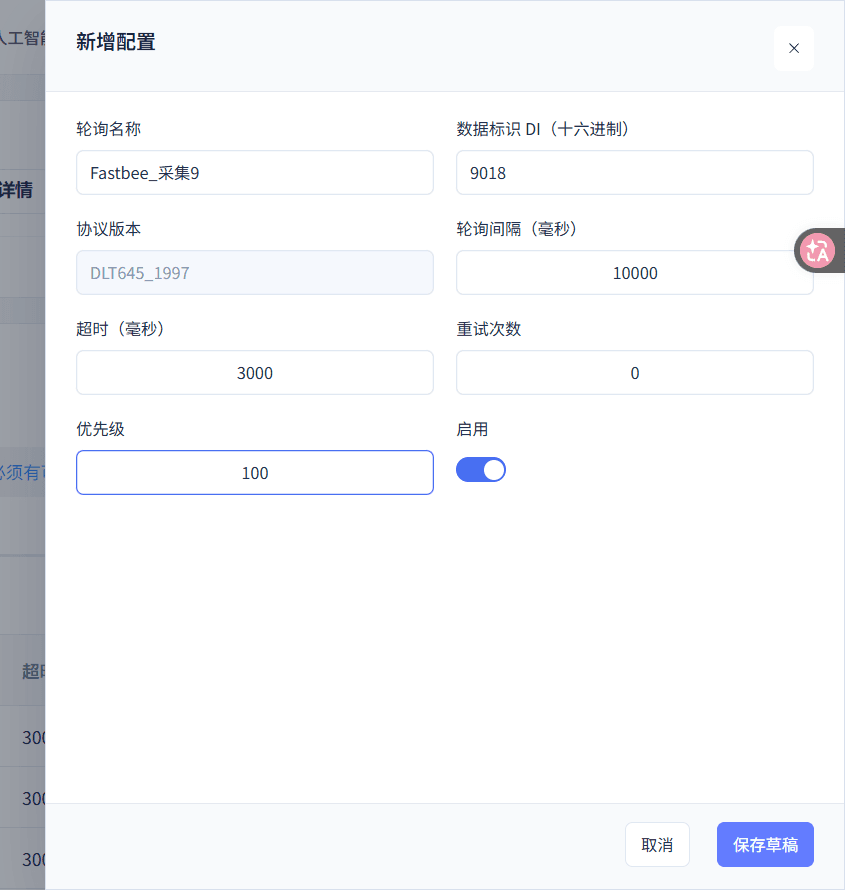
Energy 9 corresponds to 9018; the other collection parameters match the first point.
50. Save the Energy 10 Polling
Where: Product Details → Protocol Configuration → Polling Items Steps: After verifying the current field parameters in the figure, click Save Draft.
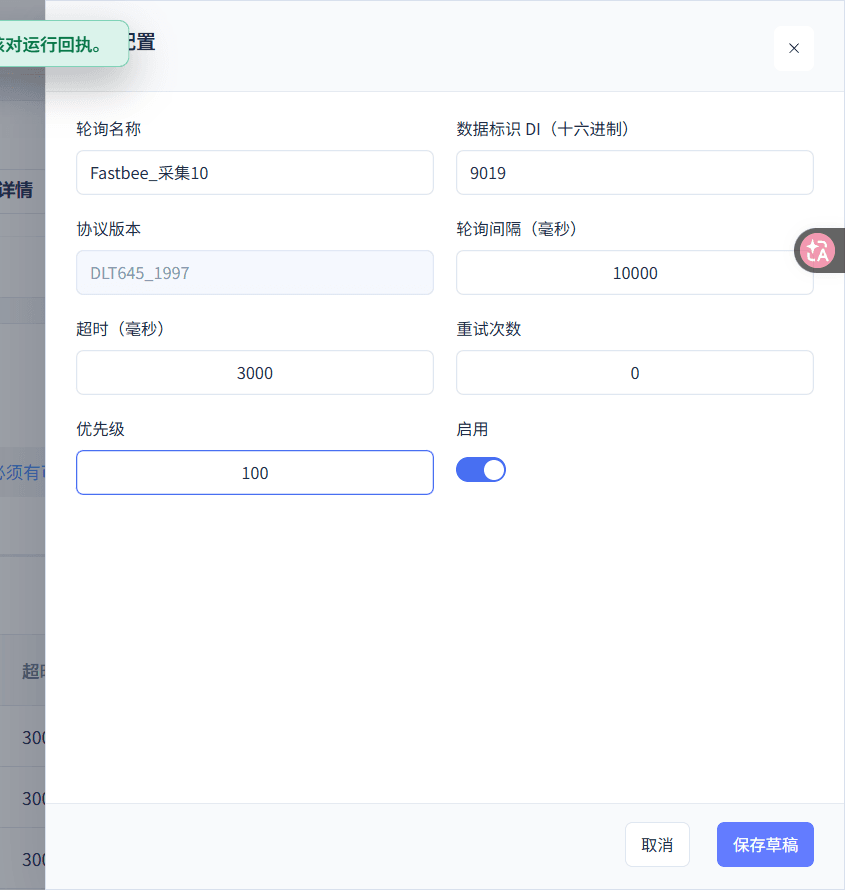
Energy 10 corresponds to 9019; the other collection parameters match the first point.
Product Details → Protocol Configuration → Polling Items
| Field / Control | Filling Notes |
|---|---|
| Polling Items | Views this product's read schedule. |
| Add Configuration | Opens a new polling draft. Republish after changes. |
| Polling Name | Makes it easier to select the formal polling item later in the mapping. Required · Value: fill in per your environmentNamed by the person performing the access, after the collection point. Republish after changes. |
| Data Identifier DI (hexadecimal) | Selects the data to read inside the meter. Required · Value: 9010 to 9019From the manufacturer's point table for this model; this tutorial uses the demo point table. Republish after changes. |
| Protocol Version | Inherits the current product protocol. Carried over automatically from the product configuration. |
| Polling Interval (ms) | Determines the period for repeated reads of the same field. Required · Value: 10000Republish after changes. |
| Timeout (ms) | Limits how long one read waits for a response. Required · Value: 3000Republish after changes. |
| Retries | Determines how many times a read is retried after a timeout. Required · Value: 0Republish after changes. |
| Enable | Allows this polling item to be included when publishing. Optional · Value: OnRepublish after changes. On: enables this option; allows this polling item to be included when publishing. Off: disables this option; the behavior is not enabled. |
| Save Draft | Saves the polling item and returns the formal record. Republish after changes. |
| Polling List | Shows the saved polling items and their actual primary keys. From the product polling query. |
Advanced parameters (1 item)
| Field / Control | Filling Notes |
|---|---|
| Priority | Saves the scheduling priority of the polling task. Required · Value: 100Republish after changes. |
Map Formal Polling Items to Properties
The mapping must select the corresponding polling item and model from the platform's formal candidates. The multiplier, offset, unit, and encoding should come from the same manufacturer point table; this tutorial uses the demo point table.
51. Map Energy 1
Where: Product Details → Protocol Configuration → Point Mapping Steps: From the candidates, select the corresponding formal polling item and the energy property with the same sequence number; verify the parameters in the figure and click Save Draft.
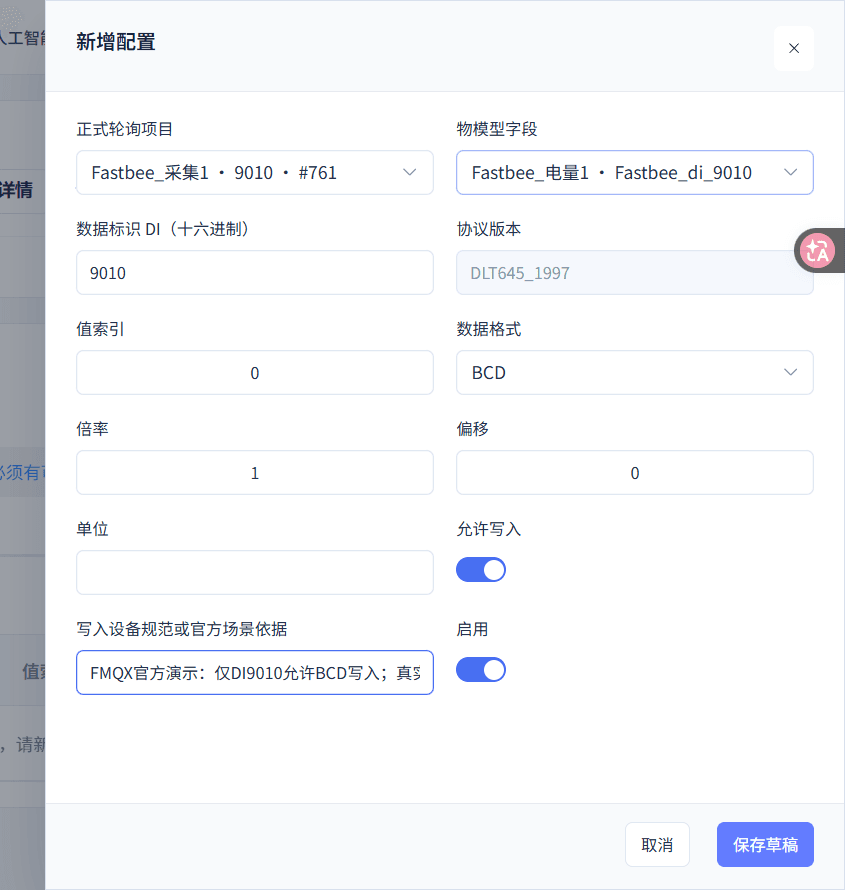
Energy 1 corresponds to 9010; only this demo first point allows writing.
52. Map Energy 2
Where: Product Details → Protocol Configuration → Point Mapping Steps: From the candidates, select the corresponding formal polling item and the energy property with the same sequence number; verify the parameters in the figure and click Save Draft.
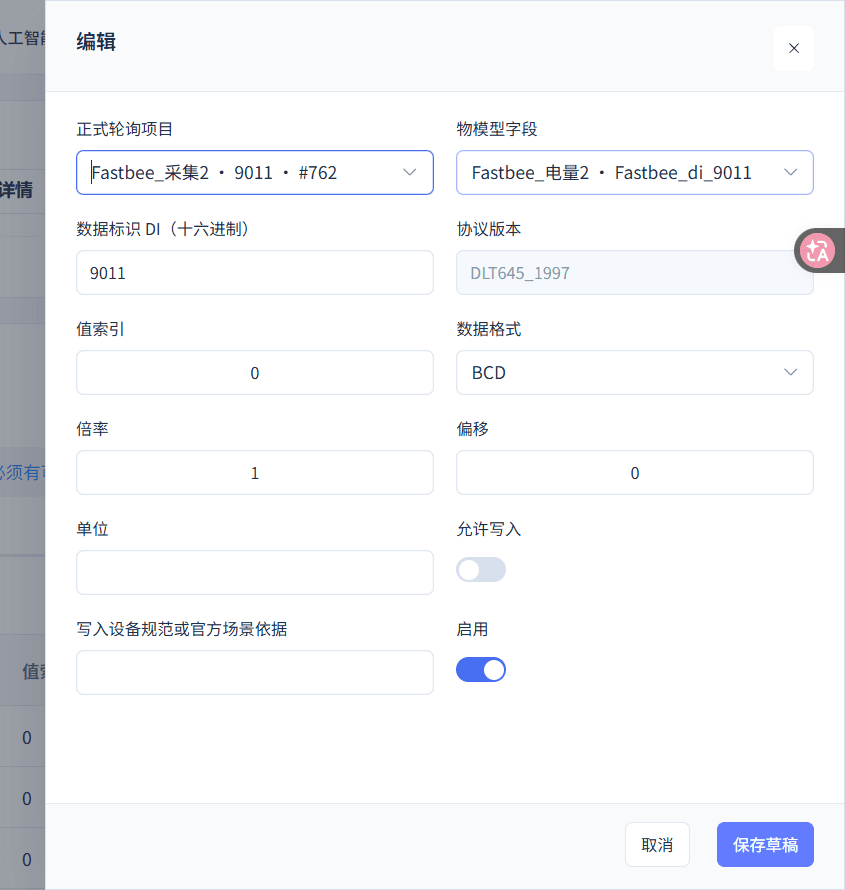
Energy 2 corresponds to 9011; this point stays read-only.
53. Map Energy 3
Where: Product Details → Protocol Configuration → Point Mapping Steps: From the candidates, select the corresponding formal polling item and the energy property with the same sequence number; verify the parameters in the figure and click Save Draft.
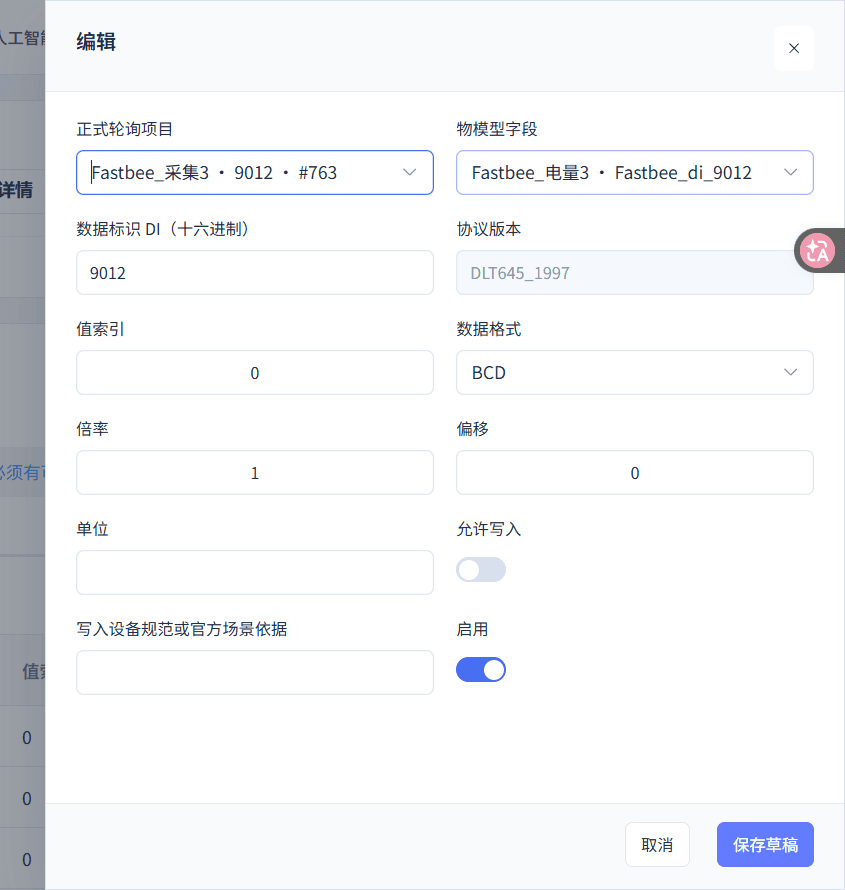
Energy 3 corresponds to 9012; this point stays read-only.
54. Map Energy 4
Where: Product Details → Protocol Configuration → Point Mapping Steps: From the candidates, select the corresponding formal polling item and the energy property with the same sequence number; verify the parameters in the figure and click Save Draft.
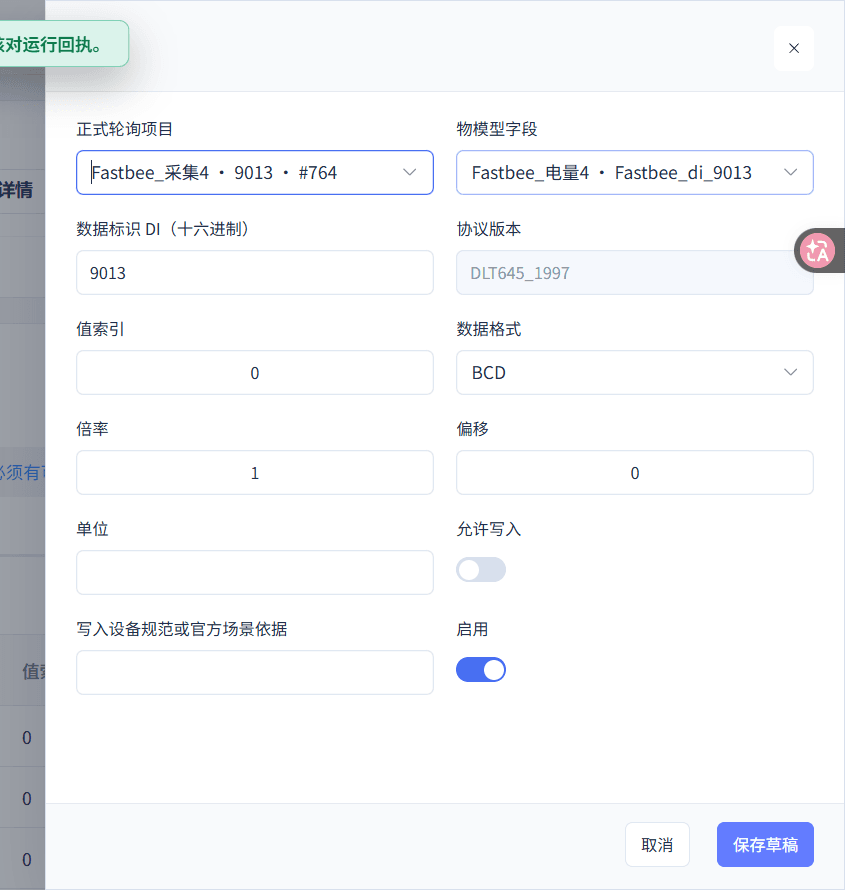
Energy 4 corresponds to 9013; this point stays read-only.
55. Map Energy 5
Where: Product Details → Protocol Configuration → Point Mapping Steps: From the candidates, select the corresponding formal polling item and the energy property with the same sequence number; verify the parameters in the figure and click Save Draft.
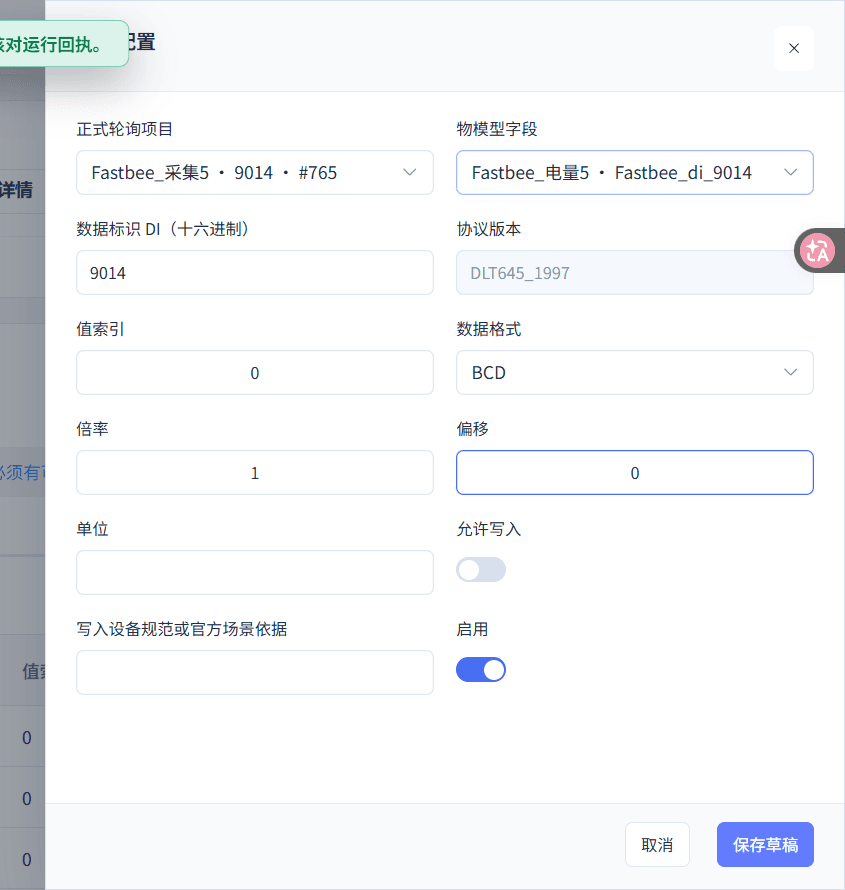
Energy 5 corresponds to 9014; this point stays read-only.
56. Map Energy 6
Where: Product Details → Protocol Configuration → Point Mapping Steps: From the candidates, select the corresponding formal polling item and the energy property with the same sequence number; verify the parameters in the figure and click Save Draft.
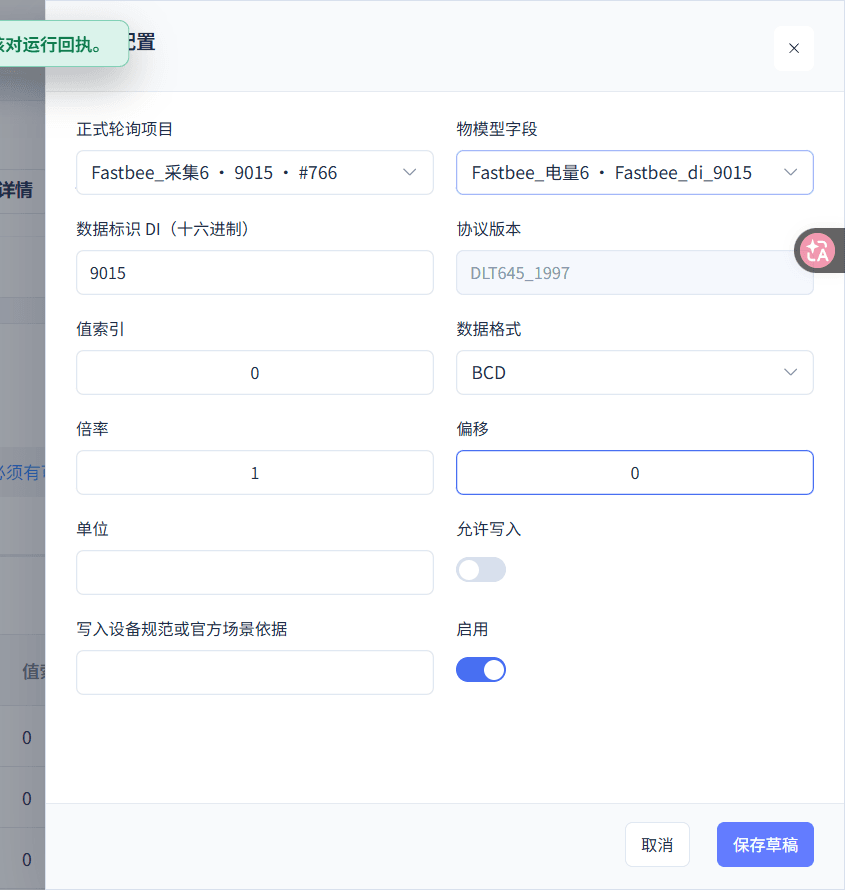
Energy 6 corresponds to 9015; this point stays read-only.
57. Map Energy 7
Where: Product Details → Protocol Configuration → Point Mapping Steps: From the candidates, select the corresponding formal polling item and the energy property with the same sequence number; verify the parameters in the figure and click Save Draft.
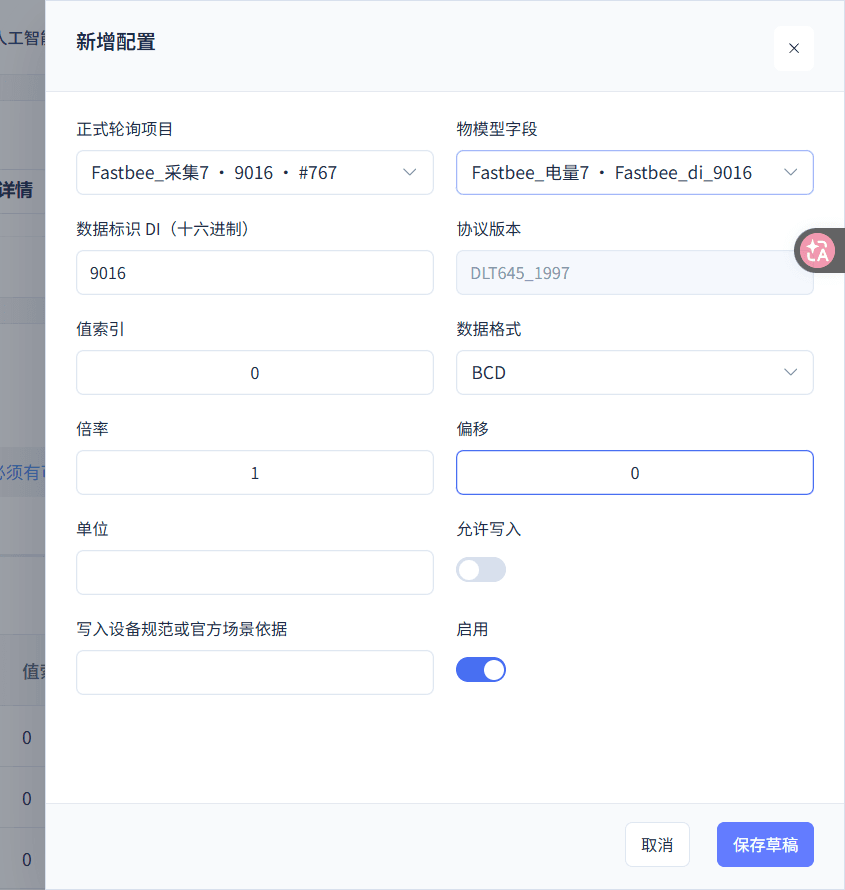
Energy 7 corresponds to 9016; this point stays read-only.
58. Map Energy 8
Where: Product Details → Protocol Configuration → Point Mapping Steps: From the candidates, select the corresponding formal polling item and the energy property with the same sequence number; verify the parameters in the figure and click Save Draft.
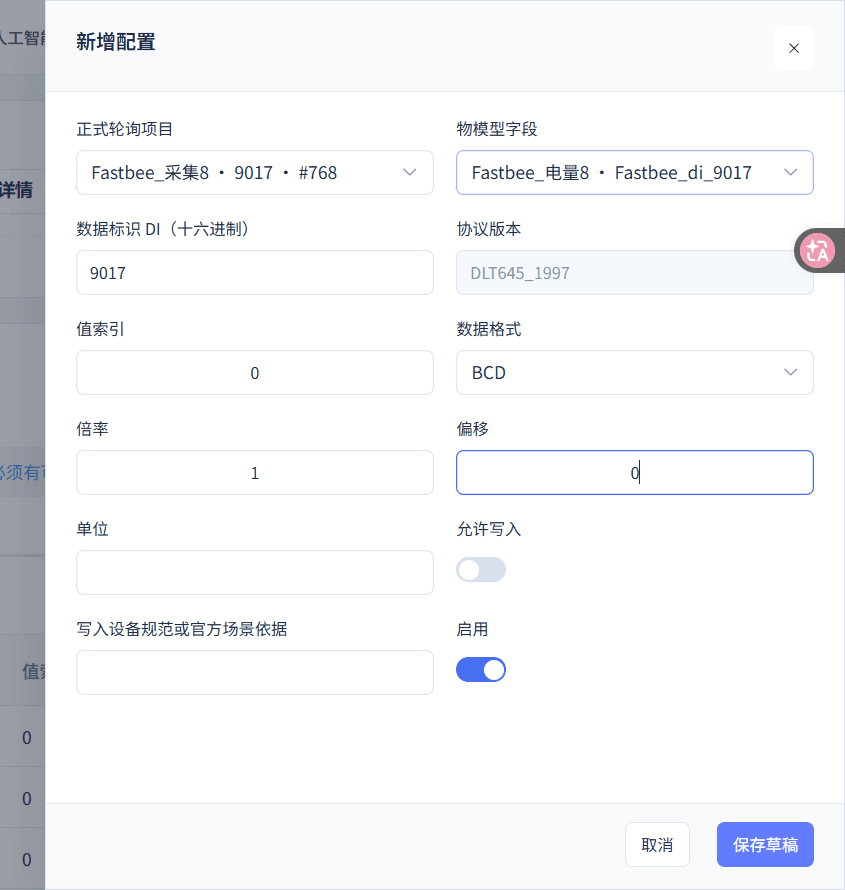
Energy 8 corresponds to 9017; this point stays read-only.
59. Map Energy 9
Where: Product Details → Protocol Configuration → Point Mapping Steps: From the candidates, select the corresponding formal polling item and the energy property with the same sequence number; verify the parameters in the figure and click Save Draft.
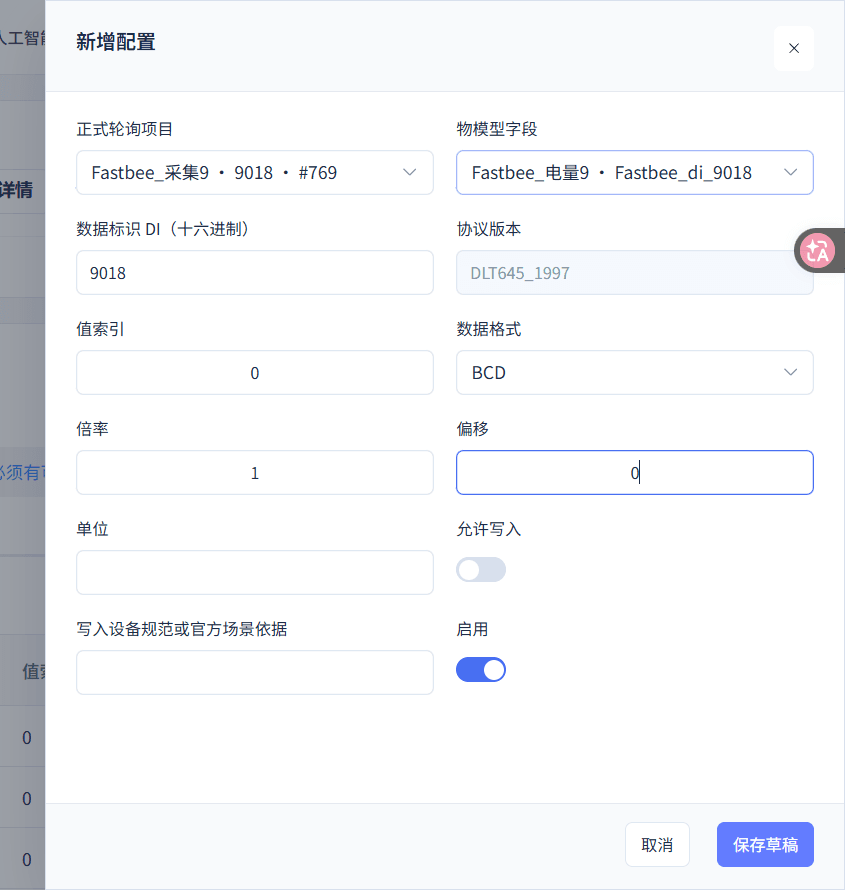
Energy 9 corresponds to 9018; this point stays read-only.
60. Map Energy 10
Where: Product Details → Protocol Configuration → Point Mapping Steps: From the candidates, select the corresponding formal polling item and the energy property with the same sequence number; verify the parameters in the figure and click Save Draft.
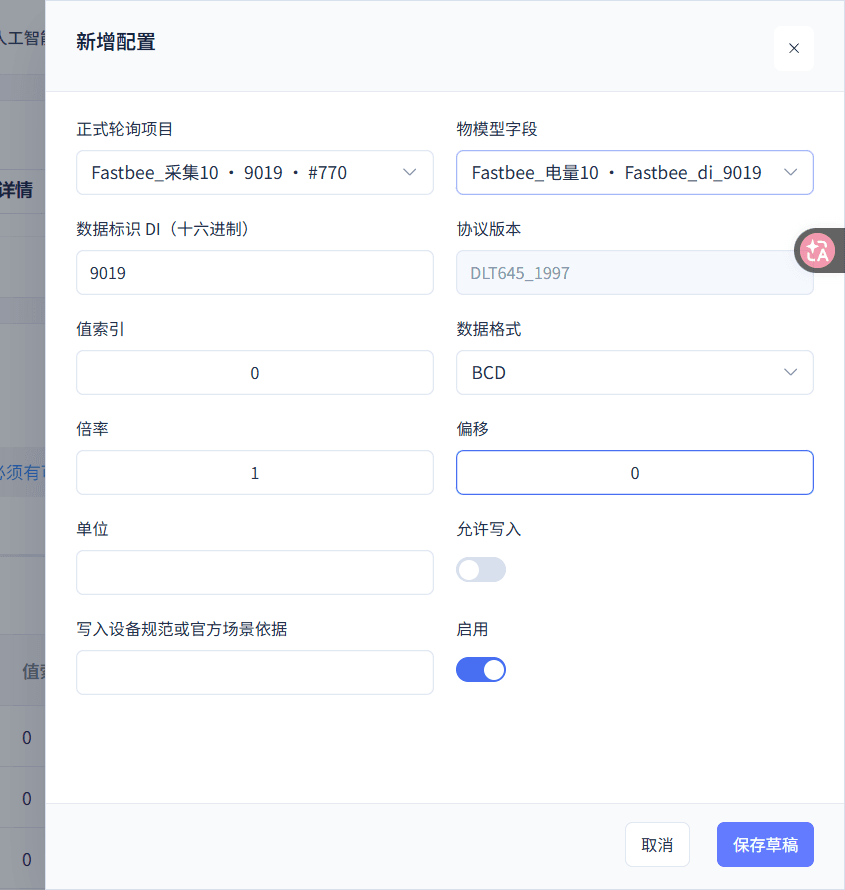
Energy 10 corresponds to 9019; this point stays read-only.
Product Details → Protocol Configuration → Point Mapping
| Field / Control | Filling Notes |
|---|---|
| Point Mapping | Associates formal polling results with model properties. |
| Add Configuration | Opens a mapping draft. Republish after changes. |
| Formal Polling Item | Specifies a saved polling record. Required · Value: fill in per your environmentSelect from the polling candidates returned by the platform query. Republish after changes. Select the current batch resource corresponding to this field: specifies a saved polling record; verify the name and data identifier, and do not type or guess a primary key. |
| Thing Model Field | Determines which property the parsed value is saved to. Required · Value: fill in per your environmentFrom the current product's feature definition. Republish after changes. Select the current batch resource with the same sequence number: determines which property the parsed value is saved to; Energy 1 corresponds to the first point, and the other nine correspond one by one. |
| Data Identifier DI (hexadecimal) | Matches the data identifier of the selected formal polling item. Required · Value: 9010 to 9019Carried over from the formal polling selection and verified. Republish after changes. |
| Protocol Version | Inherits the product protocol version. From the product configuration. |
| Data Format | Defines how the raw value is decoded. Required · Value: BCDFrom the manufacturer's point table and data encoding documentation. Republish after changes. BCD: defines how the raw value is decoded; this tutorial selects BCD, and other encodings must not be interpreted directly as BCD. |
| Multiplier | Multiplies the decoded result by a factor. Required · Value: 1From the manufacturer's decimal places and dimension documentation. Republish after changes. |
| Offset | Adds an offset to the result after the multiplier is applied. Required · Value: 0From the manufacturer or business calculation documentation. Republish after changes. |
| Unit | Stays consistent with the unit of the model property. Required · Value: left blankFrom the same model property and manufacturer documentation. Republish after changes. |
| Allow Write | Allows this mapping to accept controlled writes. Optional · Value: on for the first point onlyFrom the write range explicitly allowed by the manufacturer. Republish after changes. On: enables this option; allows this mapping to accept controlled writes. Off: disables this option; the behavior is not enabled. |
| Enable | Allows this mapping to be published. Optional · Value: OnRepublish after changes. On: enables this option; allows this mapping to be published. Off: disables this option; the behavior is not enabled. |
| Save Draft | Saves and validates the current mapping. Republish after changes. |
Advanced parameters (2 items)
| Field / Control | Filling Notes |
|---|---|
| Value Index | Specifies the value position in the response data. Required · Value: 0From the manufacturer's response data structure. Republish after changes. |
| Write Device Specification or Official Scenario Basis | Records the specific basis that allows writing. Required · Value: FMQX demo first point allows BCD writesFor a real device this comes from the manufacturer's formal documentation; in this tutorial it comes from the FMQX demo capability. Republish after changes. |
Set the Read and Demo Write Policies
Read and write policies are saved separately. 9010 is the FMQX demo writable field; it does not mean a real metering meter allows modifying its energy values; a real device must have an explicit manufacturer basis and on-site authorization.
61. Save the First Point's Read Policy
Where: Product Details → Protocol Configuration → Command Policy Steps: Verify the first point's read policy against the figure and click Save Draft.
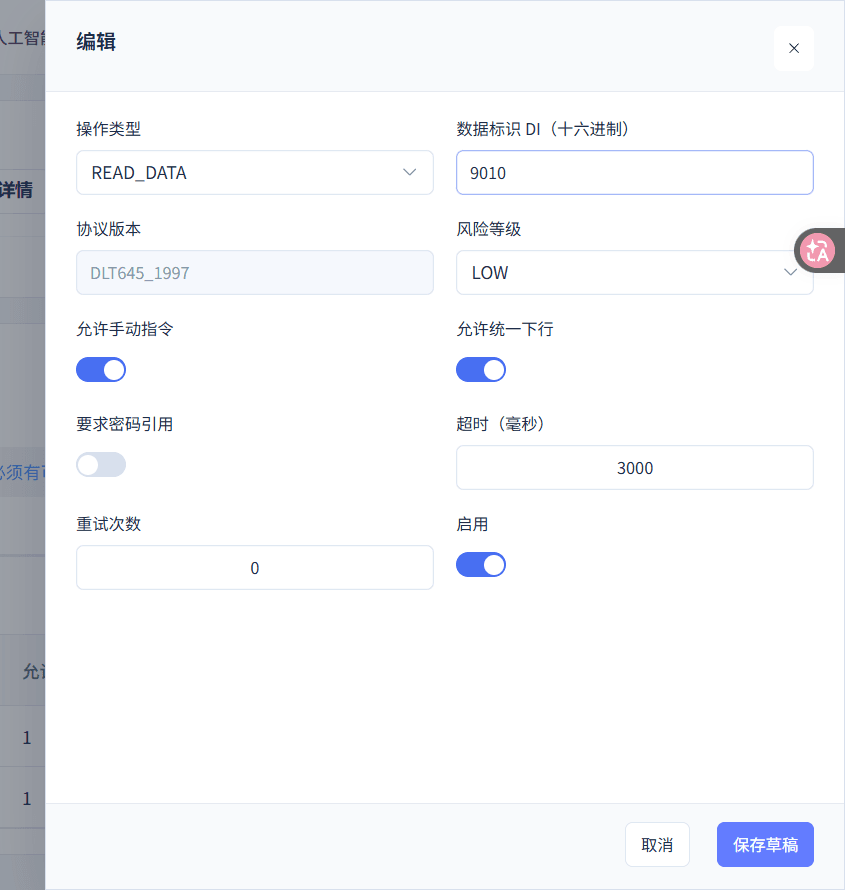
Read, low risk, 3-second timeout, 0 retries, password requirement off.
62. Save the First Point's Write Policy
Where: Product Details → Protocol Configuration → Command Policy Steps: Verify the first point's write policy against the figure and click Save Draft.
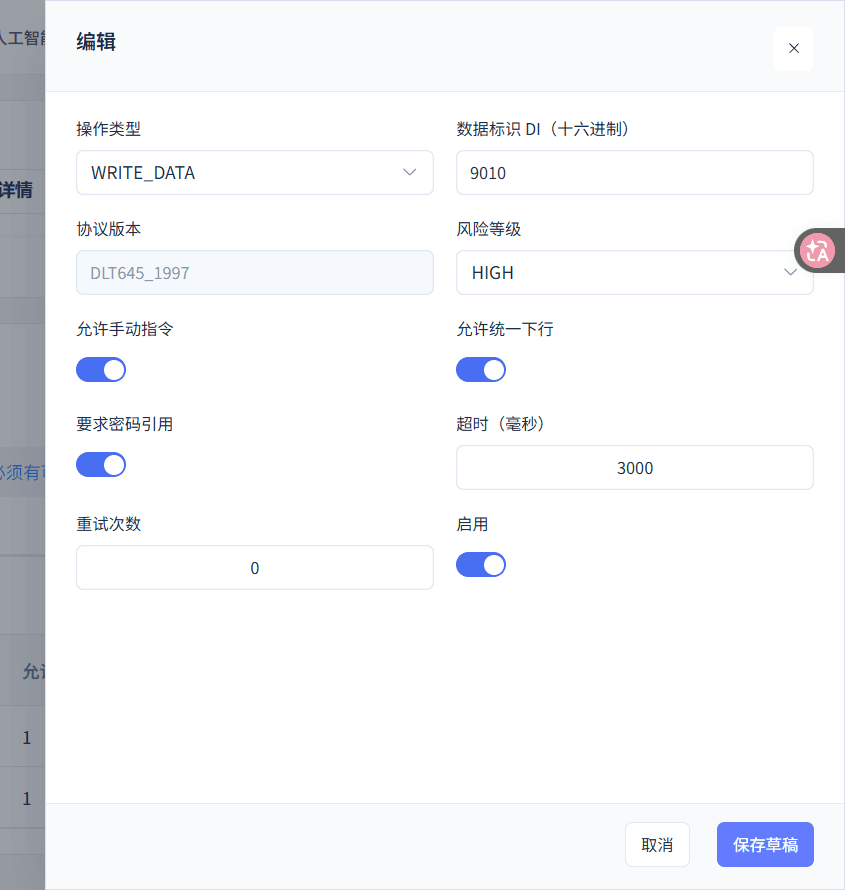
Write, high risk, password required, 3-second timeout, and 0 retries.
Product Details → Protocol Configuration → Command Policy
| Field / Control | Filling Notes |
|---|---|
| Command Policy | Sets the allowed reads and controlled writes. |
| Operation Type | Defines read and write policies separately. Required · Value: READ_DATA,WRITE_DATAFrom the operations the current device allows. Republish after changes. READ_DATA: defines read and write policies separately; select READ_DATA for reads and WRITE_DATA for writes. WRITE_DATA: defines read and write policies separately; select READ_DATA for reads and WRITE_DATA for writes. |
| Data Identifier DI (hexadecimal) | Restricts the policy to the demo first point. Required · Value: 9010From the enabled point mapping. Republish after changes. |
| Protocol Version | Inherits the product's meter protocol. From the current product. |
| Risk Level | Marks the operation risk of the policy. Required · Value: LOW,HIGHRepublish after changes. LOW: marks the operation risk of the policy; reads are LOW and writes are HIGH. HIGH: marks the operation risk of the policy; reads are LOW and writes are HIGH. |
| Allow Manual Commands | Allows this policy to be initiated from the manual operation entry. Optional · Value: OnRepublish after changes. On: enables this option; allows this policy to be initiated from the manual operation entry. Off: disables this option; the behavior is not enabled. |
| Allow Unified Downlink | Allows the platform's unified downlink entry to use this policy. Optional · Value: OnRepublish after changes. On: enables this option; allows the platform's unified downlink entry to use this policy. Off: disables this option; the behavior is not enabled. |
| Require Password Reference | Requires the necessary authorization fields when writing. Optional · Value: fill in per your environmentFrom the manufacturer's write specification and this authorization. Republish after changes. On: enables this option; requires the necessary authorization fields when writing. Off: disables this option; the behavior is not enabled. |
| Timeout (ms) | Limits the waiting time of a single policy invocation. Required · Value: 3000Republish after changes. |
| Retries | Controls repeated attempts after a policy timeout. Required · Value: 0Republish after changes. |
| Enable | Allows this policy to be published. Optional · Value: OnRepublish after changes. On: enables this option; allows this policy to be published. Off: disables this option; the behavior is not enabled. |
| Save Draft | Saves the policy draft, waiting for the unified publish. Republish after changes. |
Prepare the FMQX Meter Connection
Import this tutorial's complete point table and edit the connection in FMQX Web. The gateway address is provided by this environment, and the client number is copied from the platform device number. The temporary password is not saved in the connection configuration.
**Complete connection and point JSON template (no password)**json
{

  "schemaVersion": 3,

  "groups": [

    {

      "id": "DLT97_TCPGW_Tutorial_02_group",

      "name": "旧表接入"

    }

  ],

  "sessions": [

    {

      "id": "DLT97_TCPGW_Tutorial_02_session",

      "groupId": "DLT97_TCPGW_Tutorial_02_group",

      "name": "接入旧表",

      "protocol": "DLT645_1997",

      "transport": "TCP",

      "host": "127.0.0.1",

      "port": 8888,

      "clientId": "demo-device",

      "autoReconnect": false,

      "dlt645MeterAddress": "123456780998",

      "dlt645IncludePreamble": false,

      "dlt645MaxFrameBytes": 1024,

      "dlt645Points": [

        {

          "dataIdentifier": "9010",

          "valueHex": "21000000",

          "writable": true

        },

        {

          "dataIdentifier": "9011",

          "valueHex": "22000000",

          "writable": false

        },

        {

          "dataIdentifier": "9012",

          "valueHex": "23000000",

          "writable": false

        },

        {

          "dataIdentifier": "9013",

          "valueHex": "24000000",

          "writable": false

        },

        {

          "dataIdentifier": "9014",

          "valueHex": "25000000",

          "writable": false

        },

        {

          "dataIdentifier": "9015",

          "valueHex": "26000000",

          "writable": false

        },

        {

          "dataIdentifier": "9016",

          "valueHex": "27000000",

          "writable": false

        },

        {

          "dataIdentifier": "9017",

          "valueHex": "28000000",

          "writable": false

        },

        {

          "dataIdentifier": "9018",

          "valueHex": "29000000",

          "writable": false

        },

        {

          "dataIdentifier": "9019",

          "valueHex": "30000000",

          "writable": false

        }

      ]

    }

  ]

}After verifying against the replacement checklist, save it as a UTF-8 file named 连接配置.json (connection configuration) and choose Import Configuration in FMQX Web; this rewrite of the body text does not mean the template has actually been imported. Replaceable customer template names are used here; verify against this section's replacement checklist before importing or sending.
63. Import This Tutorial's Meter Configuration
Where: FMQX Web → This Tutorial's Meter → Edit Connection Steps: After verifying this section's complete JSON against the replacement checklist, save it as a UTF-8 file named 连接配置.json (connection configuration), then in FMQX Web choose Import Configuration under More Actions. The original step's screenshot keeps the original batch operation.
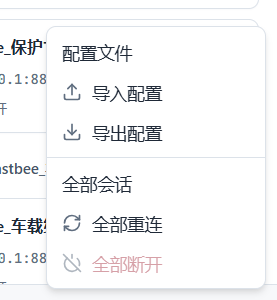
This tutorial's single meter and complete point table are imported.
64. Select the Imported Meter
Where: FMQX Web → This Tutorial's Meter → Edit Connection Steps: Click this tutorial's meter card and verify the name and the 1997-edition mark.
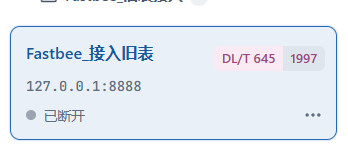
The current one is this tutorial's disconnected meter session.
65. Verify the Meter Protocol
Where: FMQX Web → This Tutorial's Meter → Edit Connection Steps: Open this tutorial's connection editor and verify the 1997-edition protocol card.
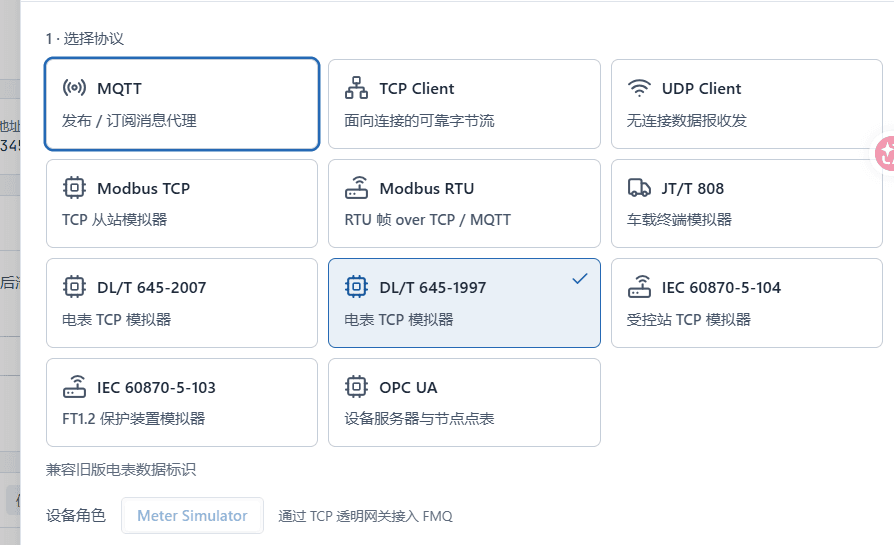
DL/T 645-1997 is selected.
66. Verify the Connection Name and Group
Where: FMQX Web → This Tutorial's Meter → Edit Connection Steps: Verify this tutorial's connection name, group, and Save to Local.
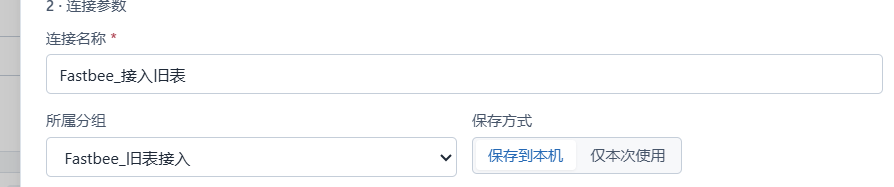
The connection is saved in this tutorial's group.
67. Fill In the Gateway Address and Client Number
Where: FMQX Web → This Tutorial's Meter → Edit Connection Steps: Enter this round's FMQ gateway address and port, and copy the device number from the platform as the client number.
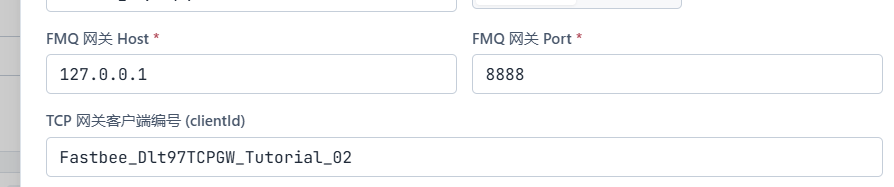
The address is reachable, and the client number matches the platform device number.
68. Save the First Point's Initial Value Once
Where: FMQX Web → This Tutorial's Meter → Edit Connection Steps: Verify the meter address and the first point, temporarily enter the encoding of 20, then Save Changes.
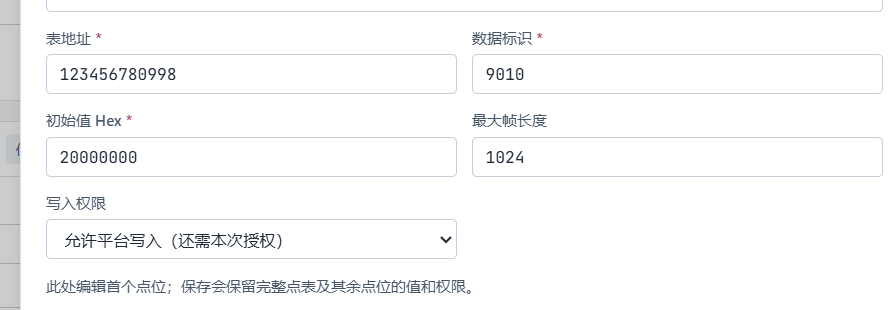
The first point uses the initial encoding of 20, and the full ten points are kept.
69. Reopen to Verify the Saved Value
Where: FMQX Web → This Tutorial's Meter → Edit Connection Steps: Reopen this tutorial's connection editor and view the first point's initial value.
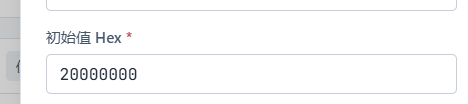
The initial value is still the encoding of 20 just saved.
70. Restore the Formal Sampling Starting Point
Where: FMQX Web → This Tutorial's Meter → Edit Connection Steps: Change the first point's initial value back to the encoding of 21.
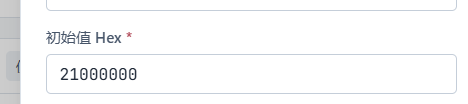
The first point's initial value is 21000000.
71. Save the Connection Preparation Result
Where: FMQX Web → This Tutorial's Meter → Edit Connection Steps: Click Save Changes.

This tutorial's connection definition is saved and waits for registration after publishing.
FMQX Web → This Tutorial's Meter → Edit Connection
| Field / Control | Filling Notes |
|---|---|
| Import Configuration | Imports this tutorial's single-meter connection and complete point table. From this tutorial's accompanying connection configuration. |
| This Tutorial's Meter Session | Selects the current meter connection. From the connection just imported. |
| Select Protocol | Determines the protocol version of the FMQX demo meter. Required · Value: DL/T 645-1997From the platform product and manufacturer documentation. Reconnect after changes. DL/T 645-1997: determines the protocol version of the FMQX demo meter; this tutorial edits the imported 1997 meter and does not use the cancelled new-connection preview. |
| Connection Name | Distinguishes connections in FMQX. Required · Value: fill in per your environmentNamed by the person performing this access, according to its purpose. |
| Group | Places the connection into this tutorial's group. Required · Value: fill in per your environmentFrom the current FMQX groups. Current batch resource: places the connection into this tutorial's group; only operate this one meter in this tutorial's group. |
| Save Method | Determines how the connection configuration is retained. Optional · Value: Save to LocalSave to Local: determines how the connection configuration is retained; this tutorial saves locally, and the password is still kept only in the current session memory. |
| FMQ Gateway Host | Specifies the FMQ gateway address FMQX connects to. Required · Value: 127.0.0.1Provided by the current test environment or the operations staff. Reconnect after changes. |
| FMQ Gateway Port | Specifies the corresponding gateway listening port. Required · Value: 8888From the current FMQ gateway configuration. Reconnect after changes. |
| TCP Gateway Client Number | Lets the platform identify the current gateway device at registration. Required · Value: copied from the platform device numberFrom the device number of this tutorial's platform device. Reconnect after changes. |
| Meter Address | Determines the meter simulated by FMQX. Required · Value: 123456780998From the meter address bound in this tutorial's platform. Reconnect after changes. |
| Data Identifier | Edits the first point in the complete point table. Required · Value: 9010From this tutorial's demo point table. |
| Initial Value Hex | Sets the raw BCD data of the first point in the connection definition. Required · Value: 21000000From this tutorial's encoding of the demo value 21. |
| Write Permission | Allows the first point to accept platform writes after temporary authorization. Required · Value: allow platform writes (this round's authorization still required)From the demo meter capability and the current authorization. Allow platform writes (this round's authorization still required): allows the first point to accept platform writes after temporary authorization; enabled only for the FMQX first point, the other nine points are read-only. |
| Save Changes | Saves the connection definition and keeps the complete point table. |
| Save and Connect | Attempts to connect immediately after saving. |
| Cancel | Discards the unsubmitted connection edits. |
| Meter Data Point | Views the specified point in the current complete point table. Required · Value: 9010 to 9019From the imported ten-point configuration. 9010 to 9019: views the specified point in the current complete point table; the first point is writable and the other nine are read-only. |
| Current Value Hex | Shows the raw value currently inside the device. From the current FMQX demo meter state. |
| Refresh Real Point Table | Re-reads the device's current point table state. |
Advanced parameters (1 item)
| Field / Control | Filling Notes |
|---|---|
| Maximum Frame Length | Limits the length of frames that can be processed. Required · Value: 1024 |
Validate, Publish, and Verify Runtime Adoption
Draft validation, the platform accepting the publish, and the runtime node adopting it are three different results. Finally, verify that the current node's receipt is APPLIED with no failure reason.
72. Validate This Tutorial's Protocol Draft
Where: Product Details → Publish and Sync Details Steps: Click Validate Publish Configuration.

The draft validation passed, with a prompt to publish from the top of the product.
73. Verify the Sampling Starting Point
Where: FMQX Web → This Tutorial's Meter → Edit Connection Steps: In Meter Data Point, view the first point's initial value and current value.
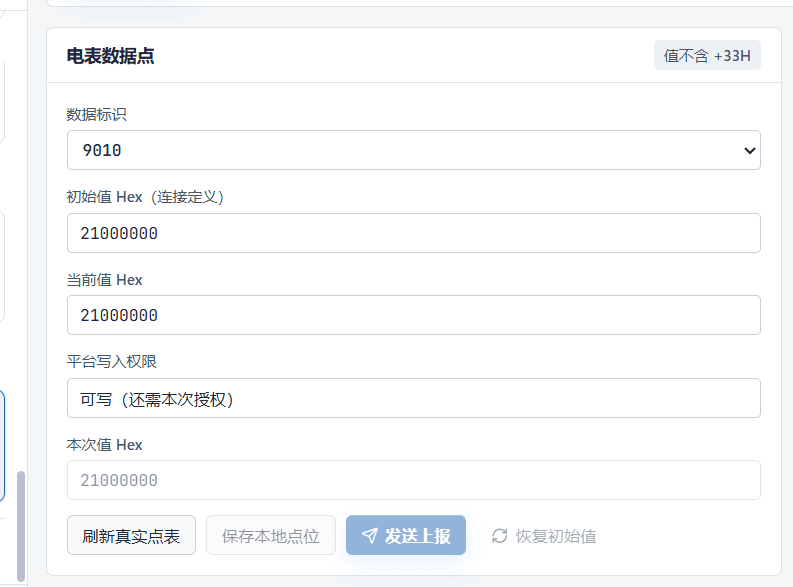
Both are the encoding of 21; writing still requires this round's authorization.
74. Publish This Tutorial's Product
Where: Product Details → Publish and Sync Details Steps: Click Publish Product at the top of this tutorial's product.

The product publish confirmation box opens.
75. Confirm the Product Publish
Where: Product Details → Publish and Sync Details Steps: After verifying the current publish target, click OK.
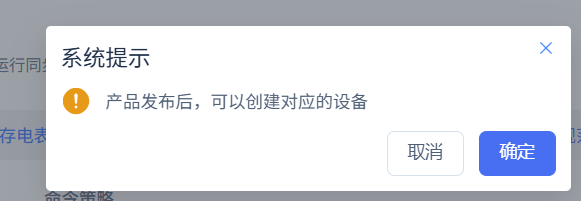
This product publish is submitted.
76. View the Publish Feedback
Where: Product Details → Publish and Sync Details Steps: View and close the Operation Succeeded prompt.
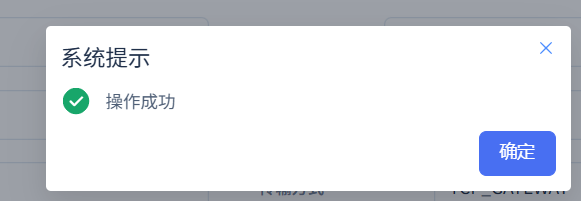
The platform has accepted this publish action.
77. Verify the Product Has Taken Effect
Where: Product Details → Publish and Sync Details Steps: View the publish and Access Configuration status at the top of this tutorial's product.

The product is published, and the access configuration has taken effect.
78. Verify the Runtime Node Receipt
Where: Product Details → Publish and Sync Details Steps: Open Sync Details and view the node result and failure reason.
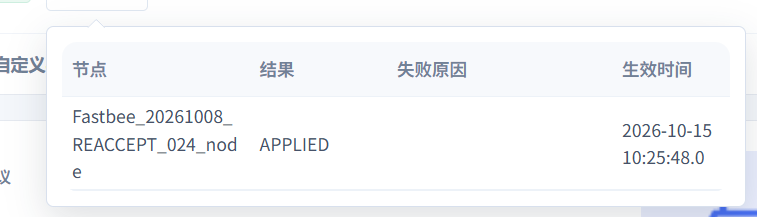
This node's result is APPLIED, and the failure reason is empty.
Product Details → Publish and Sync Details
| Field / Control | Filling Notes |
|---|---|
| Validate Publish Configuration | Checks whether the current protocol draft can be published. |
| Draft Validation Passed | Indicates this tutorial's draft passes the publish validation. |
| Publish Product | Publishes the current product configuration to the runtime plane. |
| OK | Confirms the current publish action. |
| Operation Succeeded | Indicates the platform has accepted the publish action. |
| Access Configuration | Shows the product's latest runtime sync status. |
| Sync Details | Views the runtime node's feedback on this publish. |
| Runtime Node Result | Indicates the runtime node has adopted this configuration. From the node receipt of this publish. |
Connect and Register This Meter
Verify the connect, default registration, and wait nodes first, then run the access registration flow. After successful registration, wait for the platform's normal polling.
Prepare this tutorial's registration flow: open "Automation Testing" → "YAML" in the FMQX top bar, paste the definition below in full, click "Validate" and then "Save Version". Then, in session binding, point device to this tutorial's newly imported and verified session; after verifying the run nodes and current status, click Run per the following steps. Do not use the import flow file button here.
Complete YAML template for 1997 meter access registrationyaml
schemaVersion: 2

id: DLT97GW_Tutorial_Registration_02

name: 接入注册

description: 仅连接本篇旧版电表TCP网关,先发送平台默认身份注册包,再等待真实轮询。保留会话供手动读写。

tags: []

variables: {}

requiredEnvironment: []

sessions:

  device:

    sessionId: demo-session-id

    isolation: existing

steps:

- id: connect

  kind: action

  enabled: true

  action: session.connect

  session: device

  timeoutMs: 10000

  retries: 0

  continueOnFailure: false

  repeat: 1

  format: Text

  qos: 0

  retain: false

  durationMs: 0

  maxConcurrency: 1

  parameters: {}

  assertions: []

  steps: []

  else: []

  parallel: []

- id: registration

  kind: action

  enabled: true

  action: registration.default.send

  session: device

  timeoutMs: 10000

  retries: 0

  continueOnFailure: false

  repeat: 1

  format: Text

  qos: 0

  retain: false

  durationMs: 0

  maxConcurrency: 1

  parameters: {}

  assertions: []

  steps: []

  else: []

  parallel: []

- id: wait_poll

  kind: action

  enabled: true

  action: delay

  session: device

  timeoutMs: 3000

  retries: 0

  continueOnFailure: false

  repeat: 1

  format: Text

  qos: 0

  retain: false

  durationMs: 1500

  maxConcurrency: 1

  parameters: {}

  assertions: []

  steps: []

  else: []

  parallel: []

finally: []Use the YAML page to paste, validate, and save the version; bind device to this tutorial's meter. Replaceable customer template names are used here; verify against this section's replacement checklist before importing or sending.
79. Verify the Access Registration Flow
Where: FMQX Web → Testing → Access Registration Flow Steps: In Automation Testing → YAML, paste the access registration definition above in full, validate it, and save the version; on the Flow page, verify the connect, default registration, and wait nodes, plus the device session binding.
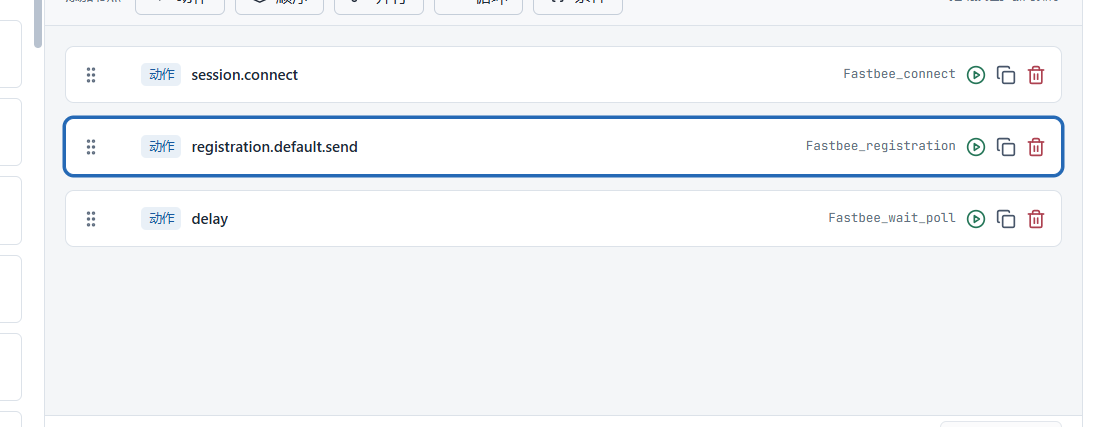
The three nodes are in the correct order.
80. Verify the Registration Node
Where: FMQX Web → Testing → Access Registration Flow Steps: Select the registration node and verify the action, session alias, and timeout.
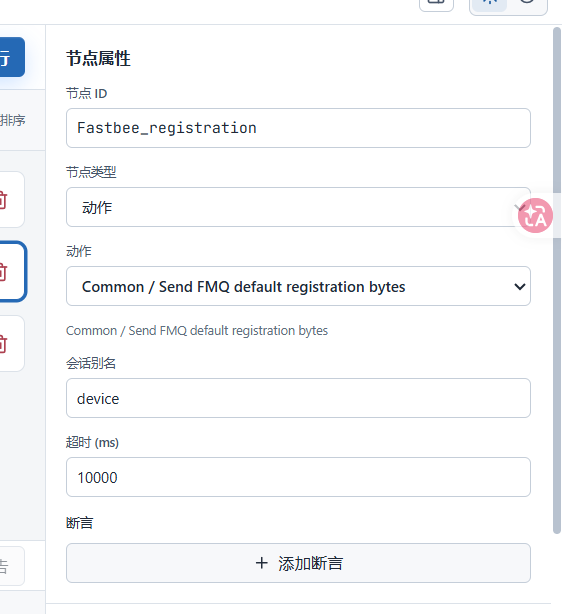
The default registration action is bound to this tutorial's device session.
81. Run the Access Registration
Where: FMQX Web → Testing → Access Registration Flow Steps: Click Run.

This tutorial's connect, registration, and wait process begins.
82. Confirm the Access Flow Passed
Where: FMQX Web → Testing → Access Registration Flow Steps: View the three nodes in the Run Console.
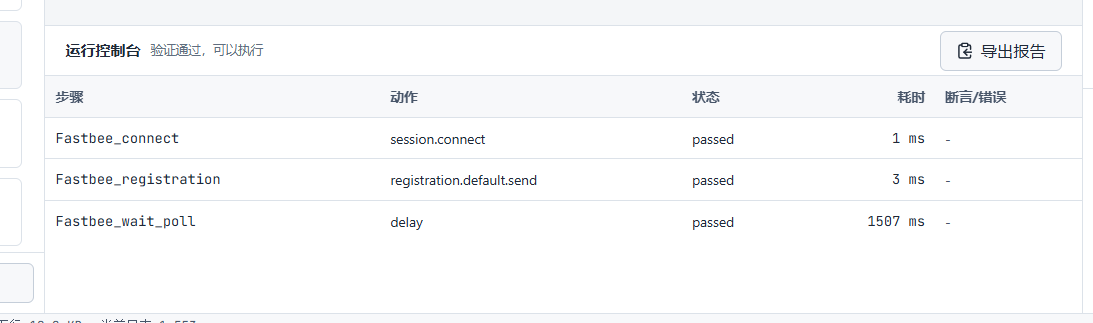
Connect, registration, and wait all passed.
FMQX Web → Testing → Access Registration Flow
| Field / Control | Filling Notes |
|---|---|
| Flow | Views the visualized nodes of the access registration. |
| Node Properties | Shows the configuration of the currently selected flow node. From this tutorial's registration flow. |
| Action | Sends the default registration identity frame. Required · Value: Common / Send FMQ default registration bytesFrom this tutorial's protocol test action. Common / Send FMQ default registration bytes: sends the default registration identity frame; use the default registration action to avoid writing the registration identity incorrectly. |
| Session Alias | Binds the flow action to this tutorial's meter session. Required · Value: deviceFrom the session settings of this tutorial's test flow. |
| Timeout (ms) | Limits the waiting time of the registration flow action. Required · Value: 10000 |
| Run | Executes this tutorial's registration flow. |
| Run Console | Shows the connect, registration, and wait results separately. From this actual run. |
Observe Continuous Ten-Point Collection
The first point changes step by step from 21 to 30, while the other nine stay at 22 through 30. When polls are staggered, the history table places different fields on different time rows; the number of merged time rows does not equal the number of field records.
83. View the Platform's First Point 21
Where: FMQX Web → Testing and Connection Status Steps: Return to this tutorial's device details and view Energy 1.
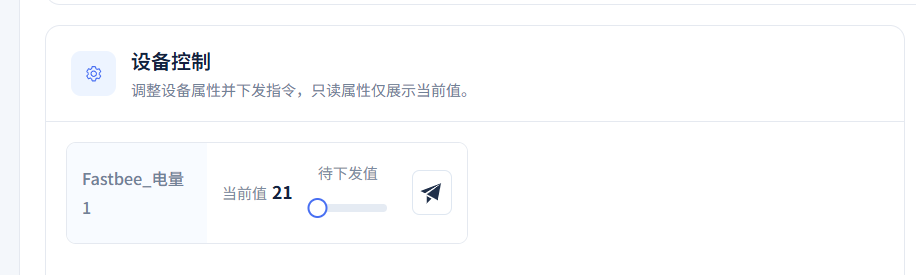
The platform's current value is 21.
Prepare this tutorial's continuous sampling flow: open "Automation Testing" → "YAML" in the FMQX top bar, paste the definition below in full, click "Validate" and then "Save Version". Then, in session binding, point device to this tutorial's newly imported and verified session; after verifying the run nodes and current status, click Run per the following steps. Do not use the import flow file button here.
Complete YAML template for continuous sampling of the 1997 meteryaml
schemaVersion: 2

id: DLT97GW_ContinuousSamples_v1_02

name: 连续旧表采集

description: 本篇1997演示电表按已发布10秒轮询周期采集首点21至30,保留其余九点及写权限。

tags: []

variables: {}

requiredEnvironment: []

sessions:

  device:

    sessionId: demo-session-id

    isolation: existing

steps:

- id: set_22

  kind: action

  enabled: true

  action: dlt645.data.set

  session: device

  timeoutMs: 12000

  retries: 0

  repeat: 1

  continueOnFailure: false

  parameters:

    dataIdentifier: 90 10

    valueHex: 22 00 00 00

  assertions: []

- id: await_poll_22

  kind: action

  enabled: true

  action: delay

  session: device

  timeoutMs: 15000

  retries: 0

  repeat: 1

  continueOnFailure: false

  durationMs: 11000

  parameters: {}

  assertions: []

- id: set_23

  kind: action

  enabled: true

  action: dlt645.data.set

  session: device

  timeoutMs: 12000

  retries: 0

  repeat: 1

  continueOnFailure: false

  parameters:

    dataIdentifier: 90 10

    valueHex: 23 00 00 00

  assertions: []

- id: await_poll_23

  kind: action

  enabled: true

  action: delay

  session: device

  timeoutMs: 15000

  retries: 0

  repeat: 1

  continueOnFailure: false

  durationMs: 11000

  parameters: {}

  assertions: []

- id: set_24

  kind: action

  enabled: true

  action: dlt645.data.set

  session: device

  timeoutMs: 12000

  retries: 0

  repeat: 1

  continueOnFailure: false

  parameters:

    dataIdentifier: 90 10

    valueHex: 24 00 00 00

  assertions: []

- id: await_poll_24

  kind: action

  enabled: true

  action: delay

  session: device

  timeoutMs: 15000

  retries: 0

  repeat: 1

  continueOnFailure: false

  durationMs: 11000

  parameters: {}

  assertions: []

- id: set_25

  kind: action

  enabled: true

  action: dlt645.data.set

  session: device

  timeoutMs: 12000

  retries: 0

  repeat: 1

  continueOnFailure: false

  parameters:

    dataIdentifier: 90 10

    valueHex: 25 00 00 00

  assertions: []

- id: await_poll_25

  kind: action

  enabled: true

  action: delay

  session: device

  timeoutMs: 15000

  retries: 0

  repeat: 1

  continueOnFailure: false

  durationMs: 11000

  parameters: {}

  assertions: []

- id: set_26

  kind: action

  enabled: true

  action: dlt645.data.set

  session: device

  timeoutMs: 12000

  retries: 0

  repeat: 1

  continueOnFailure: false

  parameters:

    dataIdentifier: 90 10

    valueHex: 26 00 00 00

  assertions: []

- id: await_poll_26

  kind: action

  enabled: true

  action: delay

  session: device

  timeoutMs: 15000

  retries: 0

  repeat: 1

  continueOnFailure: false

  durationMs: 11000

  parameters: {}

  assertions: []

- id: set_27

  kind: action

  enabled: true

  action: dlt645.data.set

  session: device

  timeoutMs: 12000

  retries: 0

  repeat: 1

  continueOnFailure: false

  parameters:

    dataIdentifier: 90 10

    valueHex: 27 00 00 00

  assertions: []

- id: await_poll_27

  kind: action

  enabled: true

  action: delay

  session: device

  timeoutMs: 15000

  retries: 0

  repeat: 1

  continueOnFailure: false

  durationMs: 11000

  parameters: {}

  assertions: []

- id: set_28

  kind: action

  enabled: true

  action: dlt645.data.set

  session: device

  timeoutMs: 12000

  retries: 0

  repeat: 1

  continueOnFailure: false

  parameters:

    dataIdentifier: 90 10

    valueHex: 28 00 00 00

  assertions: []

- id: await_poll_28

  kind: action

  enabled: true

  action: delay

  session: device

  timeoutMs: 15000

  retries: 0

  repeat: 1

  continueOnFailure: false

  durationMs: 11000

  parameters: {}

  assertions: []

- id: set_29

  kind: action

  enabled: true

  action: dlt645.data.set

  session: device

  timeoutMs: 12000

  retries: 0

  repeat: 1

  continueOnFailure: false

  parameters:

    dataIdentifier: 90 10

    valueHex: 29 00 00 00

  assertions: []

- id: await_poll_29

  kind: action

  enabled: true

  action: delay

  session: device

  timeoutMs: 15000

  retries: 0

  repeat: 1

  continueOnFailure: false

  durationMs: 11000

  parameters: {}

  assertions: []

- id: set_30

  kind: action

  enabled: true

  action: dlt645.data.set

  session: device

  timeoutMs: 12000

  retries: 0

  repeat: 1

  continueOnFailure: false

  parameters:

    dataIdentifier: 90 10

    valueHex: 30 00 00 00

  assertions: []

- id: await_poll_30

  kind: action

  enabled: true

  action: delay

  session: device

  timeoutMs: 15000

  retries: 0

  repeat: 1

  continueOnFailure: false

  durationMs: 11000

  parameters: {}

  assertions: []

finally: []Use the YAML page to paste, validate, and save the version; bind device to this tutorial's meter. This flow runs from 22 to 30; first confirm that the first point 21 was collected in the previous section — the ten samples consist of 21 plus the nine subsequent values from this flow. Replaceable customer template names are used here; verify against this section's replacement checklist before importing or sending.
84. Run Continuous Sampling
Where: FMQX Web → Testing and Connection Status Steps: In Automation Testing → YAML, paste the continuous sampling definition above in full, validate it, and save the version, with device bound to this tutorial's meter; after confirming the first point 21 has been collected, click Run to continue producing 22 through 30.

The first point starts changing step by step according to the flow.
85. Observe Sampling in Progress
Where: FMQX Web → Testing and Connection Status Steps: View the current flow's run progress.
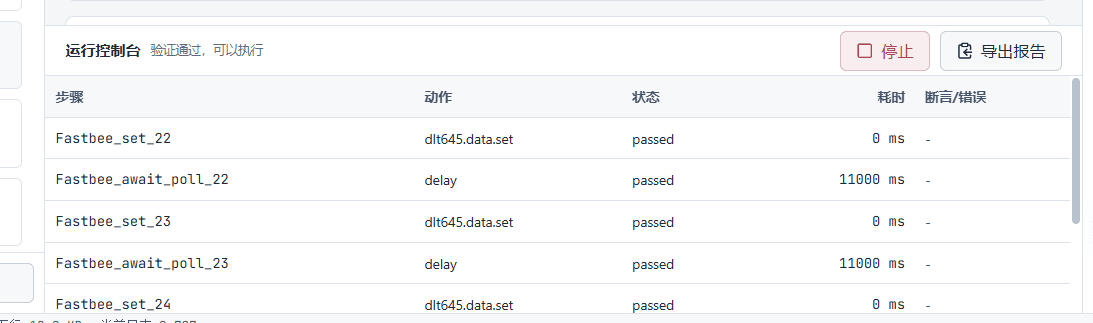
The set-value and wait nodes continue executing.
86. Verify Continuous Sampling Completed
Where: FMQX Web → Testing and Connection Status Steps: View the console after the flow completes.
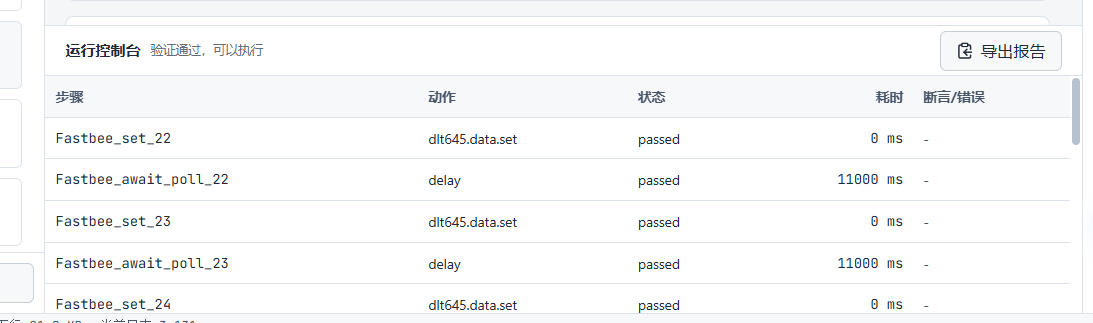
The complete run record shows this tutorial's flow has finished.
87. Verify the Platform Has Reached 30
Where: FMQX Web → Testing and Connection Status Steps: View the current value of Energy 1 for this tutorial's device.
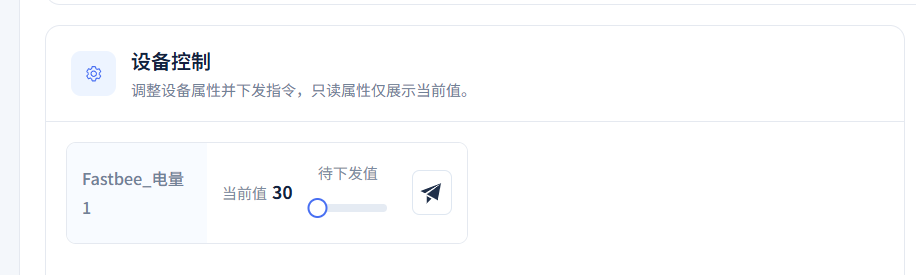
The first point's current value is 30.
FMQX Web → Testing and Connection Status
| Field / Control | Filling Notes |
|---|---|
| Run | Executes this tutorial's continuous collection flow. |
| Run Console | Shows the real flow progress. From this run's result. |
| Stop | Stops the currently running flow. |
| Platform Current Value | Shows the value obtained by subsequent normal polling. From the platform's current value for this device. |
| Disconnect | Stops this tutorial's meter connection. |
| Connection Status | Shows the current session's connection status. From comparing the current page with the actual session state. |
| Access Registration Flow | Restores registration and polling after reconnecting. |
Controlled Write, Disconnect Recovery, and Independent Read-Back
Configure the temporary authorization for the current session first, then demonstrate 61, the post-recovery 62, and 63 in turn. Submit only once each time, and verify the device's actual execution, the platform's real response, and the new normal read result separately. The platform's response prompt itself cannot replace proof of device execution.
88. Open the Demo First Point Write
Where: Device Details → Device Control; FMQX Web → Current Session Write Authorization Steps: On this tutorial's Energy 1 control card, open Meter Write.
The write box shows this tutorial's target device and the required fields.
89. Configure Authorization for This Session
Where: Device Details → Device Control; FMQX Web → Current Session Write Authorization Steps: In this tutorial's FMQX session, enter the password and operator code through the authorization channel, then click Configure This Authorization.

It shows as configured, and the submitted inputs are cleared.
90. Confirm the Demo Write 61
Where: Device Details → Device Control; FMQX Web → Current Session Write Authorization Steps: Enter the native encoding of 61, the current authorization fields, and the reason, then Confirm Write once.
Wait for this round's real protocol response; do not click repeatedly.
91. Verify the Device Actually Wrote 61
Where: Device Details → Device Control; FMQX Web → Current Session Write Authorization Steps: In FMQX, view this write's execution record.

The actual execution count is 1, and the post-write value is 61.
92. Verify the Platform Response and the 61 Read-Back
Where: Device Details → Device Control; FMQX Web → Current Session Write Authorization Steps: View the platform's real protocol response prompt and the subsequent current value.
The platform received the response, and a new normal read shows 61.
93. Disconnect This Tutorial's Meter
Where: FMQX Web → Testing and Connection Status Steps: In this tutorial's FMQX session, click Disconnect.

The actual session is disconnected.
94. Verify the Disconnected Status After Refresh
Where: FMQX Web → Testing and Connection Status Steps: Refresh the same Chrome page and view this tutorial's session again.

Both the page and the real session show disconnected.
95. Run the Access Registration Again
Where: FMQX Web → Testing and Connection Status Steps: Run this tutorial's verified Access Registration Flow.
Connect, registration, and wait all passed.
96. Verify the Device Retains 61
Where: FMQX Web → This Tutorial's Meter → Edit Connection Steps: Refresh the real point table and verify the first point's current value.
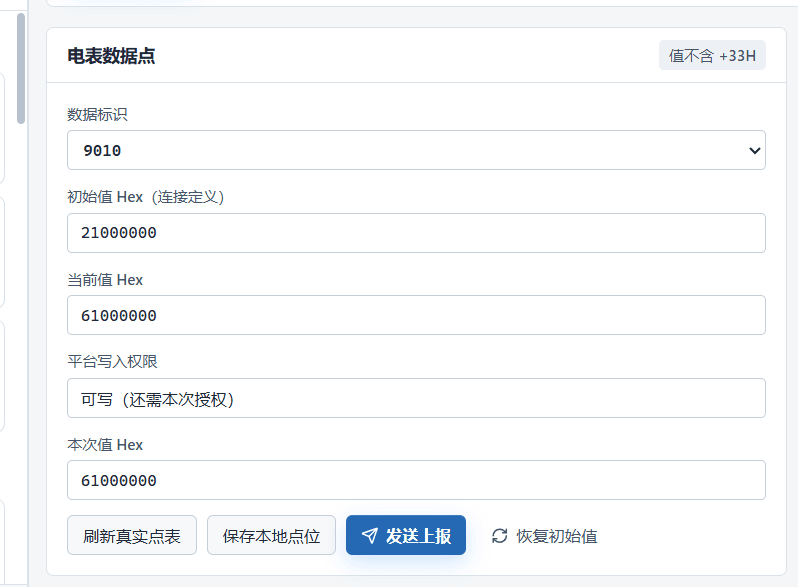
The connection initial value is still 21, and the current device value is 61.
97. Confirm the Demo Write 62
Where: Device Details → Device Control; FMQX Web → Current Session Write Authorization Steps: Enter the native encoding of 62, the current authorization fields, and the reason, then Confirm Write once.
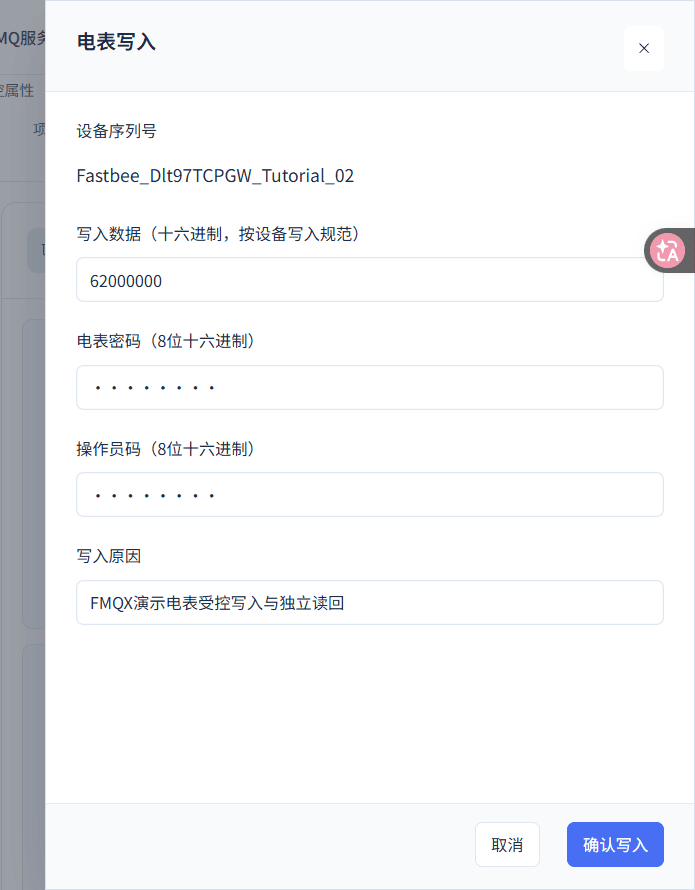
Wait for this round's real protocol response; do not click repeatedly.
98. Verify the Device Actually Wrote 62
Where: Device Details → Device Control; FMQX Web → Current Session Write Authorization Steps: In FMQX, view this write's execution record.

The actual execution count is 2, and the post-write value is 62.
99. Verify the Platform Response and the 62 Read-Back
Where: Device Details → Device Control; FMQX Web → Current Session Write Authorization Steps: View the platform's real protocol response prompt and the subsequent current value.
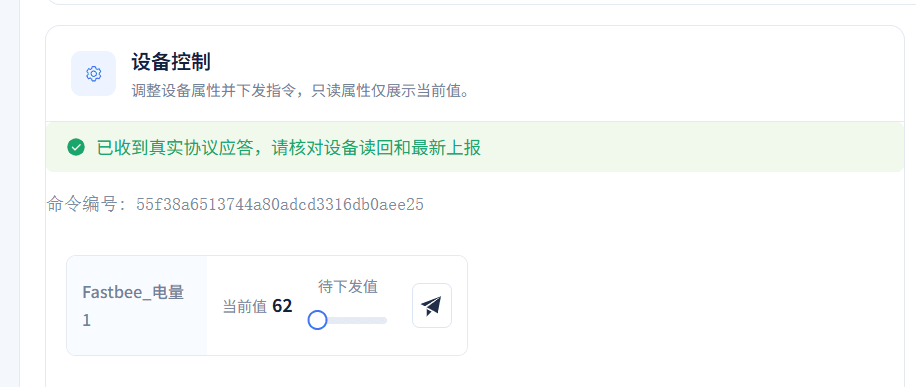
The platform received the response, and a new normal read shows 62.
100. Confirm the Demo Write 63
Where: Device Details → Device Control; FMQX Web → Current Session Write Authorization Steps: Enter the native encoding of 63, the current authorization fields, and the reason, then Confirm Write once.
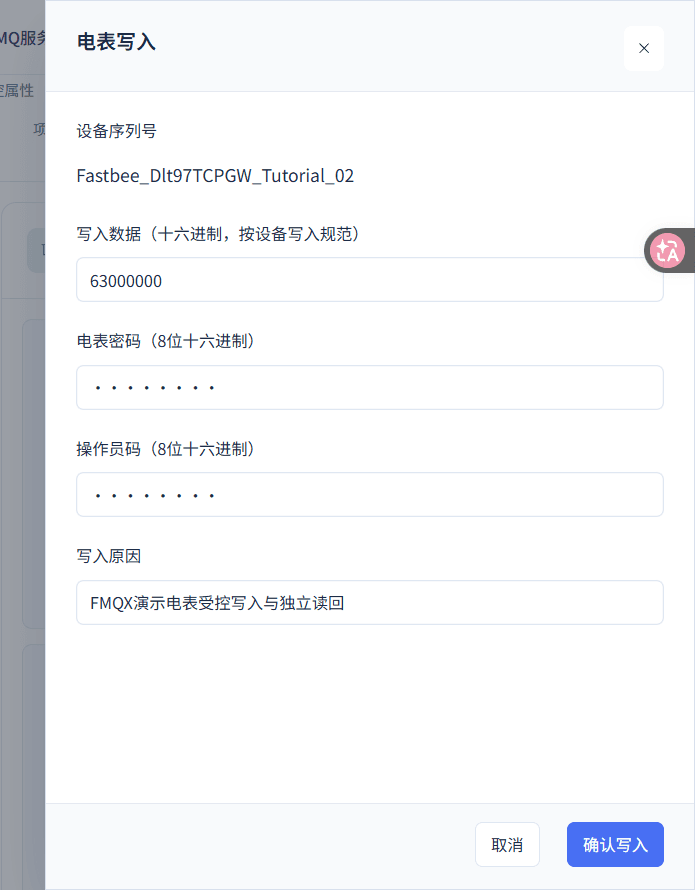
Wait for this round's real protocol response; do not click repeatedly.
101. Verify the Device Actually Wrote 63
Where: Device Details → Device Control; FMQX Web → Current Session Write Authorization Steps: In FMQX, view this write's execution record.

The actual execution count is 3, and the post-write value is 63.
102. Verify the Platform Response and the 63 Read-Back
Where: Device Details → Device Control; FMQX Web → Current Session Write Authorization Steps: View the platform's real protocol response prompt and the subsequent current value.
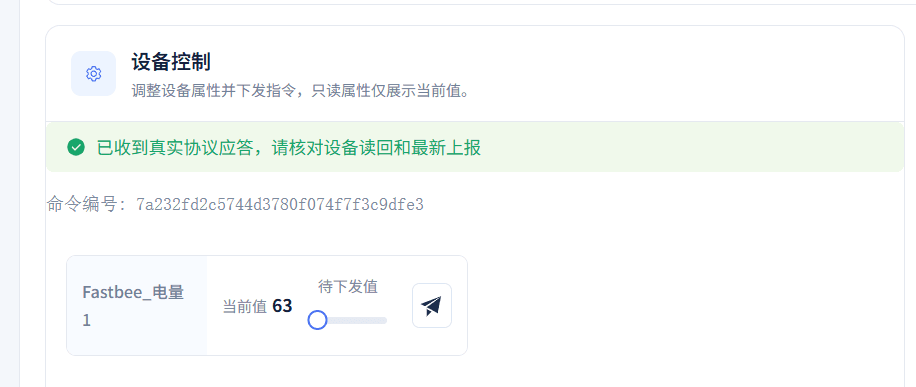
The platform received the response, and a new normal read shows 63.
Device Details → Device Control; FMQX Web → Current Session Write Authorization
| Field / Control | Filling Notes |
|---|---|
| Meter Write | Opens the controlled write box for the current writable first point. |
| Device Serial Number | Confirms the target device of this write. From the current platform device details. |
| Write Data (hexadecimal) | Provides the write content in the BCD encoding the demo meter allows. Required · Value: 61000000, 62000000, 63000000From this tutorial's demo field encoding specification. |
| Meter Password (8 hexadecimal digits) | Provides the meter password for this write. Required · Value: fill in per your environmentProvided by the device owner through a controlled channel. |
| Operator Code (8 hexadecimal digits) | Provides the operator identity code for this write. Required · Value: obtain through the authorization channel; not recorded in the documentProvided by the device owner through a controlled channel. |
| Write Reason | Records the purpose of this write. Required · Value: FMQX demo meter controlled write and independent read-backFilled in by the current operator according to the actual purpose. |
| Confirm Write | Submits one controlled write. |
| Configure This Authorization | Configures the temporary write authorization only within the current FMQX session. From the authorization obtained for this round. |
| Current Session Write Authorization | Shows the authorization configuration status of the current session. From the FMQX masked status. |
| Current Session Write Execution Record | Shows the device execution count and the pre/post-write values. From the FMQX device-side actual execution record. |
| Real Protocol Response | Indicates the device protocol response has been processed by the platform. From this command's reply. |
| Current Value | Shows the current value brought by the subsequent normal read. From this device's new read data. |
Query the Sampling and Write History
Query after selecting this tutorial's device, variables, and the exact time window. The first point's 12 real samples include repeated 22 and 30; this is the actual collection result. The whole batch of ten points has 123 field records, merged by time into 67 rows on the page.
103. Enter Historical Data
Where: Data Center → Historical Data → Device Steps: Open Historical Data in Data Center and select the Device tab.

The device history filter entry is visible.
104. Search for This Tutorial's Device
Where: Data Center → Historical Data → Device Steps: In the device dropdown, type this tutorial's device name.
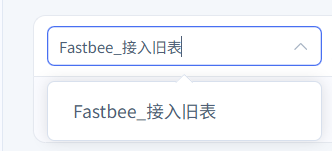
This tutorial's device candidate appears.
105. Select the Device and Expand the Filter
Where: Data Center → Historical Data → Device Steps: Select this tutorial's device and expand Advanced Filter.

The current query target is this tutorial's device.
106. Open the Variable List
Where: Data Center → Historical Data → Device Steps: Expand the Variable Name candidates.
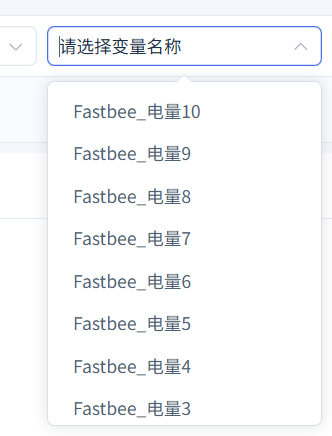
This tutorial's energy properties can be selected.
107. Select the Ten Collection Fields
Where: Data Center → Historical Data → Device Steps: Select this tutorial's Energy 1 through 10.

The ten collection fields are selected.
108. Set the Sampling Time Window
Where: Data Center → Historical Data → Device Steps: Select the start and end time of this tutorial's sampling and confirm.

The query window is 2026-10-15 10:44:25 to 10:46:30.
109. View the Ten-Point Collection Details
Where: Data Center → Historical Data → Device Steps: Click Query and verify the ten fields and their corresponding times.
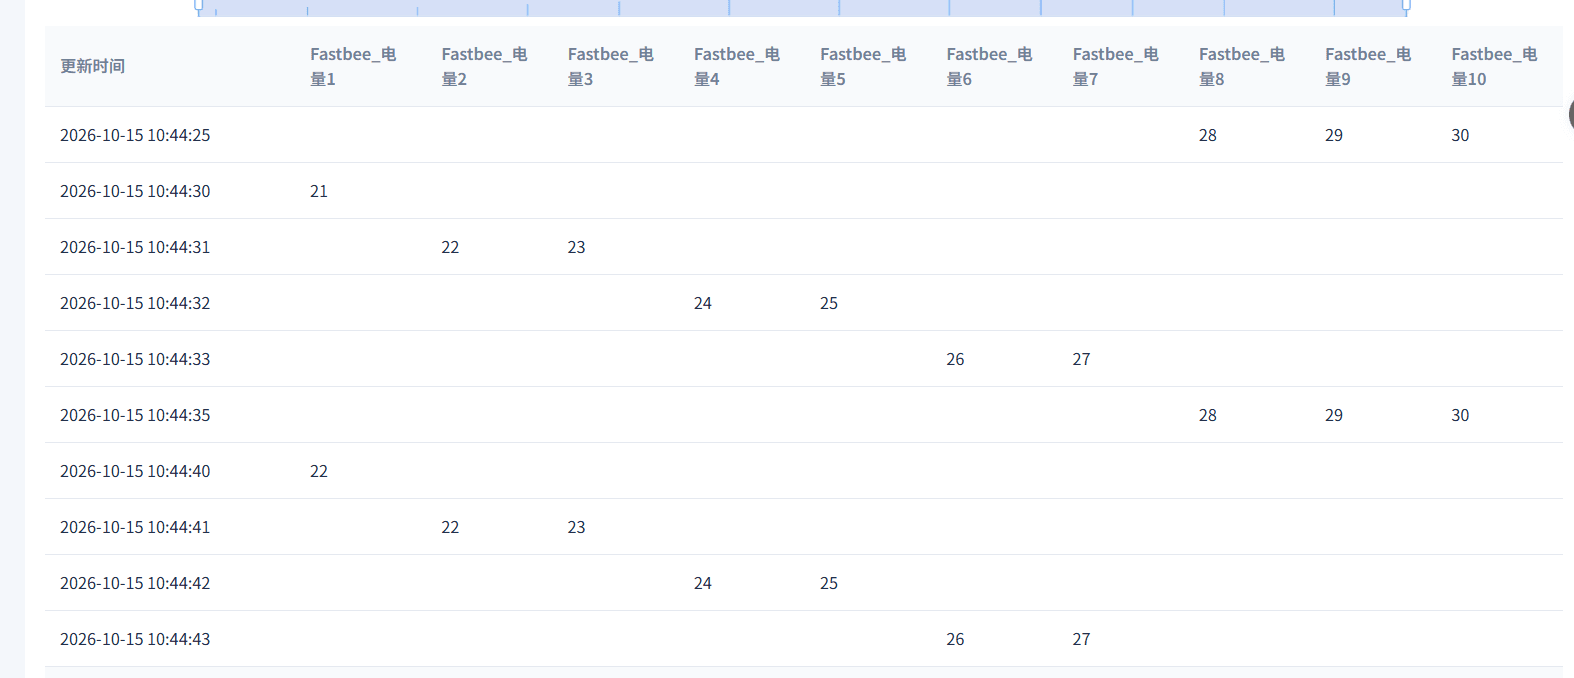
All ten points have data, with different polling moments distributed across different time rows.
110. Verify the Query Range and Row Count
Where: Data Center → Historical Data → Device Steps: View the device, variables, and count in the history trend title.

This tutorial's device, the ten variables, and the 67 merged time rows are visible.
111. View the Ten-Point Trend
Where: Data Center → Historical Data → Device Steps: View the time trend of the ten fields.
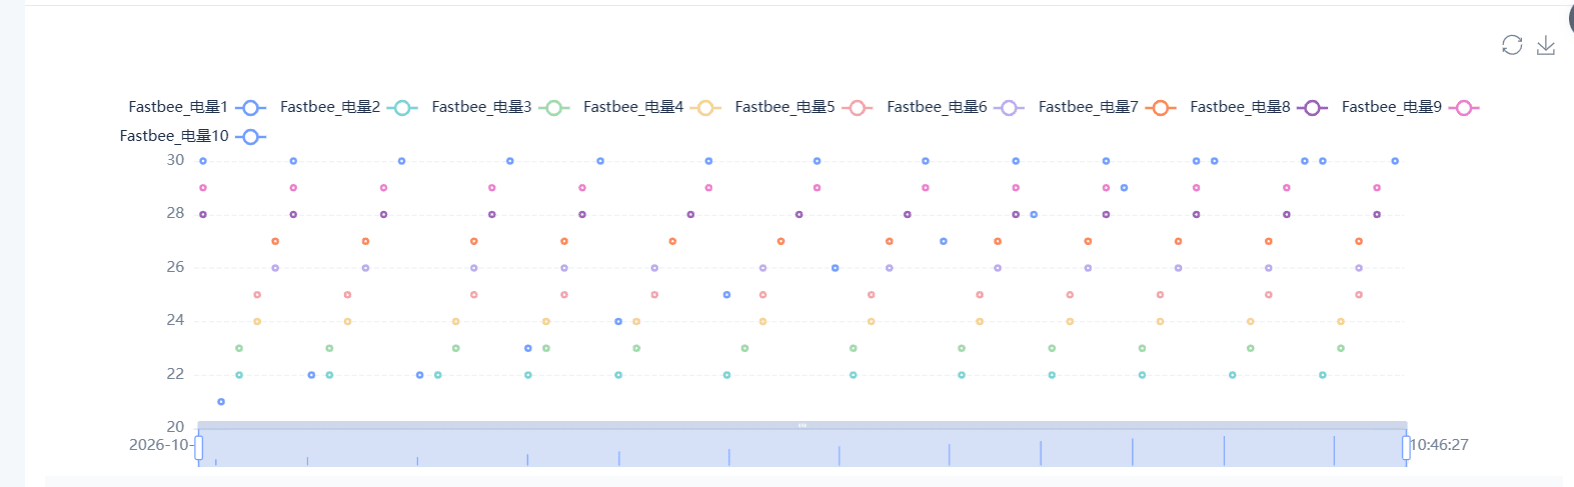
The first point goes from 21 up to 30 step by step, and the other nine keep their demo values.
112. Query Only the First Point
Where: Data Center → Historical Data → Device Steps: Change the variable selection to Energy 1 only, then Query.

The history shows only this tutorial's first point.
113. Expand the Complete First Point Records
Where: Data Center → Historical Data → Device Steps: In Page Size, select 20 per page.

One page is enough to view this tutorial's 12 first-point records.
114. Verify the Complete First Point Changes
Where: Data Center → Historical Data → Device Steps: View all current history rows of the first point.
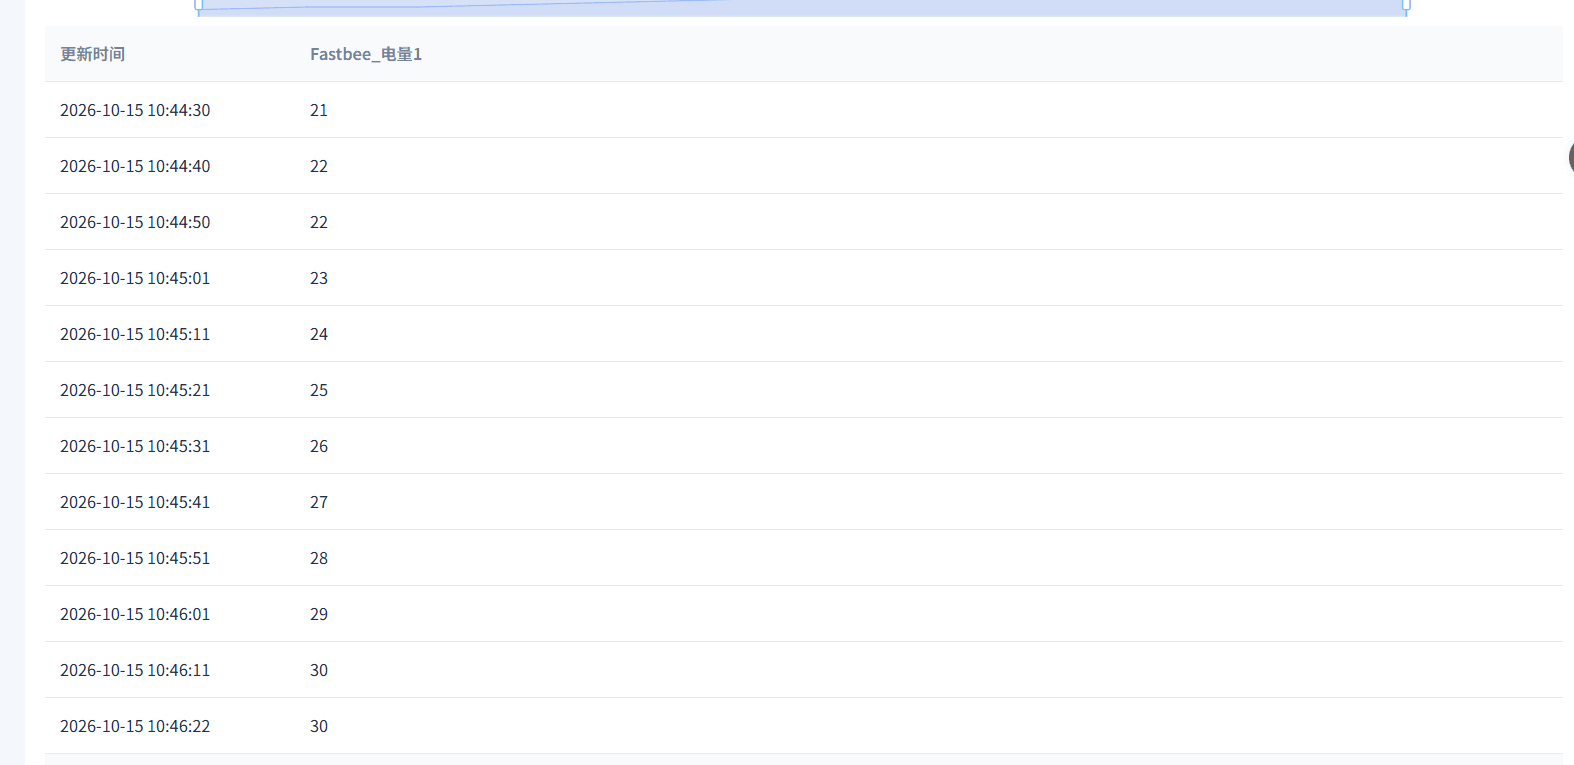
The first point's 21 through 30 are fully visible, with 22 and 30 each appearing twice.
115. Set the First Write Window
Where: Data Center → Historical Data → Device Steps: Select the times before and after the first write and confirm.

The range covers 30 before the write and 61 after it.
116. Verify 30 Changed to 61
Where: Data Center → Historical Data → Device Steps: Query the first point's history in the first write window.
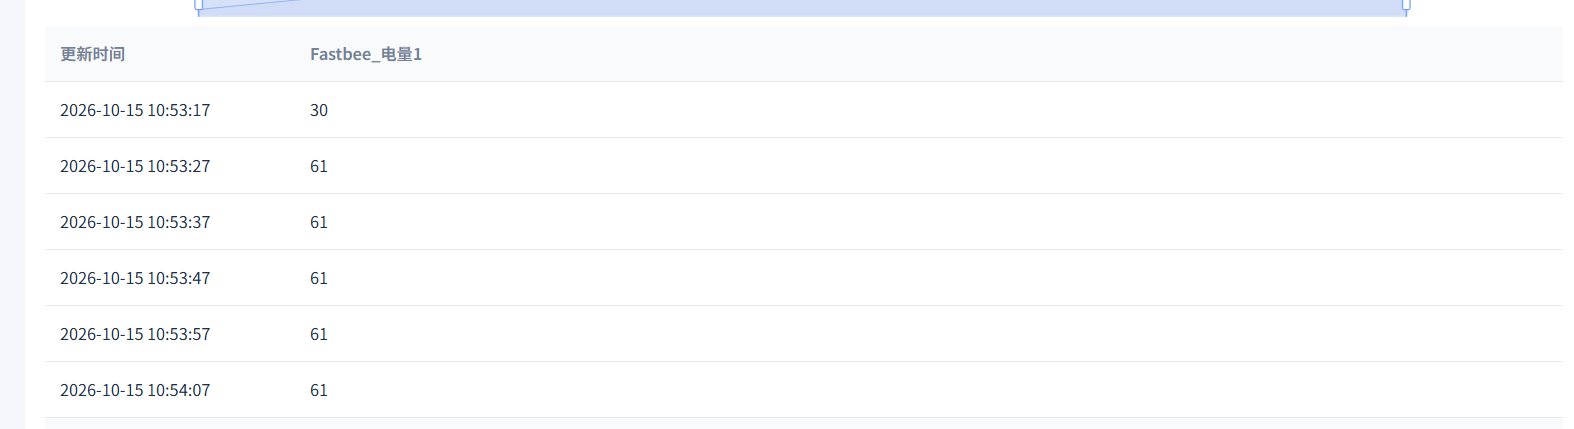
30 before the write, and the subsequent normal collection is 61.
117. Set the Post-Recovery Write Window
Where: Data Center → Historical Data → Device Steps: Select the times before and after the second post-recovery write and confirm.

The range covers 61 to 62.
118. Verify 61 Changed to 62
Where: Data Center → Historical Data → Device Steps: Query the first point's history for the second post-recovery write.
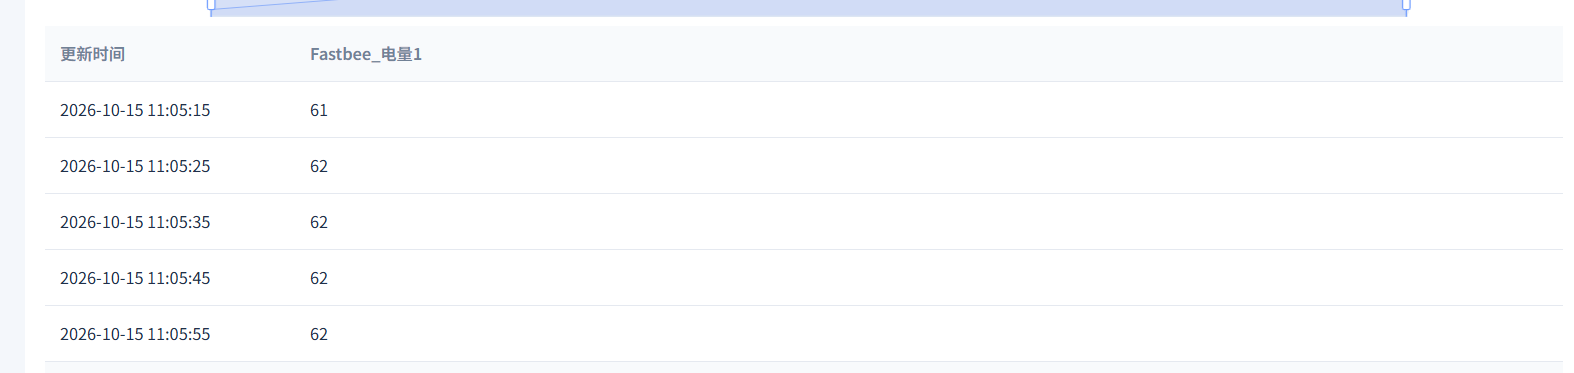
61 before the write, and the subsequent normal collection is 62.
119. Set the Third Write Window
Where: Data Center → Historical Data → Device Steps: Select the times before and after the third write and confirm.

The range covers 62 to 63.
120. Verify 62 Changed to 63
Where: Data Center → Historical Data → Device Steps: Query the first point's history for the third write.
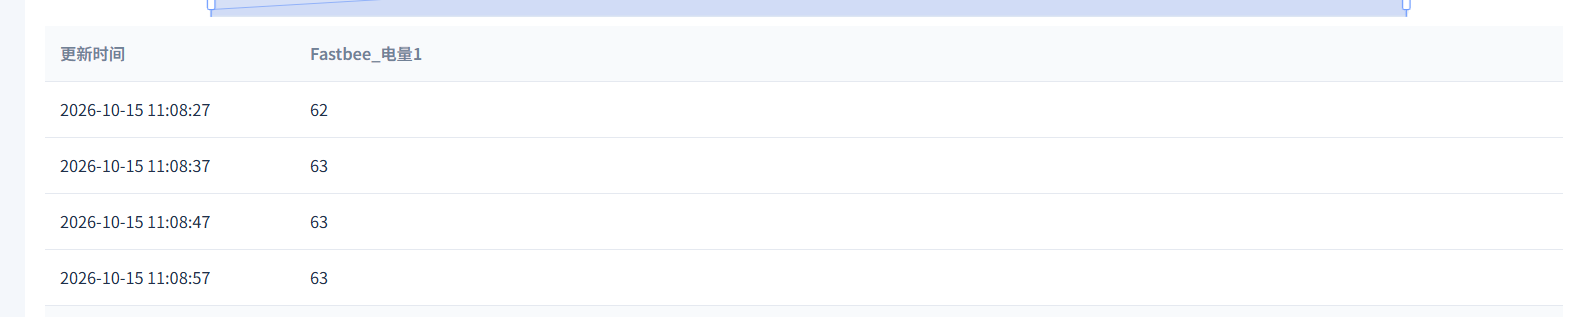
62 before the write, and the subsequent normal collection is 63.
121. Refresh the History Page
Where: Data Center → Historical Data → Device Steps: Refresh the current Chrome page.

The history page reloads, and the device and variable filters are reset.
122. Query Again After Refresh
Where: Data Center → Historical Data → Device Steps: Re-select this tutorial's device and Energy 1, set 11:08:20 to 11:09:00, then Query.

After refreshing, the original history from 62 to 63 can still be queried.
Data Center → Historical Data → Device
| Field / Control | Filling Notes |
|---|---|
| Device | Enters the device history query. |
| Device Name | Restricts the device to query. Required · Value: fill in per your environmentSelect from the current tenant's device list. Current batch resource: restricts the device to query; search for and select this tutorial's device — do not just type the name into the search box. |
| Advanced Filter | Expands the variable selection conditions. |
| Variable Name | Restricts which stored properties are queried. Optional · Value: fill in per your environmentFrom the models of the selected device that have history storage enabled. Current batch resource: restricts which stored properties are queried; select all ten for the ten-point overview, and Energy 1 alone for the first-point changes. |
| Start and End Time | Restricts the historical data range. Required · Value: use the actual time windows of this tutorial's sampling and writesFrom the times of the actual sampling and write records. |
| Query | Re-queries using the current device, variables, and time. |
| Reset | Clears the current filter conditions. |
| Refresh | Re-reads the history under the current conditions. |
| History Trend | Shows how the selected fields change over time. From the history query result. |
| History Details | Shows the historical values and their update times. From the history query result. |
| Page Size | Determines how many history details one page shows. Required · Value: 20 per page10 per page: at most 10 details per page; only changes pagination display, not the historical data. 20 per page: at most 20 details per page; only changes pagination display, not the historical data. 30 per page: at most 30 details per page; only changes pagination display, not the historical data. 50 per page: at most 50 details per page; only changes pagination display, not the historical data. |
Advanced parameters (1 item)
| Field / Control | Filling Notes |
|---|---|
| Export | Exports the current query result. |
Stop This Tutorial's Traffic While Keeping History
Clear this tutorial's session authorization, disconnect, and verify the automatic entries are off; then unpublish this tutorial's product. Refresh Sync Details to verify the runtime withdrawal receipt; finally, re-query the original history and keep the product and device for later review.
123. Open the Clear Session Authorization Entry
Where: FMQX Web → This Tutorial's Session; Product Details → Unpublish Steps: Enter the write authorization area of this tutorial's meter and click Clear Authorization.

Only this tutorial's session's temporary authorization is cleared.
124. Confirm the Temporary Authorization Has Been Cleared
Where: FMQX Web → This Tutorial's Session; Product Details → Unpublish Steps: Verify the current session write authorization and the two sensitive inputs.

It shows as not configured, and both the password and operator code inputs are empty.
125. Disconnect This Tutorial's Meter Connection
Where: FMQX Web → This Tutorial's Session; Product Details → Unpublish Steps: After verifying the current session name, click Disconnect.

This tutorial's connection stops.
126. Verify the Session Is Indeed Disconnected
Where: FMQX Web → This Tutorial's Session; Product Details → Unpublish Steps: View this tutorial's session title and connection operation.

This tutorial's session shows as disconnected, and a connect button appears.
127. Verify Scheduled Sending Is Off
Where: FMQX Web → This Tutorial's Session; Product Details → Unpublish Steps: Switch to the Scheduled Sending tab and verify the switch and status.

Scheduled sending is not enabled, and both the next send and last execution are empty.
128. Verify Auto Reply Is Off
Where: FMQX Web → This Tutorial's Session; Product Details → Unpublish Steps: Switch to the Auto Reply tab and verify the master switch and rules.

The master switch is off, and there are currently no auto-reply rules.
129. Verify Auto Reconnect Is Off
Where: FMQX Web → This Tutorial's Session; Product Details → Unpublish Steps: In the current session's connection configuration, view Auto Reconnect.
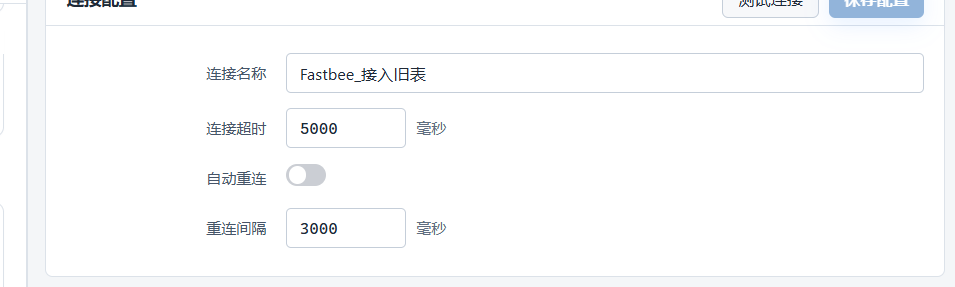
Auto reconnect is off.
130. Unpublish This Tutorial's Product
Where: FMQX Web → This Tutorial's Session; Product Details → Unpublish Steps: Return to this tutorial's product details and click Unpublish.

The unpublish confirmation box for this tutorial's product opens.
131. Verify the Withdrawal Scope and Confirm
Where: FMQX Web → This Tutorial's Session; Product Details → Unpublish Steps: Read the current confirmation box prompt, confirm that only this tutorial's demo product is withdrawn, then click OK.
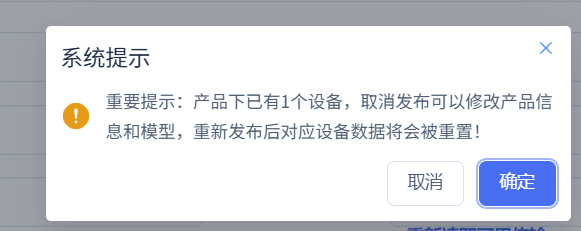
This unpublish is submitted.
132. View the Withdrawal Feedback
Where: FMQX Web → This Tutorial's Session; Product Details → Unpublish Steps: View and close the Operation Succeeded prompt.
The platform has accepted this unpublish.
133. Refresh and Verify the Runtime Withdrawal Receipt
Where: FMQX Web → This Tutorial's Session; Product Details → Unpublish Steps: Refresh the same product page, then open Sync Details.
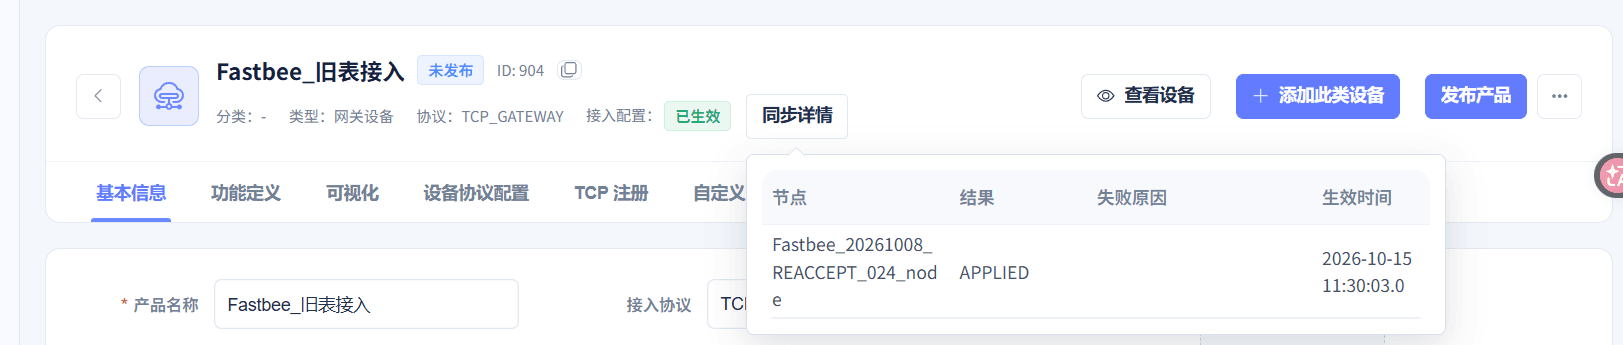
The product is unpublished, and the runtime node returned APPLIED for this withdrawal.
134. Verify History Retention Again After Stopping
Where: Data Center → Historical Data → Device Steps: After refreshing the history page, re-select this tutorial's device, Energy 1, and the original write window, then click Query.
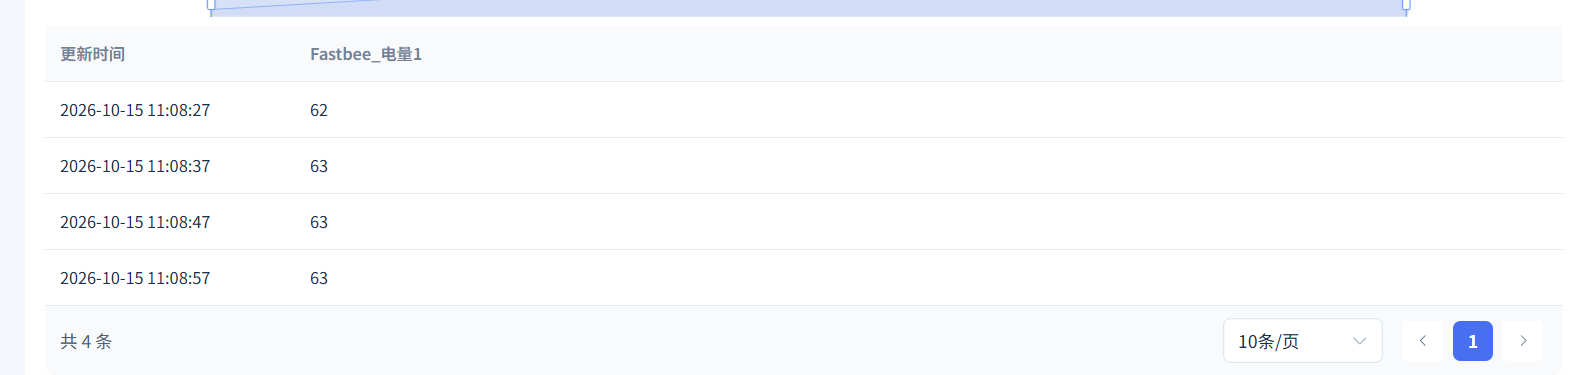
The original four history records from 62 to 63 can still be queried, with pagination and record count visible.
FMQX Web → This Tutorial's Session; Product Details → Unpublish
| Field / Control | Filling Notes |
|---|---|
| Scheduled Sending | Stops this tutorial's scheduled traffic at the end. Optional · Value: OffOn: enables this option; stops this tutorial's scheduled traffic at the end. Off: disables this option; the behavior is not enabled. |
| Auto Reconnect | Does not automatically restore this tutorial's connection at the end. Optional · Value: OffOn: enables this option; does not automatically restore this tutorial's connection at the end. Off: disables this option; the behavior is not enabled. |
| Auto Reply | Stops this tutorial's custom reply tasks at the end. Optional · Value: OffOn: enables this option; stops this tutorial's custom reply tasks at the end. Off: disables this option; the behavior is not enabled. |
| Clear Authorization | Removes the current session's temporary write authorization. |
| Disconnect | Stops this tutorial's meter connection. |
| Unpublish | Withdraws this tutorial's product runtime configuration. |
| OK | Confirms the current unpublish action. |
| Operation Succeeded | Indicates the platform has accepted this unpublish. |
| Product and Connection Status | Shows the product publish and current session status. From the actual page after stopping. |
| Runtime Withdrawal Receipt | Indicates the target runtime node adopted this withdrawal configuration. From the current product's Sync Details. |
| History Retention | The original window can still be used to query history after stopping. From the actual query after stopping. |
Item-by-Item Checks When Results Disagree
| Symptom | Possible Cause | Check First | How to Recover |
|---|---|---|---|
| The number is empty when creating the device. | Switching the product may clear the previously entered number. | Return to the final device form and verify the name, product, and device number. | Complete this tutorial's number and save again, and also verify the FMQX client number. |
| The mapping cannot find a polling item or reports inconsistency. | The formal polling item has not been saved yet, or the polling item and model of another point were selected. | Verify the polling list first, then select the record with the same data identifier from the real candidates. | Fix the mapping, then save, validate, and republish. |
| It still shows pending activation after publish or unpublish. | The page feedback and the runtime node adoption happen at different points in time. | Refresh the current product page and view the node result and failure reason in Sync Details. | Fix according to the actual failure reason, and continue only after receiving APPLIED for the current operation. |
| The meter is actually disconnected, but the page still shows connected. | A page display lag was observed this time. | Refresh the same Chrome page and compare with this tutorial's real session status. | In this tutorial they matched after refresh; the source-code fix is unverified, so re-verify the connection identity before continuing. |
| The platform shows a response received, but the post-write value cannot be confirmed. | A protocol response does not equal proof of device execution and independent read-back. | Verify the device execution count, the pre/post-write values, and the new normal READ separately. | Wait for the subsequent normal read and history; do not click write repeatedly. |
| Blank cells in the ten-point history or fewer rows than collection rounds. | Different polling moments are merged for display by time; the counting criteria differ. | Verify the device, the ten variables, and the sampling window, then select only the first point to view the full 12 records. | Verify against each field's time and value; do not treat merged time rows as message counts. |
| The history conditions or results disappeared after refresh. | A browser refresh may reset the device, variable, or time conditions. | Re-select the same device, Energy 1, and the original write window, then click Query. | Confirm the original history is still there after stopping; stopping in this tutorial does not delete the product, device, or history. |